

Learn through the super-clean Baeldung Pro experience:
>> Membership and Baeldung Pro.
No ads, dark-mode and 6 months free of IntelliJ Idea Ultimate to start with.
Learn through the super-clean Baeldung Pro experience:
>> Membership and Baeldung Pro.
No ads, dark-mode and 6 months free of IntelliJ Idea Ultimate to start with.
In this article, we’re going to learn how we can encrypt a drive or a partition in Linux. We’ll explain the encryption and decryption mechanism of the drives through the use of Cryptsetup and VeraCrypt.
Finally, we’ll see how we can encrypt a drive during the Linux installation process.
Cryptsetup is a tool that we can use for disk encryption. It’s based on DM-Crypt, which is an encryption subsystem in the Linux kernel. Not only can it encrypt hard drives, but it can also encrypt removable media and files.
Cryptsetup uses the LUKS (Linux Unified Key Setup) standard. LUKS is designed to provide disk encryption specifications to facilitate compatibility among a wide range of distributions. Therefore, we should prefer to use LUKS for partition encryption.
The cryptsetup package is available on the official repository of most Linux distributions, which can be installed with yum or apt.
Once cryptsetup is installed, verify it:
$ cryptsetup --version
cryptsetup 2.3.6Now, let’s begin by listing our currently attached drives using lsblk:
$ lsblk
NAME   MAJ:MIN RM   SIZE RO TYPE MOUNTPOINT
sda      8:0    0 119.2G  0 disk
├─sda1   8:1    0   256M  0 part /boot
├─sda2   8:2    0     4G  0 part [SWAP]
└─sda3   8:3    0   115G  0 part /
sdb      8:16   1  29.3G  0 disk
└─sdb1   8:17   1  29.3G  0 part
As we can see, sda is the primary hard drive, while sdb is an external removable hard drive. For the rest of the tutorial, we’ll be using the sdb1 partition. Make sure to back up the data from the partition that we’re going to encrypt because we’ll be formatting that partition.
Now, we’re going to format the drive with cryptsetup. This will create a container for LUKS encryption:
$ cryptsetup luksFormat --type luks1 /dev/sdb1
WARNING: Device /dev/sdb1 already contains a 'ntfs' superblock signature.

WARNING!
========
This will overwrite data on /dev/sdb1 irrevocably.

Are you sure? (Type 'yes' in capital letters): YES
Enter passphrase for /dev/sdb1:
Verify passphrase:
Let’s break down the command:
Mind that the command should be run with root access. At first, we’ll be warned that, after the operation, the data will not be recoverable. We confirmed it by supplying YES at the prompt, followed by setting up the password. Afterward, we supplied the password for the encryption. The stronger the password, the better the encryption. Moreover, we can suppress the warnings by supplying the -y flag.
The drive is formatted as LUKS, so we can’t access it directly. For that reason, we’ll need to use cryptsetup to create a mapper for the actual drive. Let’s open the encrypted drive:
$ cryptsetup -v luksOpen /dev/sdb1 my_drive
Enter passphrase for /dev/sdb1:
Key slot 0 unlocked.
Command successful.
Let’s break down the command options and parameters:
Once we run the command, we’ll be prompted for the password we set for the encryption. Afterward, cryptsetup will create a mapper device named my_drive that is located in the /dev/mapper directory. We can choose any name for the target name.
Let’s see what’s inside the /dev/mapper directory:
$ ls -l /dev/mapper
lrwxrwxrwx root 7B Sat Sep  4 21:36:42 2021 my_drive ⇒ ../dm-1
crw------- root 0B Sat Sep  4 20:55:01 2021 control
As we can see, my_drive is a symlink to a device mapper. The dm-1 file is a virtual file that maps to the actual block device attached to the system. We can treat my_drive as our encrypted partition. Therefore, we can mount it anywhere we want.
For now, our drive doesn’t have any filesystem on it. So, let’s go ahead and create a filesystem on it:
$ mkfs.vfat -F32 /dev/mapper/my_driveNow, we can mount it and copy our data into it:
$ mkdir -p /mnt/encrypted
$ mount /dev/mapper/my_drive /mnt/encrypted
Running lsblk again, we can check the type of my_drive:
$ lsblk | grep my_drive
└─my_drive 9:7 0 29.3G 0 cryptWe can unmount the volume just like any other volume:
$ umount -R /dev/mapper/my_driveWhile the volume is now unmounted, we still need to close the volume to remove the mapping and the key from kernel memory. For that purpose, we can use the LUKS-specific luksClose command:
$ cryptsetup luksClose my_driveAs an easy alternative on the command-line, we can use VeraCrypt. VeraCrypt is available for multiple platforms such as Linux, macOS, and FreeBSD. Therefore, it’s an easy-to-use choice if we frequently switch between multiple platforms.
VeraCrypt comes with a graphical interface and command-line tool. We’ll use the command-line version in this section.
VeraCrypt should be available on the official repository of our distribution. We can simply use yum or apt to install the veracrypt package.
Once installed, we can verify it by checking the version:
$ veracrypt --version
VeraCrypt 1.24-Update8Before creating the voWhile we can use a one-liner command to create an encrypted partition, it’s more convenient to use VeraCrypt’s text interface. We can launch it by passing it the –text or -t flag to veracrypt:
$ veracrypt --text --create
Volume type:
 1) Normal
 2) Hidden
Select [1]: 1
The –create or -c flag tells veracrypt to create a volume. We’ll go with a Normal volume. In this next step, we’ll choose our volume path:
Enter volume path: /dev/sdb1We can get the volume path through the fdisk -l or lsblk command. In our case, we’ll use the sdb1 partition. In the next step, enter the account password:
$ Enter your user password or administrator password:Next up, we’re going to select the encryption algorithm. We’ll go with the default AES encryption:
Encryption Algorithm:
 1) AES
 2) Serpent
 3) Twofish
 4) Camellia
 5) Kuznyechik
 6) AES(Twofish)
 7) AES(Twofish(Serpent))
 8) Camellia(Kuznyechik)
 9) Camellia(Serpent)
 10) Kuznyechik(AES)
 11) Kuznyechik(Serpent(Camellia))
 12) Kuznyechik(Twofish)
 13) Serpent(AES)
 14) Serpent(Twofish(AES))
 15) Twofish(Serpent)
Select [1]:
Simply press Return to select the default value. For the hashing algorithm, we’ll use the default SHA-512 option:
Hash algorithm:
 1) SHA-512
 2) Whirlpool
 3) SHA-256
 4) Streebog
Select [1]:
In the next step, we’ll select a filesystem for the volume:
Filesystem:
 1) None
 2) FAT
 3) Linux Ext2
 4) Linux Ext3
 5) Linux Ext4
 6) NTFS
 7) exFAT
 8) Btrfs
Select [2]:
During the next step, we’ll set a password for the volume:
Enter password:
WARNING: Short passwords are easy to crack using brute force techniques!

We recommend choosing a password consisting of 20 or more characters. Are you sure you want to use a short password? (y=Yes/n=No) [No]: y

Re-enter password:

Enter PIM:

Enter keyfile path [none]:
We can confirm the short password by entering y. For the PIM and keyfile fields, leave them empty by pressing Return. In the next step, enter or paste secret text that is going to help with the encryption strength. This step can easily be accomplished by reading from /dev/urandom and copying the contents with xclip. Let’s open up another terminal window and type in the command:
$ cat /dev/urandom | head -c320 | xclip -selection cNow, we can paste the contents into the field:
$ Please type at least 320 randomly chosen characters and then press Enter: ~5�Q0~>۲,�DVGf�2�'�xf|O��⋱e�_�O] ...Once we enter the secret text, VeraCrypt will start creating the partition. It’s going to take a while, depending on the size of the volume:
Done:   100.000%  Speed: 113 MiB/s  Left: 0 seconds
The hidden VeraCrypt volume has been successfully created and is ready for use.
Once the volume is created, we’re ready to mount it.
We can mount the encrypted volume using the veracrypt command:
$ veracrypt /dev/sdb1 /mnt/my_drive
Enter password for /dev/sdb1:
Enter PIM for /dev/sdb1:
Enter keyfile [none]:
Protect hidden volume (if any)? (y=Yes/n=No) [No]:
The first argument is the volume, while the second argument specifies the mount point. We’ll be required to enter our password. For the other fields, we’ll press Return for default values as we don’t need them in this case. We can now copy the data to the volume.
For unmounting, we can pass the -d or –dismount flag followed by the volume path:
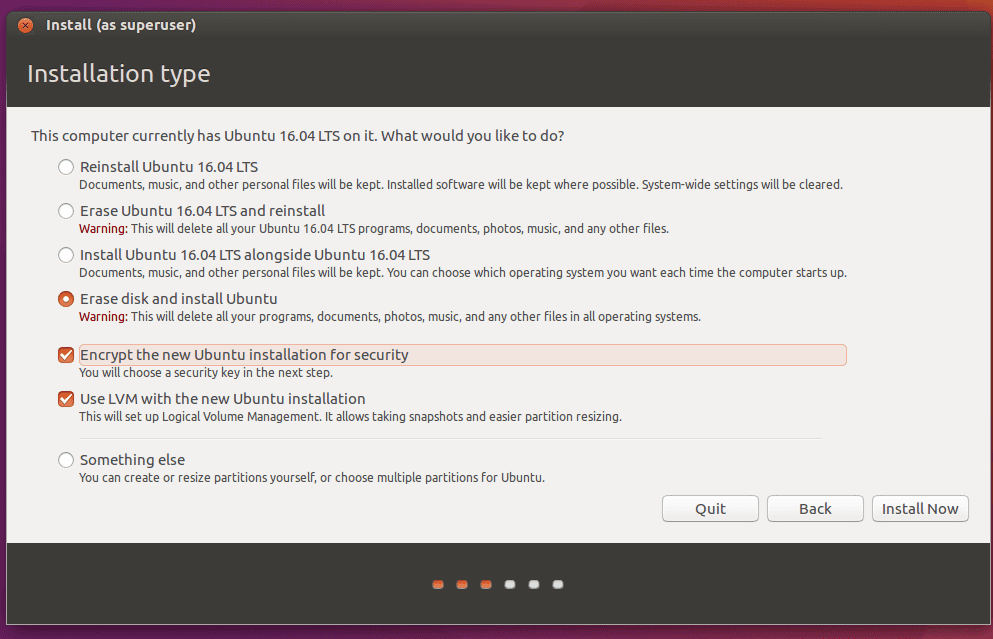
$ veracrypt --dismount /dev/sdb1The easiest way through which we can encrypt our root or home partition is during the distribution installation. While booted in the live installation medium, we are presented with an option to encrypt our disk during disk partitioning.
For instance, in the Ubuntu installer, we can check the “Encrypt the new Ubuntu installation for security” option to enable encryption, as given in the following image:
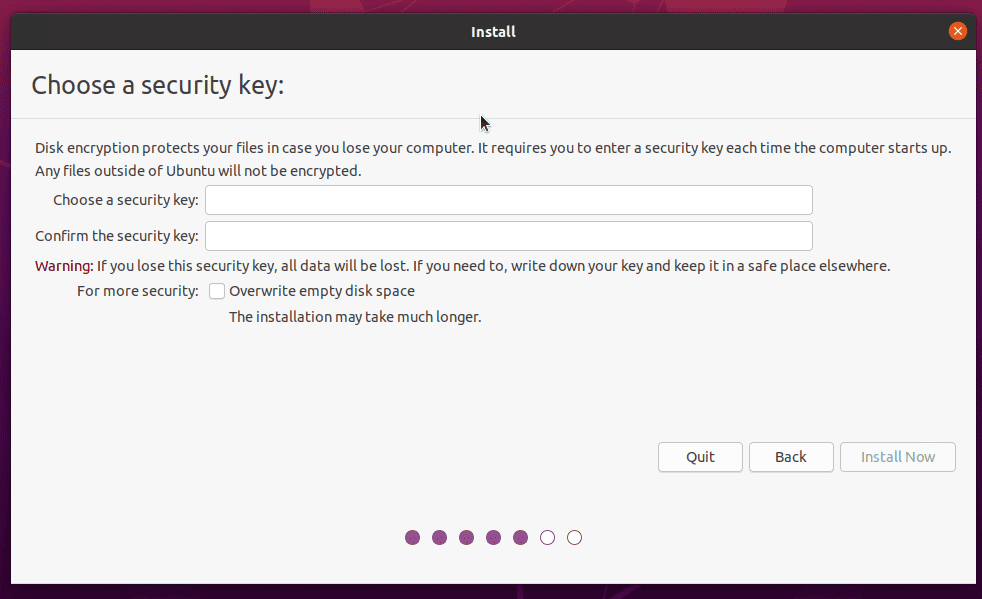
In the next step, we’ll need to set a passcode for the encryption:
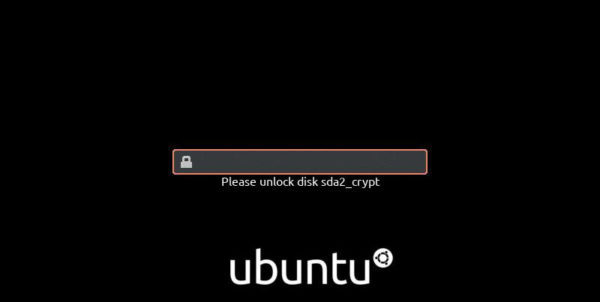
Once we set up the key and install Ubuntu, we’ll be asked to enter the key to decrypt our partitions when booting into Ubuntu:
Although the encryption method might vary a bit for different Linux distributions, we can always refer to the official installation documentation for our distribution.
In this article, we learned how we could encrypt our storage drives. We used Cryptsetup to create an encrypted LUKS container. Afterward, we used VeraCrypt as an alternative to Cryptsetup.
Finally, we briefly went over encrypting the installation volume during Ubuntu installation.