

Learn through the super-clean Baeldung Pro experience:
>> Membership and Baeldung Pro.
No ads, dark-mode and 6 months free of IntelliJ Idea Ultimate to start with.
Last updated: June 13, 2025
Learn through the super-clean Baeldung Pro experience:
>> Membership and Baeldung Pro.
No ads, dark-mode and 6 months free of IntelliJ Idea Ultimate to start with.
In this tutorial, we’ll learn how to run applications inside a Docker container and be able to see its graphical user interface. We’ll discuss three methods: X11 Forwarding through SSH, using X11VNC, and using the X server on the host.
We’ll focus only on approaches that rely on docker. There are other solutions, like x11docker, which are also solutions to the problem but we’ll not consider them here. Nevertheless, we should keep them in mind since they also provide support for GPU acceleration, webcam, and printer sharing.
The first method that we’ll discuss requires no special program apart from ssh. This means that the approach is rather simple but might also be insecure, as we’ll see later.
The idea is that we’ll connect from the Docker container to the host machine by doing X11 port forwarding via SSH.
As a preliminary step, and based on the previous setup of our machine, we need to make sure we’ve got two options in the sshd configuration file. This file is almost always located in /etc/ssh/sshd_config. In case something goes wrong, we should make a copy of the original file with cp before modifying it. Then, we can impose the options with our favorite editor, vim in this case:
$ sudo cp /etc/ssh/sshd_config /etc/ssh/sshd_config.orig
$ sudo vim /etc/ssh/sshd_config
...
X11Forwarding   yes
X11UseLocalhost no
...
We also need to open the forwarded X server port in the Docker virtual interface. By default, the X server of the host listens only in lo. The best option is to allow only local connections from the Docker ports with xhost:
$ sudo xhost +local:dockerWe shouldn’t run xhost without specifying any connection:
$ sudo xhost +This last command exposes our machine and makes sure that anyone can connect to it. Thus, it’s better to specify the source of the connections that we want.
We can now move to the Docker side of the method. We’ll build a Docker image from a simple Dockerfile based on Ubuntu that installs and executes xeyes as an example of a GUI application (contained in the x11-apps package):
$ cat ./dockerfile_1
FROM    ubuntu
RUN     apt-get update && apt-get install -qqy x11-apps
CMD     xeyes
Based on the Dockerfile, we build the Docker image using the new buildx mode:
$ sudo docker buildx build --rm --tag ssh_image_tag_1 --file ./dockerfile_1 .We’ve used the –rm flag to remove intermediate containers when the image build succeeds, –tag to give a name to the image, and –file to specify the Docker file.
Once we’ve got the image, we can run it:
$ sudo docker run --rm -it --net=host --env DISPLAY=$DISPLAY ssh_image_tag_1We’ve used the –rm flag to automate the removal of the container after exiting, -it (which is equivalent to –-interactive and –tty) to allocate a terminal connected to the standard input of the container, –net to connect the container to the host network, and –env to set the environment variable for the display.
We’ll see the graphical user interface from the application within the container in our host machine:
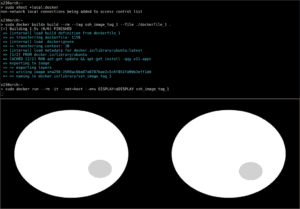
In this case, we see the two eyes from xeyes that follow the mouse’s location.
When the container is running, it needs to access the .Xauthority file to connect to the server. This file is related to xhost and it’s sensitive to the name of the host. We can give containers different host names in Docker and run into errors.
The first solution is to also mount the .Xauthority file and the X11 socket into the container:
$ sudo docker run --rm -it --net=host --volume ~/.Xauthority:~/.Xauthority --volume /tmp/.X11-unix:/tmp/.X11-unix --env DISPLAY=$DISPLAY ssh_image_tag_1 We’ve used the –volume flag twice: to mount the .Xauthority file and the X11 socket.
By default, the container user has the same UID as the host user. When we execute the GUI application in the container, it checks for a cookie entry in the .Xauthority file that matches the name and $DISPLAY of the host. Once found, the client passes the request via the socket /tmp/.X11-unix mounted in the container.
However, this might not always be the case. We can end up with errors if there are different users creating and using the container. We can still fix this by writing the .Xauthority file so that the hostname doesn’t matter when checking for the cookie entry.
To do so, we need to create the .Xauthority file for Docker with touch. Then we put the right cookie entry, replacing the part regarding the host with the FamilyWild tag. This tag, with value (0xffff) matches every display, so we can use it in all connections:
$ touch /tmp/.docker.xauth
$ xauth nlist $DISPLAY | sed -e 's/^..../ffff/' | xauth -f /tmp/.docker.xauth nmerge -
In the second command, we get the cookie with xauth nlist for the display. Then, we replace the first four digits with ffff to have the FamilyWild tag. Finally, we merge this modified cookie entry into the .Xauthority file.
Now, we’ve created a custom .Xauthority file for the container and we can run it:
$ sudo docker run --rm -it --net=host --volume /tmp/.docker.xauth:/tmp/.docker.xauth --volume /tmp/.X11-unix:/tmp/.X11-unix --env DISPLAY=$DISPLAY --env XAUTHORITY=/tmp/.docker.xauth ssh_image_tag_1 We need to change the volume that we mounted for the .Xauthority location to the modified file. We also provide another environment variable for XAUTHORITY that points into this file.
Although more intricate, this command should cover all problems we might encounter.
If we want a more powerful connection, we can connect the host to the Docker container with a VNC server.
For this, we create an image with the following content:
$ cat ./dockerfile_2
FROM    ubuntu
RUN 	apt-get update && apt-get install -qqy x11-apps x11vnc xvfb
RUN     mkdir ~/.vnc
RUN     x11vnc -storepasswd 1234 ~/.vnc/passwd
CMD     xeyes
Compared to the Dockerfile from the previous scenario, we’re performing some extra steps in the creation of the image.
We install not only x11-apps but also x11vnc (for the VNC server) and xvfb (to create a fake session). We also configure the VNC server of the container by creating a ~/.vnc folder and creating an encrypted password file in ~/.vnc/passwd. The password that we’ve used is 1234.
With the previous Dockerfile, we build the Docker image as before:
$ sudo docker buildx build --rm --tag ssh_image_tag_2 --file ./dockerfile_2 .Once we’ve created the image, we can run the container:
$ sudo docker run --rm --publish 5900:5900 --env HOME=/ ssh_image_tag_2 x11vnc -usepw -create
We’re still using the –rm flag as before, as well as creating the HOME environment variable. Moreover, we publish the container port 5900 to the host. We also invoke x11vnc after starting the container. We use two flags for x11vnc: the flag -usepw to use the password we created and stored in ~/.vnc/passwd and the flag –create to create a new xvfb session if no other session is found.
However, when running the container we’ll not see the xeyes interface, as we saw in the previous approach. We still need to connect from our host to the VNC server of the Docker container:
$ vncviewer localhost::5900
After we establish the connection, we’ll see the interface of the container.
The third solution might look similar to forwarding X through SSH, but it’s conceptually different. We can use the X server on the host to display our GUI applications. This removes the need for X and VNC servers in the docker image.
To avoid running into ~/.Xauthority issues, we’ll enforce the user and group IDs in the Docker image. Thus, we need to customize the Dockerfile with the user ID (UID) and the group ID (GID) that we can obtain from the id command:
$ id $USER
uid=1000(username) gid=1001(username) groups=1001(username),967(docker)
Enforcing the user and group IDs in the Dockerfile makes it slightly more complex:
$ cat ./dockerfile_3
FROM    ubuntu
RUN     apt-get update && apt-get install -qqy x11-apps
#
RUN     export uid=1000 gid=1001
RUN     mkdir -p /home/docker_user
RUN     echo "docker_user:x:${uid}:${gid}:docker_user,,,:/home/docker_user:/bin/bash" >> /etc/passwd
RUN     echo "docker_user:x:${uid}:" >> /etc/group
RUN     echo "docker_user ALL=(ALL) NOPASSWD: ALL" > /etc/sudoers.d/docker_user
RUN     chmod 0440 /etc/sudoers.d/docker_user
RUN     chown ${uid}:${gid} -R /home/docker_user
#
USER    docker_user
ENV     HOME /home/docker_user
CMD     xeyes
The Dockerfile starts as usual, specifying the base image with the FROM line and then installing x11apps.
However, we need to set up the environment for the Docker image. First, we export one variable for the UID and another for the GID. Then, we create the home for a user named docker_user and we fill three files with custom information: the /etc/passwd file, the /etc/group file and the /etc/sudoers.d/docker_user file, changing the permissions of the last one. We also modify the ownership of the home folder for the user.
Finally, we close the Dockerfile by defining the user, its HOME environment variable, and the xeyes call.
We can create the image from the Dockerfile as usual:
$ sudo docker buildx build --rm --tag ssh_image_tag_3 --file ./dockerfile_3 .The command is similar to the one used before.
Before running the container, we should also accept connections from Docker to the xhost:
$ sudo xhost +local:dockerWe’re finally ready to run the container:
$ sudo docker run --rm -it --env DISPLAY=$DISPLAY --volume /tmp/.X11-unix:/tmp/.X11-unix ssh_image_tag_3One of the differences with the first approach is that we don’t need the –net flag but we need to mount the volume of the X11 socket. The rest of the command is very similar to the previous cases. In this case, it opens the GUI application inside the host using the local X11 installation.
Depending on the application that we need to run, we might need an extra flag: –privileged. There are programs that employ sand-boxing so we need to give extended privileges to the container:
$ sudo docker run --rm -it --env DISPLAY=$DISPLAY --privileged --volume /tmp/.X11-unix:/tmp/.X11-unix ssh_image_tag_3For example, the Chrome browser won’t run properly without the flag.
By default, we won’t have audio from the GUI applications. However, following the same approach of mounting the Xserver socket as a volume, we can run applications with audio.
If we’re using ALSA in our host, we need to mount the /dev/snd volume:
$ sudo docker run --rm -it --env DISPLAY=$DISPLAY --privileged --volume /tmp/.X11-unix:/tmp/.X11-unix --volume /dev/snd:/dev/snd ssh_image_tag_3However, if we’re running PulseAudio, we’ve got more volumes to mount:
$ sudo docker run --rm -it --env DISPLAY=$DISPLAY --privileged --volume /tmp/.X11-unix:/tmp/.X11-unix --volume /dev/shm:/dev/shm --volume /etc/machine-id:/etc/machine-id --volume /run/user/1000/pulse:/run/user/1000/pulse --volume /var/lib/dbus:/var/lib/dbus --volume ~/.pulse:/home/docker_user/ ssh_image_tag_3With the approach that we’ve described, we’re able to not only see the X11 GUI but also hear the sounds produced inside the Docker container!
In this article, we’ve talked about three ways to display the graphical user interface of running applications inside a Docker container.
First, simply tunneling through SSH might be the simplest but also the most insecure.
Second, using a VNC server is slightly more cumbersome to set up but might provide better performance.
Finally, using the X server from the host requires some adjustments in the image-building phase but can allow even audio transmission.