

Learn through the super-clean Baeldung Pro experience:
>> Membership and Baeldung Pro.
No ads, dark-mode and 6 months free of IntelliJ Idea Ultimate to start with.
Learn through the super-clean Baeldung Pro experience:
>> Membership and Baeldung Pro.
No ads, dark-mode and 6 months free of IntelliJ Idea Ultimate to start with.
It’s recommended to frequently run disk checks on our computers to identify and fix bad sectors. This is a crucial maintenance task as it ensures we’re aware of the health and reliability of our storage devices. Thus, we can start making appropriate plans and adjustments if we have bad sectors since these are early signs of a deteriorating drive.
In this tutorial, we’ll look at bad sectors, and how to identify and repair them. Additionally, we’ll look at the commands we can use during these processes.
A sector is the smallest physical storage unit on a disk. On most file systems it’s a fixed 512 bytes in size for HDD, 2048 for CD-ROMs, and DVD-ROMs. The latest HDDs and SSDs use 4096-byte sectors. Sectors are also referred to as blocks. A collection of sectors forms a track, and a collection of tracks form clusters.
A damaged or corrupted sector is considered a bad sector. Bad sectors can result from electric surges, disk damage, disk aging, magnetic fields, etc. Even if a sector is corrupted, the OS may consider them normal and try to write to them. This can lead to data loss.
Let’s look at ways we can identify bad sectors. We’ll look at the default disks utility, smartmontools, and badblocks.
Most Linux distros come with a default disk utility. The Disks utility is a graphical tool that provides a user-friendly interface for managing and monitoring storage devices, partitions, and filesystems. GNOME Disks (also known as gnome-disk utility or Disks) is the most used disk utility among Linux distros.
Most modern hard drives and SSDs support an inbuilt feature called SMART (Self-Monitoring, Analysis, and Reporting Technology) which helps in analyzing disk status.
To use Disks, let’s run:
$ gnome-disksOr, we can find it by searching the applications.
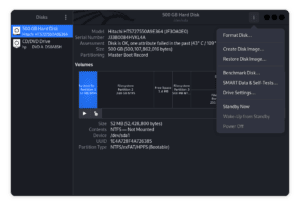
Next, let’s click on the hard drive we want to get information from:

Subsequently, let’s click the three-dotted button on the top right and then select SMART Data & Self-Tests:
The test runs and when it’s complete, we’ll see the results:
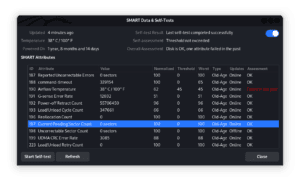
In the above image, Current Pending Sector Count is highlighted, it shows the number of sectors waiting to be remapped. Immediately below it, we’ve got Uncorrectable Sector Count which are sectors that can’t be corrected.
Further, we should continuously scroll as we look for the following options comprehensively:
If these options have higher numbers on the threshold column, then it’s an indication of the presence of a bad sector (or bad sectors). Additionally, other options that we may look at are Raw Read Error Rate, Spin Retry Count, and Reallocated Event Count.
Linux has several tools for monitoring hard drive status. Let’s take a look at smartmontools in this section. smartmontools is a command-line tool we use to check the SMART status of a disk (using the smartctl utility).
Firstly, let’s install the smartmontools since it doesn’t come by default:
$ sudo apt-get update
$ sudo apt-get install smartmontools
Next, if we’re unsure of our drive letters, we can use fdisk or lsblk to identify the right one:
$ lsblk
NAME   MAJ:MIN RM   SIZE RO TYPE MOUNTPOINTS
sda      8:0    0 465.8G  0 disk
├─sda1   8:1    0    50M  0 part
$ sudo fdisk -l
Disk /dev/sda: 465.76 GiB, 500107862016 bytes, 976773168 sectors
Device     Boot     Start       End   Sectors   Size Id Type
/dev/sda1  *         2048    104447    102400    50M  7 HPFS/NTFS/exFAT
Now, let’s run smartctl together with the specific drive we want diagnostic data from:
$ sudo smartctl -a /dev/sda
smartctl 7.3 2022-02-28 r5338 [x86_64-linux-6.1.0-kali9-amd64] (local build)
=== START OF INFORMATION SECTION ===
User Capacity:    500,107,862,016 bytes [500 GB]
Sector Sizes:     512 bytes logical, 4096 bytes physical
Rotation Rate:    7200 rpm
Form Factor:      2.5 inches
Device is:        In smartctl database 7.3/5319
ATA Version is:   ATA8-ACS T13/1699-D revision 6
SATA Version is:  SATA 2.6, 3.0 Gb/s
Local Time is:    Sat Nov  4 12:15:03 2023 EAT
SMART support is: Available - device has SMART capability.
SMART support is: Enabled
The command gives us a long list of results displayed with a lot of information. Let’s filter some of the options we mentioned earlier and check their thresholds:
$ sudo smartctl -a /dev/sda | grep -i 'Reallocated_Sector_Ct\|Reallocated_Event_Count\|Current_Pending_Sector'
  5 Reallocated_Sector_Ct   0x0033   100   100   005    Pre-fail  Always       -       0
196 Reallocated_Event_Count 0x0032   100   100   000    Old_age   Always       -       0
197 Current_Pending_Sector  0x0032   100   100   000    Old_age   Always       -       0
To identify bad sectors, we check the threshold column (the fifth column with 005, 000 and 000). If the numbers in this column are higher then we’re looking at the possibility of having bad sectors
We can also find bad sectors using a command line utility called badblocks. badblocks supports three scan modes, read-only, write-mode, and non-destructive read-write:
Let’s run a non-destructive read-write scan and save the output to a file:
$ sudo badblocks -v -n -s /dev/sda > sectorcheck.txtIn the example above, badblocks scans device /dev/sda with -v enabled, allowing it to display details about the scan. The -n flag specifies the non-destructive read-write mode and the -s flag allows the program to show progress in percentage.
Following the operation, we store the results in a text file. In the next section, we’ll use the result text we created.
After we’ve identified bad sectors on our drive we can either choose to repair it or replace the affected drive. In the meantime, our system keeps using the drive by marking the damaged sectors as unusable. However, if there are a lot of bad sectors we should consider a drive replacement, as bad sectors can be a sign that more sectors, or the whole drive, might fail soon.
When there are only a few bad sectors, we can consider using the e2fsck utility to repair it. The e2fsck utility is primarily used to check and repair ext2, ext3, and ext4 filesystem issues and inconsistencies. But it can help correct errors related to bad sectors when we use the -c option.
Before running e2fsck, let’s ensure that the file system is unmounted to prevent any data corruption:
$ sudo umount /dev/sdaNext, let’s run e2fsck:
$ sudo e2fsck -cv /dev/sdaThe -c flag uses the badblocks program to perform a read-only scan and when it finds any bad blocks, it adds them to the inode list to prevent them from being allocated.
Alternatively, we can use the text created by badblocks:
$ sudo e2fsck -l sectorcheck.txt /dev/sdaIn this article, we looked at bad sectors, how to find them and repair them.
Periodically, we should scan our hard drive and look for bad sectors. Bad sectors indicate the likeliness of imminent drive failure. If we identify any, we should repair them.
Finally, we must note that if we frequently have bad sectors then we should get a new drive.