

Learn through the super-clean Baeldung Pro experience:
>> Membership and Baeldung Pro.
No ads, dark-mode and 6 months free of IntelliJ Idea Ultimate to start with.
Learn through the super-clean Baeldung Pro experience:
>> Membership and Baeldung Pro.
No ads, dark-mode and 6 months free of IntelliJ Idea Ultimate to start with.
There are many ways to execute commands on Linux using an external device. Since Android is built using Linux, it’s fairly simple to use as a remote controller.
In this tutorial, we learn how to use anyremote to turn our Android device into a remote control for Linux. We begin by installing anyremote and creating a simple configuration file for the remote. Then, we learn how to remotely control Linux from Android using a Web browser and Bluetooth.
anyremote is an open-source program that enables remotely controlling Linux via a Web browser using TCP/IP, Bluetooth, cable, or infrared.
In particular, anyremote supports various protocols:
However, in this tutorial, we only use the Server protocol.
Moreover, anyremote can remotely control almost any application on Linux and has an extensive set of menus, buttons, and icons.
While anyremote has an app for Android, it also enables any device with a Web browser to serve as a remote.
Before we delve into anyremote, we’ll install it on both platforms.
First, we install anyremote on our Linux computer:
$ sudo apt install anyremoteWe use the apt command to install anyremote, but we may also install it via its sources.
We can use anyremote’s Web interface on Android without installing anyremote, but connecting through Bluetooth, TCP/IP, or cable requires installation.
anyremote is on the Google Play Store but unavailable for newer versions of Android. Alternatively, we can install anyremote from its APK.
To install an APK in Android, we may need to enable Install from Unknown Apps in settings. After that, we can click on the APK to install.
Before we run anyremote, we create our remote in the configuration file, ~/.anyremote.cfg:
$ cat ~/.anyremote.cfg
% Example Configuration: ~/.anyremote.cfg
[Protocol]=Server

(Init)=Exec(notify-send "Initialized");

(Connect)=\
    Set(icons, Example, \
        1,     play,  2,    pause,  3,   vol_up, \
        4,     prev,  5,     next,  6,     mute, \
        7, question,  8,  refresh,  9, vol_down, \
        0,       no,  *,       no,  #,       no );

(Disconnect)=Exec(notify-send "Disconnected");

(Exit)=Exec(notify-send "Exit");

1=Exec(notify-send "Play");
2=Exec(notify-send "Pause");
3=Exec(notify-send "Volume Up");
4=Exec(notify-send "Previous");
5=Exec(notify-send "Next");
6=Exec(notify-send "Mute");
7=Exec(notify-send "Question");
8=Exec(notify-send "Refresh");
9=Exec(notify-send "Volume Down");
0=Exit;
*=Exit;
#=Exit;

[End]
In this configuration file, we created twelve buttons, each with an icon and command. The default layout for anyremote is a 3×4 grid of buttons, but it provides many other layouts and UI tools.
Now, let’s break down the parts of this configuration file:
Buttons 1-9 use notify-send to send a notification corresponding to their icon, and buttons 10-12 exit the program.
Now that we have our configuration file created, we can run anyremote.
Perhaps the most basic method of using anyremote is with a Web browser. This way, anyremote sets up our Linux system as an HTTP server, enabling external devices to connect from a Web browser.
In this section, we first configure our IP address to enable local devices to connect. Next, we learn how to start anyremote for Web connections and then connect from our Android device’s Web browser.
Before we begin, we have to configure our computer’s IP address for incoming connections.
To allow incoming connections, we can use ufw:
$ sudo ufw allow proto tcp from 192.168.0.0/16 to any port 1895
$ sudo ufw reload
In this example, we use ufw allow proto tcp to enable TCP inbound from any local IP (192.168.0.0/16) to port 1895.
Thus, devices connected to the local network can connect to services on our computer at port 1895, so we should avoid having this rule enabled on public networks.
Now, we can run anyremote:
$ anyremote -s web:1895We run anyremote with -s to specify the protocol. In this case, we use web:1895, indicating a Web interface on port 1895.
To connect to our remote from an external device, we type in our computer’s local IP address with the associated port.
To find our computer’s local IP Address, we can run ip:
$ ip -4 -brief address
lo         UNKNOWN       127.0.0.1/8
eth0       UP            192.168.0.151/24
Let’s break this down:
Next to the interface we’re currently using (i.e., eth0) is our computer’s local IP Address in CIDR notation (<IP_Address>/<Netmask>). In this case, our IP address is 192.168.0.151.
Now, we can connect to the remote from the Web browser on the Android device.
Firstly, we ensure the Android device is connected to the same network as our computer. Then, we type in the IP address and port number (i.e., 192.168.0.151:1895) into the browser:
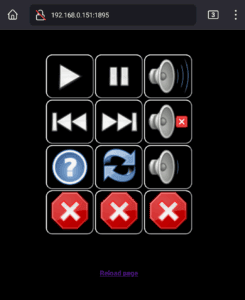
The Android device now shows the remote we defined in our configuration file. Clicking a button on the remote triggers the action we set on our computer.
Since we defined buttons 10-12 to action Exit, we can click any button on the last row to close the remote server.
anyremote provides support for Bluetooth connection through its Android app. However, this method requires more configuration than the Web interface.
In this section, we configure our computer and Android device to enable Bluetooth using anyremote. Then, we learn how to connect and use anyremote through Bluetooth.
anyremote manages Bluetooth connections through bluetoothd and bluetoothctl provided by bluez.
Let’s install bluez with apt:
$ sudo apt install bluezSome package managers don’t package bluetoothctl within bluez. In such cases, we may need to install bluez-utils.
If we are running bluez5 or above, we may need to modify some settings to enable deprecated bluez4 features.
For instance, bluez5 disables the use of SDP, so we must modify permissions:
$ sudo chmod ogu+rwx /var/run/sdpIn this example, we allow reading, writing, and executing /var/run/sdp with chmod.
Then, we stop and disable bluetooth.service via systemctl:
$ sudo systemctl stop bluetooth.service
$ sudo systemctl disable bluetooth.service
After that, we modify the bluetooth.service unit file and save the modified copy to a new location:
$ sudo sed 's/^ExecStart.*bluetoothd$/\0 -C/'  \
      /usr/lib/systemd/system/bluetooth.service > /etc/systemd/system/bluetooth_custom.service
Here, we use sed to substitute text in bluetooth.service. However, instead of writing to this file, we output to a new file, bluetooth_custom.service.
Let’s break down the sed command:
Now, we can start the new service:
$ sudo systemctl start bluetooth_custom.serviceAt this point, bluetoothd should be running with the -C flag, enabling bluez4 features required for anyremote.
The first step in connecting with Bluetooth is running bluetoothctl:
$ bluetoothctl
...
[CHG] Controller 00:2B:4A:C9:49:13 ...
[bluetooth]#
We should see our connected Bluetooth controller as [CHG] Controller with its associated MAC address, as indicated by the changed prompt.
To connect through Bluetooth, we’ll need to make our computer’s Bluetooth controller discoverable, pairable, and turn scan on:
[bluetooth]# discoverable on
[bluetooth]# pairable on
[bluetooth]# scan on
Our Bluetooth controller should now be scanning for devices to pair and connect to. We can now pair with our Android device:
[bluetooth]# trust 30:A4:9D:24:28:1F
[bluetooth]# pair 30:A4:9D:24:28:1F
Once we’re paired and trusted, we can start connecting with anyremote.
We begin by running anyremote in Bluetooth mode:
$ anyremote -s bluetoothThen, we open our Android app and input the Bluetooth address of our computer’s controller:
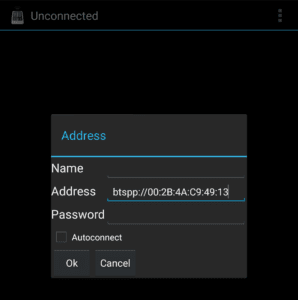
Next, we click on the added device. Once the page loads, we may have to click on the screen to establish a connection to the server and redraw the buttons.
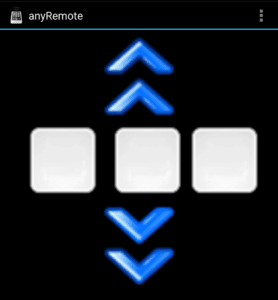
After that, we should see our remote. To get a list of additional options, we click the three dots at the top of the app:

Importantly, anyremote has mouse support:
Finally, we can also simulate keyboard events with the appropriate option:
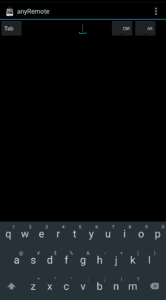
Thus, we have a functioning full-control remote for our Linux system.
In this article, we learned about how to install and configure anyremote. Then, we saw how to set up a remote and connect to it using our Web browser. Finally, we understood the use of anyremote to remote control Linux with Bluetooth.