

Learn through the super-clean Baeldung Pro experience:
>> Membership and Baeldung Pro.
No ads, dark-mode and 6 months free of IntelliJ Idea Ultimate to start with.
Last updated: March 18, 2024
Learn through the super-clean Baeldung Pro experience:
>> Membership and Baeldung Pro.
No ads, dark-mode and 6 months free of IntelliJ Idea Ultimate to start with.
Today, many Linux users would like to choose a GUI desktop environment such as GNOME, XFCE, or KDE as their daily working platform. However, in Linux, many jobs are done with shell scripts. Usually, when we launch a shell script, it’ll run in the Linux command-line.
We can start a shell script from a GUI desktop environment. But if we want to know if the script has done its job or check the execution status, we have to switch to the terminal where the script is started from or check the process status and log files of the shell script.
In this tutorial, we’ll have a look at how to send a GUI notification from a shell script so that we can see straightforwardly how the script is running.
To address and demonstrate GUI notifications from a shell script, we’ll first create a simple shell script as an example.
Let’s say we want to know our public IP address by executing a shell script called tell_me_ip.sh:
#!/bin/bash
IP_MSG="$(curl --no-progress-meter http://ifconfig.io 2>&1)"
STATUS=$?

if [ $STATUS -ne 0 ]; then
    MESSAGE="Error Occurred! [ $IP_MSG ]"
else
    MESSAGE="My Public IP: $IP_MSG"
fi
echo $MESSAGE
The script is pretty straightforward. Let’s walk through quickly.
First, we get our public IP address using the curl command to read the website http://ifconfig.io.
Here, we tell the curl command to suppress the progress meter output by setting the option –no-progress-meter.
Second, depending on the curl command’s exit code, we build up the message with the IP address or the error message.
Finally, we print the message out.
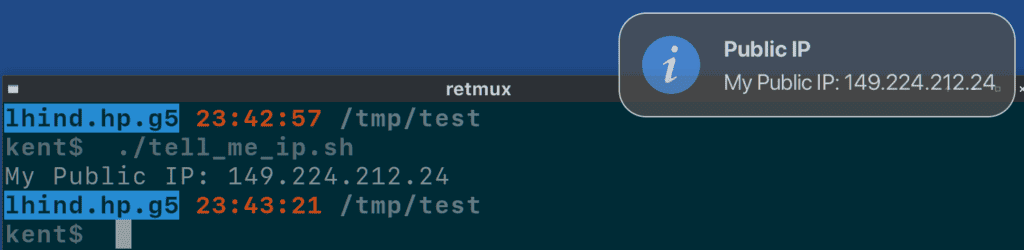
Let’s test the script quickly:
$ ./tell_me_ip.sh
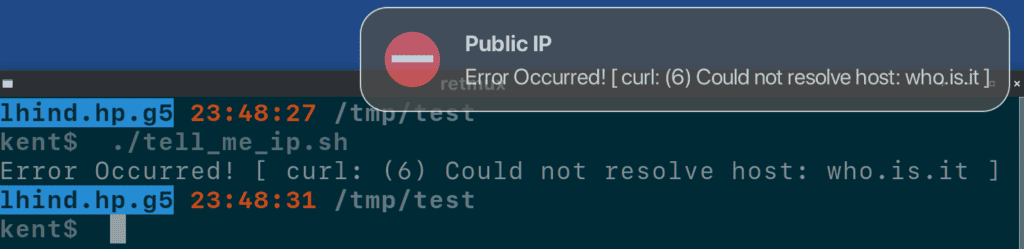
My Public IP: 149.224.212.24To simulate an error case, let’s simply change the website URL in our tell_me_ip.sh script to a non-existent one, for example, “http://who.is.it“:
$ ./tell_me_ip.sh
Error Occurred! [ curl: (6) Could not resolve host: who.is.it ]
Good! Our shell script works.
Next, let’s see if we can send the messages to our GUI desktop environment as notifications.
Most modern GUI desktop environments will start notification servers automatically on login to receive the notifications sent by different applications through D-Bus.
libnotify is an implementation of the Desktop Notifications Specification. It is widely used and desktop independent.
The libnotify package ships with a notify-send command. We can use it to send notifications from our shell scripts to a GUI desktop easily.
The syntax of using the notify-send command is pretty intuitive:
notify-send [OPTIONS] [Message Summary] [Message Body]The [message body] supports XML-based markup. It’s a small subset of HTML along with a few additional tags.
Let’s see some commonly used examples:
The notify-send command supports options to control how the notification is displayed. Let’s take a look at a couple of pretty useful options:
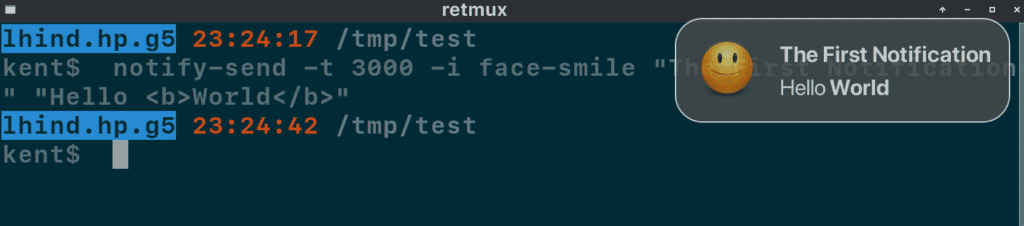
Let’s send a “Hello World” notification from the command line:
notify-send -t 3000 -i face-smile "The First Notification" "Hello <b>World</b>"If we run the command above, a notification with a joyful smile face icon will be shown in the notification area for three seconds:
Apart from the smiling face, the notify-send command supports many other icons.
Now, it’s time to assemble notify-send commands in our shell script to send desktop notifications:
#!/bin/bash
IP_MSG="$(curl --no-progress-meter http://ifconfig.io 2>&1)"
STATUS=$?
ICON="dialog-information"

if [ $STATUS -ne 0 ]; then
    MESSAGE="Error Occurred! [ $IP_MSG ]"
    ICON="dialog-error"
else
    MESSAGE="My Public IP: $IP_MSG"
fi
notify-send -t 4000 -i "$ICON" "Public IP" "$MESSAGE"
echo $MESSAGE
We modified the original script a little bit.
We added an $ICON variable to store the notification icon name because we would like to see different icons for success and error cases.
Also, we added a notify-send command to send the notification to the desktop.
Finally, let’s test our shell script:
Let’s change the URL of the website and test the error case quickly:
Cool! Now our shell script can send its execution status to our GUI desktop.
zenity is a utility to display GTK dialog boxes in command-line and shell scripts. If we want to display Qt GUI elements, we can use qarama, a “zenity clone for Qt”.
In this tutorial, we’ll only address how to use zenity to send GTK notifications.
zenity can display desktop notifications and other types of GTK dialogs — for example, information dialogs, error alerts, calendar dialogs, checkboxes, and radio buttons.
The syntax to use the zenity command is as simple as:
zenity [Options]The [Options] define everything we want zenity to do for us. For example, we can tell it what kind of GUI dialog we want to show, how to arrange the elements in the dialog, or how to transmit data between the GUI dialog and our shell script.
After all, we don’t want to design a full-featured GTK application. Instead, our goal is merely to display the information generated in a shell script to the GUI desktop.
Therefore, several options are interesting for us:
To understand how zenity works, let’s write a couple of “Hello World” examples using the zenity command.
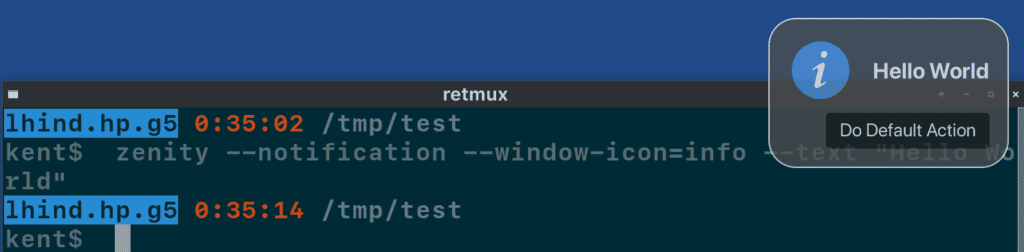
First, let’s create a desktop notification with the “Hello World” message:
zenity --notification --window-icon=info --text "Hello World"
If we execute the command above, a notification will show up:
We should keep in mind when we display a notification, the text with the –text option doesn’t support markup.
Also, we can display info or an error dialog box to contain our “Hello World” message. Let’s create an error dialog using this command:
zenity --error --text "Hello World"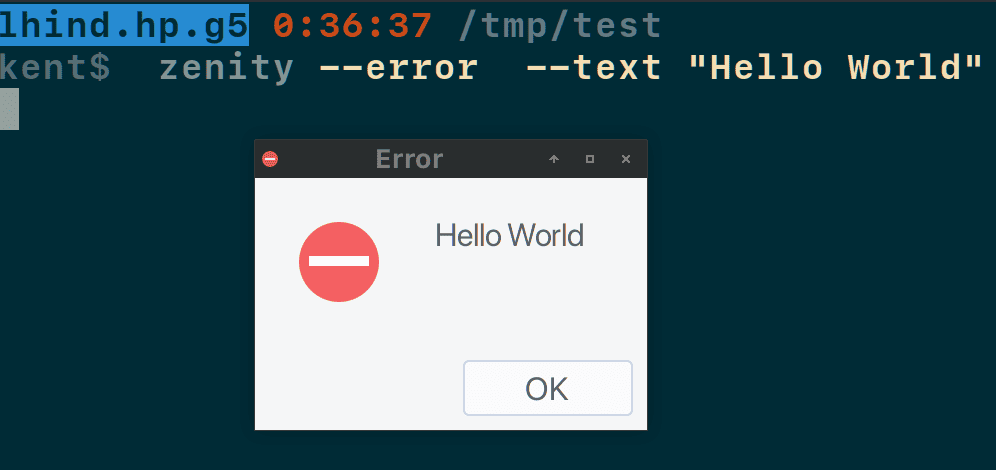
When a message is showing in a dialog, we can select the text or copy it. This can be handy in some cases.
However, unlike the notification popup, the info or error dialog will block the shell script. In other words, the shell script will continue its execution once we click the “OK” button.
Now, let’s add zenity to our tell_me_ip.sh script.
If we get the public IP successfully, we’ll display it as a message in an info dialog box. In this way, we can copy the IP address easily. But if an error occurs, we want to be informed by a notification:
#!/bin/bash
IP_MSG="$(curl --no-progress-meter http://ifconfig.io 2>&1)"
STATUS=$?

if [ $STATUS -ne 0 ]; then
    MESSAGE="Error Occurred! [ $IP_MSG ]"
    zenity --notification --window-icon=error --text="$MESSAGE"
else
    MESSAGE="My Public IP: $IP_MSG"
    zenity --info --text="$MESSAGE"
fi
echo $MESSAGE
Our public IP address will be shown in an info dialog box if we execute the shell script. We can select the IP address using the mouse:
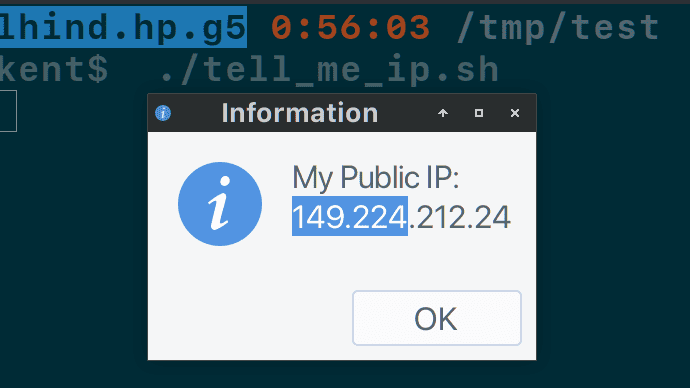
Once we click the “OK” button, the shell script’s execution will continue, and the IP address is printed.
If we change the URL in the script to http://who.is.it and launch the script once again, we’ll see an error notification with the detailed error message:

In this article, we discussed how to send information from a shell script to a GUI desktop environment. We’ve introduced two utilities to do the job: notify-send and zenity.
Both utilities are pretty straightforward to use, as we’ve demonstrated through some simple examples. However, they have different capabilities. Whereas notify-send can only send desktop notifications, zenity can do that and much more.