

Mocking is an essential part of unit testing, and the Mockito library makes it easy to write clean and intuitive unit tests for your Java code.
Get started with mocking and improve your application tests using our Mockito guide:
Handling concurrency in an application can be a tricky process with many potential pitfalls. A solid grasp of the fundamentals will go a long way to help minimize these issues.
Get started with understanding multi-threaded applications with our Java Concurrency guide:
Spring 5 added support for reactive programming with the Spring WebFlux module, which has been improved upon ever since. Get started with the Reactor project basics and reactive programming in Spring Boot:
Since its introduction in Java 8, the Stream API has become a staple of Java development. The basic operations like iterating, filtering, mapping sequences of elements are deceptively simple to use.
But these can also be overused and fall into some common pitfalls.
To get a better understanding on how Streams work and how to combine them with other language features, check out our guide to Java Streams:
Explore Spring Boot 3 and Spring 6 in-depth through building a full REST API with the framework:
Yes, Spring Security can be complex, from the more advanced functionality within the Core to the deep OAuth support in the framework.
I built the security material as two full courses - Core and OAuth, to get practical with these more complex scenarios. We explore when and how to use each feature and code through it on the backing project.
You can explore the course here:
Spring Data JPA is a great way to handle the complexity of JPA with the powerful simplicity of Spring Boot.
Get started with Spring Data JPA through the guided reference course:
Refactor Java code safely — and automatically — with OpenRewrite.
Refactoring big codebases by hand is slow, risky, and easy to put off. That’s where OpenRewrite comes in. The open-source framework for large-scale, automated code transformations helps teams modernize safely and consistently.
Each month, the creators and maintainers of OpenRewrite at Moderne run live, hands-on training sessions — one for newcomers and one for experienced users. You’ll see how recipes work, how to apply them across projects, and how to modernize code with confidence.
Join the next session, bring your questions, and learn how to automate the kind of work that usually eats your sprint time.
1. Overview
When we’re performance testing with JMeter, we may encounter web services that are secured by the HTTP Basic Authentication protocol.
In this tutorial, we’ll see how to configure Apache JMeter to provide the necessary credentials during a test.
2. What Is Basic Authentication?
Basic Authentication is the simplest access-control method we can use to secure a web resource. It consists of an HTTP header sent by the client:
Authorization: Basic <credentials>Here, the credentials are encoded as a Base64 string of the username and password, delimited by a single colon “:”.
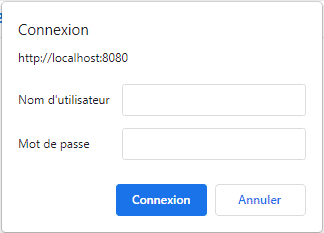
We can see that Basic Authentication is used when credentials are asked in a browser’s window instead of an HTML form. We may get a prompt in our browser:
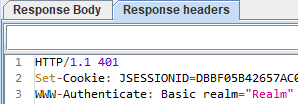
Therefore, if we try to launch a JMeter test on a secured web resource, the response code will be HTTP 401, which means “Unauthorized”. We’ll also receive a “WWW-Authenticate” response header that will describe the authentication type required by the server. In this case, it will be “Basic”:
3. Simple Ways to Implement Basic Authentication in JMeter
3.1. Adding an Authorization Header
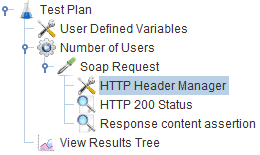
The simplest way to send credentials is to add them directly to the request header. We can do this easily with the HTTP Header Manager component, which allows us to add headers to requests sent by an HTTP Request component. The Header Manager must be a child of the HTTP Request component:
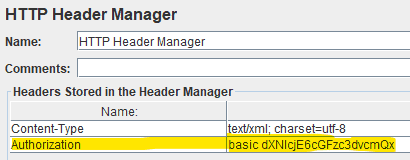
In the HTTP Header Manager‘s configuration tab, we just have to add a key/value entry with our authentication details and Authorization as the name:
We can use online tools to encode our string and paste it into the Header Manager. We should take care to add “basic” before our encoded credentials.
If everything goes well, we should receive a 200 response code from the server.
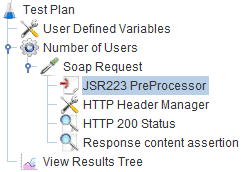
3.2. Encoding the Credentials with the JSR223 PreProcessor
If we want JMeter to encode our credentials for us, we can use the JSR223 PreProcessor component. We’ll need to use this if we want to vary the credentials used by our test plan.
All we have to do is to add a JSR223 PreProcessor before our HTTP Header Manager component:
With this component, we can execute a script at runtime. We’ll need to provide a script that retrieves the credentials and encodes them. Let’s use Java:
import org.apache.commons.codec.binary.Base64;
String username = vars.get("username");
String password = vars.get("password");
String credentials = username + ":" + password;
byte[] encodedUsernamePassword = Base64.encodeBase64(credentials.getBytes());
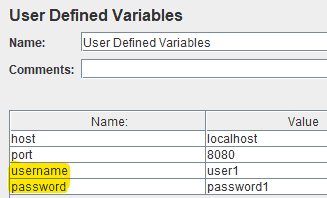
vars.put("base64Credentials", new String(encodedUsernamePassword));We should now define the username and password variables in the User Defined Variables component:
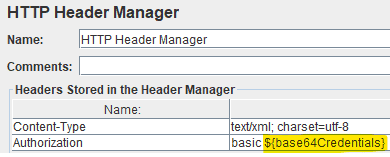
And finally, in the HTTP Header Manager component, we must set the Authorization header to use the encoded credentials:
And we’re done! Everything should work fine, and we’re able to change the credentials easily in our user-defined variables.
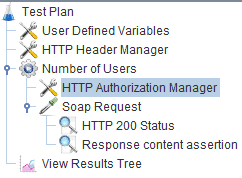
4. Using HTTP Authorization Manager
JMeter provides the HTTP Authorization Manager component to ease the use of credentials for authentication. With this component, we can give credentials for several domains and authentication protocols. This component must be a child of the Thread Group and defined before the HTTP Request component:
In the configuration tab of the component, we must define a username and a password to use for authentication:
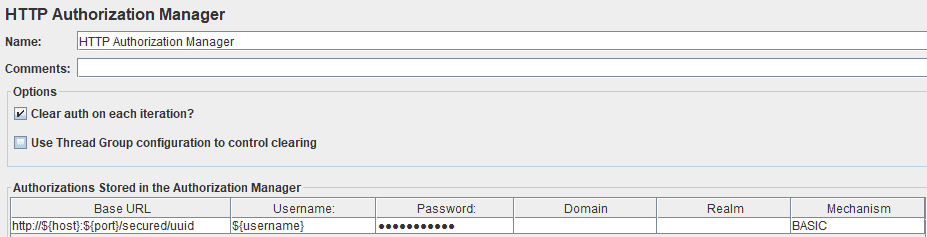
We can use variables in this tab if we defined username and password in a User Defined Variables component. It works for the password, too. Although it’s still masked, we can type “${password}” in the password field.
We must take care to select the correct Mechanism for authentication. Here, we’ll choose “BASIC”.
And that’s it! The HTTP Request component will automatically add an Authorization header in the request, and we should get an HTTP 200 OK response code.
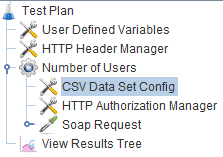
5. Using Multiple Credentials in the HTTP Authorization Manager
Sometimes, we may want to use multiple credentials during our tests. This may be helpful, for example, to validate access restrictions based on roles.
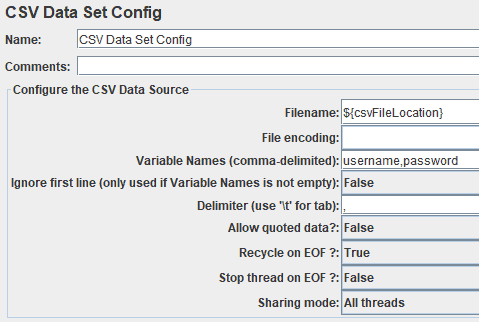
To configure this test case, we should create a CSV file in which we’ll store credentials and other information useful for our test plan. This file is read by a CSV Data Set Config component in JMeter. This component should be a child of the Thread Group and will iterate on the CSV lines on each Thread Group loop:
Then, in this component, we must define:
- The location of the file as a path in a User Defined Variables component
- The Variable Names that are set by the CSV Data Set component after its execution
- Whether the component should ignore the first line – helpful in case we have column names in the CSV file
- Which Delimiter is used in the CSV file
When defining several credentials in a CSV File, we should take care to configure our Thread Group to execute several loops.
With these settings, we should be able to see that different credentials are used in our requests headers.
6. Conclusion
In this article, we looked at how Basic Authentication works for HTTP resources.
We also learned how to set up a test plan in Apache JMeter to authenticate using this protocol. We covered hard-coded credentials, using the JSR223 PreProcessor, and then supplying multiple credentials from a CSV file.


