

Mocking is an essential part of unit testing, and the Mockito library makes it easy to write clean and intuitive unit tests for your Java code.
Get started with mocking and improve your application tests using our Mockito guide:
Handling concurrency in an application can be a tricky process with many potential pitfalls. A solid grasp of the fundamentals will go a long way to help minimize these issues.
Get started with understanding multi-threaded applications with our Java Concurrency guide:
Spring 5 added support for reactive programming with the Spring WebFlux module, which has been improved upon ever since. Get started with the Reactor project basics and reactive programming in Spring Boot:
Since its introduction in Java 8, the Stream API has become a staple of Java development. The basic operations like iterating, filtering, mapping sequences of elements are deceptively simple to use.
But these can also be overused and fall into some common pitfalls.
To get a better understanding on how Streams work and how to combine them with other language features, check out our guide to Java Streams:
Explore Spring Boot 3 and Spring 6 in-depth through building a full REST API with the framework:
Yes, Spring Security can be complex, from the more advanced functionality within the Core to the deep OAuth support in the framework.
I built the security material as two full courses - Core and OAuth, to get practical with these more complex scenarios. We explore when and how to use each feature and code through it on the backing project.
You can explore the course here:
Spring Data JPA is a great way to handle the complexity of JPA with the powerful simplicity of Spring Boot.
Get started with Spring Data JPA through the guided reference course:
Refactor Java code safely — and automatically — with OpenRewrite.
Refactoring big codebases by hand is slow, risky, and easy to put off. That’s where OpenRewrite comes in. The open-source framework for large-scale, automated code transformations helps teams modernize safely and consistently.
Each month, the creators and maintainers of OpenRewrite at Moderne run live, hands-on training sessions — one for newcomers and one for experienced users. You’ll see how recipes work, how to apply them across projects, and how to modernize code with confidence.
Join the next session, bring your questions, and learn how to automate the kind of work that usually eats your sprint time.
1. Overview
Jenkins is an open-source Continuous Integration server, which enables to create a custom plugin creation for particular task/environment.
In this article, we’ll go through the whole process of creating an extension which adds statistics to the build output, namely, number of classes and lines of code.
2. Setup
The first thing to do is to set up the project. Luckily, Jenkins provides convenient Maven archetypes for that.
Just run the command below from a shell:
mvn archetype:generate -Dfilter=io.jenkins.archetypes:pluginWe’ll get the following output:
[INFO] Generating project in Interactive mode
[INFO] No archetype defined. Using maven-archetype-quickstart
  (org.apache.maven.archetypes:maven-archetype-quickstart:1.0)
Choose archetype:
1: remote -> io.jenkins.archetypes:empty-plugin (Skeleton of
  a Jenkins plugin with a POM and an empty source tree.)
2: remote -> io.jenkins.archetypes:global-configuration-plugin
  (Skeleton of a Jenkins plugin with a POM and an example piece
  of global configuration.)
3: remote -> io.jenkins.archetypes:hello-world-plugin
  (Skeleton of a Jenkins plugin with a POM and an example build step.)
Now, choose the first option and define group/artifact/package in the interactive mode. After that, it’s necessary to make refinements to the pom.xml – as it contains entries such as <name>TODO Plugin</name>.
3. Jenkins Plugin Design
3.1. Extension Points
Jenkins provides a number of extension points. These are interfaces or abstract classes which define contracts for particular use-cases and allow other plugins to implement them.
For example, every build consists of a number of steps, e.g. “Checkout from VCS”, “Compile”, “Test”, “Assemble”, etc. Jenkins defines hudson.tasks.BuildStep extension point, so we can implement it to provide a custom step which can be configured.
Another example is hudson.tasks.BuildWrapper – this allows us to define pre/post actions.
We also have a non-core Email Extension plugin that defines the hudson.plugins.emailext.plugins.RecipientProvider extension point, which allows providing email recipients. An example implementation is available in here: hudson.plugins.emailext.plugins.recipients.UpstreamComitterRecipientProvider.
Note: there is a legacy approach where plugin class needs to extend hudson.Plugin. However, it’s now recommended to use extension points instead.
3.2. Plugin Initialization
It’s necessary to tell Jenkins about our extension and how it should be instantiated.
First, we define a static inner class within the plugin and mark it using the hudson.Extension annotation:
class MyPlugin extends BuildWrapper {
    @Extension
    public static class DescriptorImpl
      extends BuildWrapperDescriptor {

        @Override
        public boolean isApplicable(AbstractProject<?, ?> item) {
            return true;
        }

        @Override
        public String getDisplayName() {
            return "name to show in UI";
        }
    }
}
Secondly, we need to define a constructor to be used for plugin’s object instantiation and mark it by the org.kohsuke.stapler.DataBoundConstructor annotation.
It’s possible to use parameters for it. They’re shown in UI and are automatically delivered by Jenkins.
E.g. consider the Maven plugin:
@DataBoundConstructor
public Maven(
  String targets,
  String name,
  String pom,
  String properties,
  String jvmOptions,
  boolean usePrivateRepository,
  SettingsProvider settings,
  GlobalSettingsProvider globalSettings,
  boolean injectBuildVariables) { ... }
It’s mapped to the following UI:
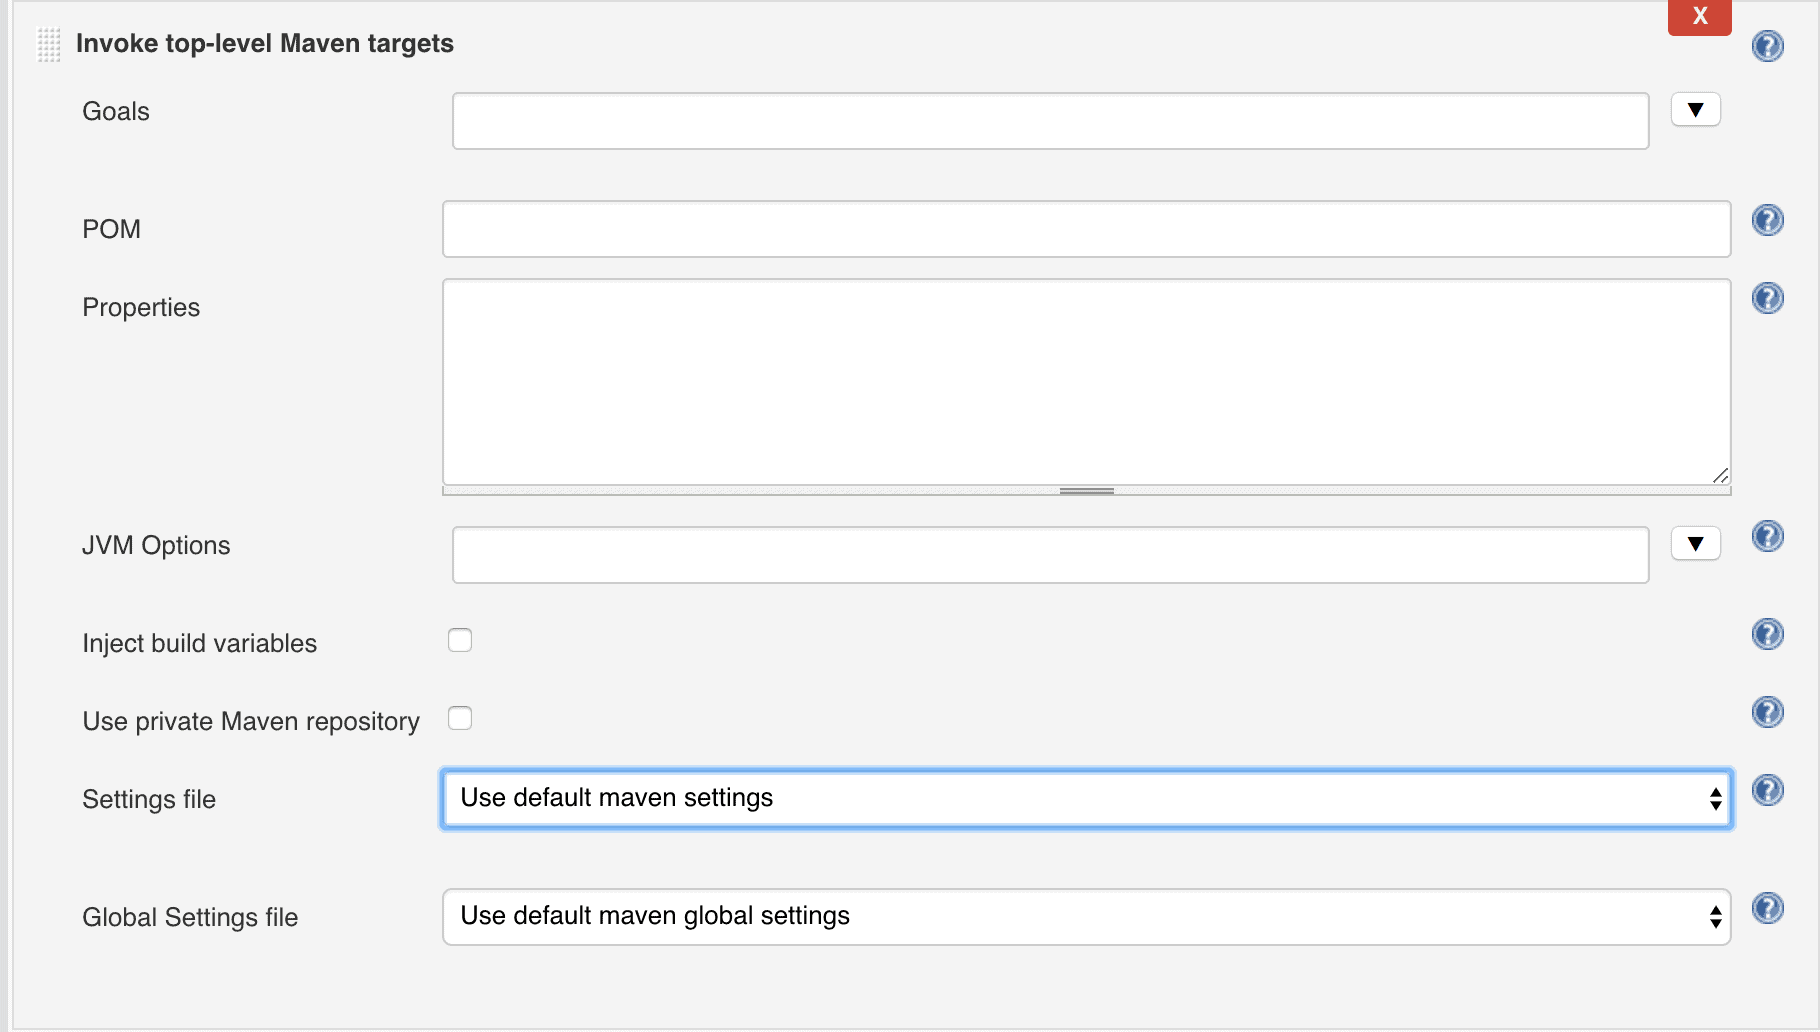
It’s also possible to use org.kohsuke.stapler.DataBoundSetter annotation with setters.
4. Plugin Implementation
We intend to collect basic project stats during a build, so, hudson.tasks.BuildWrapper is the right way to go here.
Let’s implement it:
class ProjectStatsBuildWrapper extends BuildWrapper {

    @DataBoundConstructor
    public ProjectStatsBuildWrapper() {}

    @Override
    public Environment setUp(
      AbstractBuild build,
      Launcher launcher,
      BuildListener listener) {}

    @Extension
    public static class DescriptorImpl extends BuildWrapperDescriptor {

        @Override
        public boolean isApplicable(AbstractProject<?, ?> item) {
            return true;
        }

        @Nonnull
        @Override
        public String getDisplayName() {
            return "Construct project stats during build";
        }

    }
}
Ok, now we need to implement the actual functionality.
Let’s define a domain class for the project stats:
class ProjectStats {

    private int classesNumber;
    private int linesNumber;

    // standard constructors/getters
}
And write the code which builds the data:
private ProjectStats buildStats(FilePath root)
  throws IOException, InterruptedException {

    int classesNumber = 0;
    int linesNumber = 0;
    Stack<FilePath> toProcess = new Stack<>();
    toProcess.push(root);
    while (!toProcess.isEmpty()) {
        FilePath path = toProcess.pop();
        if (path.isDirectory()) {
            toProcess.addAll(path.list());
        } else if (path.getName().endsWith(".java")) {
            classesNumber++;
            linesNumber += countLines(path);
        }
    }
    return new ProjectStats(classesNumber, linesNumber);
}
Finally, we need to show the stats to end-users. Let’s create an HTML template for that:
<!DOCTYPE html>
<html lang="en">
<head>
    <meta charset="UTF-8">
    <title>$PROJECT_NAME$</title>
</head>
<body>
Project $PROJECT_NAME$:
<table border="1">
    <tr>
        <th>Classes number</th>
        <th>Lines number</th>
    </tr>
    <tr>
        <td>$CLASSES_NUMBER$</td>
        <td>$LINES_NUMBER$</td>
    </tr>
</table>
</body>
</html>
And populate it during the build:
public class ProjectStatsBuildWrapper extends BuildWrapper {
    @Override
    public Environment setUp(
      AbstractBuild build,
      Launcher launcher,
      BuildListener listener) {
        return new Environment() {

            @Override
            public boolean tearDown(
              AbstractBuild build, BuildListener listener)
              throws IOException, InterruptedException {

                ProjectStats stats = buildStats(build.getWorkspace());
                String report = generateReport(
                  build.getProject().getDisplayName(),
                  stats);
                File artifactsDir = build.getArtifactsDir();
                String path = artifactsDir.getCanonicalPath() + REPORT_TEMPLATE_PATH;
                File reportFile = new File("path");
                // write report's text to the report's file
            }
        };
    }
}
5. Usage
It’s time to combine everything we’ve created so far – and see it in action.
It’s assumed that Jenkins is up and running in the local environment. Please refer to the installation details otherwise.
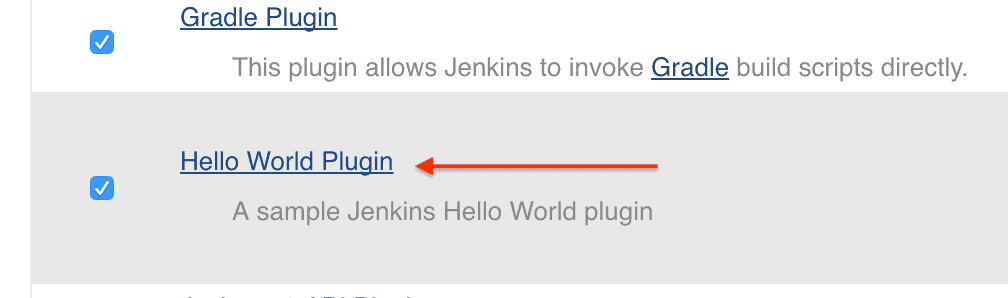
5.1. Add the Plugin to Jenkins
Now, let’s build our plugin:
mvn installThis will create a *.hpi file in the target directory. We need to copy it to the Jenkins plugins directory (~/.jenkins/plugin by default):
cp ./target/jenkins-hello-world.hpi ~/.jenkins/plugins/Finally, let’s restart the server and ensure that the plugin is applied:
- Open CI dashboard at http://localhost:8080
- Navigate to Manage Jenkins | Manage Plugins | Installed
- Find our plugin
5.2. Configure Jenkins Job
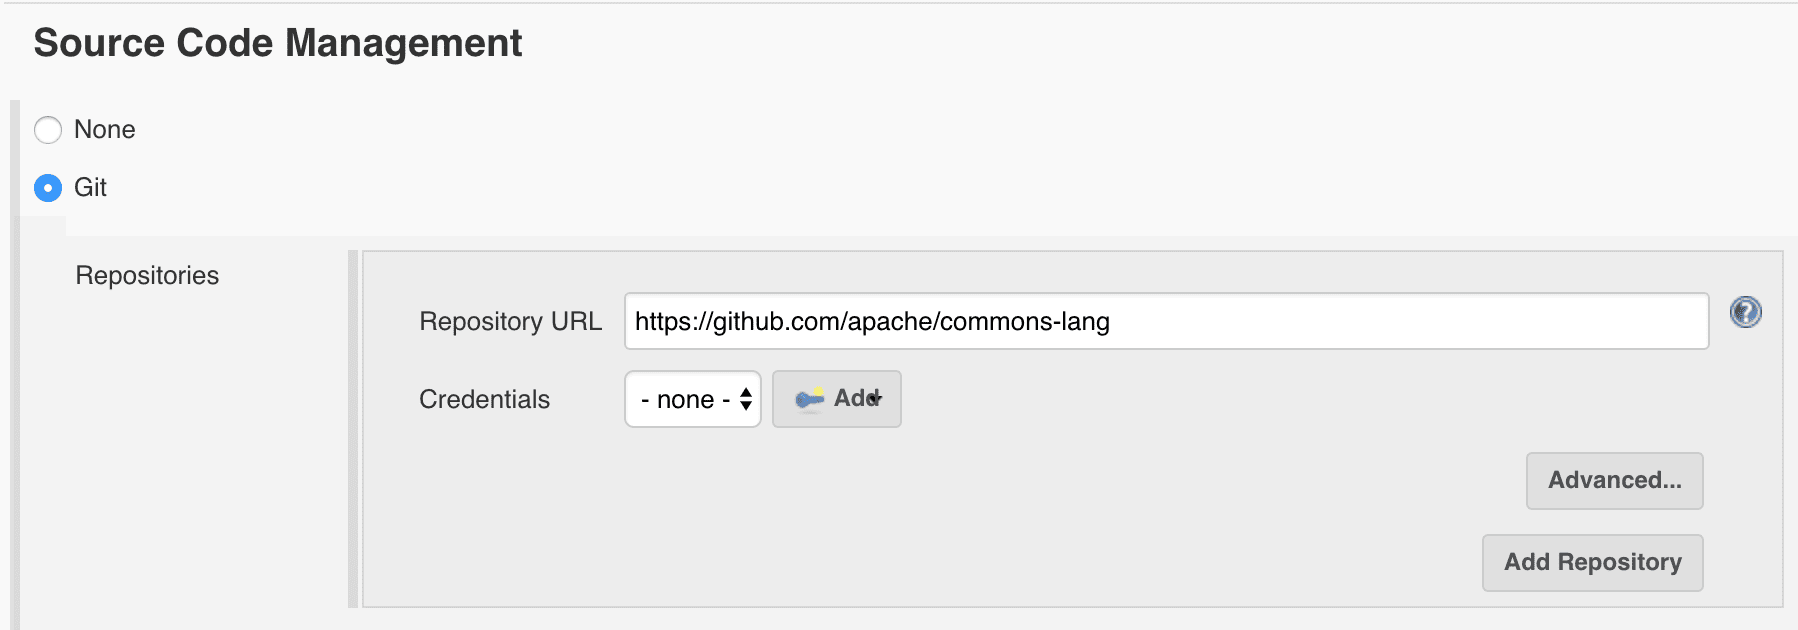
Let’s create a new job for an open-source Apache commons-lang project and configure the path to its Git repo there:
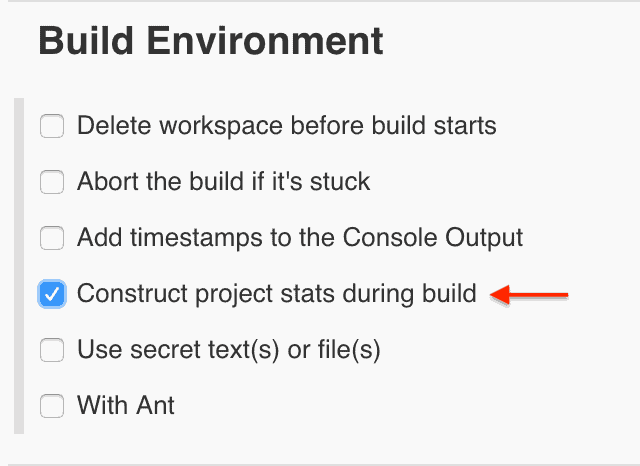
We also need to enable our plugin for that:
5.3. Check the Results
We’re all set now, let’s check how it works.
We can build the project and navigate to the results. We can see that a stats.html file is available here:
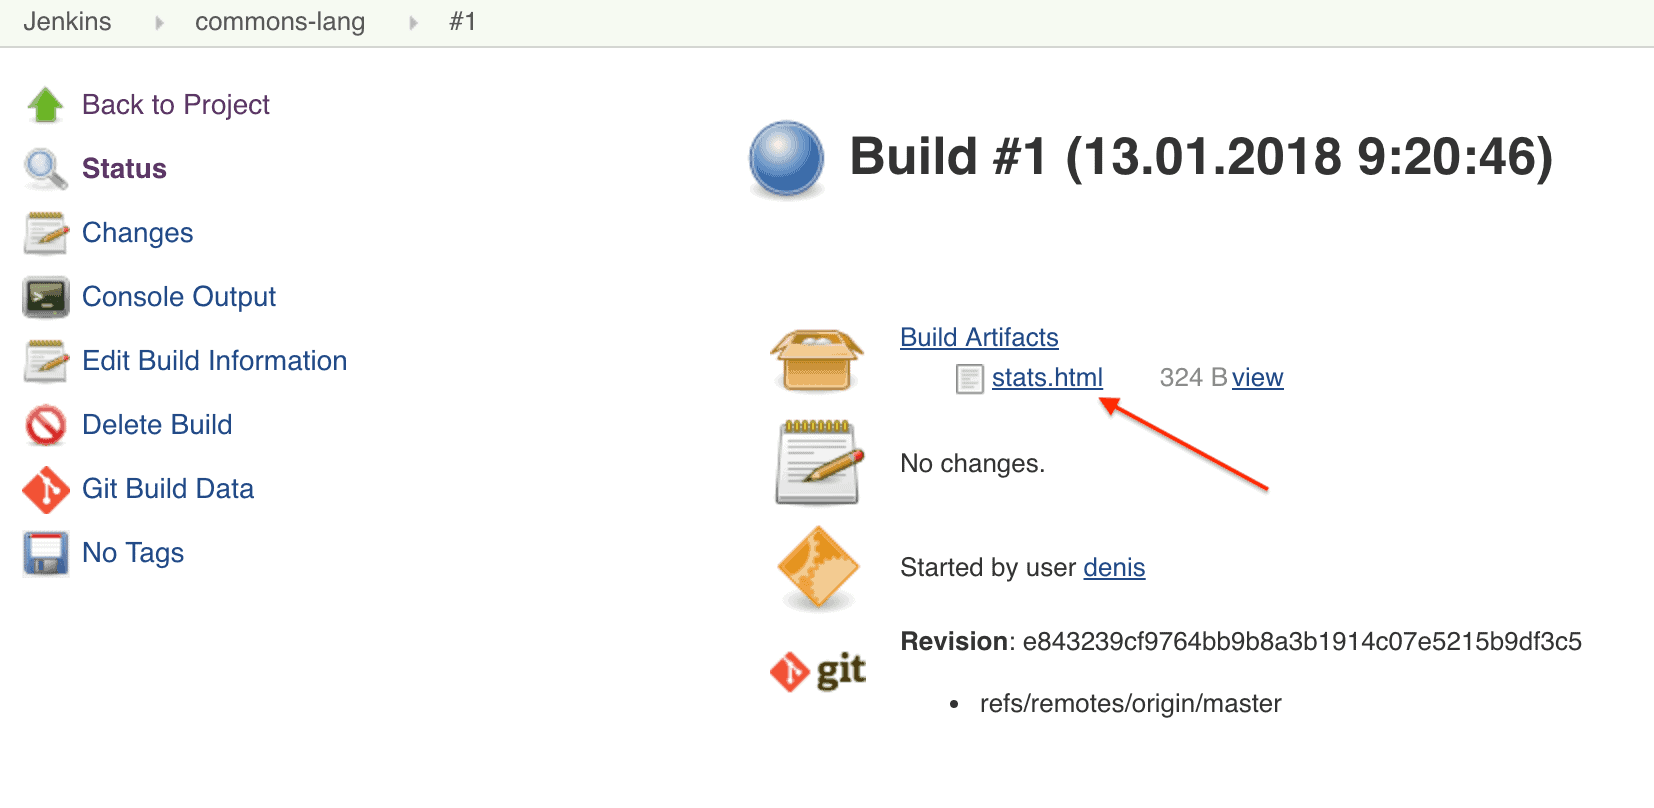
Let’s open it:
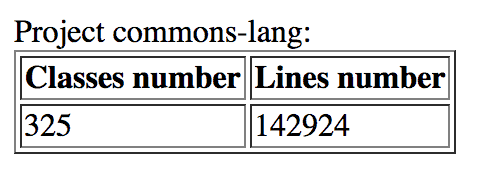
That’s what we expected – a single class which has three lines of code.
6. Conclusion
In this tutorial, we created a Jenkins plugin from scratch and ensured that it works.
Naturally, we didn’t cover all aspects of the CI extensions development, we just provided a basic overview, design ideas and an initial setup.


