Learn through the super-clean Baeldung Pro experience:
>> Membership and Baeldung Pro.
No ads, dark-mode and 6 months free of IntelliJ Idea Ultimate to start with.
Last updated: December 29, 2017

Learn through the super-clean Baeldung Pro experience:
>> Membership and Baeldung Pro.
No ads, dark-mode and 6 months free of IntelliJ Idea Ultimate to start with.
Modern software architecture is often broken. Slow delivery leads to missed opportunities, innovation is stalled due to architectural complexities, and engineering resources are exceedingly expensive.
Orkes is the leading workflow orchestration platform built to enable teams to transform the way they develop, connect, and deploy applications, microservices, AI agents, and more.
With Orkes Conductor managed through Orkes Cloud, developers can focus on building mission critical applications without worrying about infrastructure maintenance to meet goals and, simply put, taking new products live faster and reducing total cost of ownership.
Try a 14-Day Free Trial of Orkes Conductor today.
In this article, we’re going to showcase the usage of pipelines through an example of continuous delivery using Jenkins.
We’re going to build a simple, yet quite useful pipeline, for our sample project:
First of all, we need to download the latest stable version of Jenkins (2.73.3 at the point of writing this article).
Let’s navigate to the folder where our file is and run it using the java -jar jenkins.war command. Keep in mind that we can’t use Jenkins without an initial users setup.
After unlocking Jenkins by using the initial admin generated password, we must fill profile information of the first admin user and be sure to install all recommended plugins.
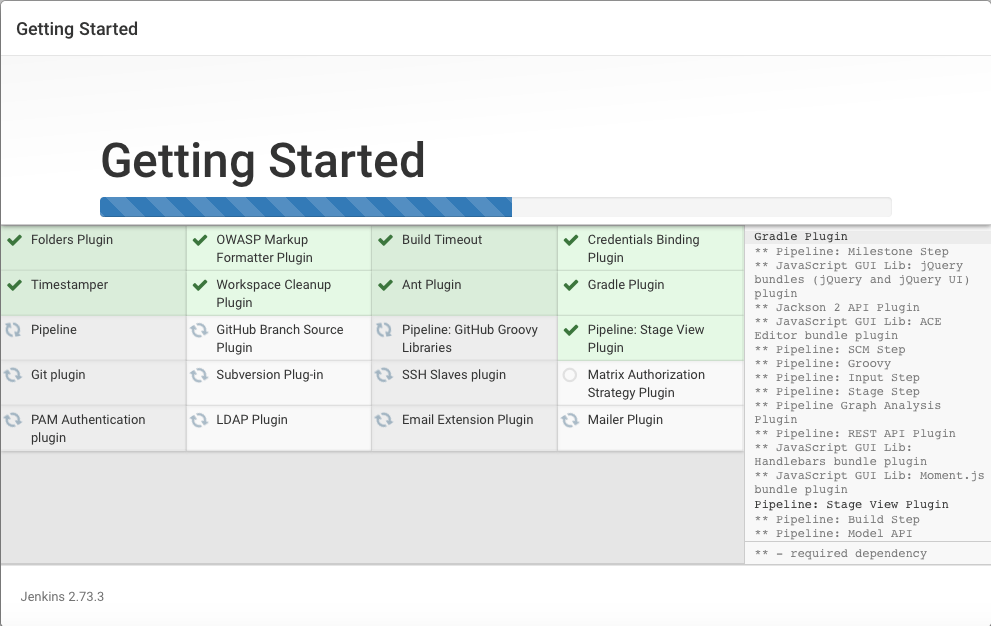
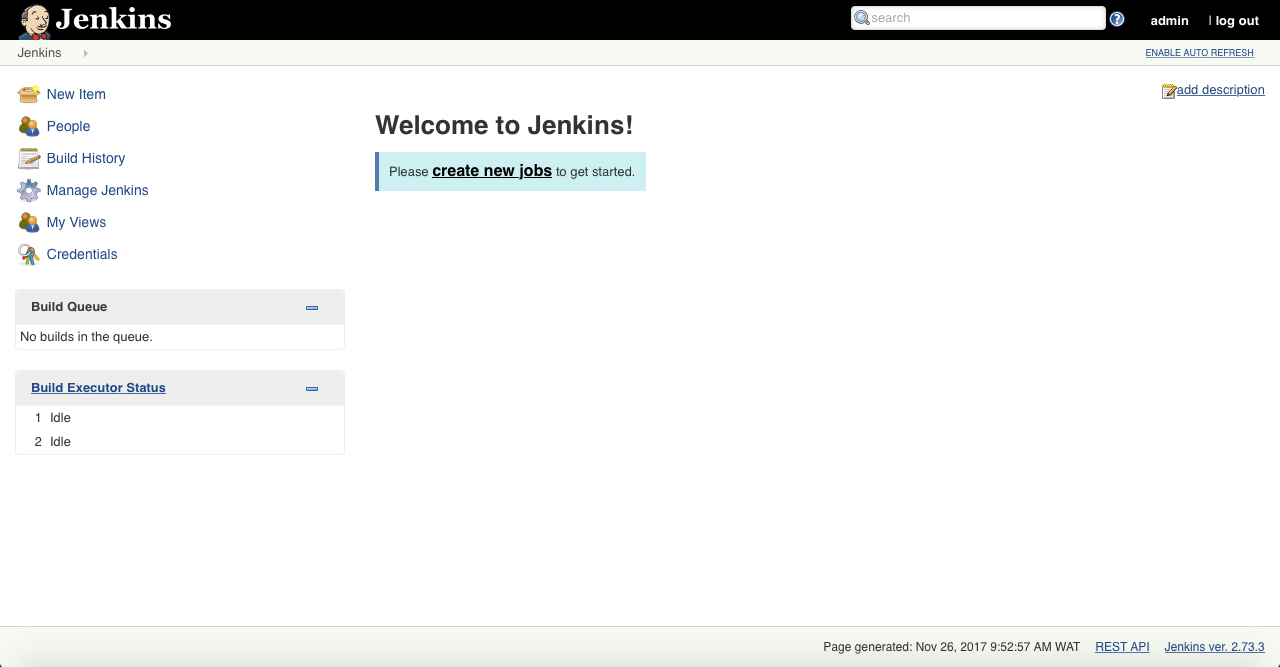
Now we have a fresh installation of Jenkins ready to be used.
All available versions of Jenkins can be found here.
Jenkins 2 comes with a great feature called Pipelines, which is very extensible when we need to define a continuous integration environment for a project.
A Pipeline is another way of defining some Jenkins steps using code, and automate the process of deploying software.
It’s using a Domain Specific Language(DSL) with two different syntaxes:
In our examples, we’re going to use the Scripted Pipeline which is following a more imperative programming model built with Groovy.
Let’s go through some characteristics of the Pipeline plugin:
In other words, setting up a Pipeline project means writing a script that will sequentially apply some steps of the process we want to accomplish.
To start using pipelines we have to install the Pipeline plugin that allows composing simple and complex automation.
We can optionally have the Pipeline Stage View one too so that when we run a build, we’ll see all the stages we’ve configured.
For our example, we’ll use a small Spring Boot application. We’ll then create a pipeline which clones the project, builds it and runs several tests, then runs the application.
Let’s install the Checkstyle, Static Analysis Collector and JUnit plugins, which are respectively useful to collect Checkstyle results, build a combined analysis graph of the test reports and illustrate successfully executed and failed tests.
First, let’s understand the reason of Checkstyle here: it’s a development tool that helps programmers write better Java code following accepted and well-known standards.
Static Analysis Collector is an add-on which collects different analysis outputs and prints the results in a combined trend graph. Additionally, the plug-in provides health reporting and build stability based on these grouped results.
Finally, the JUnit plugin provides a publisher that consumes XML test reports generated during the builds and outputs detailed and meaningful information relative to a project’s tests.
We’ll also configure Checkstyle in our application’s pom.xml:
<plugin>
    <groupId>org.apache.maven.plugins</groupId>
    <artifactId>maven-checkstyle-plugin</artifactId>
    <version>2.17</version>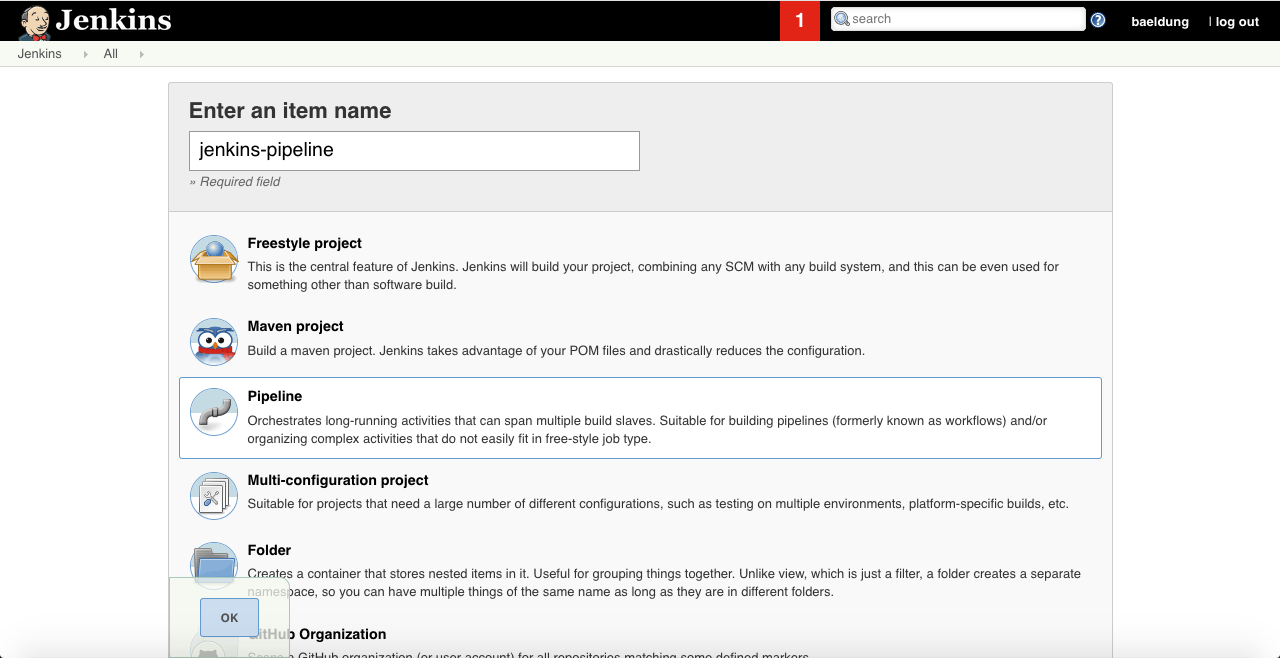
</plugin>First, we need to create a new Jenkins job. Let’s be sure to select Pipeline as the type before hitting the OK button as described in this screenshot:
The next screen allows us to fill in more details of the different steps of our Jenkins job, such as the description, triggers, some advanced project options:
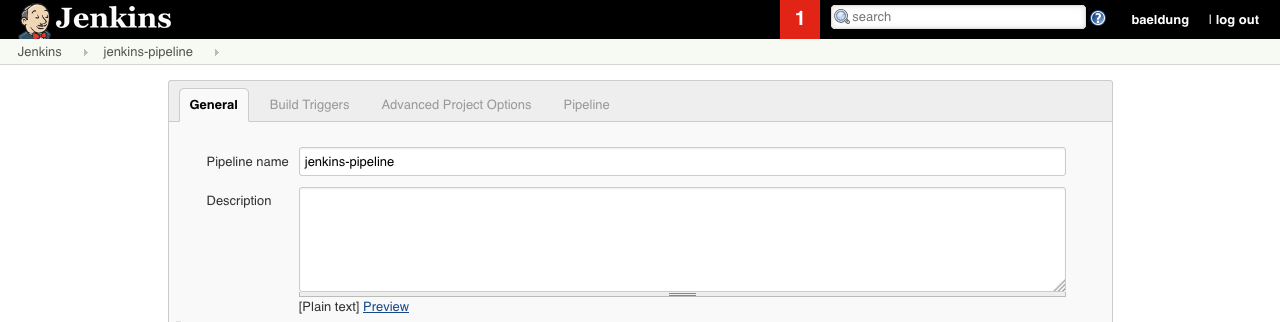
Let’s dive into the main and most important part of this kind of job by clicking on the Pipeline tab.
Then, for the definition select Pipeline script and check Use Groovy Sandbox.
Here is the working script for a Unix environment:
node {
    stage 'Clone the project'
    git 'https://github.com/eugenp/tutorials.git'

    dir('spring-jenkins-pipeline') {
        stage("Compilation and Analysis") {
            parallel 'Compilation': {
                sh "./mvnw clean install -DskipTests"
            }, 'Static Analysis': {
                stage("Checkstyle") {
                    sh "./mvnw checkstyle:checkstyle"

                    step([$class: 'CheckStylePublisher',
                      canRunOnFailed: true,
                      defaultEncoding: '',
                      healthy: '100',
                      pattern: '**/target/checkstyle-result.xml',
                      unHealthy: '90',
                      useStableBuildAsReference: true
                    ])
                }
            }
        }

        stage("Tests and Deployment") {
            parallel 'Unit tests': {
                stage("Runing unit tests") {
                    try {
                        sh "./mvnw test -Punit"
                    } catch(err) {
                        step([$class: 'JUnitResultArchiver', testResults:
                          '**/target/surefire-reports/TEST-*UnitTest.xml'])
                        throw err
                    }
                   step([$class: 'JUnitResultArchiver', testResults:
                     '**/target/surefire-reports/TEST-*UnitTest.xml'])
                }
            }, 'Integration tests': {
                stage("Runing integration tests") {
                    try {
                        sh "./mvnw test -Pintegration"
                    } catch(err) {
                        step([$class: 'JUnitResultArchiver', testResults:
                          '**/target/surefire-reports/TEST-'
                            + '*IntegrationTest.xml'])
                        throw err
                    }
                    step([$class: 'JUnitResultArchiver', testResults:
                      '**/target/surefire-reports/TEST-'
                        + '*IntegrationTest.xml'])
                }
            }

            stage("Staging") {
                sh "pid=\$(lsof -i:8989 -t); kill -TERM \$pid "
                  + "|| kill -KILL \$pid"
                withEnv(['JENKINS_NODE_COOKIE=dontkill']) {
                    sh 'nohup ./mvnw spring-boot:run -Dserver.port=8989 &'
                }
            }
        }
    }
}
First, we’re cloning the repository from GitHub, then changing the directory to our project, which is called spring-jenkins-pipeline.
Next, we compiled the project and apply Checkstyle analysis in a parallel way.
The following step represents a parallel execution of unit tests and integration tests, then deployment of the app.
Parallelism is used to optimize the pipeline, and have the job runs faster. It’s a best practice in Jenkins to simultaneously run some independent actions that can take a lot of time.
For example, in a real-world project, we usually have a lot of unit and integration tests that can take longer.
Note that if any test failed the BUILD will be marked as FAILED too and the deployment will not occur.
Also, we’re using JENKINS_NODE_COOKIE to prevent immediate shut down of our application when the pipeline reaches the end.
You can find a more general script working on other systems in the source code.
After creating the job, we’ll save our script and hit Build Now on the project home of our Jenkins dashboard.
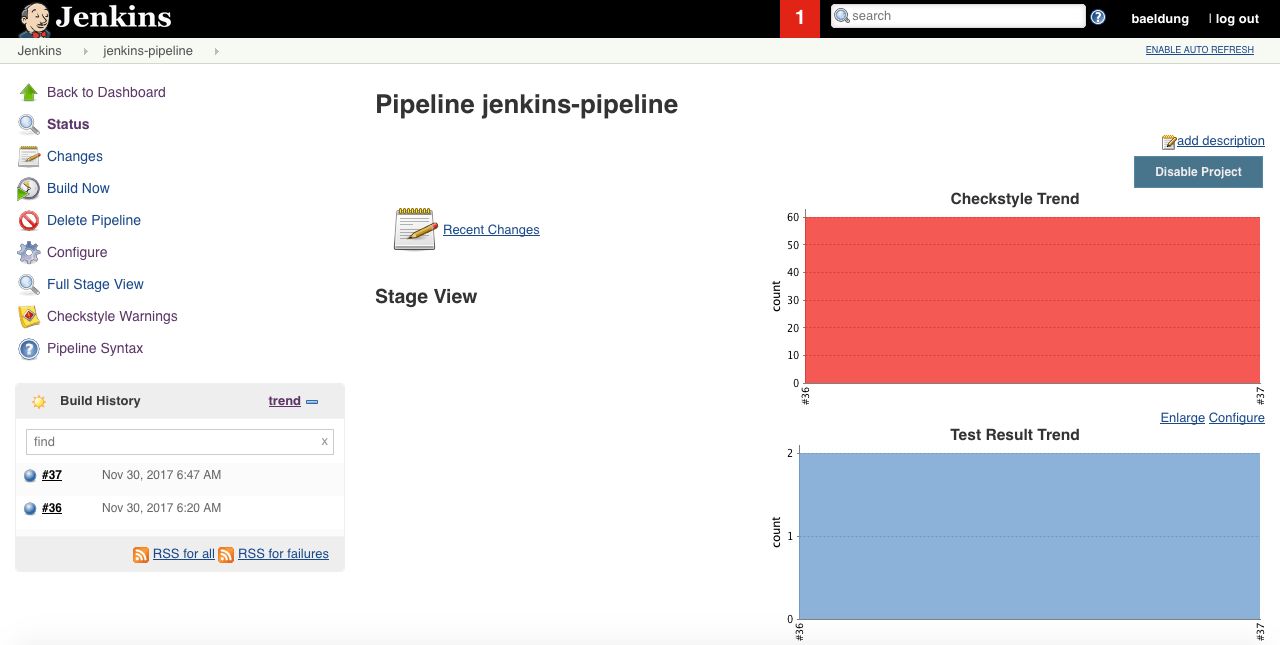
Here’s an overview of the builds:
A little further down we’ll find the stage view of the pipeline, with the result of each stage:
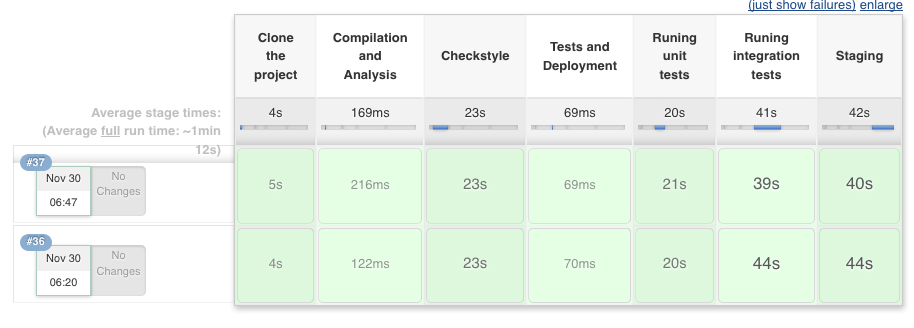
Each output is accessible when hovering over a stage cell and clicking the Logs button to see the log messages printed in that step.
We can also find more details of the code analysis. Let’s click on the desired build from the Build History on the right menu and hit Checkstyle Warnings.
Here we see 60 high priority warnings browsable by clicking:
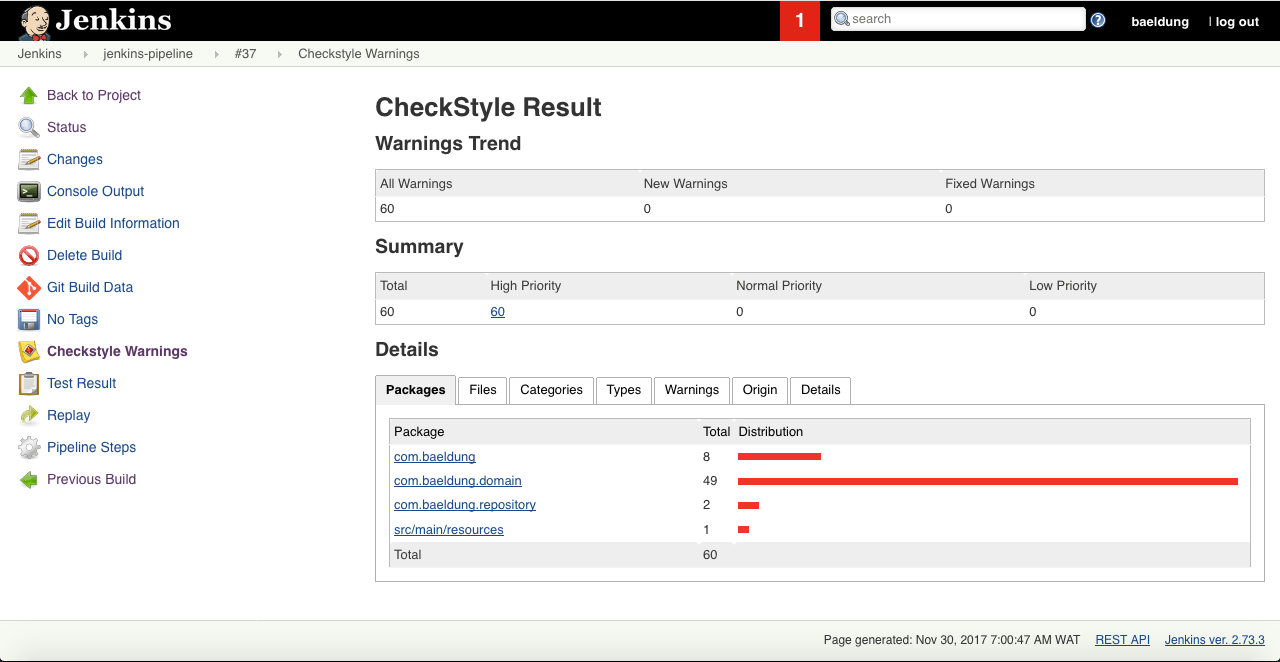
The Details tab displays pieces of information that highlight warnings and enable the developer to understand the causes behind them.
In the same way, the full test report is accessible by clicking on Test Result link. Let’s see the results of the com.baeldung package:
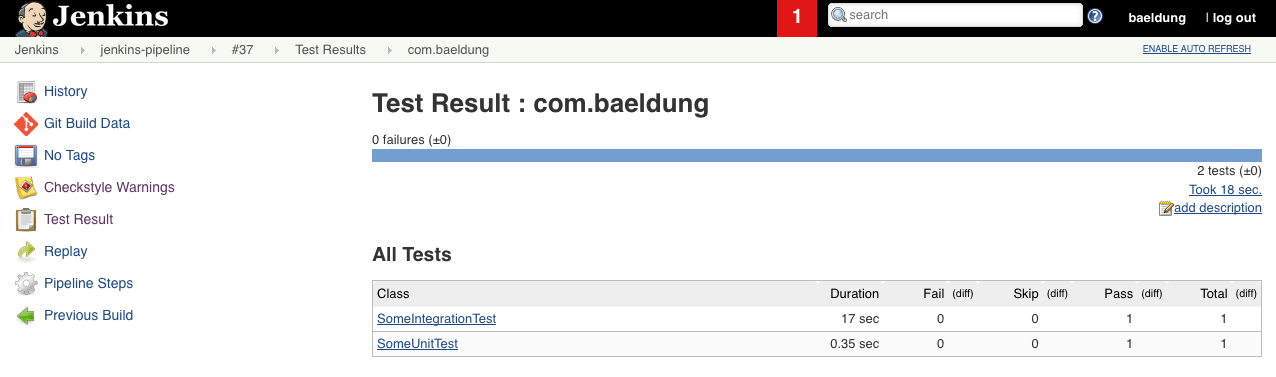
Here we can see each test file with its duration and status.
In this article, we set up a simple continuous delivery environment to run and show static code analysis and test report in Jenkins via a Pipeline job.
As always, the source code for this article can be found over on GitHub.