

Mocking is an essential part of unit testing, and the Mockito library makes it easy to write clean and intuitive unit tests for your Java code.
Get started with mocking and improve your application tests using our Mockito guide:
Handling concurrency in an application can be a tricky process with many potential pitfalls. A solid grasp of the fundamentals will go a long way to help minimize these issues.
Get started with understanding multi-threaded applications with our Java Concurrency guide:
Spring 5 added support for reactive programming with the Spring WebFlux module, which has been improved upon ever since. Get started with the Reactor project basics and reactive programming in Spring Boot:
Since its introduction in Java 8, the Stream API has become a staple of Java development. The basic operations like iterating, filtering, mapping sequences of elements are deceptively simple to use.
But these can also be overused and fall into some common pitfalls.
To get a better understanding on how Streams work and how to combine them with other language features, check out our guide to Java Streams:
Explore Spring Boot 3 and Spring 6 in-depth through building a full REST API with the framework:
Yes, Spring Security can be complex, from the more advanced functionality within the Core to the deep OAuth support in the framework.
I built the security material as two full courses - Core and OAuth, to get practical with these more complex scenarios. We explore when and how to use each feature and code through it on the backing project.
You can explore the course here:
Spring Data JPA is a great way to handle the complexity of JPA with the powerful simplicity of Spring Boot.
Get started with Spring Data JPA through the guided reference course:
Refactor Java code safely — and automatically — with OpenRewrite.
Refactoring big codebases by hand is slow, risky, and easy to put off. That’s where OpenRewrite comes in. The open-source framework for large-scale, automated code transformations helps teams modernize safely and consistently.
Each month, the creators and maintainers of OpenRewrite at Moderne run live, hands-on training sessions — one for newcomers and one for experienced users. You’ll see how recipes work, how to apply them across projects, and how to modernize code with confidence.
Join the next session, bring your questions, and learn how to automate the kind of work that usually eats your sprint time.
Yes, we're now running our only Summer Sale. All Courses are 30% off until 20th July, 2026:
Yes, we're now running our only Summer Sale. All Courses are 30% off until 20th July, 2026:
1. Overview
In this tutorial, we’ll learn about roaring bitmap. We’ll use some basic operations over a set as examples over the roaring bitmap. Additionally, we’ll execute a performance test between RoaringBitmap and BitSet in Java.
2. Introduction to Roaring Bitmap
The roaring bitmap data structure is commonly used for analytics, search, and big data projects due to its high performance and compression ratio. The idea behind it comes from bitmap indexes, a data structure for effectively representing arrays of numbers. It’s like a Java BitSet but compressed.
Compressing big integer sets while maintaining quick access to individual elements is a significant strength of roaring bitmap. Roaring bitmap internally uses different types of containers to accomplish this.
3. How Roaring Bitmap Works
A roaring bitmap is a set of unsigned integers consisting of containers of disjoint subsets. Each subset has a 16-bit key index and can hold values from a range of size 2^16. This allows unsigned 32-bit integers to be stored as Java shorts, as the worst-case scenario only necessitates 16 bits to represent a single 32-bit value. The selection of the container size also ensures that, in the worst-case scenario, the container still fits in the L1 cache of a modern CPU.
The following image represents how a roaring bitmap structure looks:
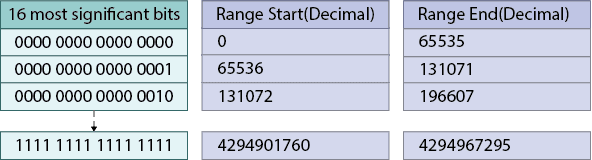
Our integer’s 16 most significant bits are the bucket or chunk keys. Each chunk of data represents the base of the range of values in the interval (0<= n < 2^16). Furthermore, the chunk won’t be created if no data is in the value range.
The next image is an example of a roaring bitmap with different data:
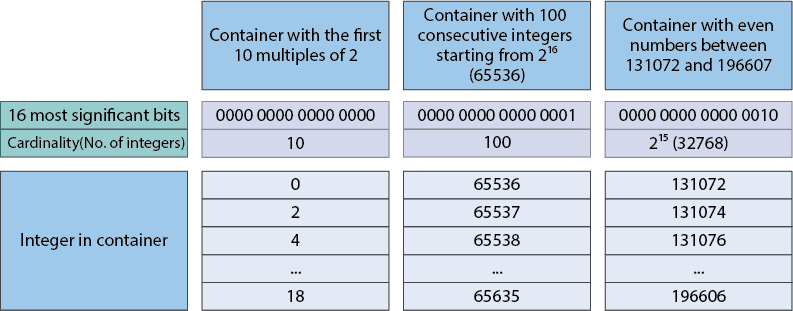
In the first chunk, we store the first 10 multiples of 2. Moreover, in the second chunk, we have 100 consecutive integers starting from 65536. The last chunk in the image has even numbers between 131072 and 19660.
4. Container Inside the Roaring Bitmap
There are three main types of containers in roaring bitmap – Array, Bitmap, and Run containers. Depending on the characteristics of the partitioned set, Run Container, Bitmap Container, or Array Container is the implementation for the container that holds the partitioned data.
When we add data to a roaring bitmap, internally, it decides whether to create a new container or change an existing one based on whether the values fit in the range covered by the container’s key.
4.1. Roaring Bitmap’s Array Container
Array Container doesn’t compress data and only holds a small amount. The amount of space it takes up is proportional to the amount of data it holds: each is two bytes.
The data type used by Array Container is the short data type. Integers are stored in sorted order.
Additionally, the initial capacity of the array is four, and the maximum number of elements is 4096. The array capacity is dynamically changing. However, roaring bitmap internally converts the Array Container into a Bitmap Container when the number of elements exceeds 4096.
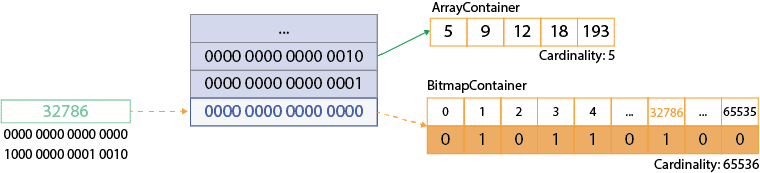
Let’s see an example of data insertion into an Array Container in a roaring bitmap. We have the number 131090. The 16 most significant bits are 0000 0000 0000 0010, and it’s our key. The lower 16 bits are 0000 0000 0001 0010. When we convert it to the decimal base, its value is 18. Now, after we insert the data, here’s our roaring bitmap structure:

We can notice that after the insertion, the cardinality of the Array Container is five for the key represented by the 16 most significant bits.
4.2. Roaring Bitmap’s Bitmap Container
Bitmap Container is the classic implementation of a bitset.
The roaring bitmap uses a long array to store bitmap data. The array capacity is constant at 1024, unlike the Array Container, which is a dynamically expanding array. The Bitmap Container doesn’t need to find the location. Instead, it accesses the index directly.
To observe how it works, we’ll use a simple example. We’ll insert the number 32786 into the roaring bitmap. The first 16 bits are 0000 0000 0000 0000. The remaining bits are 1000 0000 0001 0010 or 32786 in decimal representation. This value represents the index to be set in the bitmap container. Let’s see our roaring bitmap with the new information:
4.3. RoaringBitmap‘s Run Container
Run-length Encoding (RLE) is the optimal container choice when a region of a bitmap has a large number of clean words. It uses a short data type array.
The values at the even indices represent the beginnings of runs, and the values at the odd indices represent the lengths of those runs. The cardinality of containers is calculated by traversing the full run array.
For example, the following image shows us a container with a continuous integer sequence. Then, after the RLE execution, the container has only four values:
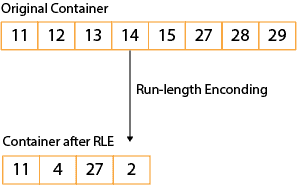
These values are expressed as 11 followed by four consecutive increasing values and 27 followed by two consecutive increasing values.
How this compression algorithm works depends on how compact or continuous the data is. If we have 100 shorts that are all in a row, it can compress them from 200 bytes to four bytes, but if they’re all in different places, it will change from 200 bytes to 400 bytes after encoding.
5. Union in RoaringBitmap
After this brief introduction to roaring bitmap, and before we jump into our code examples, we need to add the RoaringBitmap dependency to our pom.xml file:
<dependency>
    <groupId>org.roaringbitmap</groupId>
    <artifactId>RoaringBitmap</artifactId>
    <version>0.9.38</version>
</dependency>
The union of sets is the first operation to test over the roaring bitmap. First, let’s declare two RoaringBitmap instances. The first one will be A, and the second one will be B:
@Test
void givenTwoRoaringBitmap_whenUsingOr_thenWillGetSetsUnion() {
    RoaringBitmap expected = RoaringBitmap.bitmapOf(1, 2, 3, 4, 5, 6, 7, 8);
    RoaringBitmap A = RoaringBitmap.bitmapOf(1, 2, 3, 4, 5);
    RoaringBitmap B = RoaringBitmap.bitmapOf(4, 5, 6, 7, 8);
    RoaringBitmap union = RoaringBitmap.or(A, B);
    assertEquals(expected, union);
}
In the above code, we declare our two RoaringBitmap instances. We use the bitmapOf() static factory method provided by the RoaringBitmap for instance creation. Then, we use the or() method to perform the set union operation. Behind the scenes, this operation accomplishes a logical OR between set bitmaps. It’s a thread-safe operation.
6. Intersection in RoaringBitmap
Another useful operation that we can perform over our set is the intersection.
Let’s implement our test case for the intersection problem. Like the union, the intersection operation is very straightforward in RoaringBitmap:
@Test
void givenTwoRoaringBitmap_whenUsingAnd_thenWillGetSetsIntersection() {
    RoaringBitmap expected = RoaringBitmap.bitmapOf(4, 5);
    RoaringBitmap A = RoaringBitmap.bitmapOfRange(1, 6);
    RoaringBitmap B = RoaringBitmap.bitmapOf(4, 5, 6, 7, 8);
    RoaringBitmap intersection = RoaringBitmap.and(A, B);
    assertEquals(expected, intersection);
}
We declare the A set in this test case using another static factory method from the RoaringBitmap class. The bitmapOfRange() static method creates a new RoaringBitmap. Under the hood, the bitmapOfRange() method creates a new instance and uses the add() method for adding data in a range to the roaring bitmap. In this case, the add() method receives two long values as arguments representing the lower and upper bounds. The lower bound is inclusive. In comparison, the upper bound is excluded from the resulting set range. The add() method, which receives as arguments two int values, is deprecated for the current API version.
Then, we use the and() method to perform our intersection operation. As its name suggests, the and() method executes a logical AND operation between both sets. This operation is thread-safe.
7. Difference in RoaringBitmap
In addition to union and intersection, we have the relative complement of sets operation.
Next, let’s build our test case for set difference with RoaringBitmap:
@Test
void givenTwoRoaringBitmap_whenUsingAndNot_thenWillGetSetsDifference() {
    RoaringBitmap expected = RoaringBitmap.bitmapOf(1, 2, 3);
    RoaringBitmap A = new RoaringBitmap();
    A.add(1L, 6L);
    RoaringBitmap B = RoaringBitmap.bitmapOf(4, 5, 6, 7, 8);
    RoaringBitmap difference = RoaringBitmap.andNot(A, B);
    assertEquals(expected, difference);
}
Like our previous code examples, we declare two sets, A and B. We use a different approach to instantiate the A set for this case. We first create an empty RoaringBitmap. Then, we use the add() method, the same used by the bitmapOfRange() method described in the previous section.
The andNot() method performs the sets difference between A and B. From a logical point of view, this operation executes a bitwise ANDNOT (difference) operation. As long as the given bitmaps remain intact, this operation is thread-safe.
8. XOR Operation in RoaringBitmap
Additionally, we have the XOR (exclusive or) operation in the roaring bitmap. This operation is similar to the relative complement of sets, but the common elements between both sets are omitted from the result set.
We use the xor() method to perform this operation. Let’s jump into our test code example:
@Test
void givenTwoRoaringBitmap_whenUsingXOR_thenWillGetSetsSymmetricDifference() {
    RoaringBitmap expected = RoaringBitmap.bitmapOf(1, 2, 3, 6, 7, 8);
    RoaringBitmap A = RoaringBitmap.bitmapOfRange(1, 6);
    RoaringBitmap B = RoaringBitmap.bitmapOfRange(4, 9);
    RoaringBitmap xor = RoaringBitmap.xor(A, B);
    assertEquals(expected, xor);
}
In short, the xor() method in the RoaringBitmap class executes a bitwise XOR operation and is thread-safe.
9. Comparing Performance Against BitSet
Additionally, let’s build a simple performance test between RoaringBitmap and Java BitSet. For each set type, we test the previously described operations: union, intersection, difference, and XOR.
We use the Java Microbenchmark Harness (JMH) to implement our performance tests. First, we need to add the dependency to our pom.xml file:
<dependency>
    <groupId>org.openjdk.jmh</groupId>
    <artifactId>jmh-generator-annprocess</artifactId>
    <version>1.37</version>
</dependency>
<dependency>
    <groupId>org.openjdk.jmh</groupId>
    <artifactId>jmh-core</artifactId>
    <version>1.37</version>
</dependency>
The latest versions of the JMH Core and JMH Annotation Processor dependencies can be found in Maven Central.
9.1. Declaring Benchmark Escope
Next, we declare our class and the sets as we set up the initial conditions for our tests:
@State(Scope.Thread)
class BitSetsBenchmark {
    private RoaringBitmap rb1;
    private BitSet bs1;
    private RoaringBitmap rb2;
    private BitSet bs2;
    private final static int SIZE = 10_000_000;
}
Initially, we declare two sets of each type, BitSet and RoaringBitmap. Then, we set a maximum size. The SIZE variable is the upper bound we’ll use as the set size.
We’ll perform all of our tests in this class. Additionally, we use the Scope.Thread for State and the default Throughput benchmark mode.
We’ll generate a new set after the operation to avoid mutating our input data structure. Avoiding mutation is important for concurrent contexts. That’s why, for the BitSet cases, we’ll clone the input set so the results data don’t mutate input sets.
9.2. Benchmark Data Setup
Next, let’s setup our data for the test:
@Setup
public void setup() {
    rb1 = new RoaringBitmap();
    bs1 = new BitSet(SIZE);
    rb2 = new RoaringBitmap();
    bs2 = new BitSet(SIZE);
    for (int i = 0; i < SIZE / 2; i++) {
        rb1.add(i);
        bs1.set(i);
    }
    for (int i = SIZE / 2; i < SIZE; i++) {
        rb2.add(i);
        bs2.set(i);
    }
}
Our two BitSet sets are initialized to SIZE. Then, for the first RoaringBitmap and BitSet, we add/set values up to SIZE / 2, not included. For the other two sets, we add values from SIZE / 2 to SIZE.
9.3. Benchmark Tests
Finally, let’s code our tests. Let’s start with the union operation:
@Benchmark
public RoaringBitmap roaringBitmapUnion() {
    return RoaringBitmap.or(rb1, rb2);
}
@Benchmark
public BitSet bitSetUnion() {
    BitSet result = (BitSet) bs1.clone();
    result.or(bs2);
    return result;
}
The second operation is the intersection:
@Benchmark
public RoaringBitmap roaringBitmapIntersection() {
    return RoaringBitmap.and(rb1, rb2);
}
@Benchmark
public BitSet bitSetIntersection() {
    BitSet result = (BitSet) bs1.clone();
    result.and(bs2);
    return result;
}
The third one is the difference:
@Benchmark
public RoaringBitmap roaringBitmapDifference() {
    return RoaringBitmap.andNot(rb1, rb2);
}
@Benchmark
public BitSet bitSetDifference() {
    BitSet result = (BitSet) bs1.clone();
    result.andNot(bs2);
    return result;
}
The last one is the XOR operation:
@Benchmark
public RoaringBitmap roaringBitmapXOR() {
    return RoaringBitmap.xor(rb1, rb2);
}
@Benchmark
public BitSet bitSetXOR() {
    BitSet result = (BitSet) bs1.clone();
    result.xor(bs2);
    return result;
}
9.4. Benchmark Test Results
After the execution of our benchmark tests, we get the following results:
Benchmark                                    Mode  Cnt       Score       Error  Units
BitSetsBenchmark.bitSetDifference           thrpt   25    3890.694 ±   313.808  ops/s
BitSetsBenchmark.bitSetIntersection         thrpt   25    3542.387 ±   296.007  ops/s
BitSetsBenchmark.bitSetUnion                thrpt   25    3012.666 ±   503.821  ops/s
BitSetsBenchmark.bitSetXOR                  thrpt   25    2872.402 ±   348.099  ops/s
BitSetsBenchmark.roaringBitmapDifference    thrpt   25   12930.064 ±   527.289  ops/s
BitSetsBenchmark.roaringBitmapIntersection  thrpt   25  824167.502 ± 30176.431  ops/s
BitSetsBenchmark.roaringBitmapUnion         thrpt   25    6287.477 ±   250.657  ops/s
BitSetsBenchmark.roaringBitmapXOR           thrpt   25    6060.993 ±   607.562  ops/s
As we can notice, RoaringBitmap performs better than BitSet operations. Despite these results, we need to consider when we use each type.
Attempting to use compressed bitmaps is wasteful in some circumstances. For example, this could be when we have a small data universe. Compressed bitmaps are probably not for us if we can uncompress BitSet without increasing memory use. If compression isn’t required, BitSet provides exceptional speed.
10. Conclusion
In this article, we’ve learned about the roaring bitmap data structure. We discussed some operations of RoaringBitmap. Additionally, we performed some performance tests between RoaringBitmap and BitSet. As a result, we understood that the former performs better than the latter.


