Prim’s Algorithm with a Java Implementation
Last updated: January 25, 2024


Mocking is an essential part of unit testing, and the Mockito library makes it easy to write clean and intuitive unit tests for your Java code.
Get started with mocking and improve your application tests using our Mockito guide:
Handling concurrency in an application can be a tricky process with many potential pitfalls. A solid grasp of the fundamentals will go a long way to help minimize these issues.
Get started with understanding multi-threaded applications with our Java Concurrency guide:
Spring 5 added support for reactive programming with the Spring WebFlux module, which has been improved upon ever since. Get started with the Reactor project basics and reactive programming in Spring Boot:
Since its introduction in Java 8, the Stream API has become a staple of Java development. The basic operations like iterating, filtering, mapping sequences of elements are deceptively simple to use.
But these can also be overused and fall into some common pitfalls.
To get a better understanding on how Streams work and how to combine them with other language features, check out our guide to Java Streams:
Explore Spring Boot 3 and Spring 6 in-depth through building a full REST API with the framework:
Yes, Spring Security can be complex, from the more advanced functionality within the Core to the deep OAuth support in the framework.
I built the security material as two full courses - Core and OAuth, to get practical with these more complex scenarios. We explore when and how to use each feature and code through it on the backing project.
You can explore the course here:
Spring Data JPA is a great way to handle the complexity of JPA with the powerful simplicity of Spring Boot.
Get started with Spring Data JPA through the guided reference course:
Refactor Java code safely — and automatically — with OpenRewrite.
Refactoring big codebases by hand is slow, risky, and easy to put off. That’s where OpenRewrite comes in. The open-source framework for large-scale, automated code transformations helps teams modernize safely and consistently.
Each month, the creators and maintainers of OpenRewrite at Moderne run live, hands-on training sessions — one for newcomers and one for experienced users. You’ll see how recipes work, how to apply them across projects, and how to modernize code with confidence.
Join the next session, bring your questions, and learn how to automate the kind of work that usually eats your sprint time.
Yes, we're now running our only Summer Sale. All Courses are 30% off until 20th July, 2026:
Yes, we're now running our only Summer Sale. All Courses are 30% off until 20th July, 2026:
1. Introduction
In this tutorial, we first learn what minimum spanning trees are. Afterward, we’ll use Prim’s algorithm to find one.
2. Minimum Spanning Tree
A minimum spanning tree (MST) is a weighted, undirected, connected graph whose total edge weight has been minimized by removing heavier edges. In other words, we keep all the vertices of the graph intact, but we may remove some edges so that the sum of all edges is at a minimum.
We start with a weighted graph since it makes no sense to minimize the total edge weight if those edges have no weight at all. Let’s take a look at an example graph:
The above graph is a weighted, undirected, connected graph. Here is an MST of that graph:

An MST of a graph is not unique, though. If a graph has more than one MST, then each MST has the same total edge weight.
3. Prim’s Algorithm
Prim’s algorithm takes a weighted, undirected, connected graph as input and returns an MST of that graph as output.
It works in a greedy manner. In the first step, it selects an arbitrary vertex. Thereafter, each new step adds the nearest vertex to the tree constructed so far until there is no disconnected vertex left.
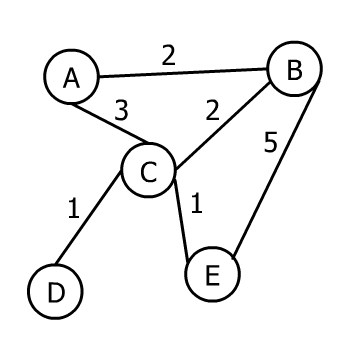
Let’s run Prim’s algorithm on this graph step-by-step:
Assuming the arbitrary vertex to start the algorithm is B, we have three choices A, C, and E to go. The corresponding weights of the edges are 2, 2, and 5, therefore the minimum is 2. In this case, we have two edges weighing 2, so we can choose either of them (it doesn’t matter which one). Let’s choose A:

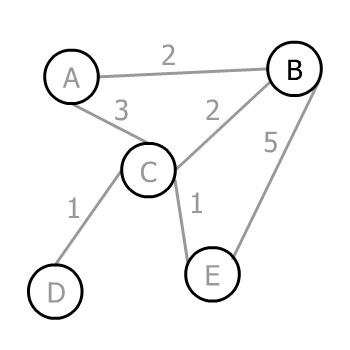
Now we have a tree with two vertices A and B. We can select any of A or B’s edges not yet added that lead to an unadded vertex. So, we can pick AC, BC, or BE.
Prim’s algorithm chooses the minimum, which is 2, or BC:
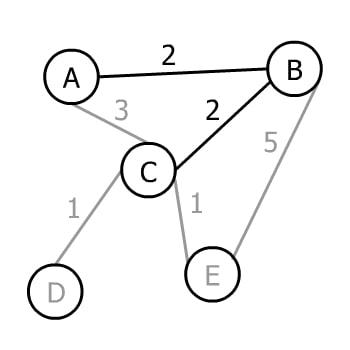
Now we have a tree with three vertices and three possible edges to move forward: CD, CE, or BE. AC isn’t included since it wouldn’t add a new vertex to the tree. The minimum weight amongst these three is 1.
However, there are two edges both weighing 1. Consequently, Prim’s algorithm chooses one of them (again doesn’t matter which one) in this step:
There is only one vertex left to join, so we can pick from CE and BE. The minimum weight that can connect our tree to it is 1, and Prim’s algorithm will choose it:
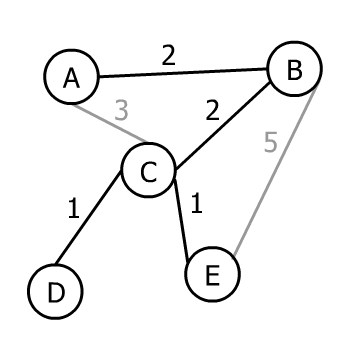
As all vertices of the input graph are now present in the output tree, Prim’s algorithm ends. Therefore, this tree is an MST of the input graph.
4. Implementation
Vertices and edges make graphs, so we need a data structure to store these elements. Let’s create the class Edge:
public class Edge {

    private int weight;
    private boolean isIncluded = false;

}
Each Edge must have a weight since Prim’s algorithm works on weighted graphs. isIncluded shows whether the Edge is present in the minimum spanning tree or not.
Now, let’s add the Vertex class:
public class Vertex {

    private String label = null;
    private Map<Vertex, Edge> edges = new HashMap<>();
    private boolean isVisited = false;

}
Each Vertex can optionally have a label. We use the edges map to store connections among vertices. Finally, isVisited shows whether the vertex has been visited by Prim’s algorithm so far or not.
Let’s create our Prim class where we’ll implement the logic:
public class Prim {

    private List<Vertex> graph;

}
A list of vertices is enough to store the whole graph because inside each Vertex, we have a Map<Vertex, Edge> to identify all connections. Inside Prim, we create a run() method:
public void run() {
    if (graph.size() > 0) {
        graph.get(0).setVisited(true);
    }
    while (isDisconnected()) {
        Edge nextMinimum = new Edge(Integer.MAX_VALUE);
        Vertex nextVertex = graph.get(0);
        for (Vertex vertex : graph) {
            if (vertex.isVisited()) {
                Pair<Vertex, Edge> candidate = vertex.nextMinimum();
                if (candidate.getValue().getWeight() < nextMinimum.getWeight()) {
                    nextMinimum = candidate.getValue();
                    nextVertex = candidate.getKey();
                }
            }
        }
        nextMinimum.setIncluded(true);
        nextVertex.setVisited(true);
    }
}
We start by setting the first element of the List<Vertex> graph as visited. The first element can be any of the vertices depending on the order they’ve been added to the list in the first place. isDisconnected() returns true if there is any Vertex not visited so far:
private boolean isDisconnected() {
    for (Vertex vertex : graph) {
        if (!vertex.isVisited()) {
            return true;
        }
    }
    return false;
}
While the minimum spanning tree isDisconnected(), we loop over the already visited vertices and find the Edge with the minimum weight as a candidate for nextVertex:
public Pair<Vertex, Edge> nextMinimum() {
    Edge nextMinimum = new Edge(Integer.MAX_VALUE);
    Vertex nextVertex = this;
    Iterator<Map.Entry<Vertex,Edge>> it = edges.entrySet()
        .iterator();
    while (it.hasNext()) {
        Map.Entry<Vertex,Edge> pair = it.next();
        if (!pair.getKey().isVisited()) {
            if (!pair.getValue().isIncluded()) {
                if (pair.getValue().getWeight() < nextMinimum.getWeight()) {
                    nextMinimum = pair.getValue();
                    nextVertex = pair.getKey();
                }
            }
        }
    }
    return new Pair<>(nextVertex, nextMinimum);
}
We find the minimum of all candidates in the main loop and store it in nextVertex. Then, we set nextVertex as visited. The loop goes on until all vertices are visited.
At the end, each Edge with isIncluded equal to true is present.
Note that since nextMinimum() iterates through the edges, the time complexity of this implementation is O(V2). If we store the edges in a priority queue (sorted by weight) instead, the algorithm will perform in O(E log V).
5. Testing
Okay, so now that we’ve got some code, let’s test it with a real example. First, we construct our graph:
public static List<Vertex> createGraph() {
    List<Vertex> graph = new ArrayList<>();
    Vertex a = new Vertex("A");
    ...
    Vertex e = new Vertex("E");
    Edge ab = new Edge(2);
    a.addEdge(b, ab);
    b.addEdge(a, ab);
    ...
    Edge ce = new Edge(1);
    c.addEdge(e, ce);
    e.addEdge(c, ce);
    graph.add(a);
    ...
    graph.add(e);
    return graph;
}
The constructor of the Prim class takes it and stores it inside the class. We can print the input graph with originalGraphToString() method:
Prim prim = new Prim(createGraph());
System.out.println(prim.originalGraphToString());
Our example will output:
A --- 2 --- B
A --- 3 --- C
B --- 5 --- E
B --- 2 --- C
C --- 1 --- E
C --- 1 --- D
Now, we run Prim’s algorithm and print the resulting MST with minimumSpanningTreeToString() method:
prim.run();
prim.resetPrintHistory();
System.out.println(prim.minimumSpanningTreeToString());
Finally, we print out our MST:
A --- 2 --- B
B --- 2 --- C
C --- 1 --- E
C --- 1 --- D
6. Conclusion
In this article, we learned how Prim’s algorithm finds a minimum spanning tree of a graph.


