

Mocking is an essential part of unit testing, and the Mockito library makes it easy to write clean and intuitive unit tests for your Java code.
Get started with mocking and improve your application tests using our Mockito guide:
Handling concurrency in an application can be a tricky process with many potential pitfalls. A solid grasp of the fundamentals will go a long way to help minimize these issues.
Get started with understanding multi-threaded applications with our Java Concurrency guide:
Spring 5 added support for reactive programming with the Spring WebFlux module, which has been improved upon ever since. Get started with the Reactor project basics and reactive programming in Spring Boot:
Since its introduction in Java 8, the Stream API has become a staple of Java development. The basic operations like iterating, filtering, mapping sequences of elements are deceptively simple to use.
But these can also be overused and fall into some common pitfalls.
To get a better understanding on how Streams work and how to combine them with other language features, check out our guide to Java Streams:
Explore Spring Boot 3 and Spring 6 in-depth through building a full REST API with the framework:
Yes, Spring Security can be complex, from the more advanced functionality within the Core to the deep OAuth support in the framework.
I built the security material as two full courses - Core and OAuth, to get practical with these more complex scenarios. We explore when and how to use each feature and code through it on the backing project.
You can explore the course here:
Spring Data JPA is a great way to handle the complexity of JPA with the powerful simplicity of Spring Boot.
Get started with Spring Data JPA through the guided reference course:
Refactor Java code safely — and automatically — with OpenRewrite.
Refactoring big codebases by hand is slow, risky, and easy to put off. That’s where OpenRewrite comes in. The open-source framework for large-scale, automated code transformations helps teams modernize safely and consistently.
Each month, the creators and maintainers of OpenRewrite at Moderne run live, hands-on training sessions — one for newcomers and one for experienced users. You’ll see how recipes work, how to apply them across projects, and how to modernize code with confidence.
Join the next session, bring your questions, and learn how to automate the kind of work that usually eats your sprint time.
Yes, we're now running our only Summer Sale. All Courses are 30% off until 20th July, 2026:
Yes, we're now running our only Summer Sale. All Courses are 30% off until 20th July, 2026:
1. Overview
In this article, we’ll see how to edit the content of an existing PDF file in Java. First, we’ll just add new content. Then, we’ll focus on removing or replacing some pre-existing content.
2. Adding the iText7 Dependency
We’ll use the iText7 library to add content to the PDF file. Later on, we’ll use the pdfSweep add-on to remove or replace content.
Note that iText is licensed under AGPL, which might limit the distribution of a commercial application: iText License Model.
First, let’s add these dependencies to our pom.xml:
<dependency>
    <groupId>com.itextpdf</groupId>
    <artifactId>itext7-core</artifactId>
    <version>7.2.3</version>
    <type>pom</type>
</dependency>
<dependency>
    <groupId>com.itextpdf</groupId>
    <artifactId>cleanup</artifactId>
    <version>3.0.1</version>
</dependency>
3. File Handling
Let’s understand the steps for handling our PDF with iText7:
- First, we open a PdfReader to read the content of the source file. This throws an IOException if an error occurs at any time while reading the file.
- Then, we open a PdfWriter to the destination file. If this file doesn’t exist or can’t be created, a FileNotFoundException is thrown.
- After that, we’ll open a PdfDocument which uses our PdfReader and PdfWriter.
- Finally, closing the PdfDocument closes both the underlying PdfReader and PdfWriter.
Let’s write a main() method that runs our whole treatment. For the sake of simplicity, we’ll just rethrow any Exception that could occur:
public static void main(String[] args) throws IOException {
    PdfReader reader = new PdfReader("src/main/resources/baeldung.pdf");
    PdfWriter writer = new PdfWriter("src/main/resources/baeldung-modified.pdf");
    PdfDocument pdfDocument = new PdfDocument(reader, writer);
    addContentToDocument(pdfDocument);
    pdfDocument.close();
}
In the following section, we’ll complete step-by-step the addContentToDocument() method in order to fill our PDF with new content. The source document’s a PDF file that only contains the text “Hello Baeldung“ on the top left. The destination file will be created by the program.
4. Adding Content to the File
We’ll now add various types of content to the file.
4.1. Adding a Form
We’ll start by adding a form to the file. Our form will be very simple and contain a unique field called name.
Furthermore, we need to tell iText where to place the field. In this case, we’ll put it at the following point: (35,400). The coordinates (0,0) refer to the bottom left of the document. Lastly, we’ll set the dimension of the field to 100×30:
PdfFormField personal = PdfFormField.createEmptyField(pdfDocument);
personal.setFieldName("information");
PdfTextFormField name = PdfFormField.createText(pdfDocument, new Rectangle(35, 400, 100, 30), "name", "");
personal.addKid(name);
PdfAcroForm.getAcroForm(pdfDocument, true)
    .addField(personal, pdfDocument.getFirstPage());
Additionally, we’ve explicitly specified iText to add the form to the first page of the document.
4.2. Adding a New Page
Let’s now have a look at how we can add a new page to the document. We’ll use the addNewPage() method.
This method can accept the index of the added page if we want to specify it. For instance, we can add a new page at the beginning of the document:
pdfDocument.addNewPage(1);4.3. Adding an Annotation
We’ll now want to add an annotation to the document. Concretely, an annotation looks like a squared comic bubble.
We’ll add it on top of the form that’s now located on the second page of the document. Consequently, we’ll place it on the coordinates (40,435). Additionally, we’ll give it a simple name and content. These will only show up when hovering over the annotation:
PdfAnnotation ann = new PdfTextAnnotation(new Rectangle(40, 435, 0, 0)).setTitle(new PdfString("name"))
    .setContents("Your name");
pdfDocument.getPage(2)
    .addAnnotation(ann);
Here’s how the middle of our second page now looks:
4.4. Adding an Image
From now on, we’ll add layout elements to the page. In order to do this, we won’t be able to manipulate the PdfDocument directly anymore. We’ll rather create a Document from it and work with that. Moreover, we’ll need to close the Document in the end. Closing a Document automatically closes the base PdfDocument. So we could remove the part where we closed the PdfDocument earlier:
Document document = new Document(pdfDocument);
// add layout elements
document.close();
Now, to add the image, we’ll need to load it from its location. We’ll do this using the create() method of the ImageDataFactory class. This throws a MalformedURLException if the passed file URL can’t be parsed. In this example, we’ll use an image of Baeldung’s logo placed in the resources directory:
ImageData imageData = ImageDataFactory.create("src/main/resources/baeldung.png");
The next step will be to set the image’s properties in the file. We’ll set its size to 550×100. We’ll put it on the first page of our PDF, at the (10,50) coordinates. Let’s see the code to add the image:
Image image = new Image(imageData).scaleAbsolute(550,100)
    .setFixedPosition(1, 10, 50);
document.add(image);
The image is automatically rescaled to the given size. So here’s how it looks in the document:

4.5. Adding a Paragraph
The iText library brings some tools to add text to the file. The font can be parameterized on the pieces themselves, or directly on the Paragraph element.
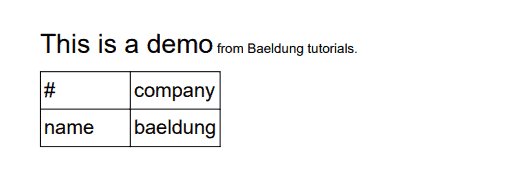
For instance, let’s add the following sentence on top of the first page: This is a demo from Baeldung tutorials. We’ll set the font size of the beginning of this sentence to 16 and the global font size of Paragraph to 8:
Text title = new Text("This is a demo").setFontSize(16);
Text author = new Text("Baeldung tutorials.");
Paragraph p = new Paragraph().setFontSize(8)
    .add(title)
    .add(" from ")
    .add(author);
document.add(p);
4.6. Adding a Table
Last but not least, we can also add a table to the file. For example, we’ll define a double-entry table with two cells and two headers on top of them. We won’t specify any position. So it’ll be naturally added on top of the document, right after the Paragraph we just added:
Table table = new Table(UnitValue.createPercentArray(2));
table.addHeaderCell("#");
table.addHeaderCell("company");
table.addCell("name");
table.addCell("baeldung");
document.add(table);
Let’s see the beginning of the first page of the document now:
5. Removing Content From the File
Let’s now see how we can remove content from the PDF file. To keep things simple, we’ll write another main() method.
Our source PDF file will be the baeldung-modified.pdf file and the destination will be a new baeldung-cleaned.pdf file. We’ll work directly on the PdfDocument object. From now on, we’ll use iText’s pdfSweep add-on.
5.1. Removing Text From the File
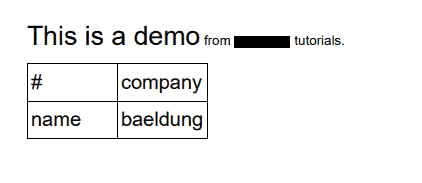
To remove a given text from the file, we’ll need to define a cleanup strategy. In this example, the strategy will simply be to find all text matching Baeldung. The last step is to call the autoSweepCleanUp() static method of PdfCleaner. This method will create a custom PdfCleanUpTool which will throw an IOException if any error happens during file handling:
CompositeCleanupStrategy strategy = new CompositeCleanupStrategy();
strategy.add(new RegexBasedCleanupStrategy("Baeldung"));
PdfCleaner.autoSweepCleanUp(pdfDocument, strategy);
As we can see, the occurrences of the Baeldung word in the source file are overlayed with a black rectangle in the result file. This behavior is suitable, for instance, for data anonymization:
5.2. Removing Other Content From the File
Unfortunately, it’s very difficult to detect any non-text content in the file. However, pdfSweep offers the possibility to erase the content of a portion of the file. Thus, if we know where the content we want to remove is located, we’ll be able to take advantage of this possibility.
As an example, we’ll erase the content of the rectangle of size 100×35 located at (35,400) on the second page. This means we’ll get rid of all the content of the form and the annotation. Furthermore, we’ll erase the rectangle of size 90×70 located at (10,50) of the first page. This basically removes the B from Baeldung’s logo. Using the PdfCleanUpTool class, here’s the code to do all that:
List<PdfCleanUpLocation> cleanUpLocations = Arrays.asList(new PdfCleanUpLocation(1, new Rectangle(10, 50, 90,70)), new PdfCleanUpLocation(2, new Rectangle(35, 400, 100, 35)));
PdfCleanUpTool cleaner = new PdfCleanUpTool(pdfDocument, cleanUpLocations, new CleanUpProperties());
cleaner.cleanUp();
We can now see the following image in baeldung-cleaned.pdf:
 6. Replacing Content in the File
In this section, we’ll do the same work as earlier, except that we’ll replace the former text with a new text instead of only erasing it.
For more clarity, we’ll use a new main() method again. Our source file will be the baeldung-modified.pdf file. Our destination file will be a new baeldung-fixed.pdf file.
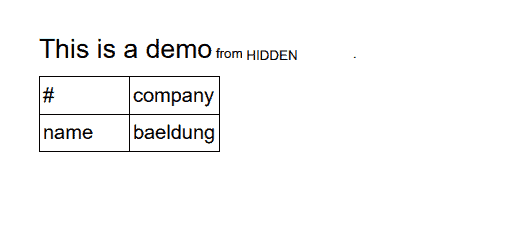
Earlier we saw that the removed text was overlayed with a black background. However, this color is configurable. As we know the background of the text is white in our file, we’ll force the overlay to be white. The beginning of the treatment will be similar to what we did earlier, except that we’ll search for the text Baeldung tutorials.
However, after calling autoSweepCleanUp(), we’ll query the strategy to get the location of the removed code. We’ll then instantiate a PdfCanvas which will contain the replacement text HIDDEN. Additionally, we’ll remove the top margin to have it a bit better aligned with the original text. The default alignment is indeed not so good. Let’s look at the resulting code:
CompositeCleanupStrategy strategy = new CompositeCleanupStrategy();
strategy.add(new RegexBasedCleanupStrategy("Baeldung").setRedactionColor(ColorConstants.WHITE));
PdfCleaner.autoSweepCleanUp(pdfDocument, strategy);

for (IPdfTextLocation location : strategy.getResultantLocations()) {
    PdfPage page = pdfDocument.getPage(location.getPageNumber() + 1);
    PdfCanvas pdfCanvas = new PdfCanvas(page.newContentStreamAfter(), page.getResources(), page.getDocument());
    Canvas canvas = new Canvas(pdfCanvas, location.getRectangle());
    canvas.add(new Paragraph("HIDDEN").setFontSize(8)
        .setMarginTop(0f));
}
And we can have a look at the file:
7. Conclusion
In this tutorial, we’ve seen how to edit the content of a PDF file. We’ve seen that we can add new content, remove existing content, and even replace text in the original file with a new one.


