1. Overview
JAR files are basic artifacts for distributing Java applications. Sometimes, we may need to inspect JAR files to check possible changes. And also to find out backward compatibility.
In this tutorial, we’ll explore different tools for comparing JAR files.
2. Sample JAR Files
In this tutorial, we’ll compare mallet JAR files. Mallet is a Java machine-learning library. Its uses include clustering, natural language processing, etc. We’ll compare version 2.0.7 with version 2.0.8. We’ll use different tools to compare the two JAR files and document changes.
3. Using Jarcomp
Jarcomp is a free cross-platform tool for comparing JAR and ZIP files. It shows changes between two files by citing size changes.
We’ll use it to compare our sample JAR files. First, let’s create a new directory and copy our sample JAR files into it.
Then let’s grab the jarcomp executable JAR and place it in our created directory. Finally, let’s open our terminal and change to our directory.
Next, we’ll run the Jarcomp executable JAR with our sample JAR files:
$ java -jar jarcomp_02.jar mallet-2.0.7.jar mallet-2.0.8.jar
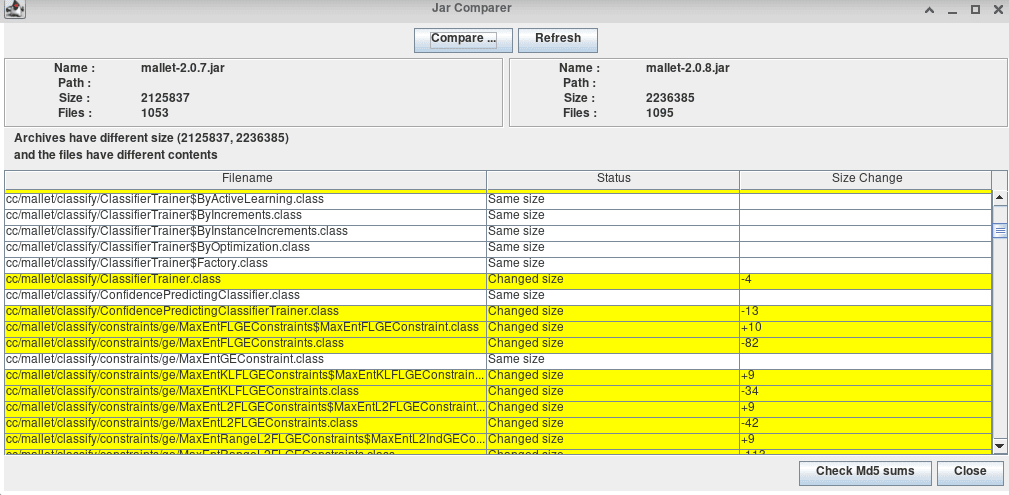
Our tool generated a report showing changes in our sample JAR files:

The report shows changes in our binary. Furthermore, it summarizes the number of files in the sample JAR files. It also indicates the overall size of the sample JAR files.
4. Using PkgDiff
PkgDiff means package changes analyzer. It visualizes changes in software packages like ZIP, JAR, TAR.GZ, DEB, etc. The tool helps software maintainer to track changes. And ensure compatibility between new and old versions.
The supported platform includes FreeBSD, Mac OS X, and GNU/Linux.
We’ll use this tool to compare our sample JAR files.
4.1. Installation
First, we’ll download the tool on our machine. Then, we’ll extract the downloaded tar.gz:
$ tar -xvf pkgdiff-1.7.2.tar.gz
Next, let’s change to the extracted file:
$ cd pkgdiff-1.7.2
Finally, let’s install the tool using a makefile:
$ sudo make install
Our tool is now ready for usage.
4.2. Usage
Let’s use the tool to visualize changes in our sample JAR files. First, let’s change to the directory that contains our sample JAR files.
Then let’s use the pkgdiff command to compare the sample JAR files:
$ pkgdiff mallet-2.0.7.jar mallet-2.0.8.jar
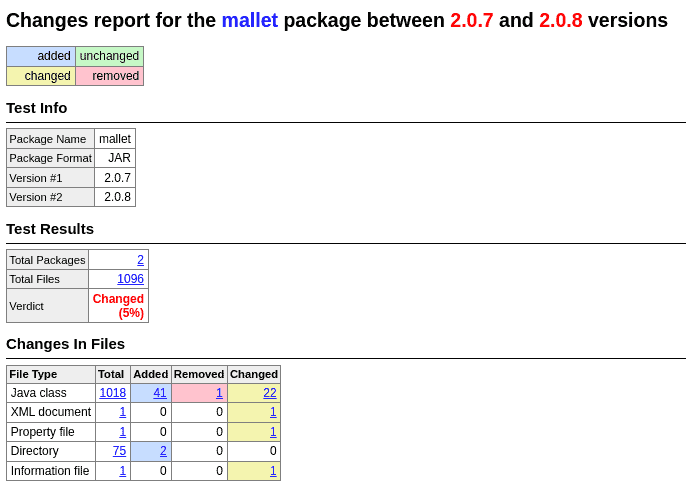
Our tool generated a report in HTML format to show the differences between binary and source files:

The report shows changes in our binary. It shows the percentage changes in class files. Furthermore, it summarizes the binary. It shows the number of added and removed files. Finally, it indicates the total number of directories and new additions.
5. Using JAPICC
The Java API Compliance Checker (JAPICC) is a tool for evaluating similarities between Java libraries. It shows changes at the binary and source level. The tool examines modifications that could put backward compatibility at risk. It checks for removed methods and class fields, introduced methods, etc. It does this by comparing the two binary files.
This tool generates an HTML report for both binary and source compatibility inspection. It supports both Java and Scala.
5.1. Installation
First, we’ll download the tool on our machine. Then, we’ll extract the downloaded zip:
$ unzip japi-compliance-checker-2.4.zip
After extracting our zip, we’ll change into the directory:
$ cd japi-compliance-checker-2.4
Finally, we’ll use a makefile to install it on our system:
$ sudo make install
Our tool is now ready for usage.
5.2. Usage
We’ll use our install tool to compare our sample JAR files. First, we’ll create a new directory and move our JAR files into it. Then we’ll open our terminal and change into our new directory. Finally, we’ll run the japi-compliance command to compare the two JAR files:
$ japi-compliance-checker mallet-2.0.7.jar mallet-2.0.8.jar
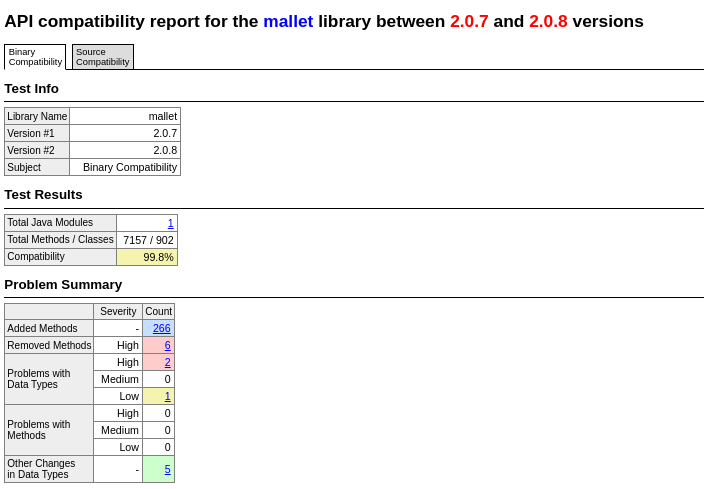
This generated a report in our directory. The report contains differences in our JAR files at both binary and source levels.

Our report shows 99.8% compatibility and added methods to the latest version. It indicates the total number of methods and classes in the source file. It also compares individual binary and source files and gives the percentage changes.
6. Using IntelliJ IDEA
IntelliJ IDEA is an integrated development environment by JetBrains. The IDE has a built-in tool for comparing JAR files. We’ll use the IDE to compare our sample JAR files. First, let’s launch the IDE and open the folder containing our sample JAR files.
Next, let’s select the two sample JAR files. Finally, let’s press CTRL + D to compare the two JAR files.
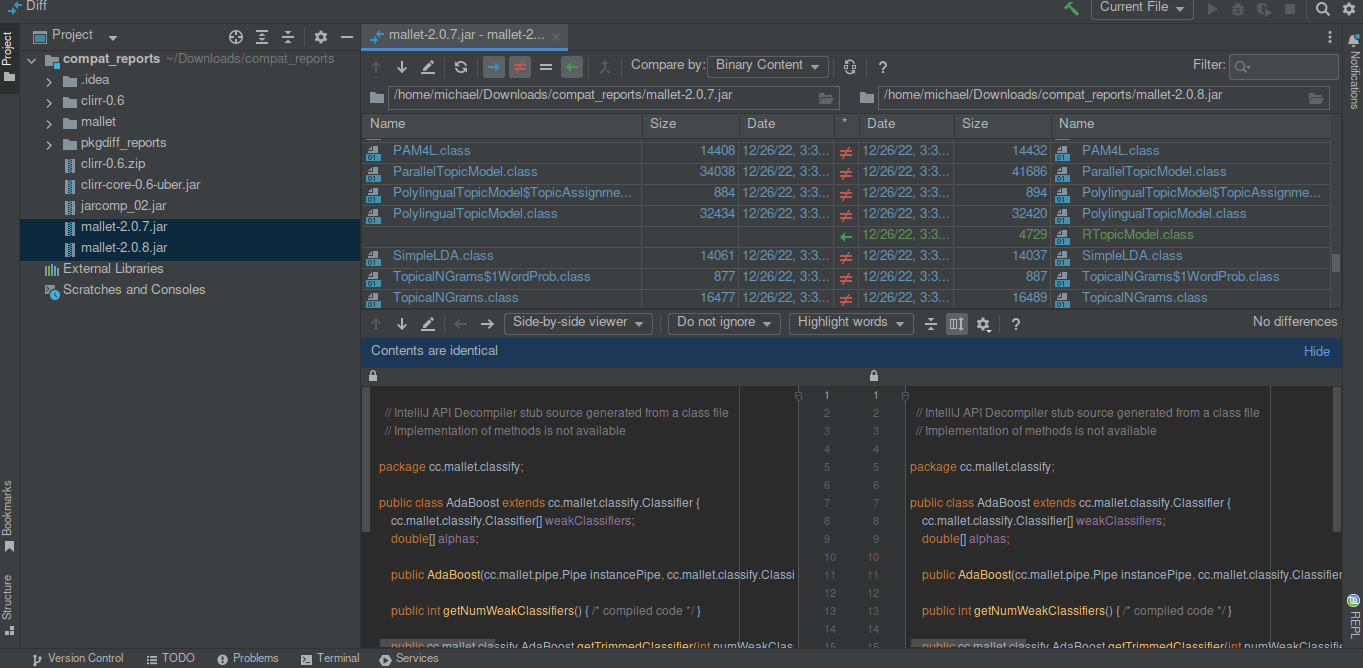
We’ll get a comprehensive report on changes in our JAR files:

The generated report is explicitly clear. It shows the binary, its content, and what changes. This feature is easy, simple, and powerful. We don’t need to install anything to use it.
The result also compares the source files. It shows the classes and indicates what changes are in the source file. Furthermore, it shows the classes and their content. And explicitly show added codes in the source file.
7. Conclusion
In this tutorial, we’ve examined different tools to compare two JAR files. The IntelliJ IDEA looks simple and easier to begin with. It gives a comprehensive report and visualizes changes in the class file.
Other tools also get the job done. PkgDiff and JAPICC generate a report to show changes in binary and the source file.


