How to Make IntelliJ IDEA Insert a New Line at Every End of File
Last updated: December 27, 2025


Mocking is an essential part of unit testing, and the Mockito library makes it easy to write clean and intuitive unit tests for your Java code.
Get started with mocking and improve your application tests using our Mockito guide:
Handling concurrency in an application can be a tricky process with many potential pitfalls. A solid grasp of the fundamentals will go a long way to help minimize these issues.
Get started with understanding multi-threaded applications with our Java Concurrency guide:
Spring 5 added support for reactive programming with the Spring WebFlux module, which has been improved upon ever since. Get started with the Reactor project basics and reactive programming in Spring Boot:
Since its introduction in Java 8, the Stream API has become a staple of Java development. The basic operations like iterating, filtering, mapping sequences of elements are deceptively simple to use.
But these can also be overused and fall into some common pitfalls.
To get a better understanding on how Streams work and how to combine them with other language features, check out our guide to Java Streams:
Explore Spring Boot 3 and Spring 6 in-depth through building a full REST API with the framework:
Yes, Spring Security can be complex, from the more advanced functionality within the Core to the deep OAuth support in the framework.
I built the security material as two full courses - Core and OAuth, to get practical with these more complex scenarios. We explore when and how to use each feature and code through it on the backing project.
You can explore the course here:
Spring Data JPA is a great way to handle the complexity of JPA with the powerful simplicity of Spring Boot.
Get started with Spring Data JPA through the guided reference course:
Refactor Java code safely — and automatically — with OpenRewrite.
Refactoring big codebases by hand is slow, risky, and easy to put off. That’s where OpenRewrite comes in. The open-source framework for large-scale, automated code transformations helps teams modernize safely and consistently.
Each month, the creators and maintainers of OpenRewrite at Moderne run live, hands-on training sessions — one for newcomers and one for experienced users. You’ll see how recipes work, how to apply them across projects, and how to modernize code with confidence.
Join the next session, bring your questions, and learn how to automate the kind of work that usually eats your sprint time.
1. Introduction
When we save a file in IntelliJ IDEA, it might not always end with a newline. Although this seems minor, it can cause small issues in version control or when combining files.
In this tutorial, we’ll see how to make IntelliJ IDEA automatically add a newline at the end of every file for better consistency.
2. How IntelliJ IDEA Handles Newlines Automatically
IntelliJ IDEA can automatically insert a newline at the end of a file (EOF) when we save it. By default, this behavior might not be enabled, so some files may end without a newline. However, we can easily turn it on through the IDE settings.
Inserting a newline at the end of a file ensures proper formatting and compatibility across editors and version control systems.
It helps prevent unnecessary Git diffs, warnings, or merge conflicts, keeping our project organized and compliant with common coding standards.
3. Enable New Lines at the End of File via IDE Settings
IntelliJ IDEA includes a built-in option that automatically adds a newline when we save files. This method is recommended because it’s simple, built into the IDE, and works for all projects without requiring any manual setup.
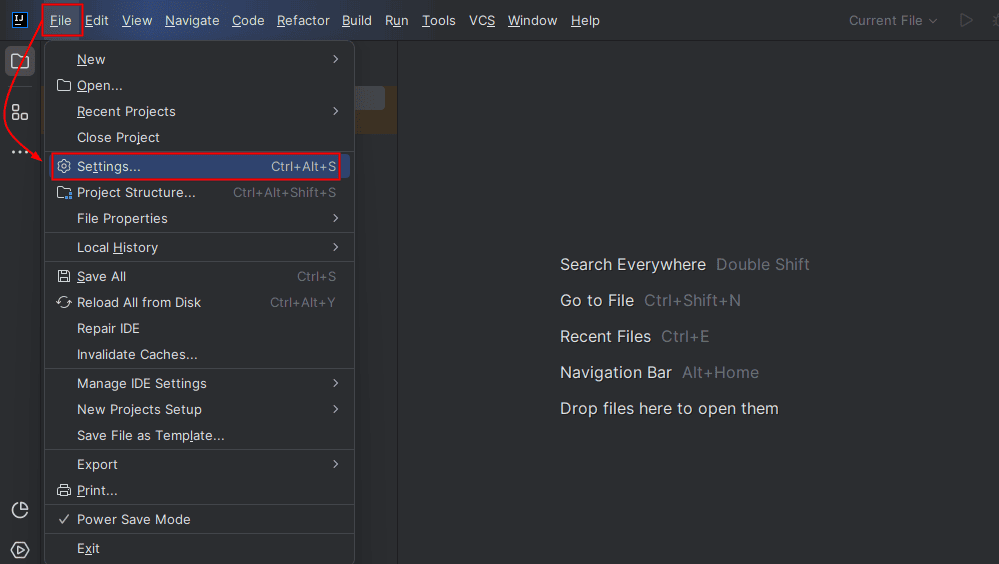
We can enable it through the IDE settings by pressing Ctrl+Alt+S or navigating to File > Settings:
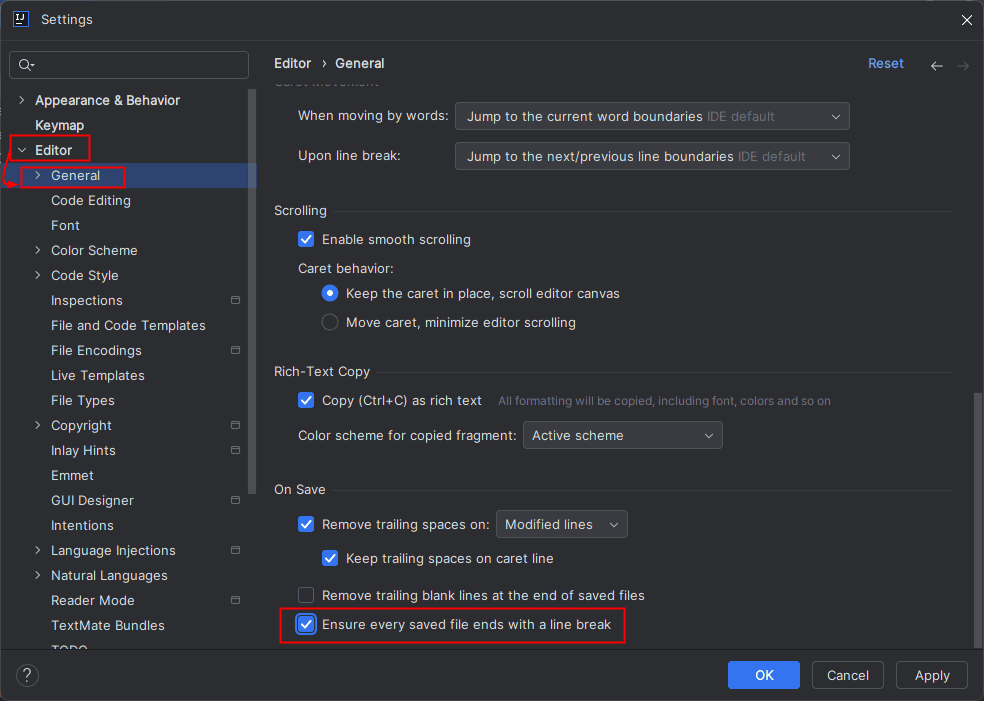
Next, we open the Editor > General > On Save section and enable the Ensure every saved file ends with a line break checkbox to allow automatic newlines:
Finally, we can click the OK button to apply the changes.
4. Using Code Style Settings to Insert Newlines
We can also control newline behavior through Code Style settings in IntelliJ IDEA. This method lets us define formatting rules that apply automatically whenever we reformat our code or save files.
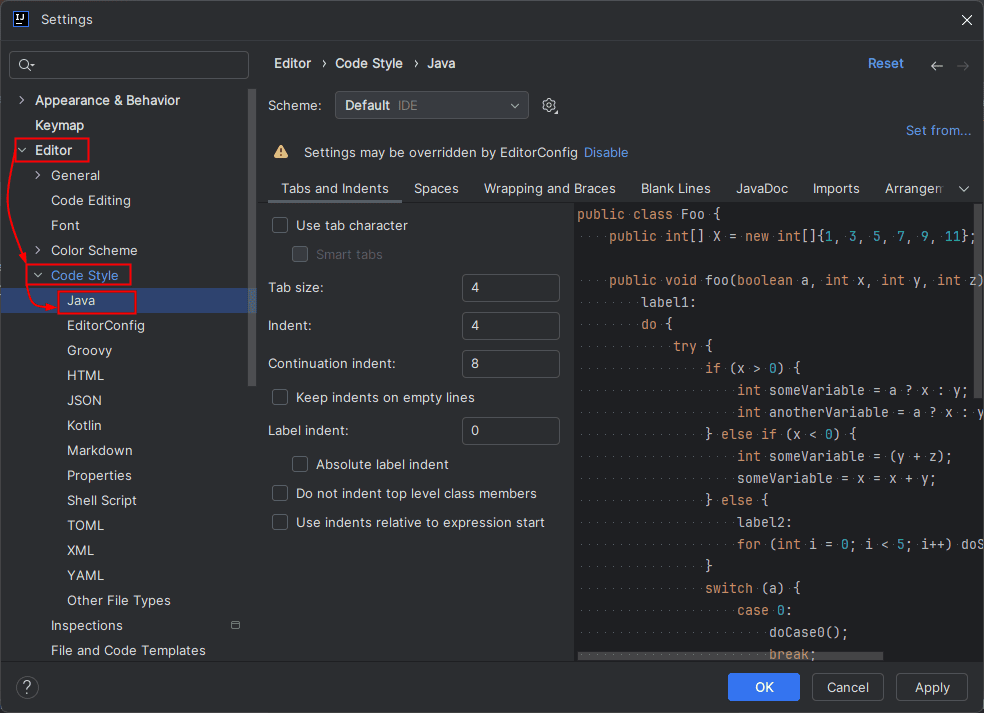
To do this, we can open File > Settings > Editor > Code Style, then select the relevant programming language, such as Java:
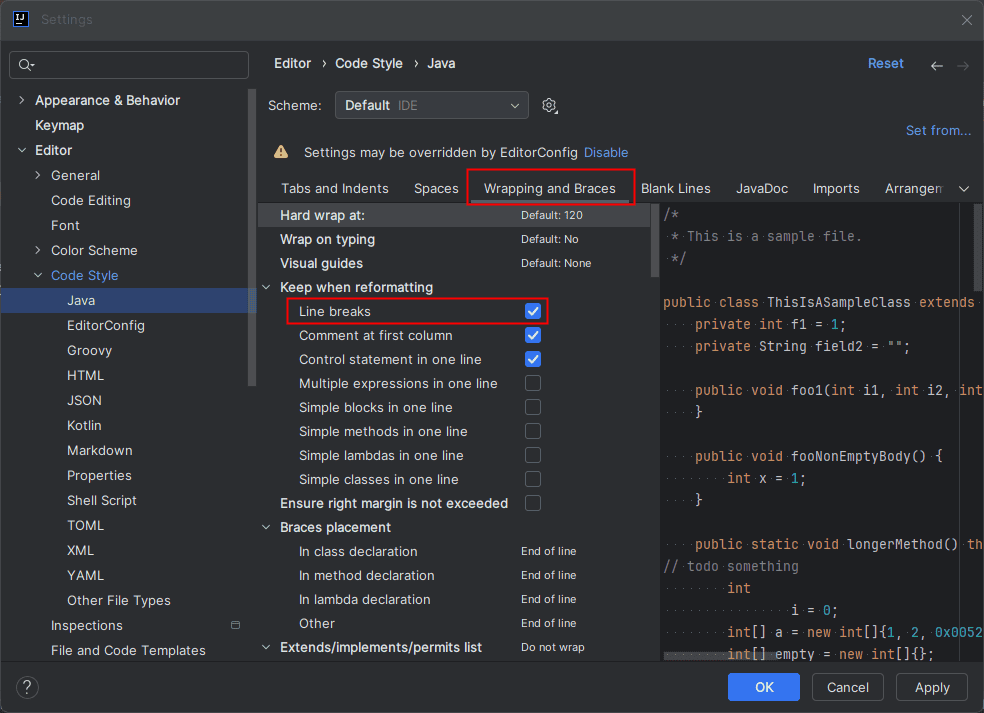
Under the Other or Wrapping and Braces tab (depending on the language), we can find and enable options related to line breaks or file endings:
After adjusting these settings, we can click OK to save the changes.
IntelliJ IDEA then follows these formatting rules whenever we reformat or save our code files.
5. Enforce New Line at the End of a File via .editorconfig
While the IDE-wide On Save setting works well for individual developers, EditorConfig is the recommended approach for team projects.
It defines formatting rules in a .editorconfig file that lives in our project root and is respected by IntelliJ IDEA, VS Code, and most modern editors. This ensures consistent behavior across the team, even if someone uses a different IDE.
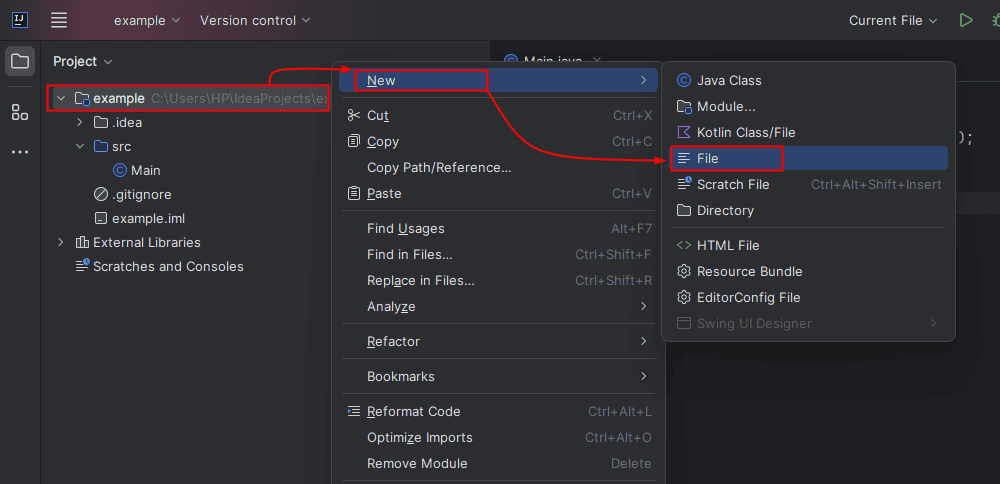
To do this, we first need to create or open the .editorconfig file in our project’s root directory. If the file doesn’t already exist, we can create it by right-clicking the project folder in IntelliJ IDEA, selecting New > File, and naming it .editorconfig:
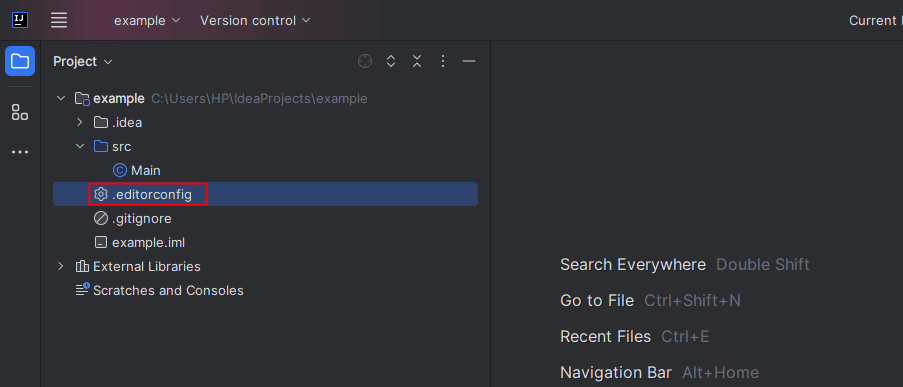
If the file is already present, we can simply open it from the Project tool window:
 Next, we add the following line to ensure that every file ends with a newline:
root = true
[*]
insert_final_newline = true
trim_trailing_whitespace = true
Here, insert_final_newline = true ensures every saved file ends with exactly one newline. trim_trailing_whitespace = true removes spaces or tabs at the end of lines, complementing EOF consistency. root = true stops EditorConfig from inheriting rules from parent directories.
Once the .editorconfig file is saved, IntelliJ IDEA enforces the newline and whitespace rules for every file in the project automatically.
This approach gives us better control over file formatting and keeps our codebase clean and consistent.
6. Ensure Exactly One Newline at EOF
When we enable the option to insert a newline at the end of every file, we might occasionally end up with multiple blank lines, especially if we manually add extra line breaks or copy code with trailing newlines.
Having more than one blank line at the end of a file can make our code messy. It may trigger warnings in linters or code-quality tools and create unnecessary Git diffs.
To maintain clean and professional code, we should ensure that every file ends with exactly one newline.
IntelliJ IDEA provides a built-in setting that automatically removes any extra blank lines at the end of the file while preserving the required single newline.
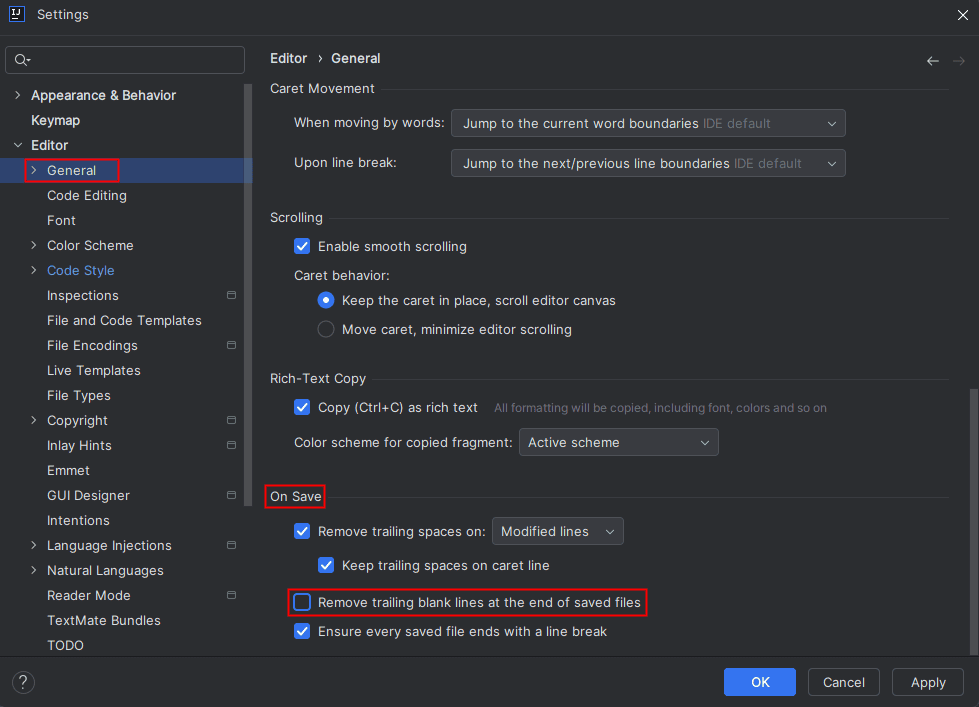
To do this, we can open File > Settings > Editor > General > On Save and enable the Remove trailing blank lines at the end of the file option:
Enabling this option ensures that IntelliJ IDEA automatically removes extra blank lines at the end of files.
This setting works perfectly in combination with the Ensure every saved file ends with a line break option. Together, these settings make sure every file ends with exactly one newline, keeping our code clean and consistent.
This helps us maintain a clean and professional code structure. Moreover, it ensures that every file ends with just one proper newline instead of multiple blank ones.
7. Conclusion
In this article, we explored how to manage newlines in IntelliJ IDEA to keep our code clean and consistent. We learned how to enable newlines via the settings or EditorConfig file to ensure every file ends with a single newline. We also discussed how to remove extra blank lines that can clutter files and cause unnecessary Git diffs or warnings.
For individual developers, enabling the IDE’s Ensure every saved file ends with a New Line option is the simplest solution. However, for teams or projects where multiple contributors work with different editors, EditorConfig is the best choice as it ensures consistent newline behavior across the entire project.


