Accessing Session Attributes in Thymeleaf
Last updated: January 8, 2024


Mocking is an essential part of unit testing, and the Mockito library makes it easy to write clean and intuitive unit tests for your Java code.
Get started with mocking and improve your application tests using our Mockito guide:
Handling concurrency in an application can be a tricky process with many potential pitfalls. A solid grasp of the fundamentals will go a long way to help minimize these issues.
Get started with understanding multi-threaded applications with our Java Concurrency guide:
Spring 5 added support for reactive programming with the Spring WebFlux module, which has been improved upon ever since. Get started with the Reactor project basics and reactive programming in Spring Boot:
Since its introduction in Java 8, the Stream API has become a staple of Java development. The basic operations like iterating, filtering, mapping sequences of elements are deceptively simple to use.
But these can also be overused and fall into some common pitfalls.
To get a better understanding on how Streams work and how to combine them with other language features, check out our guide to Java Streams:
Explore Spring Boot 3 and Spring 6 in-depth through building a full REST API with the framework:
Yes, Spring Security can be complex, from the more advanced functionality within the Core to the deep OAuth support in the framework.
I built the security material as two full courses - Core and OAuth, to get practical with these more complex scenarios. We explore when and how to use each feature and code through it on the backing project.
You can explore the course here:
Spring Data JPA is a great way to handle the complexity of JPA with the powerful simplicity of Spring Boot.
Get started with Spring Data JPA through the guided reference course:
Refactor Java code safely — and automatically — with OpenRewrite.
Refactoring big codebases by hand is slow, risky, and easy to put off. That’s where OpenRewrite comes in. The open-source framework for large-scale, automated code transformations helps teams modernize safely and consistently.
Each month, the creators and maintainers of OpenRewrite at Moderne run live, hands-on training sessions — one for newcomers and one for experienced users. You’ll see how recipes work, how to apply them across projects, and how to modernize code with confidence.
Join the next session, bring your questions, and learn how to automate the kind of work that usually eats your sprint time.
Yes, we're now running our only Summer Sale. All Courses are 30% off until 20th July, 2026:
Yes, we're now running our only Summer Sale. All Courses are 30% off until 20th July, 2026:
1. Overview
In this short article, we’ll learn how to access the HTTP session on the server side using the Thymeleaf library. With this purpose in mind, we’ll build a web page with a form to send name analysis requests and a section to show the result, and finally, a panel with all the requests launched during the session time.
As a way to simplify, the example will use Spring + Thymeleaf, so we’ll use the Thymeleaf Spring Standard dialect.
2. Web Session Attributes in Thymeleaf
The session info is inside of the servlet context∫and we’ll have access to the info at the template level or inside the Spring Boot controller. Now, we’ll check both ways to access the session info.
2.1. Accessing Session Attributes in Thymeleaf Templates
In Thymeleaf, we have two base objects that are always available: ctx and locale, which are prefixed by ‘#’. The #ctx base object gives access to the servlet context that contains the HTTP session info. So, in the templates, we have access to the session using the expression:
#ctx.sessionIn case we want to access the session in a shorter way, we could use the variable session, so the previous command is equivalent to:
sessionNow, let’s check what we can and can’t do with the session instance in the templates. First of all, we can get how many attributes exist inside the session:
${#ctx.session.size()}Also, we can check if the session is empty:
${#ctx.session.isEmpty()}We can’t check if an attribute is registered in the session using the method containsKey in the template:
${#ctx.session.containsKey('lastAnalysis')}This method will always return true, so instead, we should check if the session attribute is null:
${#ctx.session.lastAnalysis}==nullAnd lastly, we can access the session attributes:
${#ctx.session.foo}2.2. Accessing Session Attributes in Spring Boot Controller
Inside the controller, the IWebSession interface from Thymeleaf defines the methods we have to access the information of the session:
public interface IWebSession {
    public boolean exists();
    public boolean containsAttribute(String name);
    public int getAttributeCount();
    public Set<String> getAllAttributeNames();
    public Map<String,Object> getAttributeMap();
    public Object getAttributeValue(String name);
    public void setAttributeValue(String name,Object value);
    public void removeAttribute(String name);
}
In our example, we’ll see how to get an instance of the IWebSession interface, and we’ll use it to remove, get, and set attributes to it, so we won’t use the whole methods from the interface, but it should be enough to show it how can be used.
Starting from the end, the IServletWebExchange will provide the IWebSession instance. And we build an instance of IServletWebExchange using the HttpServletRequest and the HttpServletResponse received in the NameAnalysisController controller requests using the webApp attribute.
Let’s have a look at the method getIWebSession:
private IWebSession getIWebSession(HttpServletRequest request, HttpServletResponse response) {
    IServletWebExchange exchange = webApp.buildExchange(request, response);
    return exchange == null ? null : exchange.getSession();
}
And now, let’s see the type of the webApp attribute and how it’s instantiated:
private JakartaServletWebApplication webApp;

@Autowired
public NameAnalysisController(NameAnalysisService nameAnalysisService, SessionNameRequestFactory sessionNameRequestFactory, ServletContext servletContext) {
    super();
    ...
    this.webApp = JakartaServletWebApplication.buildApplication(servletContext);
}
Here, we can see that the webApp attribute is a JakartaServletWebApplication instance built with the injected ServletContext instance. At this point, we have everything in place to access the session info.
3. Project Setup
Let’s review our project setup. It’s a Maven project with two dependencies. The first one, spring-boot-starter-web, will import everything needed for a web project using Spring Boot:
<dependency>
    <groupId>org.springframework.boot</groupId>
    <artifactId>spring-boot-starter-web</artifactId>
</dependency>
And the second one, spring-boot-starter-thymeleaf, will import everything to enable the use of Thymeleaf alongside Spring Boot:
<dependency>
    <groupId>org.springframework.boot</groupId>
    <artifactId>spring-boot-starter-thymeleaf</artifactId>
    <version>${spring.boot.starter.thymeleaf}</version>
</dependency>
3.1. Thymeleaf Engine Configuration
The spring-boot-starter-thymeleaf dependency will configure everything for us, but in our example, let’s make some adjustments to the SpringResourceTemplateResolver to set the template mode, the template prefix, and the template suffix:
@Autowired
public SpringWebConfig(SpringResourceTemplateResolver templateResolver) {
    super();

    templateResolver.setPrefix("/WEB-INF/templates/");
    templateResolver.setSuffix(".html");
    templateResolver.setTemplateMode(TemplateMode.HTML);
}
With these changes, the resolver will transform the requests by adding the prefix /WEB-INF/templates/ and the suffix .html. So, the following request to the URL:
http://localhost:8080/name-analysis.htmlis transformed into the following template path:
WEB-INF/templates/name-analysis.html4. Run the Example
To check everything is running and going on, let’s execute the following Maven command from the command line at the root of the project:
mvn spring-boot:runThe command will launch a Tomcat server and will embed the app. The server listens on port 8080 and publishes the app of the example in the root context. So, the URL to access the base page is:
http://localhost:8080This request will show: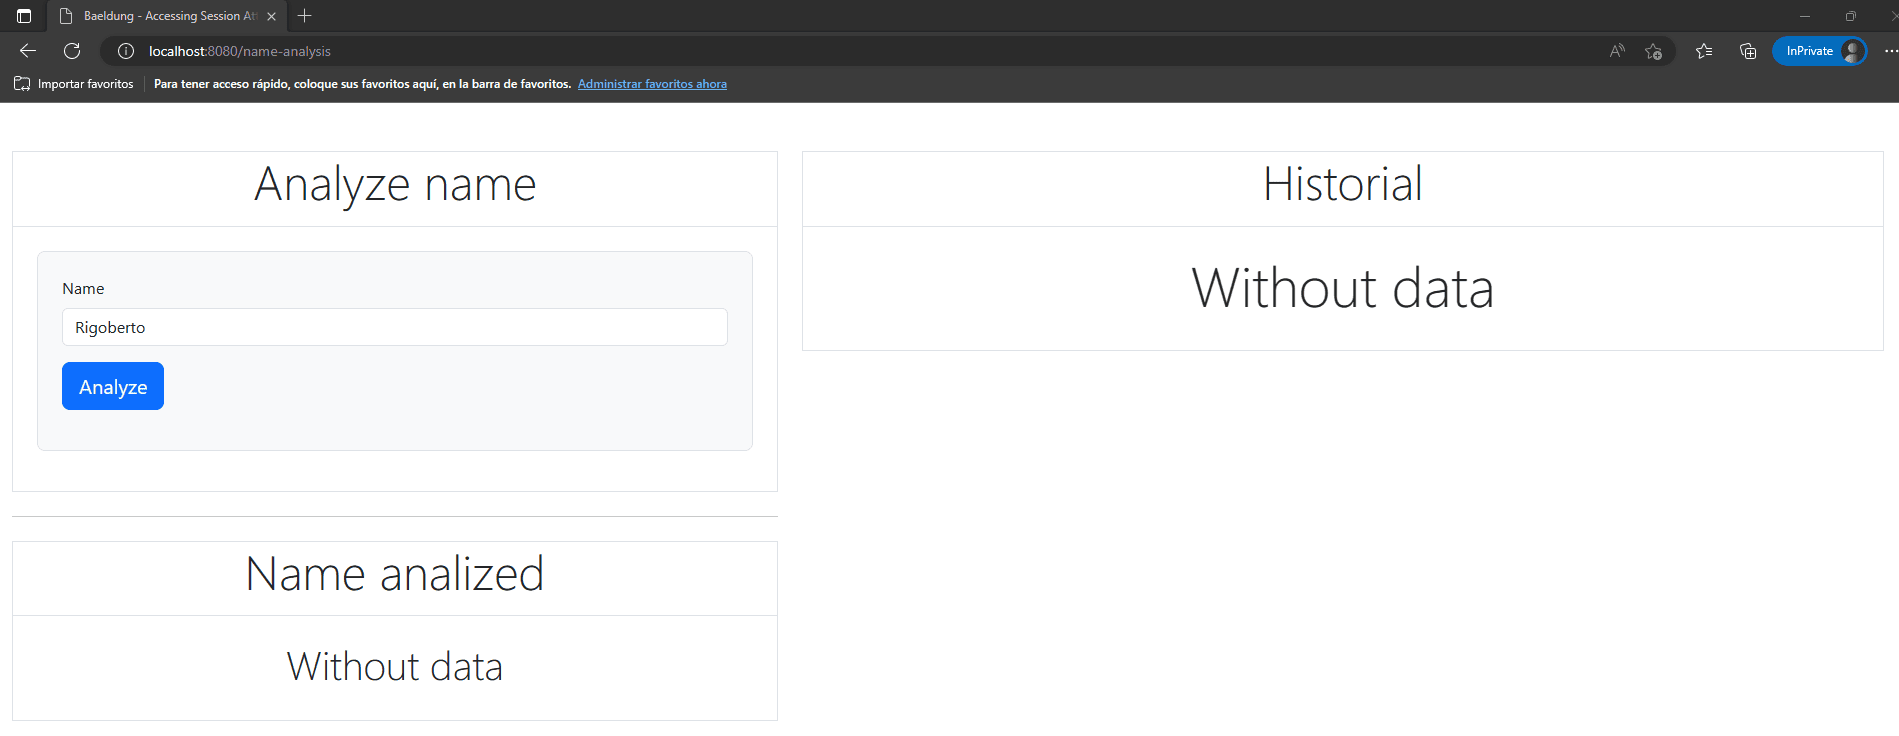
Here, we can see the three different sections of the example. We’ll start from the Analyze name panel. It doesn’t have access to any session info. It uses the exposed nameRequest model attribute.
We continue with the Name analyzed panel, which shows the result of the name analysis request using the lastRequest attribute from the session. Finally, the last panel, the Requests History panel, will also access the information stored in the requests attribute of the session.
5. Conclusion
In this article, we’ve seen how to configure a Maven project to use Spring + Thymeleaf. On top of that, we’ve focused on how we can access the HTTP session info from the Thymeleaf templates and from the Spring Boot server side. To dig deeper and understand how Thymeleaf works from scratch, please read Introduction to Using Thymeleaf in Spring.


