Form Login and Basic Authentication in springdoc-openapi
Last updated: January 8, 2024


Mocking is an essential part of unit testing, and the Mockito library makes it easy to write clean and intuitive unit tests for your Java code.
Get started with mocking and improve your application tests using our Mockito guide:
Handling concurrency in an application can be a tricky process with many potential pitfalls. A solid grasp of the fundamentals will go a long way to help minimize these issues.
Get started with understanding multi-threaded applications with our Java Concurrency guide:
Spring 5 added support for reactive programming with the Spring WebFlux module, which has been improved upon ever since. Get started with the Reactor project basics and reactive programming in Spring Boot:
Since its introduction in Java 8, the Stream API has become a staple of Java development. The basic operations like iterating, filtering, mapping sequences of elements are deceptively simple to use.
But these can also be overused and fall into some common pitfalls.
To get a better understanding on how Streams work and how to combine them with other language features, check out our guide to Java Streams:
Explore Spring Boot 3 and Spring 6 in-depth through building a full REST API with the framework:
Yes, Spring Security can be complex, from the more advanced functionality within the Core to the deep OAuth support in the framework.
I built the security material as two full courses - Core and OAuth, to get practical with these more complex scenarios. We explore when and how to use each feature and code through it on the backing project.
You can explore the course here:
Spring Data JPA is a great way to handle the complexity of JPA with the powerful simplicity of Spring Boot.
Get started with Spring Data JPA through the guided reference course:
Refactor Java code safely — and automatically — with OpenRewrite.
Refactoring big codebases by hand is slow, risky, and easy to put off. That’s where OpenRewrite comes in. The open-source framework for large-scale, automated code transformations helps teams modernize safely and consistently.
Each month, the creators and maintainers of OpenRewrite at Moderne run live, hands-on training sessions — one for newcomers and one for experienced users. You’ll see how recipes work, how to apply them across projects, and how to modernize code with confidence.
Join the next session, bring your questions, and learn how to automate the kind of work that usually eats your sprint time.
If you're working on a Spring Security (and especially an OAuth) implementation, definitely have a look at the Learn Spring Security course:
>> LEARN SPRING SECURITY1. Overview
Springdoc-OpenAPI is a library that automates the service documentation generation for Spring Boot applications based on the OpenAPI 3 specification.
Interacting with our APIs through a user interface without implementing one can be handy. Therefore let’s see how we consume the endpoints if authorization is involved.
In this tutorial, we’ll learn how to manage secure endpoint access in Springdoc with Form Login and Basic Authentication using Spring Security.
2. Project Setup
We’ll set up a Spring Boot web application exposing an API secured by Spring Security and have the documentation generated with Springdoc.
2.1. Dependencies
Let’s declare the required maven dependencies for our project. We’ll add springdoc-openapi-starter-webmvc-ui, responsible for integrating with Swagger-UI and providing the visual tool accessible by default at:
http://localhost:8080/swagger-ui.html<dependency>
<groupId>org.springdoc</groupId>
<artifactId>springdoc-openapi-starter-webmvc-ui</artifactId>
<version>2.5.0</version>
</dependency>2.2. Sample API
For this article, we’ll implement a dummy REST Controller as the source for generating documentation with Springdoc. In addition, we’ll exemplify the means of authenticating to interact with FooController‘s protected endpoints via Swagger-UI.
@RestController
@RequestMapping(value = "foos", produces = MediaType.APPLICATION_JSON_VALUE)
@OpenAPIDefinition(info = @Info(title = "Foos API", version = "v1"))
public class FooController {

    @GetMapping(value = "/{id}")
    public FooDTO findById(@PathVariable("id") final Long id) {
        return new FooDTO(randomAlphabetic(STRING_LENGTH));
    }

    @GetMapping
    public List<FooDTO> findAll() {
        return Lists.newArrayList(new FooDTO(randomAlphabetic(STRING_LENGTH)),
          new FooDTO(randomAlphabetic(STRING_LENGTH)), new FooDTO(randomAlphabetic(STRING_LENGTH)));
    }

    @PostMapping
    @ResponseStatus(HttpStatus.CREATED)
    public FooDTO create(@RequestBody final FooDTO fooDTO) {
        return fooDTO;
    }
}
2.3. User Credentials
We’ll make use of Spring Security’s in-memory authentication to register our test user credentials:
@Autowired
public void configureGlobal(AuthenticationManagerBuilder auth, PasswordEncoder passwordEncoder) throws Exception {
    auth.inMemoryAuthentication()
      .withUser("user")
      .password(passwordEncoder.encode("password"))
      .roles("USER");
}
3. Form-Based Login Authentication
Let’s look at how we can authenticate to interact with our form-based login-secured documented endpoints.
3.1. Security Configuration
Here we’re defining the security configuration to authorize requests with Form Login:
@Bean
public SecurityFilterChain filterChain(HttpSecurity http) throws Exception {
    http.csrf(AbstractHttpConfigurer::disable)
            .authorizeHttpRequests(auth -> auth.requestMatchers("/v3/api-docs/**",
                 "/swagger-ui/**", "/swagger-ui.html")
                .permitAll()
                .anyRequest()
                .authenticated())
            .formLogin(formLogin -> formLogin.defaultSuccessUrl("/foos"));
    return http.build();
}
3.2. Login Documentation
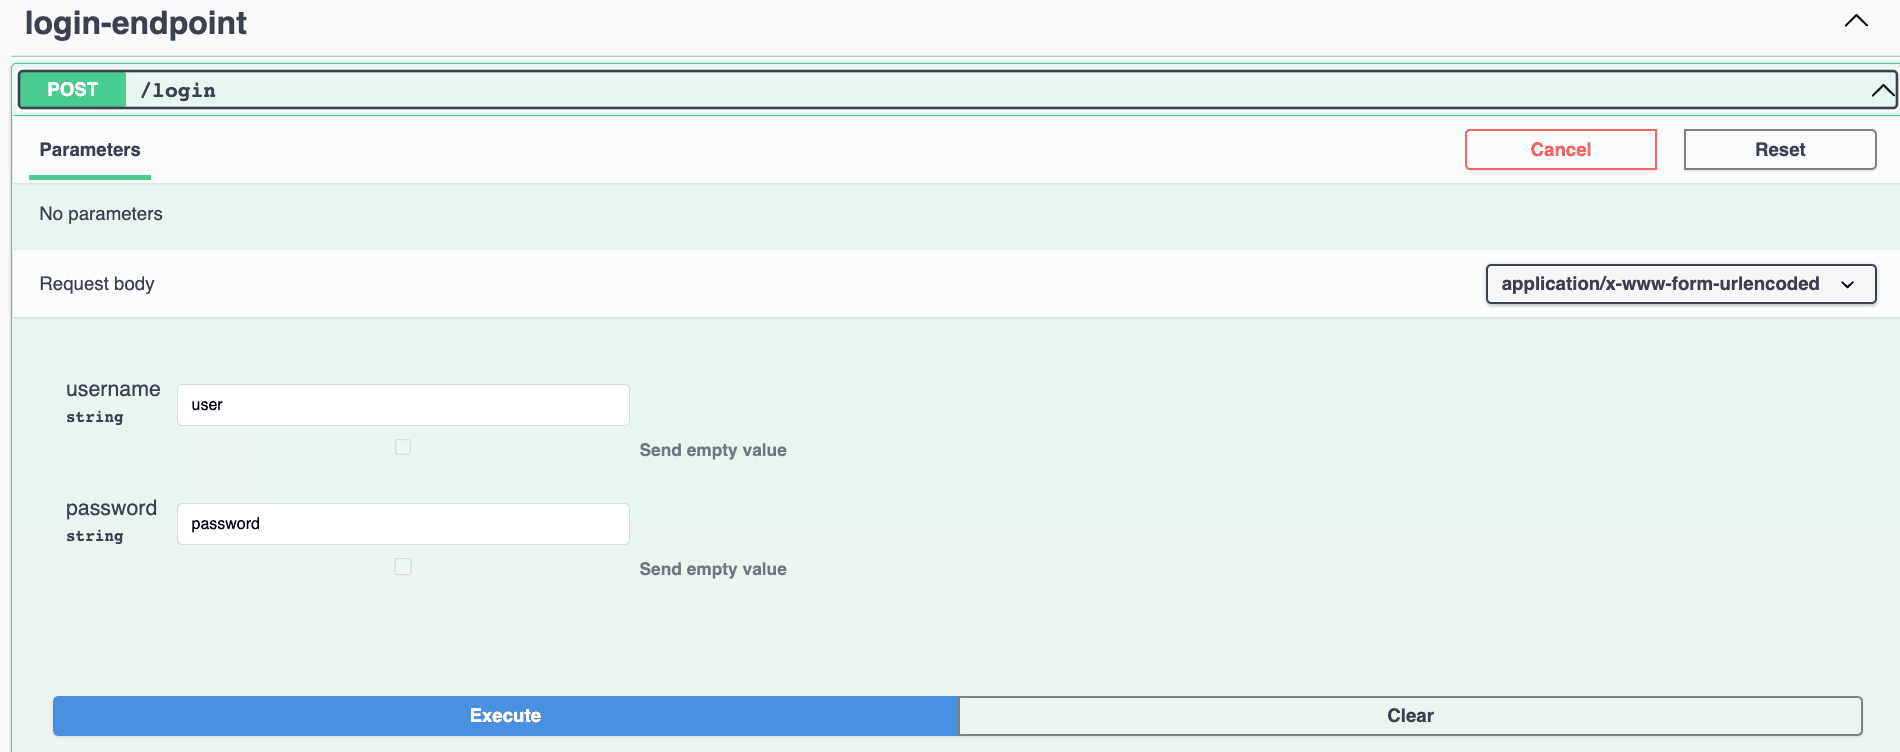
By default, the framework-provided login endpoint is not documented. Therefore we need to make it visible by setting the corresponding configuration property. Moreover, useful configuration properties can be found in the library’s documentation:
springdoc.show-login-endpoint=trueAfterward, Springdoc will detect the configured Spring Security’s Form Login and generate the documentation in Swagger-UI. As so, it will add the /login endpoint with the username and password request parameters and the specific application/x-www-form-urlencoded request body type:
After authenticating, we’re set to call the secured FooController endpoints. Also, we get the response from the /foos endpoint for the successful login because of the defaultSucccesfulUrl security configuration:

3.3. Logout Documentation
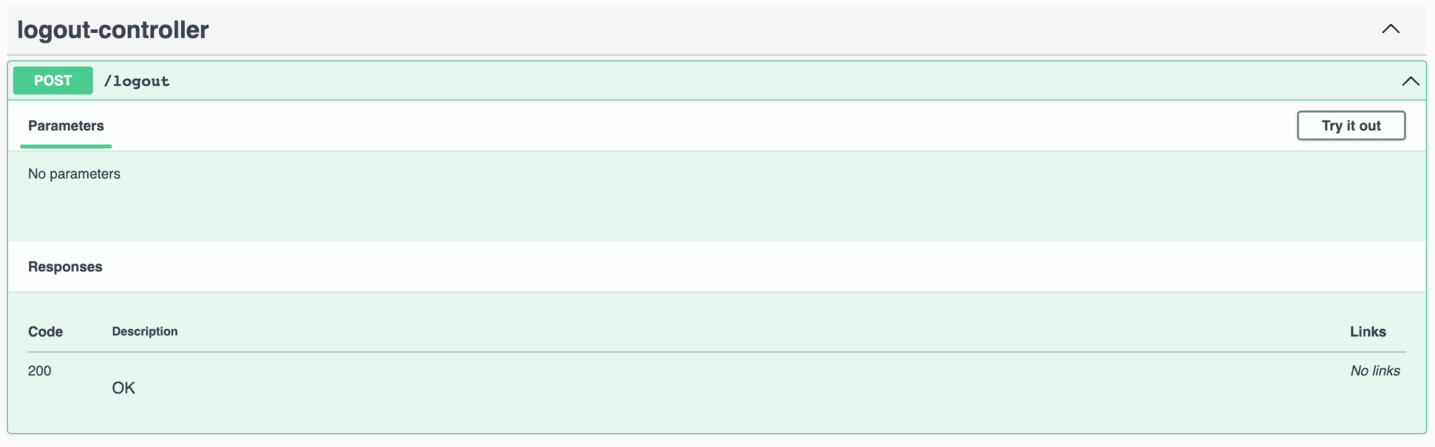
Being able to log out facilitates user switching in Swagger-UI, which can be helpful. For example, when applying role-based API authorization.
Springdoc does not offer a way of auto-detecting the logout endpoint like for login. In this case, we’ll need to define a fake REST Controller exposing a post-request mapping for the /logout path. However, we don’t need to add implementation since Spring Security will intercept and process the request:
@RestController
public class LogoutController {

    @PostMapping("logout")
    public void logout() {}
}
By adding LogoutController, the library will generate documentation and make logout available in Swagger-UI:
4. Basic Authentication
When dealing with Basic Authentication secured endpoints, we don’t need to invoke login directly. On the other hand, OpenAPI supports a set of standard security schemes, including Basic Auth, and we can configure Springdoc accordingly.
4.1. Security Configuration
Simple security configuration to protect endpoints using Basic Authentication:
@Bean
public SecurityFilterChain filterChain(HttpSecurity http) throws Exception {
    http.csrf(AbstractHttpConfigurer::disable)
            .authorizeHttpRequests(auth -> auth.requestMatchers("/v3/api-docs/**",
                 "/swagger-ui/**", "/swagger-ui.html")
                .permitAll()
                .anyRequest()
                .authenticated())
            .httpBasic(Customizer.withDefaults());
    return http.build();
 }
4.2. Springdoc Security Scheme
To configure the OpenAPI security scheme, we need to provide a @SecurityScheme annotation-based configuration:
@Configuration
@SecurityScheme(
type = SecuritySchemeType.HTTP,
name = "basicAuth",
scheme = "basic")
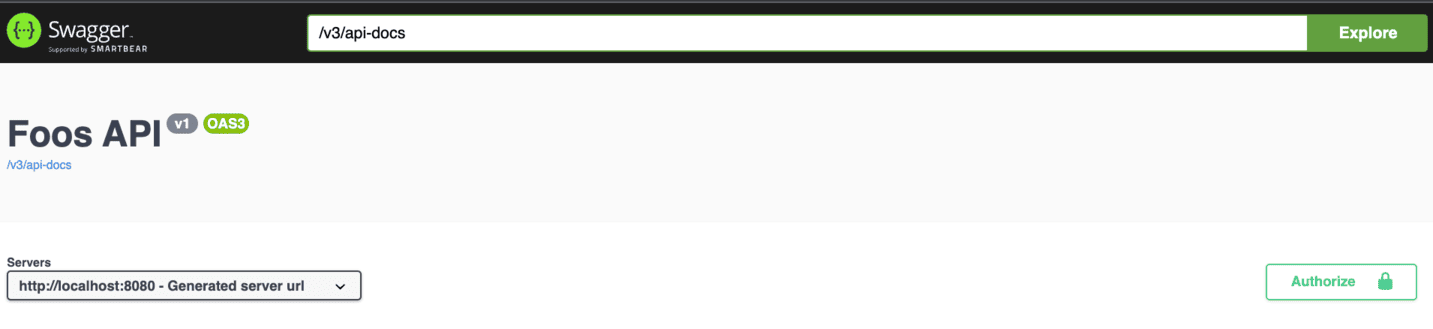
public class SpringdocConfig {}And then, we’ll also have to annotate our FooController with @SecurityRequirement(name = “basicAuth”). We could apply this annotation at the method level if we want only to secure some endpoints or use different schemes:
@RestController
@OpenAPIDefinition(info = @Info(title = "Foos API", version = "v1"))
@SecurityRequirement(name = "basicAuth")
@RequestMapping(value = "foos", produces = MediaType.APPLICATION_JSON_VALUE)
public class FooController {
    ...
}
Hence, the Authorize button will be available in Swagger-UI:
Then, we can provide our user credentials in the form:
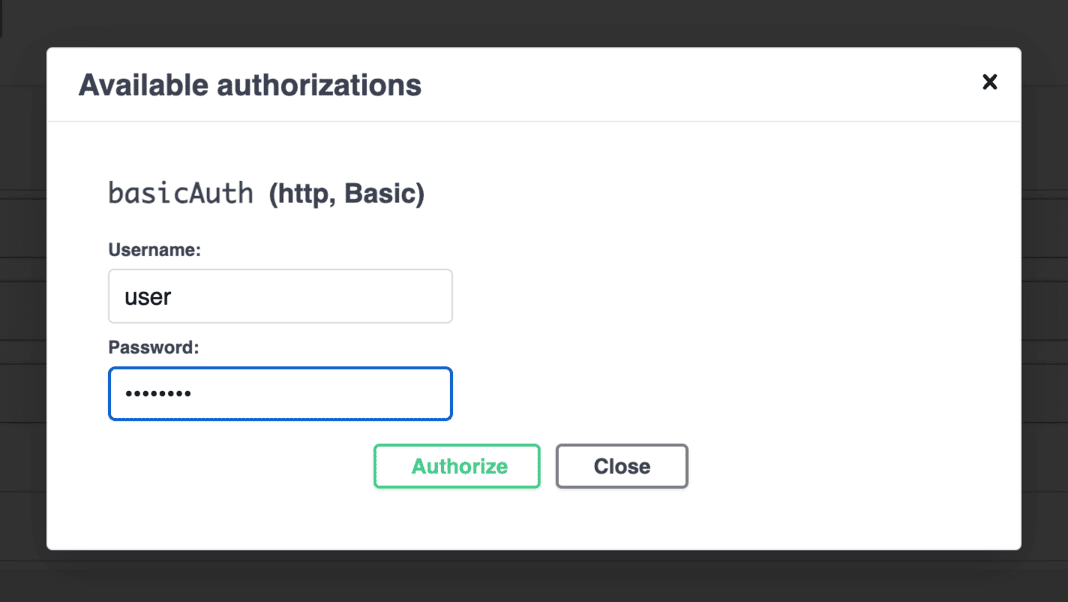
Subsequently, when invoking any FooController endpoint, the Authorization header with the credentials will be included in the request, as shown in the generated curl command. Thus, we’ll be authorized to execute requests:

5. Conclusion
In this article, we learned how to configure authentication in Springdoc for accessing protected endpoints via generated documentation in Swagger-UI. Initially, we went through a form-based login setup. And then, we configured the security scheme for Basic Authentication.


