1. Overview
Yet Another Report Generator (YARG) is an open source reporting library for Java, developed by Haulmont. It allows creating templates in most common formats (.doc, .docs, .xls, .xlsx, .html, .ftl, .csv) or custom text formats and filling it with data loaded by SQL, Groovy, or JSON.
In this article, we’re going to demonstrate how to use a Spring @RestController that outputs a .docx document with JSON-loaded data.
2. Setting up the Example
In order to start using YARG, we need to add the following dependencies to our pom:
<repositories>
    <repository>
        <snapshots>
            <enabled>false</enabled>
        </snapshots>
        <id>bintray-cuba-platform-main</id>
        <name>bintray</name>
        <url>http://dl.bintray.com/cuba-platform/main</url>
    </repository>
</repositories>
...
<dependency>
    <groupId>com.haulmont.yarg</groupId>
    <artifactId>yarg</artifactId>
    <version>2.0.4</version>
</dependency>
Next, we need a template for our data; we’re going to use a simple Letter.docx :
${Main.title}

Hello ${Main.name},

${Main.content}
Notice how YARG uses a markup/templating language – which allows the insertion of content in the different sections. These sections are divided in terms of the data group that they belong to.
In this example, we have a “Main” group that contains the title, name, and content of the letter.
These groups are called ReportBand in YARG and they are very useful for separating the different types of data you can have.
3. Integrating Spring With YARG
One of the best ways to use a report generator is to create a service that can return the document for us.
And so, we’ll use Spring and implement a simple @RestController that will be responsible for reading the template, getting the JSON, loading it into the document and returning a formatted .docx.
First, let’s create a DocumentController:
@RestController
public class DocumentController {

    @GetMapping("/generate/doc")
    public void generateDocument(HttpServletResponse response)
      throws IOException {
    }
}
This will expose the creation of the document as a service.
Now we will add the loading logic for the template:
ReportBuilder reportBuilder = new ReportBuilder();
ReportTemplateBuilder reportTemplateBuilder = new ReportTemplateBuilder()
  .documentPath("./src/main/resources/Letter.docx")
  .documentName("Letter.docx")
  .outputType(ReportOutputType.docx)
  .readFileFromPath();
reportBuilder.template(reportTemplateBuilder.build());
The ReportBuilder class is going to be responsible for the creation of the report, grouping up the template and the data. ReportTemplateBuilder loads our previously defined Letter.docx template by specifying the path, name, and output-type of the document.
Then we’ll add the loaded template to the report builder.
Now we need to define the data that is going to be inserted in the document, this will be a Data.json file with the following:
{
    "main": {
        "title" : "INTRODUCTION TO YARG",
        "name" : "Baeldung",
        "content" : "This is the content of the letter, can be anything we like."
    }
}
This is a simple JSON structure with a “main” object containing the title, name, and content that our template needs.
Now, let’s continue to load the data into our ReportBuilder:
BandBuilder bandBuilder = new BandBuilder();
String json = FileUtils.readFileToString(
  new File("./src/main/resources/Data.json"));
ReportBand main = bandBuilder.name("Main")
  .query("Main", "parameter=param1 $.main", "json")
  .build();
reportBuilder.band(main);
Report report = reportBuilder.build();
Here we define a BandBuilder in order to create a ReportBand, which is the abstraction that YARG uses for the groups of data that we defined earlier in the template document.
We can see that we define the name with the exact same section “Main”, then we use a query method to find the “Main” section and declare a parameter that will be used to find the data needed to fill the template.
It’s important to note that YARG uses JsonPath to traverse the JSON, which is why we see this “$.main” syntax.
Next, let’s specify in the query that the format of the data is “json”, then add the band to the report and finally, build it.
The last step is to define the Reporting object, which is responsible for inserting the data into the template and generate the final document:
Reporting reporting = new Reporting();
reporting.setFormatterFactory(new DefaultFormatterFactory());
reporting.setLoaderFactory(
  new DefaultLoaderFactory().setJsonDataLoader(new JsonDataLoader()));
response.setContentType(
 "application/vnd.openxmlformats-officedocument.wordprocessingml.document");
reporting.runReport(
  new RunParams(report).param("param1", json),
  response.getOutputStream());
We use a DefaultFormatterFactory that supports the common formats listed at the beginning of the article. After that, we set the JsonDataLoader that is going to be responsible for parsing the JSON.
In the final step, we set the appropriate content type for the .docx format and run the report. This will wire up the JSON data and insert it into the template outputting the result into the response output stream.
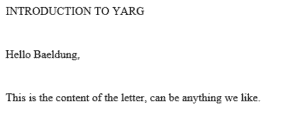
Now we can access the /generate/doc URL to download the document and we shall see the following result in our generated .docx:

4. Conclusion
In this article, we showed how we can easily integrate YARG with Spring and use its powerful API to create documents in a simple way.
We used JSON as the data input, but Groovy and SQL are also supported.
If you want to learn more about it you can find the documentation here.
And as always, you can find the complete example over on GitHub.


