Social Login with Spring Security in a Jersey Application
Last updated: January 8, 2024


Mocking is an essential part of unit testing, and the Mockito library makes it easy to write clean and intuitive unit tests for your Java code.
Get started with mocking and improve your application tests using our Mockito guide:
Handling concurrency in an application can be a tricky process with many potential pitfalls. A solid grasp of the fundamentals will go a long way to help minimize these issues.
Get started with understanding multi-threaded applications with our Java Concurrency guide:
Spring 5 added support for reactive programming with the Spring WebFlux module, which has been improved upon ever since. Get started with the Reactor project basics and reactive programming in Spring Boot:
Since its introduction in Java 8, the Stream API has become a staple of Java development. The basic operations like iterating, filtering, mapping sequences of elements are deceptively simple to use.
But these can also be overused and fall into some common pitfalls.
To get a better understanding on how Streams work and how to combine them with other language features, check out our guide to Java Streams:
Explore Spring Boot 3 and Spring 6 in-depth through building a full REST API with the framework:
Yes, Spring Security can be complex, from the more advanced functionality within the Core to the deep OAuth support in the framework.
I built the security material as two full courses - Core and OAuth, to get practical with these more complex scenarios. We explore when and how to use each feature and code through it on the backing project.
You can explore the course here:
Spring Data JPA is a great way to handle the complexity of JPA with the powerful simplicity of Spring Boot.
Get started with Spring Data JPA through the guided reference course:
Refactor Java code safely — and automatically — with OpenRewrite.
Refactoring big codebases by hand is slow, risky, and easy to put off. That’s where OpenRewrite comes in. The open-source framework for large-scale, automated code transformations helps teams modernize safely and consistently.
Each month, the creators and maintainers of OpenRewrite at Moderne run live, hands-on training sessions — one for newcomers and one for experienced users. You’ll see how recipes work, how to apply them across projects, and how to modernize code with confidence.
Join the next session, bring your questions, and learn how to automate the kind of work that usually eats your sprint time.
If you're working on a Spring Security (and especially an OAuth) implementation, definitely have a look at the Learn Spring Security course:
>> LEARN SPRING SECURITY1. Overview
Security is a first-class citizen in the Spring ecosystem. Therefore, it’s not surprising that OAuth2 can work with Spring Web MVC with almost no configuration.
However, a native Spring solution isn’t the only way to implement the presentation layer. Jersey, a JAX-RS compliant implementation, can also work in tandem with Spring OAuth2.
In this tutorial, we’ll find out how to protect a Jersey application with Spring Social Login, which is implemented using the OAuth2 standard.
2. Maven Dependencies
Let’s add the spring-boot-starter-jersey artifact to integrate Jersey into a Spring Boot application:
<dependency>
    <groupId>org.springframework.boot</groupId>
    <artifactId>spring-boot-starter-jersey</artifactId>
</dependency>
To configure Security OAuth2, we need spring-boot-starter-security and spring-security-oauth2-client:
<dependency>
    <groupId>org.springframework.boot</groupId>
    <artifactId>spring-boot-starter-security</artifactId>
</dependency>
<dependency>
    <groupId>org.springframework.security</groupId>
    <artifactId>spring-security-oauth2-client</artifactId>
</dependency>
We’ll manage all these dependencies using the Spring Boot Starter Parent version 2.
3. Jersey Presentation Layer
We’ll need a resource class with a couple of endpoints to use Jersey as the presentation layer.
3.1. Resource Class
Here’s the class that contains endpoint definitions:
@Path("/")
public class JerseyResource {
    // endpoint definitions
}
The class itself is very simple – it has just a @Path annotation. The value of this annotation identifies the base path for all endpoints in the class’s body.
It may be worth mentioning that this resource class doesn’t carry a stereotype annotation for component scanning. In fact, it doesn’t even need to be a Spring bean. The reason is that we don’t rely on Spring to handle the request mapping.
3.2. Login Page
Here’s the method that handles login requests:
@GET
@Path("login")
@Produces(MediaType.TEXT_HTML)
public String login() {
    return "Log in with <a href=\"/oauth2/authorization/github\">GitHub</a>";
}
This method returns a string for GET requests that target the /login endpoint. The text/html content type instructs the user’s browser to display the response with a clickable link.
We’ll use GitHub as the OAuth2 provider, hence the link /oauth2/authorization/github. This link will trigger a redirection to the GitHub authorize page.
3.3. Home Page
Let’s define another method to handle requests to the root path:
@GET
@Produces(MediaType.TEXT_PLAIN)
public String home(@Context SecurityContext securityContext) {
    OAuth2AuthenticationToken authenticationToken = (OAuth2AuthenticationToken) securityContext.getUserPrincipal();
    OAuth2AuthenticatedPrincipal authenticatedPrincipal = authenticationToken.getPrincipal();
    String userName = authenticatedPrincipal.getAttribute("login");
    return "Hello " + userName;
}
This method returns the home page, which is a string containing the logged-in username. Notice, in this case, we extracted the username from the login attribute. Another OAuth2 provider may use a different attribute for the username, though.
Obviously, the above method works for authenticated requests only. If a request is unauthenticated, it’ll be redirected to the login endpoint. We’ll see how to configure this redirection in section 4.
3.4. Registering Jersey with the Spring Container
Let’s register the resource class with a servlet container to enable Jersey services. Fortunately, it’s pretty simple:
@Component
public class RestConfig extends ResourceConfig {
    public RestConfig() {
        register(JerseyResource.class);
    }
}
By registering JerseyResource in a ResourceConfig subclass, we informed the servlet container of all the endpoints in that resource class.
The last step is to register the ResourceConfig subclass, which is RestConfig in this case, with the Spring container. We implemented this registration with the @Component annotation.
4. Configuring Spring Security
We can configure security for Jersey just like we would for a normal Spring application:
@Configuration
public class SecurityConfig {

    @Bean
    public SecurityFilterChain filterChain(HttpSecurity http) throws Exception {
        http.authorizeRequests()
            .antMatchers("/login")
            .permitAll()
            .anyRequest()
            .authenticated()
            .and()
            .oauth2Login()
            .loginPage("/login");
        return http.build();
    }
}
The most important method in the given chain is oauth2Login. This method configures authentication support using an OAuth 2.0 provider. In this tutorial, the provider is GitHub.
Another noticeable configuration is the login page. By providing string “/login” to the loginPage method, we tell Spring to redirect unauthenticated requests to the /login endpoint.
Note that the default security configuration also provides an auto-generated page at /login. Therefore, even if we didn’t configure the login page, an unauthenticated request would still be redirected to that endpoint.
The difference between the default configuration and the explicit setting is that in the default case, the application returns the generated page rather than our custom string.
5. Application Configuration
In order to have an OAuth2-protected application, we’ll need to register a client with an OAuth2 provider. After that, add the client’s credentials to the application.
5.1. Registering OAuth2 Client
Let’s start the registration process by registering a GitHub app. After landing on the GitHub developer page, hit the New OAuth App button to open the Register a new OAuth application form.
Next, fill out the displayed form with appropriate values. For the application name, enter any string that makes the app recognizable. The homepage URL can be http://localhost:8083, and the authorization callback URL is http://localhost:8083/login/oauth2/code/github.
The callback URL is the path to which the browser redirects after the user authenticates with GitHub and grants access to the application.
This is how the registration form may look like:
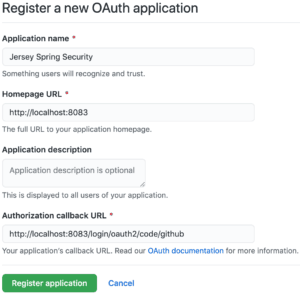
Now, click on the Register application button. The browser should then redirect to the GitHub app’s homepage, which shows up the client ID and client secret.
5.2. Configuring Spring Boot Application
Let’s add a properties file, named jersey-application.properties, to the classpath:
server.port=8083
spring.security.oauth2.client.registration.github.client-id=<your-client-id>
spring.security.oauth2.client.registration.github.client-secret=<your-client-secret>
Remember to replace the placeholders <your-client-id> and <your-client-secret> with values from our own GitHub application.
Lastly, add this file as a property source to a Spring Boot application:
@SpringBootApplication
@PropertySource("classpath:jersey-application.properties")
public class JerseyApplication {
    public static void main(String[] args) {
        SpringApplication.run(JerseyApplication.class, args);
    }
}
6. Authentication in Action
Let’s see how we can log in to our application after registering with GitHub.
6.1. Accessing the Application
Let’s start the application, then access the homepage at the address localhost:8083. Since the request is unauthenticated, we’ll be redirected to the login page:
Now, when we hit the GitHub link, the browser will redirect to the GitHub authorize page:
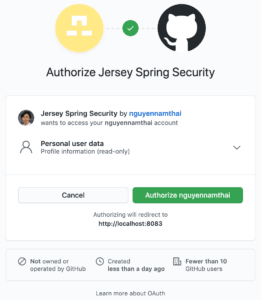
By looking at the URL, we can see that the redirected request carried many query parameters, such as response_type, client_id, and scope:
https://github.com/login/oauth/authorize?response_type=code&client_id=c30a16c45a9640771af5&scope=read:user&state=dpTme3pB87wA7AZ--XfVRWSkuHD3WIc9Pvn17yeqw38%3D&redirect_uri=http://localhost:8083/login/oauth2/code/githubThe value of response_type is code, meaning the OAuth2 grant type is authorization code. Meanwhile, the client_id parameter helps identifies our application. For the meanings of all the parameters, please head over to the GitHub Developer page.
When the authorize page shows up, we need to authorize the application to continue. After the authorization is successful, the browser will redirect to a predefined endpoint in our application, together with a few query parameters:
http://localhost:8083/login/oauth2/code/github?code=561d99681feeb5d2edd7&state=dpTme3pB87wA7AZ--XfVRWSkuHD3WIc9Pvn17yeqw38%3DBehind the scenes, the application will then exchange the authorization code for an access token. Afterward, it uses this token to get information on the logged-in user.
After the request to localhost:8083/login/oauth2/code/github returns, the browser goes back to the homepage. This time, we should see a greeting message with our own username:
6.2. How to Obtain the Username?
It’s clear that the username in the greeting message is our GitHub username. At this point, a question may arise: how can we get the username and other information from an authenticated user?
In our example, we extracted the username from the login attribute. However, this isn’t the same across all OAuth2 providers. In other words, a provider may provide data in certain attributes at its own discretion. Therefore, we can say there’re simply no standards in this regard.
In the case of GitHub, we can find which attributes we need in the reference documentation. Likewise, other OAuth2 providers provide their own references.
Another solution is that we can launch the application in the debug mode and set a breakpoint after an OAuth2AuthenticatedPrincipal object is created. When going through all attributes of this object, we’ll have insight into the user’s information.
7. Testing
Let’s write a few tests to verify the application’s behavior.
7.1. Setting Up Environment
Here’s the class that will hold our test methods:
@RunWith(SpringRunner.class)
@SpringBootTest(webEnvironment = RANDOM_PORT)
@TestPropertySource(properties = "spring.security.oauth2.client.registration.github.client-id:test-id")
public class JerseyResourceUnitTest {
    @Autowired
    private TestRestTemplate restTemplate;

    @LocalServerPort
    private int port;

    private String basePath;

    @Before
    public void setup() {
        basePath = "http://localhost:" + port + "/";
    }

    // test methods
}
Instead of using the real GitHub client ID, we defined a test ID for the OAuth2 client. This ID is then set to the spring.security.oauth2.client.registration.github.client-id property.
All annotations in this test class are common in Spring Boot testing, hence we won’t cover them in this tutorial. In case any of these annotations are unclear, please head over to Testing in Spring Boot, Integration Testing in Spring, or Exploring the Spring Boot TestRestTemplate.
7.2. Home Page
We’ll prove that when an unauthenticated user attempts to access the home page, they’ll be redirected to the login page for authentication:
@Test
public void whenUserIsUnauthenticated_thenTheyAreRedirectedToLoginPage() {
    ResponseEntity<Object> response = restTemplate.getForEntity(basePath, Object.class);
    assertThat(response.getStatusCode()).isEqualTo(HttpStatus.FOUND);
    assertThat(response.getBody()).isNull();

    URI redirectLocation = response.getHeaders().getLocation();
    assertThat(redirectLocation).isNotNull();
    assertThat(redirectLocation.toString()).isEqualTo(basePath + "login");
}
7.3. Login Page
Let’s verify that accessing the login page will lead to the authorization path being returned:
@Test
public void whenUserAttemptsToLogin_thenAuthorizationPathIsReturned() {
    ResponseEntity response = restTemplate.getForEntity(basePath + "login", String.class);
    assertThat(response.getHeaders().getContentType()).isEqualTo(TEXT_HTML);
    assertThat(response.getBody()).isEqualTo("Log in with GitHub");
}
7.4. Authorization Endpoint
Finally, when sending a request to the authorization endpoint, the browser will redirect to the OAuth2 provider’s authorize page with appropriate parameters:
@Test
public void whenUserAccessesAuthorizationEndpoint_thenTheyAresRedirectedToProvider() {
    ResponseEntity response = restTemplate.getForEntity(basePath + "oauth2/authorization/github", String.class);
    assertThat(response.getStatusCode()).isEqualTo(HttpStatus.FOUND);
    assertThat(response.getBody()).isNull();

    URI redirectLocation = response.getHeaders().getLocation();
    assertThat(redirectLocation).isNotNull();
    assertThat(redirectLocation.getHost()).isEqualTo("github.com");
    assertThat(redirectLocation.getPath()).isEqualTo("/login/oauth/authorize");

    String redirectionQuery = redirectLocation.getQuery();
    assertThat(redirectionQuery.contains("response_type=code"));
    assertThat(redirectionQuery.contains("client_id=test-id"));
    assertThat(redirectionQuery.contains("scope=read:user"));
}
8. Conclusion
In this tutorial, we have set up Spring Social Login with a Jersey application. The tutorial also included steps for registering an application with the GitHub OAuth2 provider.


