Introduction to SPNEGO/Kerberos Authentication in Spring
Last updated: February 20, 2026


Mocking is an essential part of unit testing, and the Mockito library makes it easy to write clean and intuitive unit tests for your Java code.
Get started with mocking and improve your application tests using our Mockito guide:
Handling concurrency in an application can be a tricky process with many potential pitfalls. A solid grasp of the fundamentals will go a long way to help minimize these issues.
Get started with understanding multi-threaded applications with our Java Concurrency guide:
Spring 5 added support for reactive programming with the Spring WebFlux module, which has been improved upon ever since. Get started with the Reactor project basics and reactive programming in Spring Boot:
Since its introduction in Java 8, the Stream API has become a staple of Java development. The basic operations like iterating, filtering, mapping sequences of elements are deceptively simple to use.
But these can also be overused and fall into some common pitfalls.
To get a better understanding on how Streams work and how to combine them with other language features, check out our guide to Java Streams:
Explore Spring Boot 3 and Spring 6 in-depth through building a full REST API with the framework:
Yes, Spring Security can be complex, from the more advanced functionality within the Core to the deep OAuth support in the framework.
I built the security material as two full courses - Core and OAuth, to get practical with these more complex scenarios. We explore when and how to use each feature and code through it on the backing project.
You can explore the course here:
Spring Data JPA is a great way to handle the complexity of JPA with the powerful simplicity of Spring Boot.
Get started with Spring Data JPA through the guided reference course:
Refactor Java code safely — and automatically — with OpenRewrite.
Refactoring big codebases by hand is slow, risky, and easy to put off. That’s where OpenRewrite comes in. The open-source framework for large-scale, automated code transformations helps teams modernize safely and consistently.
Each month, the creators and maintainers of OpenRewrite at Moderne run live, hands-on training sessions — one for newcomers and one for experienced users. You’ll see how recipes work, how to apply them across projects, and how to modernize code with confidence.
Join the next session, bring your questions, and learn how to automate the kind of work that usually eats your sprint time.
If you're working on a Spring Security (and especially an OAuth) implementation, definitely have a look at the Learn Spring Security course:
>> LEARN SPRING SECURITY1. Overview
In this tutorial, we’ll understand the basics of the Kerberos authentication protocol. We’ll also cover the need for SPNEGO in connection with Kerberos.
Finally, we’ll see how to make use of the Spring Security Kerberos extension to create applications enabled for Kerberos with SPNEGO.
Before we proceed, it’s worthwhile to note that this tutorial will introduce many new terms for those uninitiated in this area. Hence, we’ll spend some time up front to cover the grounds.
2. Understanding Kerberos
Kerberos is a Network Authentication Protocol developed at Massachusetts Institute of Technology (MIT) in the early eighties. As you may realize, this is relatively old and has stood the test of time. Windows Server widely supports Kerberos as an authentication mechanism and has even made it the default authentication option.
Technically, Kerberos is a ticket-based authentication protocol that allows nodes in a computer network to identify themselves to each other.
2.1. Simple Use Case for Kerberos
Let’s draw up a hypothetical situation to demonstrate this.
Suppose that a user, through his mail client on his machine, needs to pull his emails from a mail server on another machine on the same network. There is an obvious need for authentication here. The mail client and mail server must be able to identify and trust each other for them to communicate securely.
How can Kerberos help us here? Kerberos introduces a third party called Key Distribution Centre (KDC), which has a mutual trust with each node in the network. Let’s see how this can work in our case:

2.2. Key Aspects of Kerberos Protocol
While this may sound esoteric, this is quite simple and creative in securing communication over an unsecured network. Some of the problems presented here are quite taken for granted in the era of TLS everywhere!
While a detailed discussion of the Kerberos Protocol is not possible here, let’s go through some salient aspects:
- Trust between nodes (client and server) and KDC is assumed to exist here over the same realm
- Password is never exchanged over the network
- Trust between the client and server is implied based on the fact that they can decrypt messages with a key shared only with the KDC
- Trust between the client and the server is mutual
- The client can cache tickets for repeated use until the expiry, providing a single sign-on experience
- Authenticator Messages are based on the timestamp and thus are good only for one-time use
- All three parties here must have a relatively synchronized time
While this just scratches the surface of this beautiful authentication protocol, it is sufficient to get us going with our tutorial.
3. Understanding SPNEGO
SPNEGO stands for Simple and Protected GSS-API Negotiation Mechanism. Quite a name! Let’s first see what GSS-API stands for. The Generic Security Service Application Program Interface (GSS-API) is nothing but an IETF standard for client and server to communicate in a secure and vendor-agnostic manner.
SPNEGO is a part of the GSS-API for client and server to negotiate the choice of security mechanism to use, for instance, Kerberos or NTLM.
4. Why Do We Need SPNEGO With Kerberos?
As we saw in the previous section, Kerberos is a pure Network Authentication Protocol operating primarily in the transport layer (TCP/UDP). While this is good for many use cases, this falls short of requirements for the modern web. If we have an application that operates on a higher abstraction, like HTTP, it is not possible to use Kerberos directly.
This is where SPNEGO comes to our help. In the case of a web application, communication primarily happens between a web browser like Chrome and a web server like Tomcat hosting the web application over HTTP. If enabled, they can negotiate Kerberos as a security mechanism through SPNEGO and exchange tickets as SPNEGO tokens over HTTP.
So how does this change our scenario mentioned earlier? Let’s replace our simple mail client with a web browser and mail server with a web application:
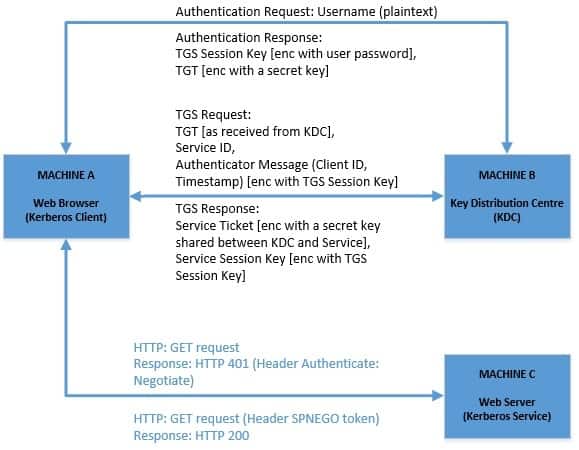
So, not much has changed in this compared to our previous diagram except that the communication between client and server happens explicitly over HTTP now. Let’s understand this better:
- The client machine authenticates against the KDC and caches the TGT
- Web browser on the client machine is configured to use SPNEGO and Kerberos
- The web application is also configured to support SPNEGO and Kerberos
- Web application throws a “Negotiate” challenge to web browser trying to access a protected resource
- Service Ticket is wrapped as SPNEGO token and exchanged as an HTTP header
5. Requirements
Before we can proceed to develop a web application that supports Kerberos authentication mode, we must gather some basic setup. Let’s go through these tasks quickly.
5.1. Setting up KDC
Setting up a Kerberos environment for production use is beyond the scope of this tutorial. This is unfortunately not a trivial task and fragile as well. There are several options available to get an implementation of Kerberos, both open source and commercial versions:
- MIT makes the implementation of Kerberos v5 available for multiple operating systems
- Apache Kerby is an extension to Apache Directory, which provides a Java Kerberos binding
- Windows Server from Microsoft supports Kerberos v5 natively backed by Active Directory
- Heimdel has an implementation of Kerberos v5
The actual set-up of KDC and related infrastructure is dependent on the provider and should be followed from their respective documentation. However, Apache Kerby can be run inside a Docker container, which makes it platform-neutral.
5.2. Setting up Users in KDC
We need to set up two users — or, as they call it, principals — in KDC. We can use the “kadmin” command-line tool for this purpose. Let’s suppose we’ve created a realm called “baeldung.com” in the KDC database and logged in to “kadmin” with a user having admin privileges.
We’ll create our first user, whom we wish to authenticate from a web browser, with:
$ kadmin: addprinc -randkey kchandrakant -pw password
Principal "[email protected]" created.
We’ll also need to register our web application with the KDC:
$ kadmin: addprinc -randkey HTTP/[email protected] -pw password
Principal "HTTP/[email protected]" created.
Note the convention for naming the principal here, as this must match the domain on which the application is accessible from the web browser. The web browser automatically tries to create a Service Principal Name (SPN) with this convention when presented with a “Negotiate” challenge.
We also need to export this as a keytab file to make it available to the web application:
$ kadmin: ktadd -k baeldung.keytab HTTP/[email protected]This should give us a file named “baeldung.keytab”.
5.3. Browser Configuration
We need to enable the web browser that we use to access a protected resource on the web application for the “Negotiate” authentication scheme. Fortunately, most of the modern web browsers like Chrome support “Negotiate” as an authentication scheme by default.
Additionally, we can configure the browser to provide “Integrated Authentication”. In this mode, when presented with the “Negotiate” challenge, the browser tries to make use of the cached credentials in the host machine, which has already been logged into a KDC principal. However, we’ll not use this mode in here to keep things explicit.
5.4. Domain Configuration
It is understandable that we may not have actual domains to test our web application. But sadly, we can’t use localhost or 127.0.0.1 or any other IP address with Kerberos authentication. There is, however, an easy solution to this, which involves setting up entries in the “hosts” file like:
demo.kerberos.bealdung.com 127.0.0.16. Spring to Our Rescue!
Finally, as we’ve got the basics clear, it is time to test the theory. But, won’t it be cumbersome to create a web application supporting SPNEGO and Kerberos? Not if we use Spring. Spring has a Kerberos Extension as part of Spring Security that supports SPNEGO with Kerberos seamlessly.
Almost all we have to do is just configurations in Spring Security to enable SPNEGO with Kerberos. We’ll use Java-style configurations here, but an XML configuration can be set up as easily.
6.1. Maven Dependencies
The first thing we have to set up are the dependencies:
<dependency>
    <groupId>org.springframework.security.kerberos</groupId>
    <artifactId>spring-security-kerberos-web</artifactId>
    <version>${kerberos.extension.version}</version>
</dependency>
<dependency>
    <groupId>org.springframework.security.kerberos</groupId>
    <artifactId>spring-security-kerberos-client</artifactId>
    <version>${kerberos.extension.version}</version>
</dependency>
These dependencies are available for download from Maven Central.
6.2. SPNEGO Configurations
Firstly, SPNEGO is integrated into Spring Security as a Filter in HTTPSecurity:
 @Override
 public void configure(HttpSecurity http) throws Exception {
     AuthenticationManager authenticationManager = http.getSharedObject(AuthenticationManager.class);
     http.addFilterBefore(spnegoAuthenticationProcessingFilter(authenticationManager),
         BasicAuthenticationFilter.class);
}
This only shows the part required to configure SPNEGO Filter and is not a complete HTTPSecurity configuration, which should be configured as per application security requirements.
Next, we need to provide the SPNEGO Filter as Bean:
@Bean
public SpnegoAuthenticationProcessingFilter spnegoAuthenticationProcessingFilter(
  AuthenticationManager authenticationManager) {
    SpnegoAuthenticationProcessingFilter filter = new SpnegoAuthenticationProcessingFilter();
    filter.setAuthenticationManager(authenticationManager);
    return filter;
}
6.3. Kerberos Configurations
In addition, We can configure Kerberos by adding AuthenticationProvider to AuthenticationManagerBuilder in Spring Security:
 @Bean
 public AuthenticationManager authManager(HttpSecurity http) throws Exception {
     return http.getSharedObject(AuthenticationManagerBuilder.class)
         .authenticationProvider(kerberosAuthenticationProvider())
         .authenticationProvider(kerberosServiceAuthenticationProvider())
         .build();
 }
The first thing we have to provide is a KerberosAuthenticationProvider as a Bean. This is an implementation of AuthenticationProvider, and this is where we set SunJaasKerberosClient as a KerberosClient:
@Bean
public KerberosAuthenticationProvider kerberosAuthenticationProvider() {
    KerberosAuthenticationProvider provider = new KerberosAuthenticationProvider();
    SunJaasKerberosClient client = new SunJaasKerberosClient();
    provider.setKerberosClient(client);
    provider.setUserDetailsService(userDetailsService());
    return provider;
}
Next, we also have to provide a KerberosServiceAuthenticationProvider as a Bean. This is the class that validates Kerberos Service Tickets or SPNEGO Tokens:
@Bean
public KerberosServiceAuthenticationProvider kerberosServiceAuthenticationProvider() {
    KerberosServiceAuthenticationProvider provider = new KerberosServiceAuthenticationProvider();
    provider.setTicketValidator(sunJaasKerberosTicketValidator());
    provider.setUserDetailsService(userDetailsService());
    return provider;
}
Lastly, we need to provide a SunJaasKerberosTicketValidator as a Bean. This is an implementation of KerberosTicketValidator and uses SUN JAAS Login Module:
@Bean
public SunJaasKerberosTicketValidator sunJaasKerberosTicketValidator() {
    SunJaasKerberosTicketValidator ticketValidator = new SunJaasKerberosTicketValidator();
    ticketValidator.setServicePrincipal("HTTP/[email protected]");
    ticketValidator.setKeyTabLocation(new FileSystemResource("baeldung.keytab"));
    return ticketValidator;
}
6.4. User Details
We’ve seen references to a UserDetailsService in our AuthenticationProvider earlier, so why do we need it? Well, as we’ve come to know Kerberos, it is purely an authentication mechanism that is ticket-based.
So, while it’s able to identify the user, it doesn’t provide other details related to the user, like their authorizations. We need a valid UserDetailsService provided to our AuthenticationProvider to fill this gap.
6.5. Running the Application
This is pretty much what we need to set up a web application with Spring Security enabled for SPNEGO with Kerberos. When we boot up the web application and access any page therein, the web browser should prompt for username and password, prepare a SPNEGO token with Service Ticket, and send it to the application.
The application should be able to process it using the credentials in the keytab file and respond with successful authentication.
However, as we saw earlier, setting up a working Kerberos environment is complicated and quite brittle. If things don’t work as expected, it’s worthwhile to check all the steps again. A simple mistake like mismatch in the domain name can lead to failure with error messages that aren’t particularly helpful.
7. Practical Use of SPNEGO and Kerberos
Now that we’ve seen how Kerberos authentication works and how we can use SPNEGO with Kerberos in web applications, we may question the need for it. While this makes complete sense to use it as an SSO mechanism within an enterprise network, why should we use this in web applications?
Well, for one, even after so many years, Kerberos is still very actively used within enterprise applications, especially Windows-based applications. If an organization has several internal and external web applications, it does make sense to extend the same SSO infrastructure to cover them all. This makes it much easier for administrators and users of an organization to have a seamless experience through disparate applications.
8. Conclusion
To sum up, in this tutorial, we understood the basics of Kerberos authentication protocol. We also discussed SPNEGO as part of GSS-API and how we can use it to facilitate Kerberos-based authentication in a web application over HTTP. Furthermore, we tried to build a small web application leveraging Spring Security’s built-in support for SPNEGO with Kerberos.
This tutorial just provides a quick sneak peek of a powerful and time tested authentication mechanism. There is quite a wealth of information available for us to learn more and possibly appreciate even more!


