

Mocking is an essential part of unit testing, and the Mockito library makes it easy to write clean and intuitive unit tests for your Java code.
Get started with mocking and improve your application tests using our Mockito guide:
Handling concurrency in an application can be a tricky process with many potential pitfalls. A solid grasp of the fundamentals will go a long way to help minimize these issues.
Get started with understanding multi-threaded applications with our Java Concurrency guide:
Spring 5 added support for reactive programming with the Spring WebFlux module, which has been improved upon ever since. Get started with the Reactor project basics and reactive programming in Spring Boot:
Since its introduction in Java 8, the Stream API has become a staple of Java development. The basic operations like iterating, filtering, mapping sequences of elements are deceptively simple to use.
But these can also be overused and fall into some common pitfalls.
To get a better understanding on how Streams work and how to combine them with other language features, check out our guide to Java Streams:
Explore Spring Boot 3 and Spring 6 in-depth through building a full REST API with the framework:
Yes, Spring Security can be complex, from the more advanced functionality within the Core to the deep OAuth support in the framework.
I built the security material as two full courses - Core and OAuth, to get practical with these more complex scenarios. We explore when and how to use each feature and code through it on the backing project.
You can explore the course here:
Spring Data JPA is a great way to handle the complexity of JPA with the powerful simplicity of Spring Boot.
Get started with Spring Data JPA through the guided reference course:
Refactor Java code safely — and automatically — with OpenRewrite.
Refactoring big codebases by hand is slow, risky, and easy to put off. That’s where OpenRewrite comes in. The open-source framework for large-scale, automated code transformations helps teams modernize safely and consistently.
Each month, the creators and maintainers of OpenRewrite at Moderne run live, hands-on training sessions — one for newcomers and one for experienced users. You’ll see how recipes work, how to apply them across projects, and how to modernize code with confidence.
Join the next session, bring your questions, and learn how to automate the kind of work that usually eats your sprint time.
Yes, we're now running our only Summer Sale. All Courses are 30% off until 20th July, 2026:
Yes, we're now running our only Summer Sale. All Courses are 30% off until 20th July, 2026:
1. Overview
Spring REST Docs and OpenAPI 3.0 are two ways to create API documentation for a REST API.
In this tutorial, we’ll examine their relative advantages and disadvantages.
2. A Brief Summary of Origins
Spring REST Docs is a framework developed by the Spring community in order to create accurate documentation for RESTful APIs. It takes a test-driven approach, wherein the documentation is written either as Spring MVC tests, Spring Webflux’s WebTestClient, or REST-Assured.
The output of running the tests is created as AsciiDoc files which can be put together using Asciidoctor to generate an HTML page describing our APIs. Since it follows the TDD method, Spring REST Docs automatically brings in all its advantages such as less error-prone code, reduced rework, and faster feedback cycles, to name a few.
OpenAPI, on the other hand, is a specification born out of Swagger 2.0. Its latest version as of writing this is 3.0 and has many known implementations.
As any other specification would, OpenAPI lays out certain ground rules for its implementations to follow. Simply put, all OpenAPI implementations are supposed to produce the documentation as a JSON object, either in JSON or YAML format.
There also exist many tools that take this JSON/YAML in and spit out a UI to visualize and navigate the API. This comes in handy during acceptance testing, for example. In our code samples here, we’ll be using springdoc – a library for OpenAPI 3 with Spring Boot.
Before looking at the two in detail, let’s quickly set up an API to be documented.
3. The REST API
Let’s put together a basic CRUD API using Spring Boot.
3.1. The Repository
Here, the repository that we’ll be using is a bare-bones PagingAndSortingRepository interface, with the model Foo:
@Repository
public interface FooRepository extends PagingAndSortingRepository<Foo, Long>{}

@Entity
public class Foo {
    @Id
    @GeneratedValue(strategy = GenerationType.IDENTITY)
    private long id;

    @Column(nullable = false)
    private String title;

    @Column()
    private String body;

    // constructor, getters and setters
}
We’ll also load the repository using a schema.sql and a data.sql.
3.2. The Controller
Next, let’s look at the controller, skipping its implementation details for brevity:
@RestController
@RequestMapping("/foo")
public class FooController {

    @Autowired
    FooRepository repository;

    @GetMapping
    public ResponseEntity<List<Foo>> getAllFoos() {
        // implementation
    }

    @GetMapping(value = "{id}")
    public ResponseEntity<Foo> getFooById(@PathVariable("id") Long id) {
        // implementation
    }

    @PostMapping
    public ResponseEntity<Foo> addFoo(@RequestBody @Valid Foo foo) {
        // implementation
    }

    @DeleteMapping("/{id}")
    public ResponseEntity<Void> deleteFoo(@PathVariable("id") long id) {
        // implementation
    }

    @PutMapping("/{id}")
    public ResponseEntity<Foo> updateFoo(@PathVariable("id") long id, @RequestBody Foo foo) {
        // implementation
    }
}
3.3. The Application
And finally, the Boot App:
@SpringBootApplication()
public class Application {
    public static void main(String[] args) {
        SpringApplication.run(Application.class, args);
    }
}
4. OpenAPI / Springdoc
Now let’s see how springdoc can add documentation to our Foo REST API.
Recall that it’ll generate a JSON object and a UI visualization of the API based on that object.
4.1. Basic UI
To begin with, we’ll just add a couple of Maven dependencies – springdoc-openapi-data-rest for generating the JSON, and springdoc-openapi-ui for rendering the UI.
The tool will introspect the code for our API, and read the controller methods’ annotations. On that basis, it’ll generate the API JSON which will be live at http://localhost:8080/api-docs/. It’ll also serve a basic UI at http://localhost:8080/swagger-ui-custom.html:
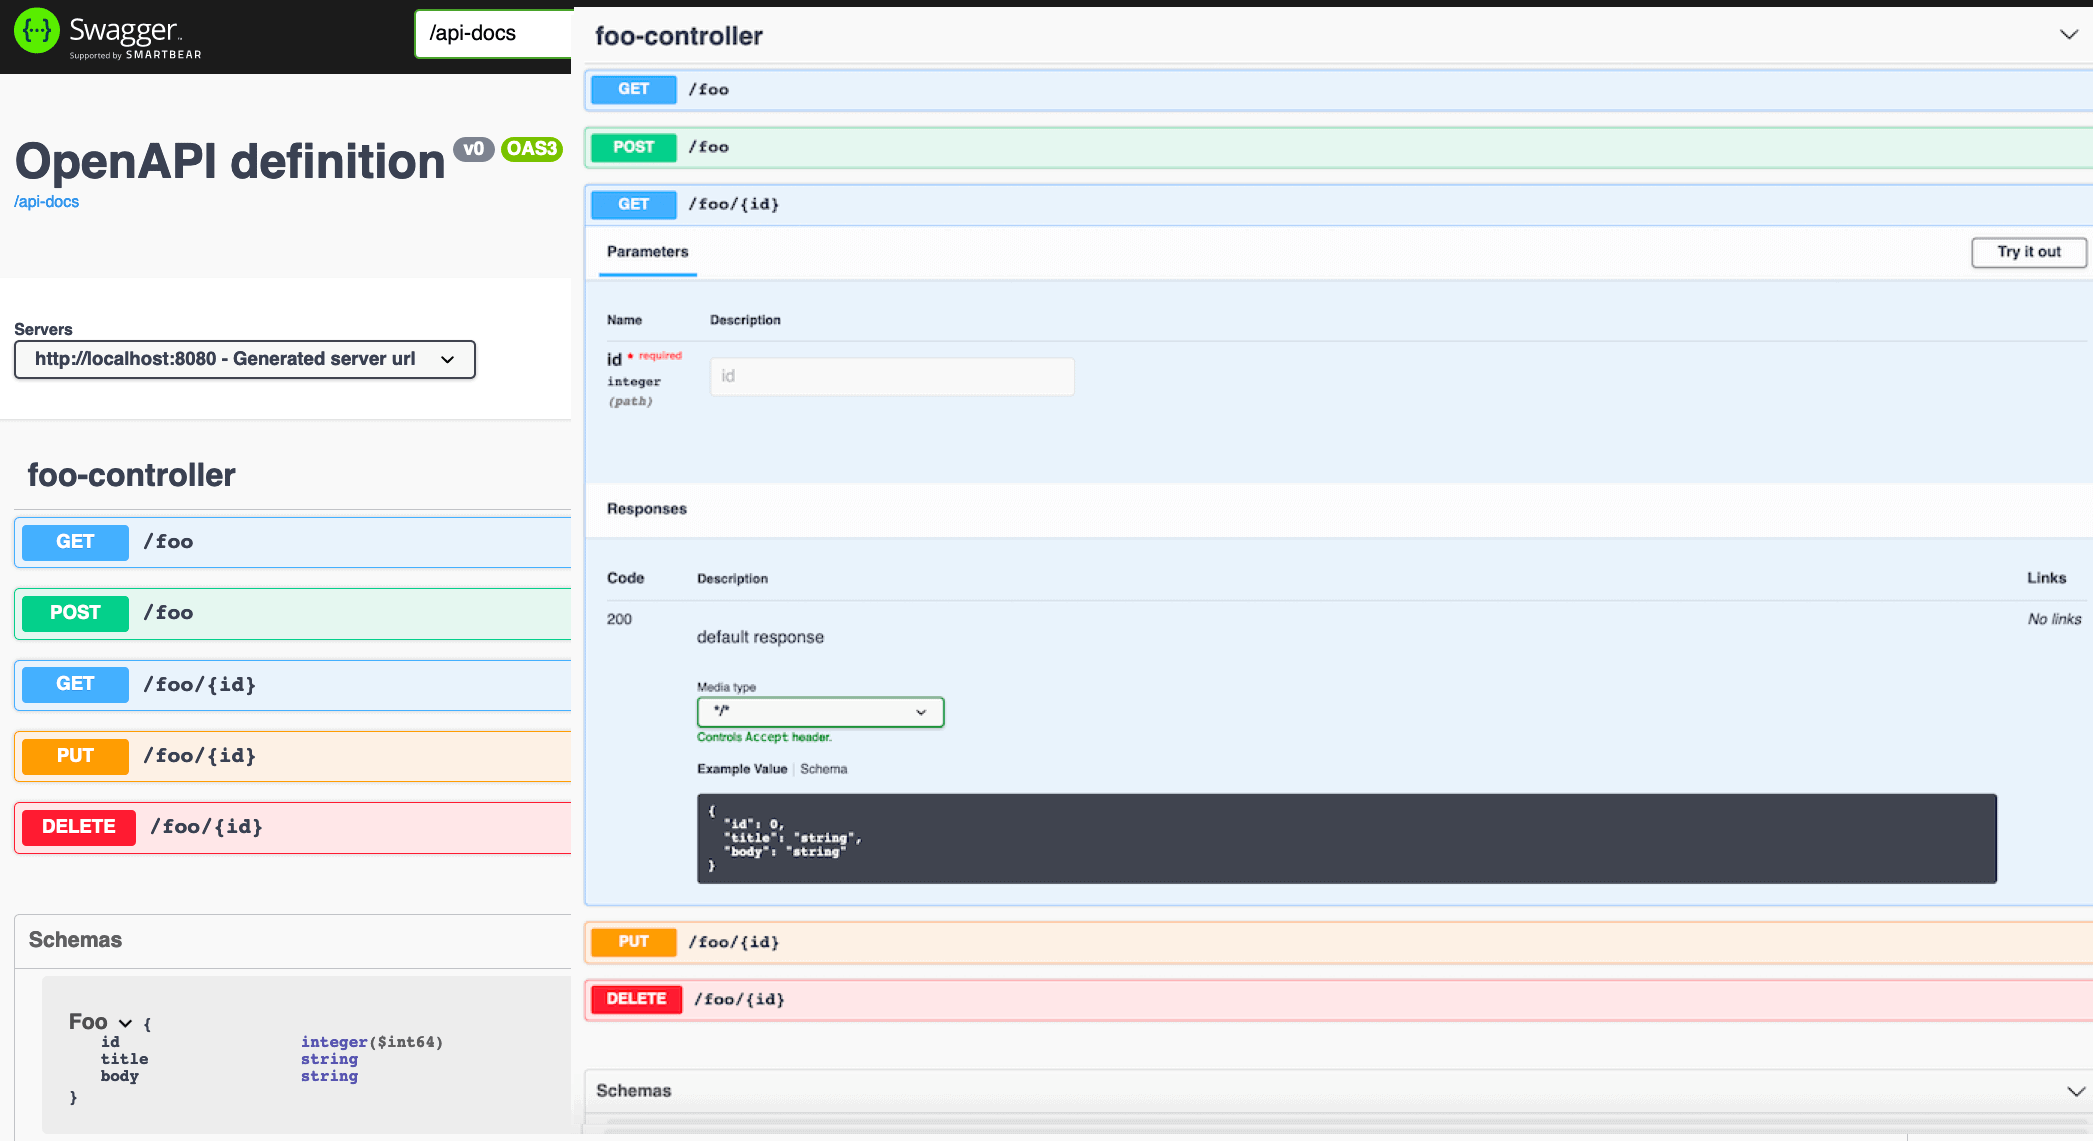
As we can see, without adding any code at all, we obtained a beautiful visualization of our API, right down to the Foo schema. Using the Try it out button, we can even execute the operations and view the results.
Now, what if we wanted to add some real documentation to the API? In terms of what the API is all about, what all its operations mean, what should be input, and what responses to expect?
We’ll look at this in the next section.
4.2. Detailed UI
Let’s first see how to add a general description to the API.
For that, we’ll add an OpenAPI bean to our Boot App:
@Bean
public OpenAPI customOpenAPI(@Value("${springdoc.version}") String appVersion) {
    return new OpenAPI().info(new Info()
      .title("Foobar API")
      .version(appVersion)
      .description("This is a sample Foobar server created using springdocs - " +
        "a library for OpenAPI 3 with spring boot.")
      .termsOfService("http://swagger.io/terms/")
      .license(new License().name("Apache 2.0")
      .url("http://springdoc.org")));
}
Next, to add some information to our API operations, we’ll decorate our mappings with a few OpenAPI-specific annotations.
Let’s see how we can describe getFooById. We’ll do this inside another controller, FooBarController, which is similar to our FooController:
@RestController
@RequestMapping("/foobar")
@Tag(name = "foobar", description = "the foobar API with documentation annotations")
public class FooBarController {
    @Autowired
    FooRepository repository;

    @Operation(summary = "Get a foo by foo id")
    @ApiResponses(value = {
      @ApiResponse(responseCode = "200", description = "found the foo", content = {
        @Content(mediaType = "application/json", schema = @Schema(implementation = Foo.class))}),
      @ApiResponse(responseCode = "400", description = "Invalid id supplied", content = @Content),
      @ApiResponse(responseCode = "404", description = "Foo not found", content = @Content) })
    @GetMapping(value = "{id}")
    public ResponseEntity getFooById(@Parameter(description = "id of foo to be searched")
      @PathVariable("id") String id) {
        // implementation omitted for brevity
    }
    // other mappings, similarly annotated with @Operation and @ApiResponses
}
Now let’s see the effect on the UI:
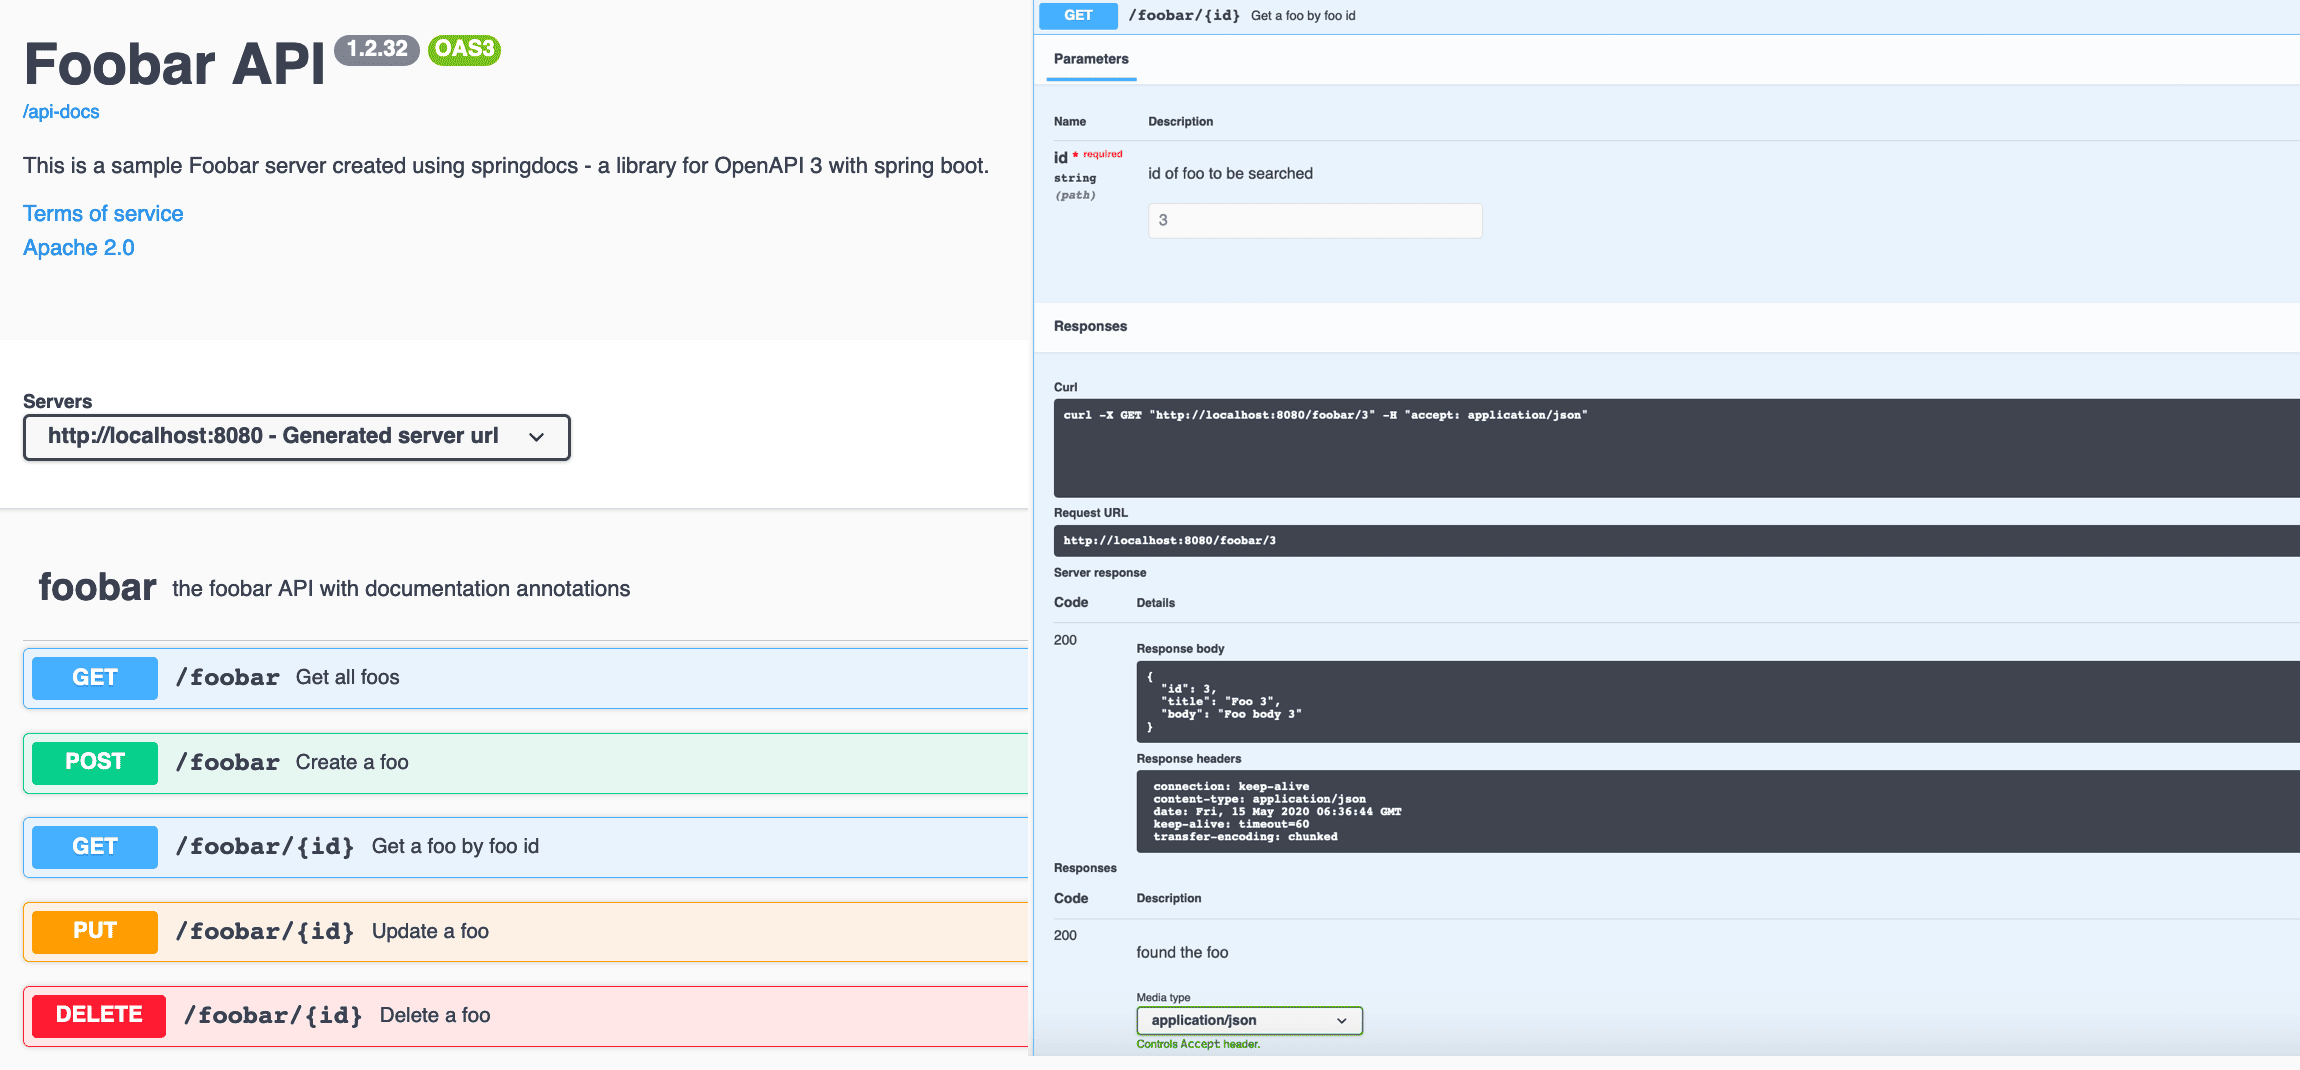
So with these minimal configurations, the user of our API can now see what it’s about, how to use it, and what results to expect. All we had to do was compile the code and run the Boot App.
5. Spring REST Docs
REST docs is a totally different take on API documentation. As described earlier, the process is test-driven, and the output is in the form of a static HTML page.
In our example here, we’ll be using Spring MVC Tests to create documentation snippets.
At the outset, we’ll need to add the spring-restdocs-mockmvc dependency and the asciidoc Maven plugin to our pom.
5.1. The JUnit5 Test
Now let’s have a look at the JUnit5 test which includes our documentation:
@ExtendWith({ RestDocumentationExtension.class, SpringExtension.class })
@SpringBootTest(classes = Application.class)
public class SpringRestDocsIntegrationTest {
    private MockMvc mockMvc;

    @Autowired
    private ObjectMapper objectMapper;

    @BeforeEach
    public void setup(WebApplicationContext webApplicationContext,
      RestDocumentationContextProvider restDocumentation) {
        this.mockMvc = MockMvcBuilders.webAppContextSetup(webApplicationContext)
          .apply(documentationConfiguration(restDocumentation))
          .build();
    }

    @Test
    public void whenGetFooById_thenSuccessful() throws Exception {
        ConstraintDescriptions desc = new ConstraintDescriptions(Foo.class);
        this.mockMvc.perform(get("/foo/{id}", 1))
          .andExpect(status().isOk())
          .andDo(document("getAFoo", preprocessRequest(prettyPrint()),
            preprocessResponse(prettyPrint()),
            pathParameters(parameterWithName("id").description("id of foo to be searched")),
            responseFields(fieldWithPath("id")
              .description("The id of the foo" +
                collectionToDelimitedString(desc.descriptionsForProperty("id"), ". ")),
              fieldWithPath("title").description("The title of the foo"),
              fieldWithPath("body").description("The body of the foo"))));
    }

    // more test methods to cover other mappings
}
After running this test, we get several files in our targets/generated-snippets directory with information about the given API operation. Particularly, whenGetFooById_thenSuccessful will give us eight adocs in a getAFoo folder in the directory.
Here’s a sample http-response.adoc, of course containing the response body:
[source,http,options="nowrap"]
----
HTTP/1.1 200 OK
Content-Type: application/json
Content-Length: 60

{
  "id" : 1,
  "title" : "Foo 1",
  "body" : "Foo body 1"
}
----
5.2. fooapi.adoc
Now we need a master file that will weave all these snippets together to form a well-structured HTML.
Let’s call it fooapi.adoc and see a small portion of it:
=== Accessing the foo GET
A `GET` request is used to access the foo read.
==== Request structure
include::{snippets}/getAFoo/http-request.adoc[]
==== Path Parameters
include::{snippets}/getAFoo/path-parameters.adoc[]
==== Example response
include::{snippets}/getAFoo/http-response.adoc[]
==== CURL request
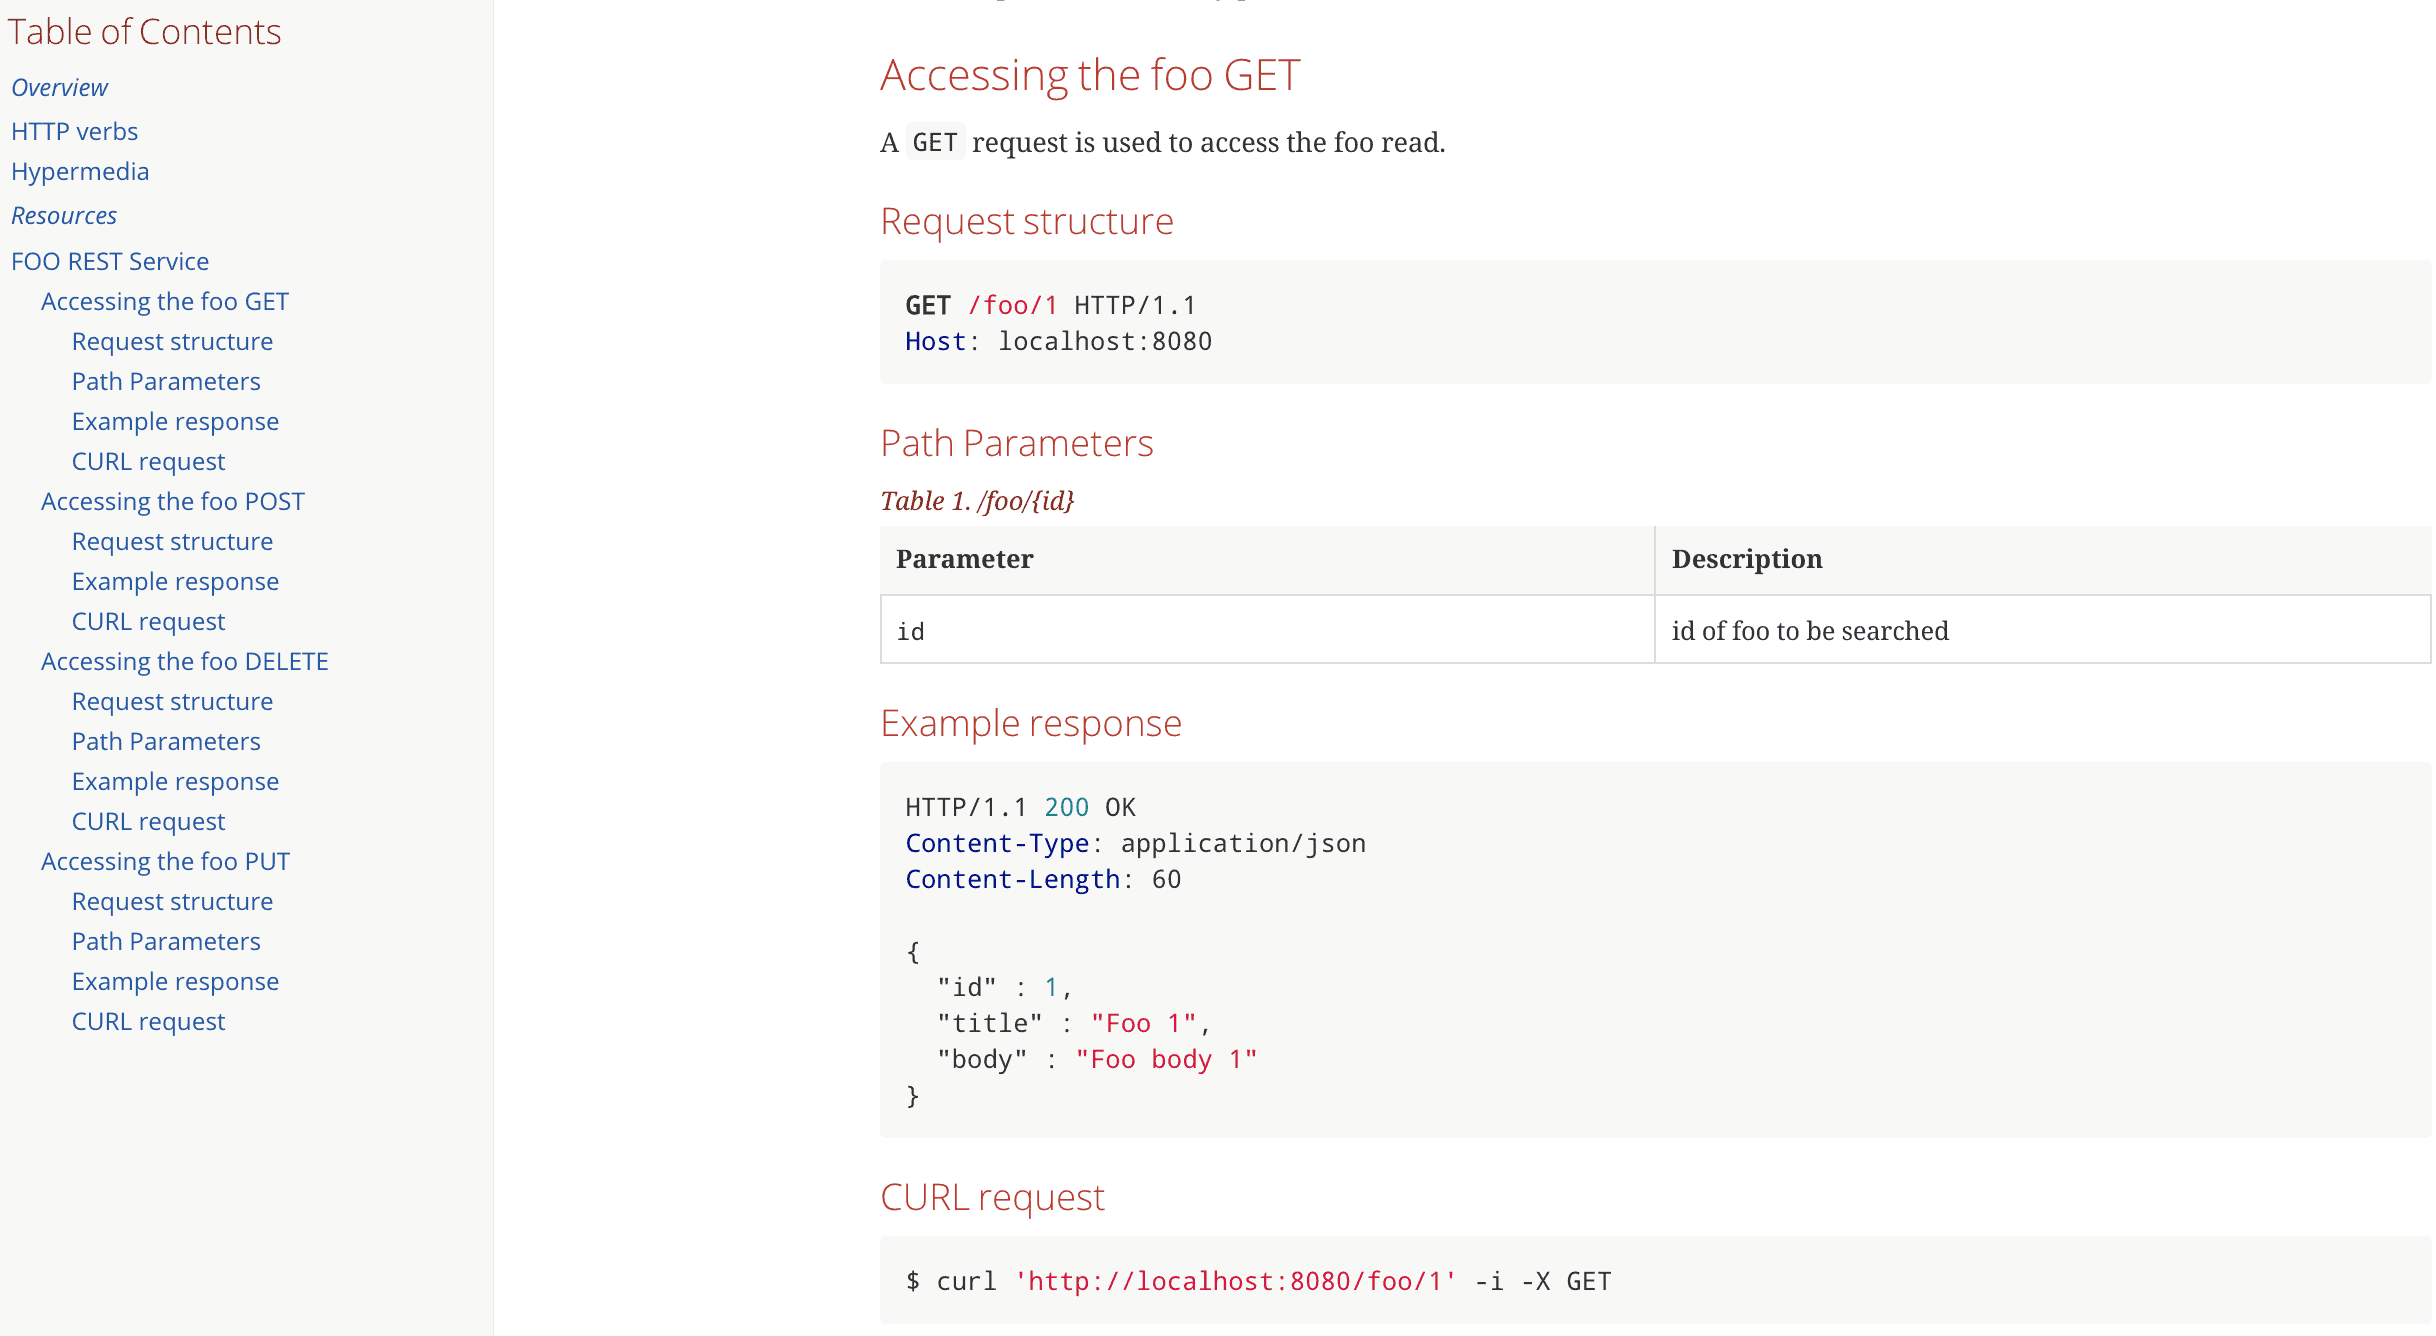
include::{snippets}/getAFoo/curl-request.adoc[]After executing the asciidoctor-maven-plugin, we get the final HTML file fooapi.html in the target/generated-docs folder.
And this is how it’ll look when opened in a browser:
6. Key Takeaways
Now that we’ve looked at both the implementations, let’s summarize the advantages and disadvantages.
With springdoc, the annotations we had to use cluttered our rest controller’s code and reduced its readability. Also, the documentation was tightly coupled to the code and would make its way into production.
Needless to say, maintaining the documentation is another challenge here – if something in the API changed, would the programmer always remember to update the corresponding OpenAPI annotation?
On the other hand, REST Docs neither looks as catchy as the other UI did nor can it be used for acceptance testing. But it has its advantages.
Notably, the successful completion of the Spring MVC test not only gives us the snippets but also verifies our API as any other unit test would. This forces us to make documentation changes corresponding to API modifications if any. Also, the documentation code is completely separate from the implementation.
But again, on the flip side, we had to write more code to generate the documentation. First, the test itself which is arguably as verbose as the OpenAPI annotations, and second, the master adoc.
It also needs more steps to generate the final HTML – running the test first and then the plugin. Springdoc only required us to run the Boot App.
7. Conclusion
In this tutorial, we looked at the differences between the OpenAPI based springdoc and Spring REST Docs. We also saw how to implement the two to generate documentation for a basic CRUD API.
In summary, both have their pros and cons, and the decision of using one over the other is subject to our specific requirements.


