1. Overview
In this tutorial, we’ll learn how to use Spring OAuth2RestTemplate to make OAuth2 REST calls.
We’ll create a Spring Web Application capable of listing the repositories of a GitHub account.
2. Maven Configuration
First, we need to add spring-boot-starter-security and the spring-security-oauth2-autoconfigure dependencies to our pom.xml. As we are building a web application, we also need spring-boot-starter-web and spring-boot-starter-thymeleaf artifacts to be included.
<dependency>
    <groupId>org.springframework.boot</groupId>
    <artifactId>spring-boot-starter-web</artifactId>
</dependency>
<dependency>
    <groupId>org.springframework.boot</groupId>
    <artifactId>spring-boot-starter-security</artifactId>
</dependency>
<dependency>
    <groupId>org.springframework.security.oauth.boot</groupId>
    <artifactId>spring-security-oauth2-autoconfigure</artifactId>
    <version>2.6.8</version>
</dependency>
<dependency>
    <groupId>org.springframework.boot</groupId>
    <artifactId>spring-boot-starter-thymeleaf</artifactId>
</dependency>
3. OAuth2 Properties
Next, let’s add the OAuth configuration to our application.properties file to be able to connect the GitHub account:
github.client.clientId=[CLIENT_ID]
github.client.clientSecret=[CLIENT_SECRET]
github.client.userAuthorizationUri=https://github.com/login/oauth/authorize
github.client.accessTokenUri=https://github.com/login/oauth/access_token
github.client.clientAuthenticationScheme=form

github.resource.userInfoUri=https://api.github.com/user
github.resource.repoUri=https://api.github.com/user/repos
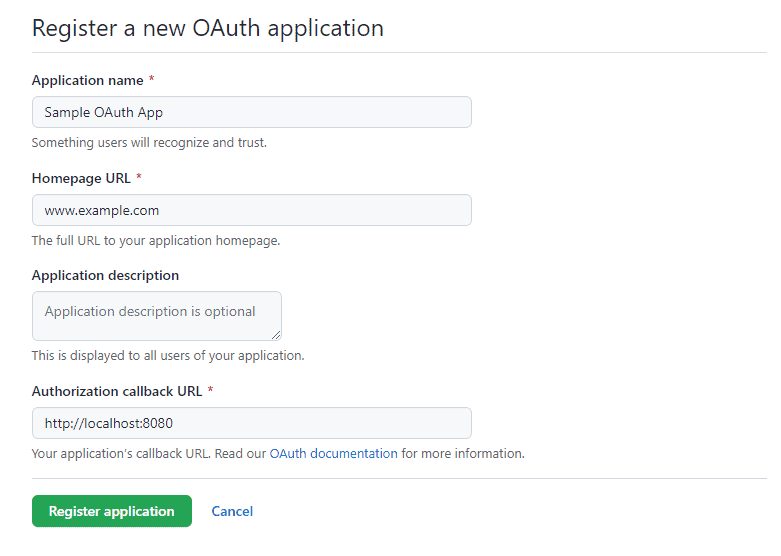
Notice we need to replace [CLIENT_ID] and [CLIENT_SECRET] with values from a GitHub OAuth App. We can follow the Creating an OAuth App guide to register a new app on GitHub:

Let’s make sure the Authorization callback URL is set to http://localhost:8080, which will redirect the OAuth flow to our web application home page.
4. OAuth2RestTemplate Configuration
Now, it’s time to create a security configuration to provide our application with OAuth2 support.
4.1. The SecurityConfig Class
First, let’s create Spring’s security configuration:
@Configuration
@EnableOAuth2Client
public class SecurityConfig {
    OAuth2ClientContext oauth2ClientContext;

    public SecurityConfig(OAuth2ClientContext oauth2ClientContext) {
        this.oauth2ClientContext = oauth2ClientContext;
    }

    ...
}
The @EnableOAuth2Client gives us access to an OAuth2 context that we’ll use to create our OAuth2RestTemplate.
4.2. OAuth2RestTemplate Bean
Second, we’ll create the bean for our OAuth2RestTemplate:
@Bean
public OAuth2RestTemplate restTemplate() {
    return new OAuth2RestTemplate(githubClient(), oauth2ClientContext);
}

@Bean
@ConfigurationProperties("github.client")
public AuthorizationCodeResourceDetails githubClient() {
    return new AuthorizationCodeResourceDetails();
}
With this, we’re using the OAuth2 properties and context to create an instance of the template.
The @ConfigurationProperties annotation injects all github.client properties to the AuthorizationCodeResourceDetails instance.
4.3. Authentication Filter
Third, we need an authentication filter to handle the OAuth2 flow:
private Filter oauth2ClientFilter() {
    OAuth2ClientAuthenticationProcessingFilter oauth2ClientFilter = new OAuth2ClientAuthenticationProcessingFilter("/login/github");
    OAuth2RestTemplate restTemplate = restTemplate();
    oauth2ClientFilter.setRestTemplate(restTemplate);
    UserInfoTokenServices tokenServices = new UserInfoTokenServices(githubResource().getUserInfoUri(), githubClient().getClientId());
    tokenServices.setRestTemplate(restTemplate);
    oauth2ClientFilter.setTokenServices(tokenServices);
    return oauth2ClientFilter;
}

@Bean
@ConfigurationProperties("github.resource")
public ResourceServerProperties githubResource() {
    return new ResourceServerProperties();
}
Here, we’re instructing the filter to initiate the OAuth2 flow on the /login/github URL of our application.
4.4. Spring Security Configuration
Finally, let’s register the OAuth2ClientContextFilter and create a web security configuration:
@Bean
public SecurityFilterChain filterChain(HttpSecurity http) throws Exception {
    http.authorizeRequests()
        .antMatchers("/", "/login**", "/error**")
        .permitAll()
        .anyRequest()
        .authenticated()
        .and()
        .logout()
        .logoutUrl("/logout")
        .logoutSuccessUrl("/")
        .and()
        .addFilterBefore(oauth2ClientFilter(), BasicAuthenticationFilter.class);
    return http.build();
}

@Bean
public FilterRegistrationBean<OAuth2ClientContextFilter> oauth2ClientFilterRegistration(OAuth2ClientContextFilter filter) {
    FilterRegistrationBean<OAuth2ClientContextFilter> registration = new FilterRegistrationBean<>();
    registration.setFilter(filter);
    registration.setOrder(Ordered.HIGHEST_PRECEDENCE + 1);
    return registration;
}
We secure our web application paths and ensure that the OAuth2ClientAuthenticationProcessingFilter is registered ahead of BasicAuthenticationFilter.
5. Using the OAuth2RestTemplate
The main goal of the OAuth2RestTemplate is to reduce the code needed to make OAuth2-based API calls. It basically meets two needs for our application:
- Handles the OAuth2 authentication flow
- Extends Spring RestTemplate for making API calls
We’re now able to use the OAuth2RestTemplate as an auto-wired bean in a web controller.
5.1. Login
Let’s create the index.html file with login and home options:
<!DOCTYPE html>
<html lang="en" xmlns="http://www.w3.org/1999/xhtml" xmlns:th="http://www.thymeleaf.org">
<head>
    <title>OAuth2Client</title>
</head>
<body>
<h3>
    <a href="/login/github" th:href="@{/home}" th:if="${#httpServletRequest?.remoteUser != undefined }">
        Go to Home
    </a>
    <a href="/hello" th:href="@{/login/github}" th:if="${#httpServletRequest?.remoteUser == undefined }">
        GitHub Login
    </a>
</h3>
</body>
</html>
Unauthenticated users will be presented with the login option, while authenticated users can access the home page.
5.2. Home
Now, let’s create a controller to greet the authenticated GitHub user:
@Controller
public class AppController {

    OAuth2RestTemplate restTemplate;

    public AppController(OAuth2RestTemplate restTemplate) {
        this.restTemplate = restTemplate;
    }

    @GetMapping("/home")
    public String welcome(Model model, Principal principal) {
        model.addAttribute("name", principal.getName());
        return "home";
    }
}
Notice that we have a security Principal parameter in the welcome method. We’re using the Principal‘s name as an attribute to the UI model.
Let’s take a look at the home.html template:
<!DOCTYPE html>
<html lang="en" xmlns="http://www.w3.org/1999/xhtml" xmlns:th="http://www.thymeleaf.org">
<head>
    <title>Home</title>
</head>
<body>
    <p>
        Welcome <b th:inline="text"> [[${name}]] </b>
    </p>
    <h3>
        <a href="/repos">View Repositories</a><br/><br/>
    </h3>

    <form th:action="@{/logout}" method="POST">
        <input type="submit" value="Logout"/>
    </form>
</body>
</html>
In addition, we’re adding a link to view the user’s repository list and a logout option.
5.3. GitHub Repositories
Now, it’s time to use the OAuth2RestTemplate created in the previous controller to present all the GitHub repositories owned by the user.
First, we need to create the GithubRepo class to represent a repository:
public class GithubRepo {
    Long id;
    String name;

    // getters and setters

}
Second, let’s add a repositories mapping to the previous AppController:
@GetMapping("/repos")
public String repos(Model model) {
    Collection<GithubRepo> repos = restTemplate.getForObject("https://api.github.com/user/repos", Collection.class);
    model.addAttribute("repos", repos);
    return "repositories";
}
The OAuth2RestTemplate handles all the boilerplate code for making a request to GitHub. Also, it converts the REST response into a GithubRepo collection.
Finally, let’s create the repositories.html template to iterate over the repositories collection:
<!DOCTYPE html>
<html lang="en" xmlns="http://www.w3.org/1999/xhtml" xmlns:th="http://www.thymeleaf.org">
<head>
    <title>Repositories</title>
</head>
<body>
    <p>
        <h2>Repos</h2>
    </p>
    <ul th:each="repo: ${repos}">
        <li th:text="${repo.name}"></li>
    </ul>
</body>
</html>
6. Conclusion
In this article, we learned how to use OAuth2RestTemplate to simplify REST calls to an OAuth2 resource server like GitHub.
We went through the building blocks of a web application running the OAuth2 flow. Then, we saw how to make a REST API call to retrieve all of a GitHub user’s repositories.
As always, the complete example of this tutorial can be found over on GitHub.


