Spring MVC Streaming and SSE Request Processing
Last updated: June 24, 2026


Mocking is an essential part of unit testing, and the Mockito library makes it easy to write clean and intuitive unit tests for your Java code.
Get started with mocking and improve your application tests using our Mockito guide:
Handling concurrency in an application can be a tricky process with many potential pitfalls. A solid grasp of the fundamentals will go a long way to help minimize these issues.
Get started with understanding multi-threaded applications with our Java Concurrency guide:
Spring 5 added support for reactive programming with the Spring WebFlux module, which has been improved upon ever since. Get started with the Reactor project basics and reactive programming in Spring Boot:
Since its introduction in Java 8, the Stream API has become a staple of Java development. The basic operations like iterating, filtering, mapping sequences of elements are deceptively simple to use.
But these can also be overused and fall into some common pitfalls.
To get a better understanding on how Streams work and how to combine them with other language features, check out our guide to Java Streams:
Explore Spring Boot 3 and Spring 6 in-depth through building a full REST API with the framework:
Yes, Spring Security can be complex, from the more advanced functionality within the Core to the deep OAuth support in the framework.
I built the security material as two full courses - Core and OAuth, to get practical with these more complex scenarios. We explore when and how to use each feature and code through it on the backing project.
You can explore the course here:
Spring Data JPA is a great way to handle the complexity of JPA with the powerful simplicity of Spring Boot.
Get started with Spring Data JPA through the guided reference course:
Refactor Java code safely — and automatically — with OpenRewrite.
Refactoring big codebases by hand is slow, risky, and easy to put off. That’s where OpenRewrite comes in. The open-source framework for large-scale, automated code transformations helps teams modernize safely and consistently.
Each month, the creators and maintainers of OpenRewrite at Moderne run live, hands-on training sessions — one for newcomers and one for experienced users. You’ll see how recipes work, how to apply them across projects, and how to modernize code with confidence.
Join the next session, bring your questions, and learn how to automate the kind of work that usually eats your sprint time.
1. Introduction
This simple tutorial demonstrates the use of several asynchronous and streaming objects in Spring MVC 5.x.x.
Specifically, we’ll review three key classes:
- ResponseBodyEmitter
- SseEmitter
- StreamingResponseBody
Also, we’ll discuss how to interact with them using a JavaScript client.
2. ResponseBodyEmitter
ResponseBodyEmitter handles async responses.
Also, it represents a parent for a number of subclasses – one of which we’ll take a closer look at below.
2.1. Server Side
It’s better to use a ResponseBodyEmitter along with its own dedicated asynchronous thread and wrapped with a ResponseEntity (which we can inject the emitter into directly):
@Controller
public class ResponseBodyEmitterController {

    private ExecutorService executor
      = Executors.newCachedThreadPool();

    @GetMapping("/rbe")
    public ResponseEntity<ResponseBodyEmitter> handleRbe() {
        ResponseBodyEmitter emitter = new ResponseBodyEmitter();
        executor.execute(() -> {
            try {
                emitter.send(
                  "/rbe" + " @ " + new Date(), MediaType.TEXT_PLAIN);
                emitter.complete();
            } catch (Exception ex) {
                emitter.completeWithError(ex);
            }
        });
        return new ResponseEntity(emitter, HttpStatus.OK);
    }
}
So, in the example above, we can sidestep needing to use CompleteableFutures, more complicated asynchronous promises, or use of the @Async annotation.
Instead, we simply declare our asynchronous entity and wrap it in a new Thread provided by the ExecutorService.
2.2. Client Side
For client-side use, we can use a simple XHR method and call our API endpoints just like in a usual AJAX operation:
var xhr = function(url) {
    return new Promise(function(resolve, reject) {
        var xmhr = new XMLHttpRequest();
        //...
        xmhr.open("GET", url, true);
        xmhr.send();
       //...
    });
};

xhr('http://localhost:8080/javamvcasync/rbe')
  .then(function(success){ //... });
3. SseEmitter
SseEmitter is actually a subclass of ResponseBodyEmitter and provides additional Server-Sent Event (SSE) support out-of-the-box.
3.1. Server Side
So, let’s take a quick look at an example controller leveraging this powerful entity:
@Controller
public class SseEmitterController {
    private ExecutorService nonBlockingService = Executors
      .newCachedThreadPool();

    @GetMapping("/sse")
    public SseEmitter handleSse() {
         SseEmitter emitter = new SseEmitter();
         nonBlockingService.execute(() -> {
             try {
                 emitter.send("/sse" + " @ " + new Date());
                 // we could send more events
                 emitter.complete();
             } catch (Exception ex) {
                 emitter.completeWithError(ex);
             }
         });
         return emitter;
    }
}
Pretty standard fare, but we’ll notice a few differences between this and our usual REST controller:
- First, we return a SseEmitter
- Also, we wrap the core response information in its own Thread
- Finally, we send response information using emitter.send()
3.2. Client Side
Our client works a little bit differently this time since we can leverage the continuously connected Server-Sent Event Library:
var sse = new EventSource('http://localhost:8080/javamvcasync/sse');
sse.onmessage = function (evt) {
    var el = document.getElementById('sse');
    el.appendChild(document.createTextNode(evt.data));
    el.appendChild(document.createElement('br'));
};
4. StreamingResponseBody
Lastly, we can use StreamingResponseBody to write directly to an OutputStream before passing that written information back to the client using a ResponseEntity.
4.1. Server Side
@Controller
public class StreamingResponseBodyController {

    @GetMapping("/srb")
    public ResponseEntity<StreamingResponseBody> handleRbe() {
        StreamingResponseBody stream = out -> {
            String msg = "/srb" + " @ " + new Date();
            out.write(msg.getBytes());
        };
        return new ResponseEntity(stream, HttpStatus.OK);
    }
}
4.2. Client Side
Just like before, we’ll use a regular XHR method to access the controller above:
var xhr = function(url) {
    return new Promise(function(resolve, reject) {
        var xmhr = new XMLHttpRequest();
        //...
        xmhr.open("GET", url, true);
        xmhr.send();
        //...
    });
};

xhr('http://localhost:8080/javamvcasync/srb')
  .then(function(success){ //... });
Next, let’s take a look at some successful uses of these examples.
5. Bringing It All Together
After we’ve successfully compiled our server and run our client above (accessing the supplied index.jsp), we should see the following in our browser:
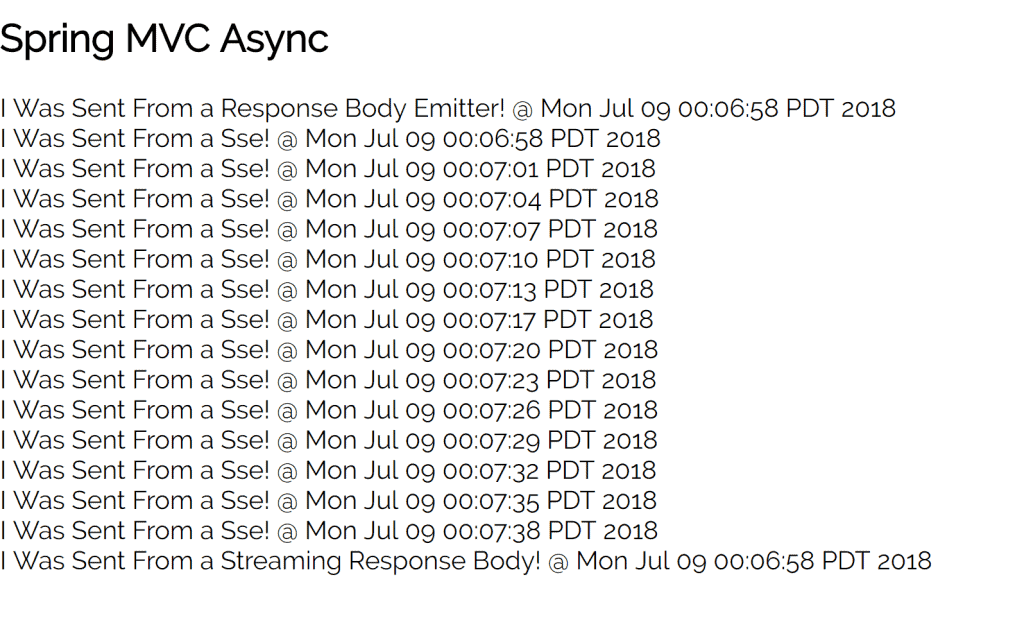
And the following in our terminal:
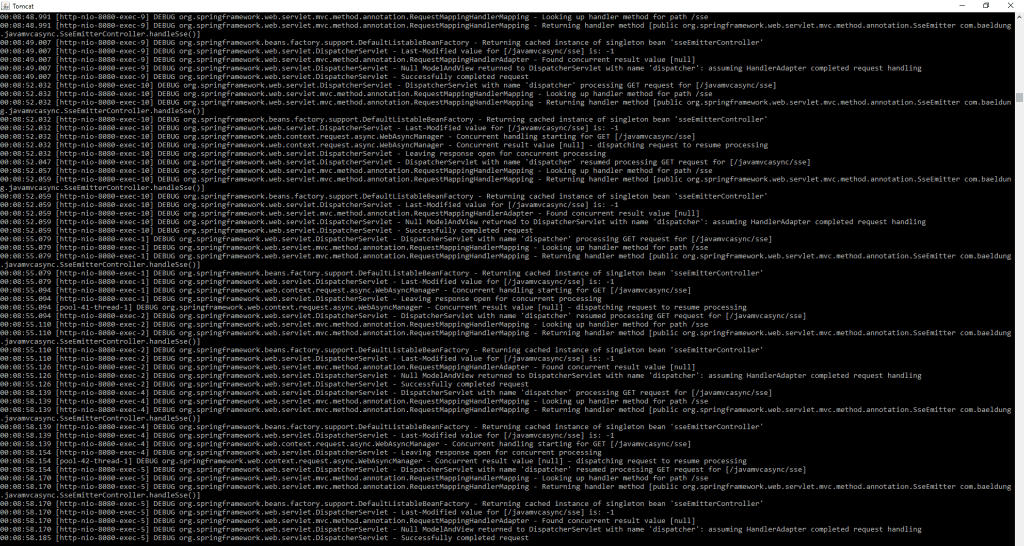
We can also call the endpoints directly and see them streaming responses appear in our browser.
6. Conclusion
While Future and CompleteableFuture have proven robust additions to Java and Spring, we now have several resources at our disposal to more adequately handle asynchronous and streaming data for highly-concurrent web applications.


