

Mocking is an essential part of unit testing, and the Mockito library makes it easy to write clean and intuitive unit tests for your Java code.
Get started with mocking and improve your application tests using our Mockito guide:
Handling concurrency in an application can be a tricky process with many potential pitfalls. A solid grasp of the fundamentals will go a long way to help minimize these issues.
Get started with understanding multi-threaded applications with our Java Concurrency guide:
Spring 5 added support for reactive programming with the Spring WebFlux module, which has been improved upon ever since. Get started with the Reactor project basics and reactive programming in Spring Boot:
Since its introduction in Java 8, the Stream API has become a staple of Java development. The basic operations like iterating, filtering, mapping sequences of elements are deceptively simple to use.
But these can also be overused and fall into some common pitfalls.
To get a better understanding on how Streams work and how to combine them with other language features, check out our guide to Java Streams:
Explore Spring Boot 3 and Spring 6 in-depth through building a full REST API with the framework:
Yes, Spring Security can be complex, from the more advanced functionality within the Core to the deep OAuth support in the framework.
I built the security material as two full courses - Core and OAuth, to get practical with these more complex scenarios. We explore when and how to use each feature and code through it on the backing project.
You can explore the course here:
Spring Data JPA is a great way to handle the complexity of JPA with the powerful simplicity of Spring Boot.
Get started with Spring Data JPA through the guided reference course:
Refactor Java code safely — and automatically — with OpenRewrite.
Refactoring big codebases by hand is slow, risky, and easy to put off. That’s where OpenRewrite comes in. The open-source framework for large-scale, automated code transformations helps teams modernize safely and consistently.
Each month, the creators and maintainers of OpenRewrite at Moderne run live, hands-on training sessions — one for newcomers and one for experienced users. You’ll see how recipes work, how to apply them across projects, and how to modernize code with confidence.
Join the next session, bring your questions, and learn how to automate the kind of work that usually eats your sprint time.
1. Introduction
Modular Monolith is an architectural style where our source code is structured on the concept of modules. For many organizations, the modular monolith can be an excellent choice. It helps maintain a level of independence, which helps us transition to Microservices Architecture if required.
Spring Modulith is a project by Spring that can be used for modular monolith applications that guide developers in finding and working with application modules. Also, it supports building well-structured, domain-aligned Spring Boot applications.
In this tutorial, we’ll discuss the basics of the Spring Modulith project and show an example of how it can be used in practice.
2. Modular Monolith Architecture
We have different options for structuring the code of our application. Traditionally, we design software solutions around infrastructure. But, when we design applications around business, it leads to a better understanding and maintenance of the system. Modular monolith architecture is one such design.
Modular monolith architecture is gaining popularity among architects and developers due to its simplicity and maintainability. If we apply Domain-driven Design (DDD) to our existing monolithic application, we can refactor it toward a modular monolith architecture:
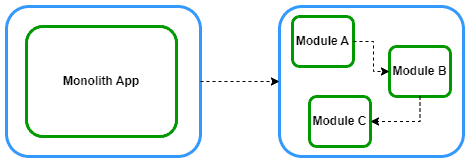
We can split the core of the monolith into modules by identifying the domains of our application and defining bounded contexts.
Let’s see how can we implement modular monolith applications within the Spring Boot framework. Spring Modulith consists of a set of libraries that helps developers to build modular Spring Boot applications.
3. Spring Modulith Basics
Spring Modulith helps developers to work with application modules driven by the domain. Also, it supports the verification and documentation of such modular arrangements.
3.1. Maven Dependencies
Let’s start by importing the spring-modulith-bom dependency as a Bill of Materials (BOM) in the <dependencyManagement> section of the pom.xml:
<dependencyManagement>
    <dependencies>
        <dependency>
            <groupId>org.springframework.modulith</groupId>
            <artifactId>spring-modulith-bom</artifactId>
            <version>1.2.2</version>
            <scope>import</scope>
            <type>pom</type>
        </dependency>
    </dependencies>
</dependencyManagement>
Also, we’ll need some core Spring Modulith dependencies:
<dependency>
    <groupId>org.springframework.modulith</groupId>
    <artifactId>spring-modulith-api</artifactId>
</dependency>
<dependency>
    <groupId>org.springframework.modulith</groupId>
    <artifactId>spring-modulith-starter-test</artifactId>
    <scope>test</scope>
</dependency>
3.2. Application Modules
The main concept of Spring Modulith is the application module. An application module is a unit of functionality that exposes an API to other modules. Also, it has some internal implementations that aren’t supposed to be accessed by other modules. When we design our application, we consider an application module for each domain.
Spring Modulith provides different ways of expressing modules. We can consider the domain or business modules of our application as direct sub-packages of the application’s main package. In other words, an application module is a package located at the same level as the Spring Boot main class (annotated with @SpringBootApplication):
├───pom.xml
├───src
    ├───main
    │   ├───java
    │   │   └───main-package
    │   │       └───module A
    │   │       └───module B
    │   │           ├───sub-module B
    │   │       └───module C
    │   │           ├───sub-module C
    │   │       │ MainApplication.java
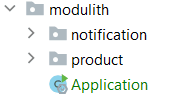
Now, let’s see a simple application including product and notification domains. In this sample, we call a service from the product module, and then the product module calls a service from the notification module.
First, we’ll create two application modules: product and notification. To do this, we need to create two direct sub-packages in the main package:
Let’s take a look at the product module for this example. We have a simple Product class in the product module:
public class Product {

    private String name;
    private String description;
    private int price;

    public Product(String name, String description, int price) {
        this.name = name;
        this.description = description;
        this.price = price;
    }

    // getters and setters

}
Then, let’s define ProductService bean in the product module:
@Service
public class ProductService {

    private final NotificationService notificationService;

    public ProductService(ApplicationEventPublisher events, NotificationService notificationService) {
        this.events = events;
        this.notificationService = notificationService;
    }

    public void create(Product product) {
        notificationService.createNotification(new Notification(new Date(), NotificationType.SMS, product.getName()));
    }
}
In this class, the create() method invokes an exposed NotificationService API from the notification module and also creates an instance of the Notification class.
Let’s take a look at the notification module. The notification module includes Notification, NotificationType, and NotificationService classes.
Let’s see the NotificationService bean:
@Service
public class NotificationService {

    private static final Logger LOG = LoggerFactory.getLogger(NotificationService.class);

    public void createNotification(Notification notification) {
        LOG.info("Received notification by module dependency for product {} in date {} by {}.",
          notification.getProductName(),
          notification.getDate(),
          notification.getFormat());
    }
}
In this service, we just log the created product.
Finally, in the main() method, we invoke the create() method of the ProductService API from the product module:
@SpringBootApplication
public class Application {
public static void main(String[] args) {
SpringApplication.run(Application.class, args)
.getBean(ProductService.class)
.create(new Product("baeldung", "course", 10));
}
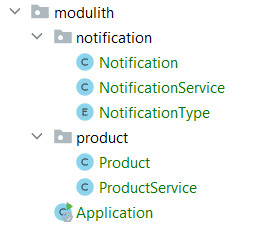
}The directory structure is depicted below:
3.3. Application Module Model
We can analyze our codebase to derive an application module model based on the arrangement. The ApplicationModules class provides functionality to create application module arrangements.
Let’s create an application module model:
@Test
void createApplicationModuleModel() {
    ApplicationModules modules = ApplicationModules.of(Application.class);
    modules.forEach(System.out::println);
}
If we take a look at the console output, we can see our application module arrangement:
# Notification
> Logical name: notification
> Base package: com.baeldung.ecommerce.notification
> Spring beans:
  + ….NotificationService

# Product
> Logical name: product
> Base package: com.baeldung.ecommerce.product
> Spring beans:
  + ….ProductService
As we can see, it detects our two modules: notification and product. Also, it lists each module’s Spring components.
3.4. Module Encapsulation
It’s worth noting that the current design has issues. The ProductService API has access to the Notification class, which is the internal functionality of the notification module.
In modular design, we must protect and hide specific information and control access to an internal implementation. Spring Modulith provides module encapsulation using sub-packages of the application module base package.
Also, it hides types from being referred to by code residing in other packages. A module can access the content of any other module but can’t access sub-packages of other modules.
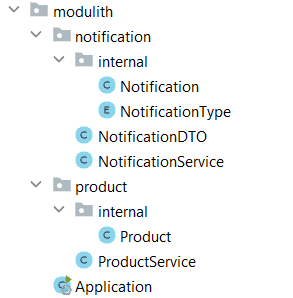
Now, let’s create an internal sub-package inside each module and move the internal implementations to it:
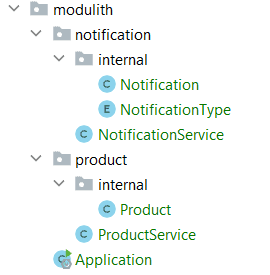
In such an arrangement, the notification package is considered an API package. Source code from other application modules can refer to types within that. But source code within the notification.internal package mustn’t be referred to from other modules.
3.5. Verifying the Modular Structure
There’s another issue with this design. In the above example, the Notification class is located in the notification.internal package. But, we referred to the Notification class from other packages, such as the product one:
public void create(Product product) {
    notificationService.createNotification(new Notification(new Date(), NotificationType.SMS, product.getName()));
}
This, unfortunately, means that it violates module access rules. In this case, the Spring Modulith can’t make Java compilation fail to prevent these illegal references. It uses unit tests instead:
@Test
void verifiesModularStructure() {
    ApplicationModules modules = ApplicationModules.of(Application.class);
    modules.verify();
}
We use the verify() method on the ApplicationModules instance to identify whether our code arrangement adheres to the intended constraints. Spring Modulith uses the ArchUnit project for this capability.
Our verification test fails for the example above and throws org.springframework.modulith.core.Violations exception:
org.springframework.modulith.core.Violations:
- Module 'product' depends on non-exposed type com.baeldung.modulith.notification.internal.Notification within module 'notification'!
Method <com.baeldung.modulith.product.ProductService.create(com.baeldung.modulith.product.internal.Product)> calls constructor <com.baeldung.modulith.notification.internal.Notification.<init>(java.util.Date, com.baeldung.modulith.notification.internal.NotificationType, java.lang.String)> in (ProductService.java:25)
The test fails because the product module tries to access the notification module’s internal class Notification.
Now, let’s fix it by adding a NotificationDTO class to the notification module:
public class NotificationDTO {
    private Date date;
    private String format;
    private String productName;

    // getters and setters
}
After that, we use the NotificationDTO instance instead of the Notification in the product module:
public void create(Product product) {
    notificationService.createNotification(new NotificationDTO(new Date(), "SMS", product.getName()));
}
The final directory structure is depicted below:
3.6. Documenting Modules
We can document the relationships between the modules of a project. Spring Modulith offers to generate diagrams based on PlantUML, with UML or C4 skins.
Let’s export application modules as C4 component diagrams:
@Test
void createModuleDocumentation() {
    ApplicationModules modules = ApplicationModules.of(Application.class);
    new Documenter(modules)
      .writeDocumentation()
      .writeIndividualModulesAsPlantUml();
}
The C4 diagrams will be created in the target/modulith-docs directory as puml files.
Let’s render the generated component diagram using the online PlantUML server:
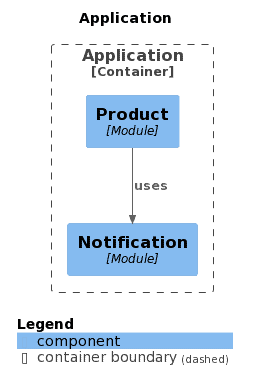
This diagram shows that the product module uses the notification module’s API.
4. Inter-Module Interaction Using Events
We have two approaches for inter-module interaction: depending on the other application module’s Spring bean or using events.
In the previous section, we injected the notification module API into the product module. However, Spring Modulith encourages using Spring Framework application events for inter-module communication. To keep application modules as decoupled as possible from each other, we use event publication and consumption as the primary means of interaction.
4.1. Publishing an Event
Now, let’s use Spring’s ApplicationEventPublisher to publish a domain event:
@Service
public class ProductService {

    private final ApplicationEventPublisher events;

    public ProductService(ApplicationEventPublisher events, NotificationService notificationService) {
        this.events = events;
        this.notificationService = notificationService;
    }

    public void create(Product product) {
        events.publishEvent(new NotificationDTO(new Date(), "SMS", product.getName()));
    }
}
We simply injected the ApplicationEventPublisher and used the publishEvent() API.
4.2. Application Module Listener
To register a listener, Spring Modulith provides the @ApplicationModuleListener annotation:
@Service
public class NotificationService {
    @ApplicationModuleListener
    public void notificationEvent(NotificationDTO event) {
        Notification notification = toEntity(event);
        LOG.info("Received notification by event for product {} in date {} by {}.",
          notification.getProductName(),
          notification.getDate(),
          notification.getFormat());
    }
We can use the @ApplicationModuleListener annotation on the method level. In the above example, we consumed the NotificationDTO event and logged the details.
4.3. Asynchronous Event Handling
For asynchronous event handling, we can use the @ApplicationModuleListener annotation, which already includes the functionality of @Async, @Transactional, and @TransactionalEventListener. Therefore, we don’t need to add the @Async annotation separately:
@ApplicationModuleListener
public void notificationEvent(NotificationDTO event) {
    // ...
}
In addition, asynchronous behavior needs to be enabled in the Spring context with the @EnableAsync annotation. It can be added to the main application class:
@EnableAsync
@SpringBootApplication
public class Application {

    public static void main(String[] args) {
        // ...
    }
}
5. Conclusion
In this guide, we focused on and covered the basics of the Spring Modulith project. We started by talking about what a modular monolith design is.
Next, we talked about application modules. We also covered the creation of the application module model and the verification of its structure in detail.
Finally, we explained inter-module interaction using events.


