

Mocking is an essential part of unit testing, and the Mockito library makes it easy to write clean and intuitive unit tests for your Java code.
Get started with mocking and improve your application tests using our Mockito guide:
Handling concurrency in an application can be a tricky process with many potential pitfalls. A solid grasp of the fundamentals will go a long way to help minimize these issues.
Get started with understanding multi-threaded applications with our Java Concurrency guide:
Spring 5 added support for reactive programming with the Spring WebFlux module, which has been improved upon ever since. Get started with the Reactor project basics and reactive programming in Spring Boot:
Since its introduction in Java 8, the Stream API has become a staple of Java development. The basic operations like iterating, filtering, mapping sequences of elements are deceptively simple to use.
But these can also be overused and fall into some common pitfalls.
To get a better understanding on how Streams work and how to combine them with other language features, check out our guide to Java Streams:
Explore Spring Boot 3 and Spring 6 in-depth through building a full REST API with the framework:
Yes, Spring Security can be complex, from the more advanced functionality within the Core to the deep OAuth support in the framework.
I built the security material as two full courses - Core and OAuth, to get practical with these more complex scenarios. We explore when and how to use each feature and code through it on the backing project.
You can explore the course here:
Spring Data JPA is a great way to handle the complexity of JPA with the powerful simplicity of Spring Boot.
Get started with Spring Data JPA through the guided reference course:
Refactor Java code safely — and automatically — with OpenRewrite.
Refactoring big codebases by hand is slow, risky, and easy to put off. That’s where OpenRewrite comes in. The open-source framework for large-scale, automated code transformations helps teams modernize safely and consistently.
Each month, the creators and maintainers of OpenRewrite at Moderne run live, hands-on training sessions — one for newcomers and one for experienced users. You’ll see how recipes work, how to apply them across projects, and how to modernize code with confidence.
Join the next session, bring your questions, and learn how to automate the kind of work that usually eats your sprint time.
1. Overview
Keycloak is an open-source identity and access management or IAM solution, that can be used as a third-party authorization server to manage our web or mobile applications’ authentication and authorization requirements.
In this tutorial, we’ll focus on how we can customize the theme for our Keycloak server so that we can have a different look and feel for our end-user facing web pages.
First, we’ll establish a background from the perspective of a standalone Keycloak server. In later sections, we’ll look at similar examples in the context of an embedded one.
For that, we’ll build on top of our previous articles: a Quick Guide to Using Keycloak and Keycloak Embedded in a Spring Boot Application. So, for those starting out, it’s a good idea to go through them first.
2. Themes in Keycloak
2.1. Default Themes
A couple of themes are pre-built in Keycloak and come bundled with the distribution.
For a standalone server, these can be found as different folders within the theme directory of ../lib/lib/main/org.keycloak.keycloak-themes-20.0.3.jar, which can be opened using any
standard ZIP archive tool:
- base: a skeletal theme that contains HTML templates and message bundles; all themes, including custom ones, generally inherit from it
- keycloak: contains images and stylesheets for beautifying pages; if we don’t provide a custom theme, this is the one used by default
- keycloak.v2: react based theme; part of new Admin Console; old console is deprecated and will be removed in Keycloak 21.
It is not recommended to modify the existing themes. Instead, we should create a new theme that extends one of the above two.
To create a new customized theme, we’ll need to add a new folder, let’s call it custom, to the themes directory. In case we want a complete overhaul, copying contents from the base folder is the best way to kick-start.
For our demo, we’re not planning on replacing everything, so it’s pragmatic to get the contents from the keycloak directory.
As we’ll see in the next section, custom will only need the contents of the theme type that we want to override, and not the entire keycloak folder.
2.2. Types of Themes
Keycloak supports five types of themes:
- Welcome: for the landing page
- Login: for login, OTP, grant, registration, and forgot password pages
- Account: for user account management pages
- Admin Console: for admin console
- Email: for emails that are sent by the server
The last four themes from the above list can be set via the Admin Console for a standalone server. When we create a new folder in the themes directory, it’s available for selection after a server restart.
Let’s login to the admin console with the credentials initial1/zaq1!QAZ (set in the previous tutorial) and go to the Themes tab for our realm:
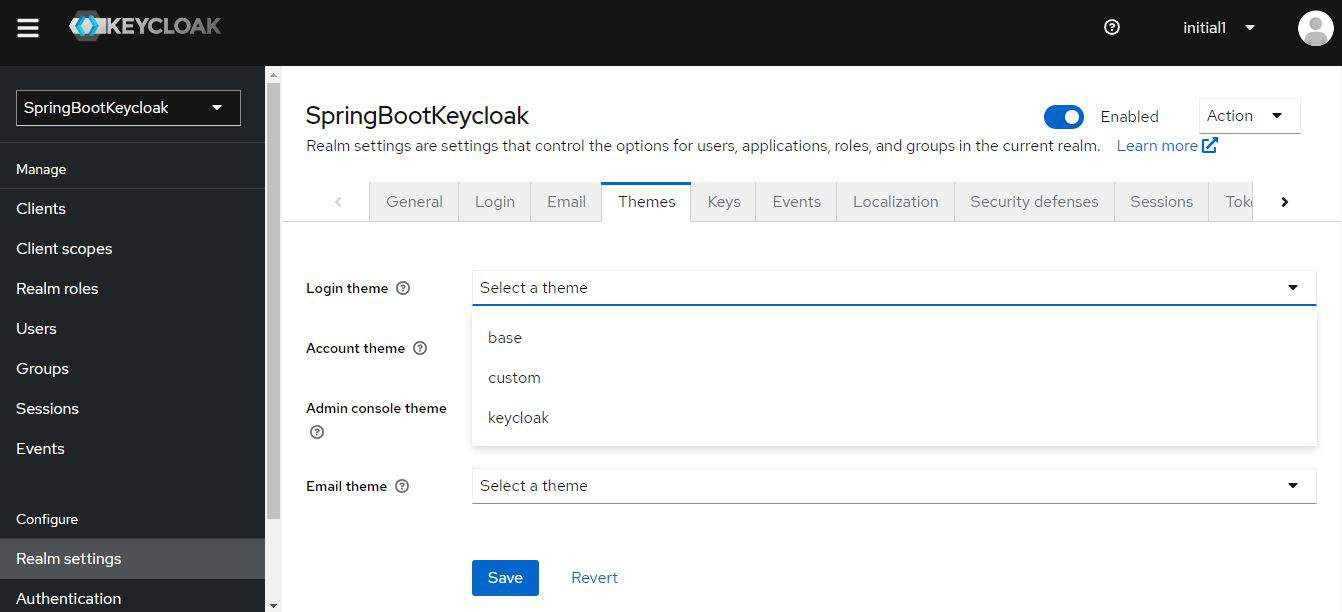
Notably, the themes are set realm-wise so that we can have different ones for different realms. Here we’re setting our custom theme for user account management for our SpringBootKeycloak realm.
2.3. Structure of a Theme Type
Apart from the HTML templates, message bundles, images, and stylesheets as outlined in our Default Themes section, a theme in Keycloak consists of a couple more elements – theme properties and scripts.
Each theme type contains a theme.properties file. As an example, let’s have a look at this file from the account type:
parent=base
import=common/keycloak

styles=css/account.css
stylesCommon=node_modules/patternfly/dist/css/patternfly.min.css node_modules/patternfly/dist/css/patternfly-additions.min.css
As we can see, this theme extends from the base theme to get all its HTML and message bundles and also imports the common theme to include a few styles from it. Apart from that, it also defines its own style, css/account.css.
Scripts are an optional feature. If we need to include tailored JavaScript files for our templates for a given theme type, we can create a resources/js directory and keep them there. Next, we need to include them in our theme.properties:
scripts=js/script1.js js/script2.js2.4. Adding Customizations
Now on to the fun part!
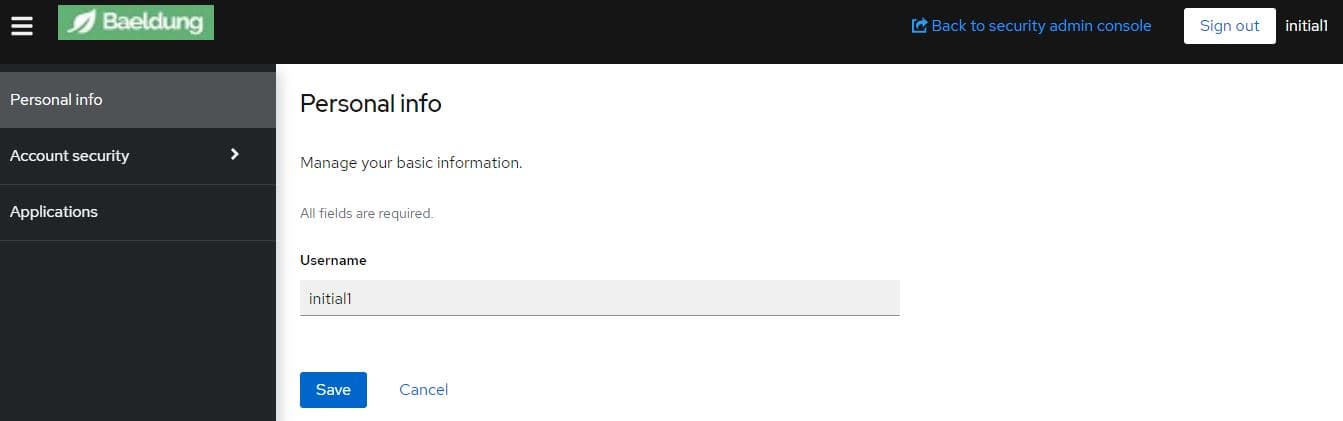
Let’s take the example of our Account Management page and see how to change its appearance. To be precise, we’ll be changing the logo appearing on the page.
Just before we’ll do all the changes, below is the original template, available at http://localhost:8080/realms/master/account/#/personal-info:

Let’s try to change the logo to our own. For that, we need to add a new folder, account inside the themes/custom directory. We’ll rather copy it from the theme/keycloak.v2 directory so that we have all the required elements.
Now, it’s just a matter of adding our new logo file, say baeldung.png to resources/public in our custom/account directory and modifying theme.properties file in the account folder:
# This is the logo in upper lefthand corner.
# It must be a relative path.
logo=/public/baeldung.png
And here’s how the page looks now:
Importantly, during the development phase, we’ll like to see the effect of our changes immediately, without a server restart. To enable that, we need to run Keycloak with the following options :
bin/kc.[sh|bat] start --spi-theme-static-max-age=-1 --spi-theme-cache-themes=false --spi-theme-cache-templates=falseSimilar to how we customized the account theme here, to change the look and feel of the other theme types, we need to add new folders called admin, email, or login, and follow the same process.
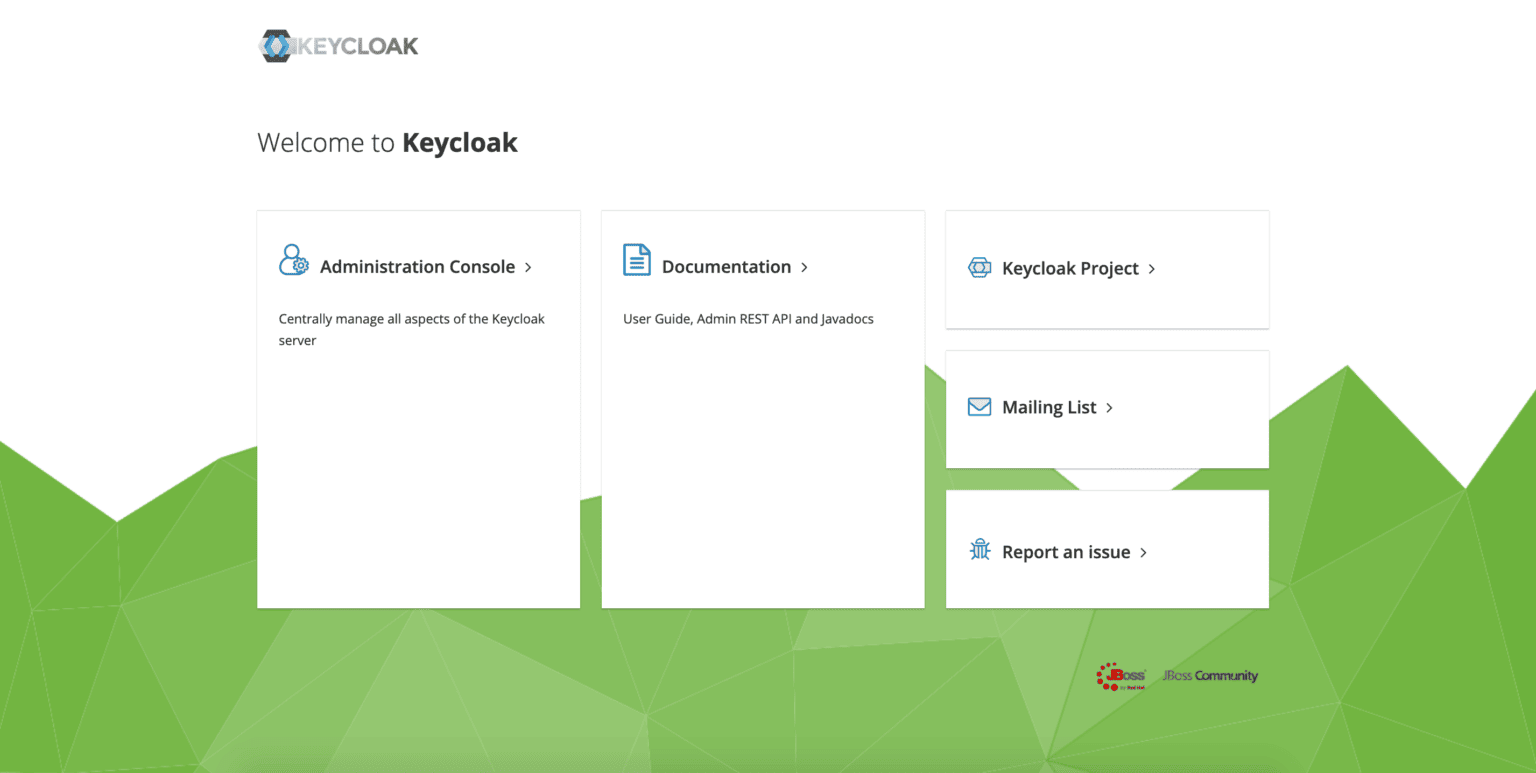
2.5. Customizing the Welcome Page
To customize the Welcome page, first, we have to create a folder welcome under themes/custom. Again, it’s prudent to copy index.ftl and theme.properties along with existing resources from the theme/keycloak/welcome directory.
Second, we have to run Keycloak with the following options:
bin/kc.[sh|bat] start-dev --spi-theme-welcome-theme=customNow let’s try to change the background of this page.
Let’s navigate to http://localhost:8080 to see what it initially looks like:

To change the background image, keep the new image, say geo.png, inside themes/custom/welcome/resources, then simply edit resources/css/welcome.css:
body {
    background: #fff url(../geo.png);
    background-size: cover;
}
Here’s the effect:
3. Customizing an Embedded Keycloak Server
An embedded Keycloak server by definition means that we do not have the IAM provider installed on our machine. Consequently, we need to keep all required artifacts, such as themes.properties and CSS files, in our source code.
A good place to keep them is in the src/main/resources/themes folder of our Spring Boot project.
Of course, since the files of the theme structure are the same, the way we customize them also remains the same as the standalone server.
However, we need to configure a few things to instruct the Keycloak server to pick stuff up from our custom theme.
3.1. Changes to Realm Definition File
First, let’s see how to specify a custom theme for a given theme type.
Recall that in the case of our standalone server, on the Themes page of our admin console, we’d added the custom theme from the dropdown for Account Theme.
To achieve the same effect here, we need to add a line to our realm definition file, baeldung-realm.json:
"accountTheme": "custom",And that’s all we need; all other types such as Login and Email will still follow the standard theme.
3.2. Redirecting to the Custom Theme Directory
Next, let’s see how we can tell the server where the said custom theme is located.
We can do this in a couple of ways.
At the time of starting up the Boot App for our embedded server, we can specify the theme directory as a VM argument:
mvn spring-boot:run -Dkeycloak.theme.dir=/src/main/resources/themesTo achieve the same programmatically, we can set it as a system property in our @SpringBootApplication class:
public static void main(String[] args) throws Exception {
    System.setProperty("keycloak.theme.dir","src/main/resources/themes");
    SpringApplication.run(JWTAuthorizationServerApp.class, args);
}
Or, we can change the server configuration in the keycloak-server.json:
"theme": {
    ....
    "welcomeTheme": "custom",
    "folder": {
        "dir": "src/main/resources/themes"
    }
},
Notably, here we added a welcomeTheme attribute as well to enable customizations to the welcome page.
As noted earlier, all other changes to CSS files and images remain the same.
To view the changes to our welcome page, we need to start the embedded server and navigate to http://localhost:8083/auth.
The account management page is available at http://localhost:8083/auth/realms/baeldung/account and we can access it using the following credentials: [email protected]/123.
4. Conclusion
In this tutorial, we learned about themes in Keycloak – their types and structure.
Then we looked at a couple of pre-built themes and how to extend them to create our own customized theme in a standalone instance.
Lastly, we saw how to achieve the same in an embedded Keycloak server.


