Detach and Attach Entity in Spring JpaRepository
Last updated: January 28, 2026


Mocking is an essential part of unit testing, and the Mockito library makes it easy to write clean and intuitive unit tests for your Java code.
Get started with mocking and improve your application tests using our Mockito guide:
Handling concurrency in an application can be a tricky process with many potential pitfalls. A solid grasp of the fundamentals will go a long way to help minimize these issues.
Get started with understanding multi-threaded applications with our Java Concurrency guide:
Spring 5 added support for reactive programming with the Spring WebFlux module, which has been improved upon ever since. Get started with the Reactor project basics and reactive programming in Spring Boot:
Since its introduction in Java 8, the Stream API has become a staple of Java development. The basic operations like iterating, filtering, mapping sequences of elements are deceptively simple to use.
But these can also be overused and fall into some common pitfalls.
To get a better understanding on how Streams work and how to combine them with other language features, check out our guide to Java Streams:
Explore Spring Boot 3 and Spring 6 in-depth through building a full REST API with the framework:
Yes, Spring Security can be complex, from the more advanced functionality within the Core to the deep OAuth support in the framework.
I built the security material as two full courses - Core and OAuth, to get practical with these more complex scenarios. We explore when and how to use each feature and code through it on the backing project.
You can explore the course here:
All Access is finally out, with all of my Spring courses. Learn JUnit is out as well, and Learn Maven is coming fast. And, of course, quite a bit more affordable. Finally.
>> GET THE COURSE
Spring Data JPA is a great way to handle the complexity of JPA with the powerful simplicity of Spring Boot.
Get started with Spring Data JPA through the guided reference course:
Refactor Java code safely — and automatically — with OpenRewrite.
Refactoring big codebases by hand is slow, risky, and easy to put off. That’s where OpenRewrite comes in. The open-source framework for large-scale, automated code transformations helps teams modernize safely and consistently.
Each month, the creators and maintainers of OpenRewrite at Moderne run live, hands-on training sessions — one for newcomers and one for experienced users. You’ll see how recipes work, how to apply them across projects, and how to modernize code with confidence.
Join the next session, bring your questions, and learn how to automate the kind of work that usually eats your sprint time.
1. Introduction
Spring JPA simplifies querying in the persistence layer, eliminating the need to write any Hibernate-specific boilerplate code.
However, we require certain behavior that the JpaRepository classes do not include.
Such a scenario involves detaching and reattaching an entity to the persistent context. The purpose of detaching the entity can vary, such as to avoid automatic updates, to support a multi-transaction workflow, to improve performance, or to avoid the LazyInitializationException.
In this tutorial, we’ll learn how to detach and attach an entity in the Spring application.
2. Example Application
Let’s imagine we need to build an application that creates new users.
2.1. Define the Data Model
We’ll define the User entity with a few fields:
@Entity
@Table(name = "users")
public class User {

    @Id
    @GeneratedValue(strategy = GenerationType.IDENTITY)
    private Long id;

    private String name;

    @Column(unique = true)
    private String email;

    private boolean activated;
}
In the code above, we’ve included an activated field to store the active user.
2.2. Define the JpaRepository
Let’s implement the UserRepository interface by extending the JpaRepository class:
@Repository
public interface UserRepository extends JpaRepository<User, Long> {}
Next, we’ll implement a few operations on the User entity.
2.3. Implement the DataService
To create and activate the user, we’ll implement two methods in the service class.
First, we’ll implement the createUser method in the UserDataService class:
@Service
public class UserDataService {
    private final UserRepository userRepository;

    @Transactional
    public User createUser(String name, String email) {
        User user = new User();
        user.setName(name);
        user.setEmail(email);
        user.setActivated(false);

        User savedUser = userRepository.save(user);

        return savedUser;
    }
}
In the code above, we create a new user in the inactive state.
Next, we’ll implement the activateUser method in the same UserDataService class:
@Transactional
public User activateUser(Long id) {
    User user = userRepository.findById(id)
      .orElseThrow(() -> new RuntimeException("User not found for Id" + id));

    user.setActivated(true);
    userRepository.save(user);
    return user;
}
In the code above, we save the activated user only if one exists. Otherwise, we throw the RuntimeException exception.
2.4. Define an API Client
We’ll define the UserApiClient interface with the verify method:
public interface UserApiClient {
    boolean verify(String email);
}
To demonstrate this, we don’t need to implement the interface above.
Next, we’ll integrate all the classes defined above to create the user.
2.5. Implement the User Registration
To orchestrate user registration, we’ll implement a separate class to handle creation, verification, and activation. After the successful external verification, the user will be active.
We’ll implement the handleRegistration method in the UserRegistrationService class:
public User handleRegistration(String name, String email) {
    User user = userDataService.createUser(name, email);

    if (userApiClient.verify(email)) {
        user = userDataService.activateUser(user.getId());
    }

    return user;
}
As we’re using the User entity across services outside the transaction, it’s good practice to detach the entity from the persistent context to avoid automatic changes caused by Hibernate’s dirty-checking mechanism. Additionally, it’ll improve the performance of such a long-running process.
3. Detach and Attach the Entity
We can detach and reattach the entity using JPA’s support.
3.1. Detach the Entity
To detach an entity, we’ll use the EntityManager‘s detach method.
We’ll integrate the detach method in the existing UserRepository interface, as it’s a specific use case.
First, we’ll define a detach method in the DetachableRepository interface:
public interface DetachableRepository<T> {
    void detach(T t);
}
Next, let’s implement the above method in the DetachableRepositoryImpl class:
public class DetachableRepositoryImpl<T> implements DetachableRepository<T> {
    @PersistenceContext
    private EntityManager entityManager;

    @Override
    public void detach(T entity) {
        if(entity != null) {
            entityManager.detach(entity);
        }
    }
}
In the code above, the EntityManager‘s detach method removes the entity from the persistent context. In essence, the detached entity will no longer be managed and persisted.
Alternatively, to detach all entities, we can either use the EntityManager‘s clear method or disable the Open-Session in View to implicitly detach entities after the transaction closes.
Then, we’ll extend the UserRepository interface with the DetachableRepository interface:
@Repository
public interface UserRepository extends JpaRepository<User, Long>, DetachableRepository<User> {}
Finally, we’ll include the detach method in the createUser method after the user is created:
userRepository.detach(savedUser);Now, entity changes will not be automatically persisted, regardless of whether they are executed within or outside the transaction boundary.
We can invoke the EntityManager‘s detach method directly in the UserDataService‘s createUser method. However, it’ll reduce the flexibility and introduce coupling between the service and persistence layer.
3.2. Attach the Entity
As we’ve detached the entity, we’ll need to re-attach it to persist any changes.
To attach an entity, there are a few approaches. We can re-query and update the entity in a transaction, or explicitly save the same entity, or use the EntityManager‘s merge method. We’ll implement it by re-querying the same entity and automatically persisting the required changes in a transactional boundary.
We’ll keep the activateUser method with the transactional annotation and remove the redundant save method:
@Transactional
public User activateUser(Long id) {
    User user = userRepository.findById(id)
      .orElseThrow(() -> new RuntimeException("User not found for Id" + id));

    user.setActivated(true);
    return user;
}
We should note that the transactional annotation will attach and save the updated entity without explicitly requiring us to call the UserRepository‘s save method.
We can visualize the overall flow of the internal services:
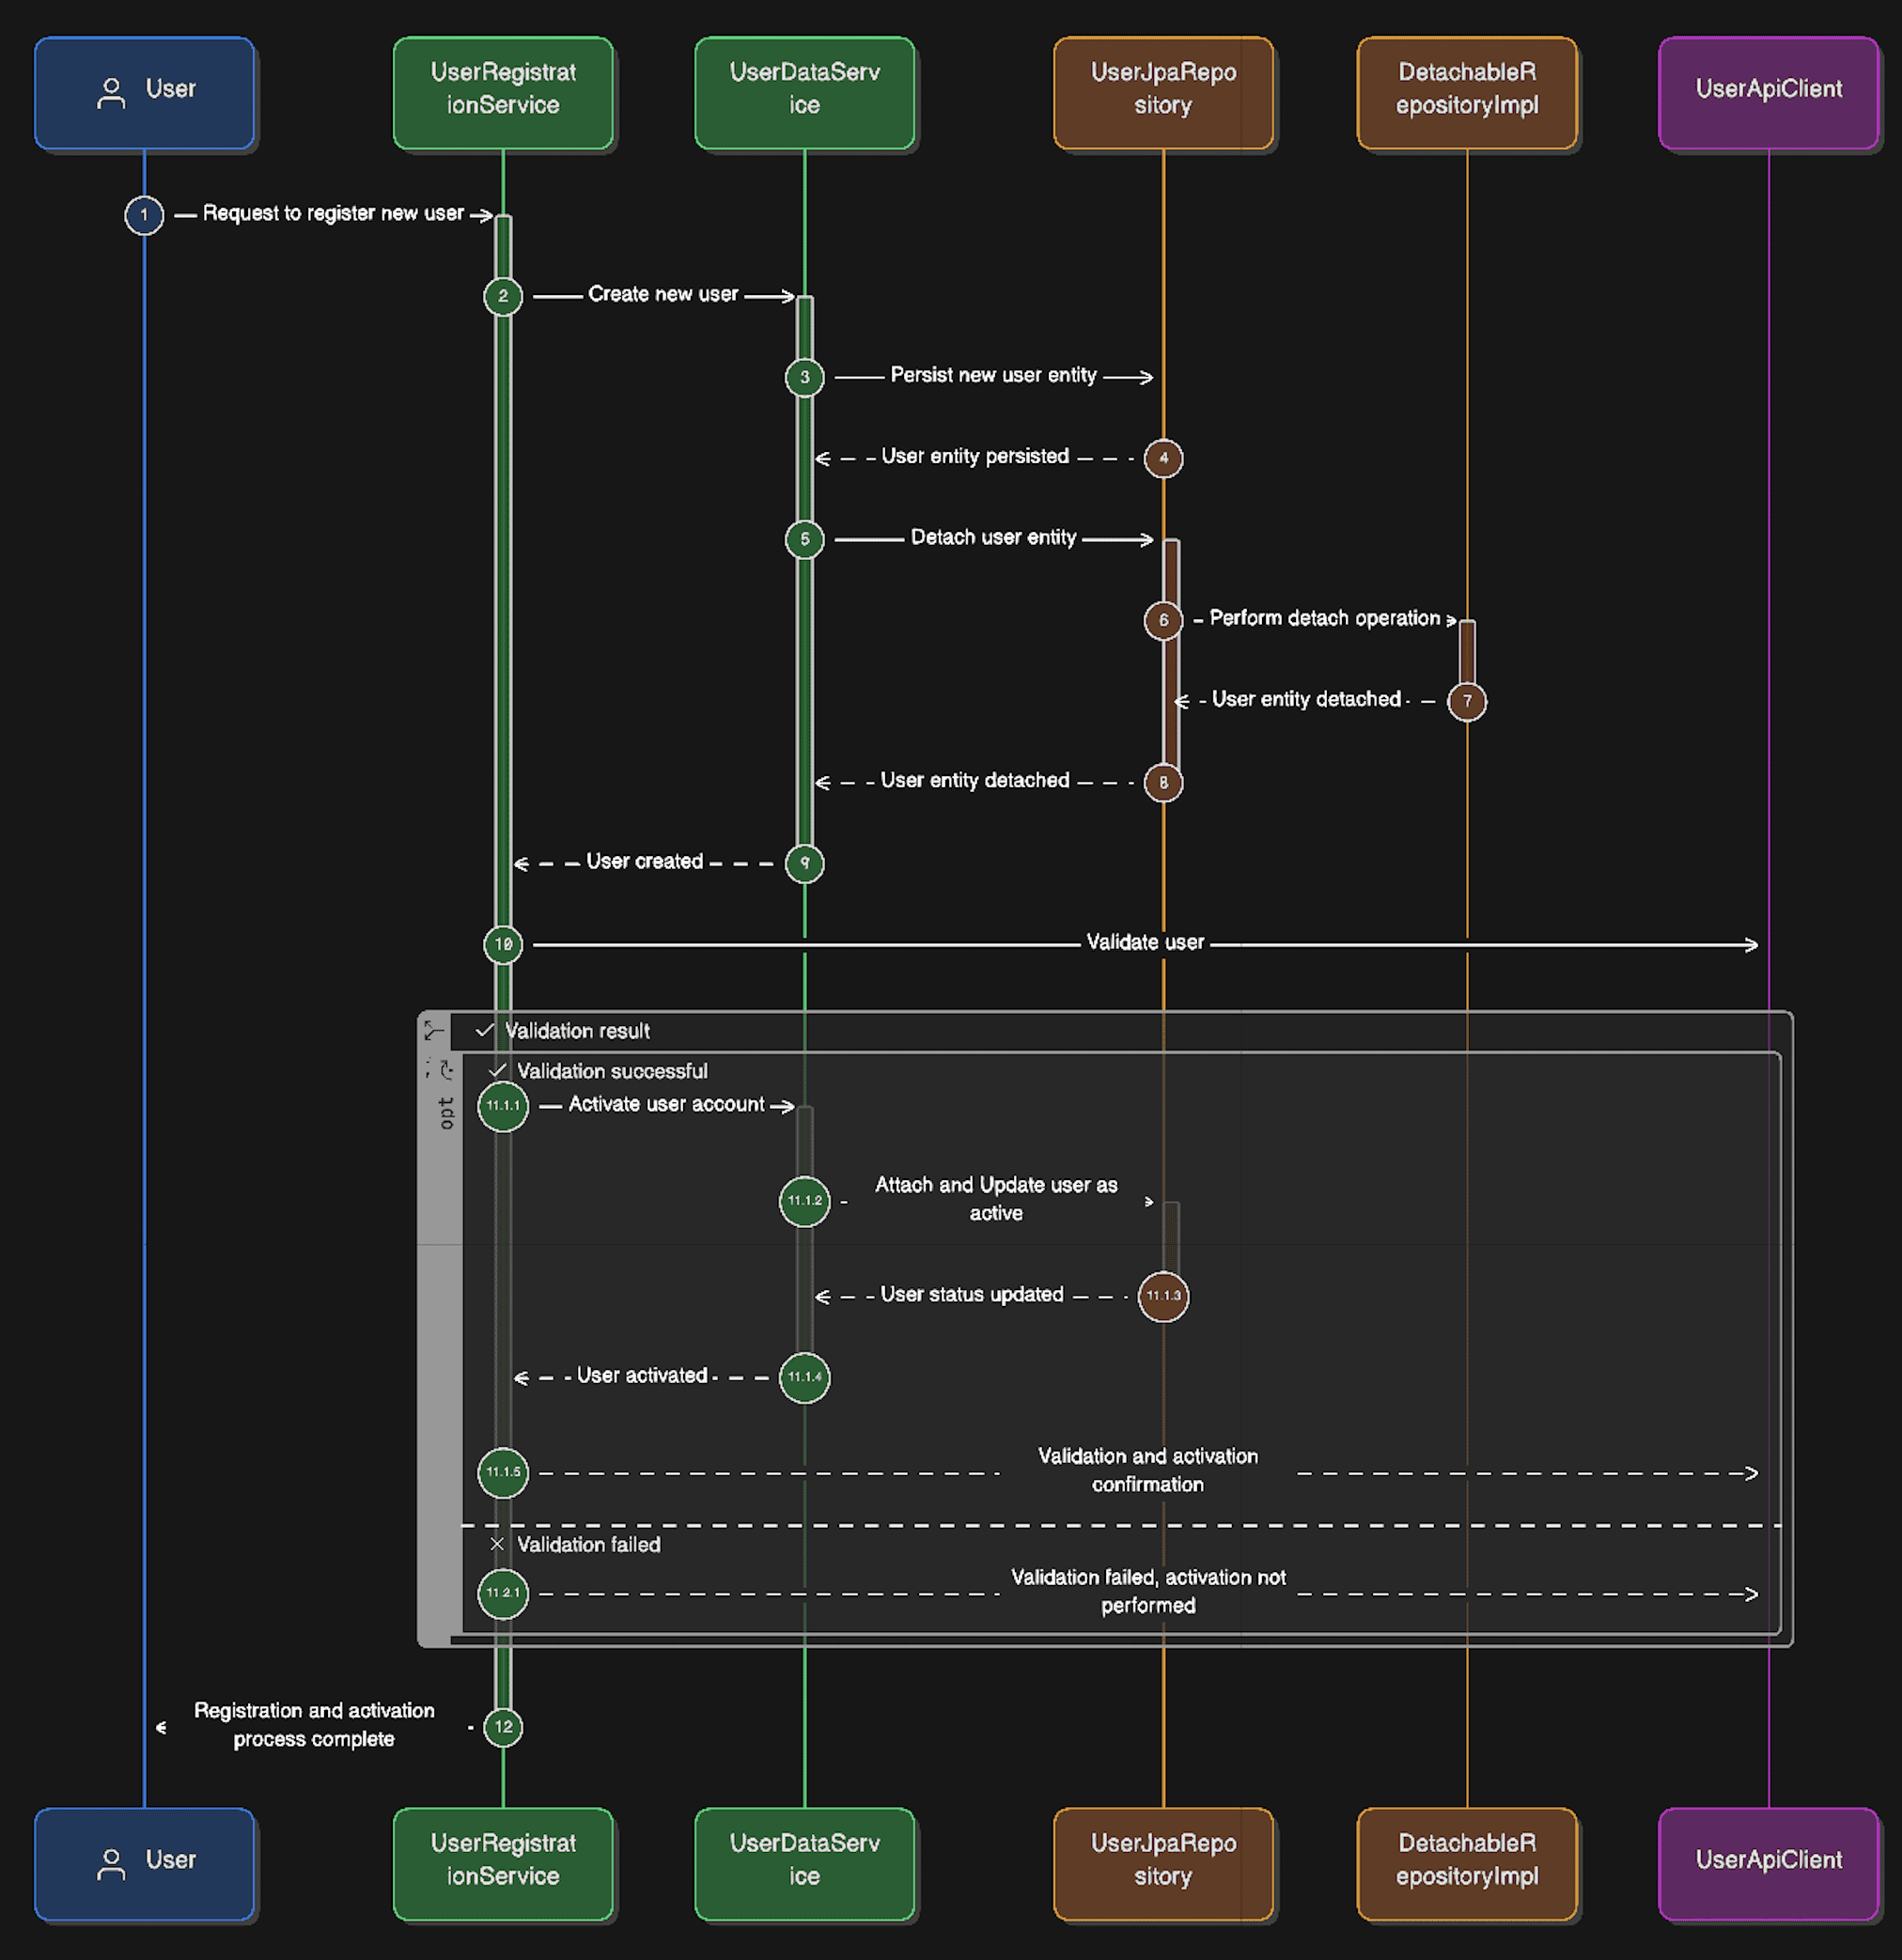
Next, we’ll implement the integration tests for the services.
4. Test the Application
We’ll implement the tests for both the UserRepository and UserRegistration using the Spring Boot test support.
4.1. Testing the Repository
We’ll test a scenario where the user is saved, detached, and then updated:
@Test
void givenValidUserIsDetached_whenUserSaveIsCalled_AndUpdated_thenUserIsNotUpdated() {
    User user = new User();
    user.setName("test1");
    user.setEmail("[email protected]");
    user.setActivated(true);

    userRepository.save(user);
    userRepository.detach(user);
    user.setName("test1_updated");
    entityManager.flush();

    Optional<User> savedUser = userRepository.findById(user.getId());

    assertNotNull(savedUser);
    assertTrue(savedUser.isPresent());
    assertEquals("test1", savedUser.get().getName());
    assertEquals("[email protected]", savedUser.get().getEmail());
    assertTrue(savedUser.get().isActivated());
}
From the above test, we confirm that the updated change is not flushed by the EntityManager, as its being detached from the persistence context.
4.2. Testing the Service
We’ll test the UserRegistration class for the detach behavior.
First, we’ll implement a test where a valid user is registered:
@Test
void givenValidUser_whenUserIsRegistrationIsCalled_thenSaveActiveUser() {
    Mockito.when(userApiClient.verify(any())).thenReturn(true);

    User user = userRegistrationService.handleRegistration("test1", "[email protected]");
    Optional<User> savedUser = userRepository.findById(user.getId());

    assertNotNull(savedUser);
    assertTrue(savedUser.isPresent());
    assertEquals("test1", savedUser.get().getName());
    assertEquals("[email protected]", savedUser.get().getEmail());
    assertTrue(savedUser.get().isActivated());
}
We confirm that all the assertions pass, including that the user is activated after detaching.
Now, let’s test another scenario where the user’s email is invalid:
@Test
void givenInValidUser_whenUserIsRegistrationIsCalled_thenSaveInActiveUser() {
    Mockito.when(userApiClient.verify(any())).thenReturn(false);

    User user = userRegistrationService.handleRegistration("test2", "[email protected]");
    Optional<User> savedUser = userRepository.findById(user.getId());

    assertNotNull(savedUser);
    assertTrue(savedUser.isPresent());
    assertEquals("test2", savedUser.get().getName());
    assertEquals("[email protected]", savedUser.get().getEmail());
    assertFalse(savedUser.get().isActivated());
}
Based on the test above, we confirm that the invalid user is inactive.
Note that detaching the entity should not introduce side effects.
5. Conclusion
In this article, we’ve learned why and how to detach and attach an entity in the Spring JPA application. We’ve implemented the code using both EntityManager‘s detach method and transaction support. We’ve also tested the application across the JPA repository and service layers.














