Using Firebase Cloud Messaging in Spring Boot Applications
Last updated: January 8, 2024


Mocking is an essential part of unit testing, and the Mockito library makes it easy to write clean and intuitive unit tests for your Java code.
Get started with mocking and improve your application tests using our Mockito guide:
Handling concurrency in an application can be a tricky process with many potential pitfalls. A solid grasp of the fundamentals will go a long way to help minimize these issues.
Get started with understanding multi-threaded applications with our Java Concurrency guide:
Spring 5 added support for reactive programming with the Spring WebFlux module, which has been improved upon ever since. Get started with the Reactor project basics and reactive programming in Spring Boot:
Since its introduction in Java 8, the Stream API has become a staple of Java development. The basic operations like iterating, filtering, mapping sequences of elements are deceptively simple to use.
But these can also be overused and fall into some common pitfalls.
To get a better understanding on how Streams work and how to combine them with other language features, check out our guide to Java Streams:
Explore Spring Boot 3 and Spring 6 in-depth through building a full REST API with the framework:
Yes, Spring Security can be complex, from the more advanced functionality within the Core to the deep OAuth support in the framework.
I built the security material as two full courses - Core and OAuth, to get practical with these more complex scenarios. We explore when and how to use each feature and code through it on the backing project.
You can explore the course here:
Spring Data JPA is a great way to handle the complexity of JPA with the powerful simplicity of Spring Boot.
Get started with Spring Data JPA through the guided reference course:
Refactor Java code safely — and automatically — with OpenRewrite.
Refactoring big codebases by hand is slow, risky, and easy to put off. That’s where OpenRewrite comes in. The open-source framework for large-scale, automated code transformations helps teams modernize safely and consistently.
Each month, the creators and maintainers of OpenRewrite at Moderne run live, hands-on training sessions — one for newcomers and one for experienced users. You’ll see how recipes work, how to apply them across projects, and how to modernize code with confidence.
Join the next session, bring your questions, and learn how to automate the kind of work that usually eats your sprint time.
1. Introduction
In this quick tutorial, we’ll show how to send push notifications to web and mobile applications using Google’s Firebase Cloud Messaging.
2. What Is FCM?
Firebase Cloud Messaging, or FCM for short, is a cloud-based messaging service that provides the following capabilities:
- Reliably send messages to mobile or web applications, referred here forth as “clients”
- Send messages to all or specific clients using topic or subscription-based addressing
- Receive messages from clients in a server application
Here are some examples of real-world applications for this technology:
- Send targeted messages with exclusive offers of a given product
- Inform all users of a given application that a new feature is available
- Instant messaging/chat applications
- Direct notifications to a given customer
3. Application Architecture
The typical architecture of an FCM-based application consists of a server, clients, and FCM itself:
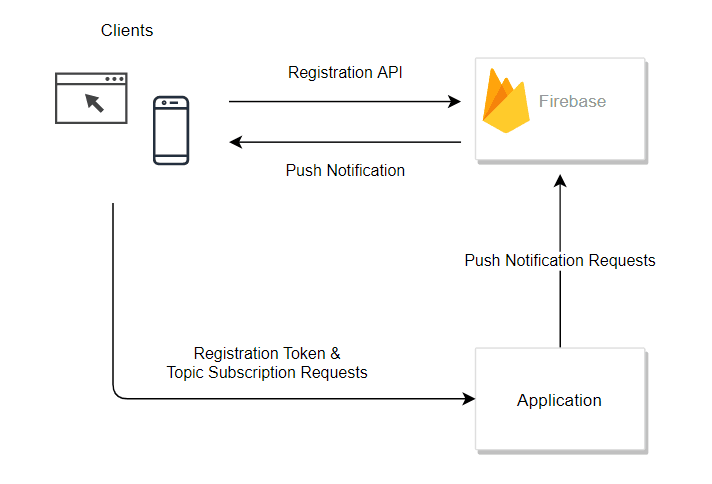
In this tutorial, we’ll focus on the server side of this kind of application. In our case, this server will be a Spring Boot-based service that exposes a REST API. This API allows us to explore the different ways we can send notifications to our (hopefully) vast user base:
- Publish notifications to a topic
- Publish notifications to specific clients
- Publish notifications to multiple topics
Core to this kind of application is the notion of clients, topics, and subscriptions.
3.1. Topics
A topic is a named entity that acts as a hub for notifications that share some properties. For instance, a financial app can use a topic for each kind of asset it trades. Likewise, a sports app can use a topic for each team or even a specific match.
3.2. Clients
A client is an instance of our application installed on a given mobile device or running on a browser. To receive notifications, a client uses the appropriate SDK API calls to register itself with our Firebase project.
Upon successful registration, the client gets a unique registration token from Firebase. Usually, this token is sent to the server side so it can be used for direct notifications.
3.3. Subscriptions
A subscription represents the association between a client and a topic. A server application creates new subscriptions using an API call that takes one or more client registration tokens and a topic name.
4. Firebase Project Setup
A Firebase Project acts as a container for cloud resources we’ll use with our application. Google offers a no-cost initial tier that allows developers to experiment with the available services and pay only for what goes over the available quotas.
So, to use FCM, our first step is to create a new project using Firebase’s console. Once we’ve logged in, we’ll get Firebase’s home page:
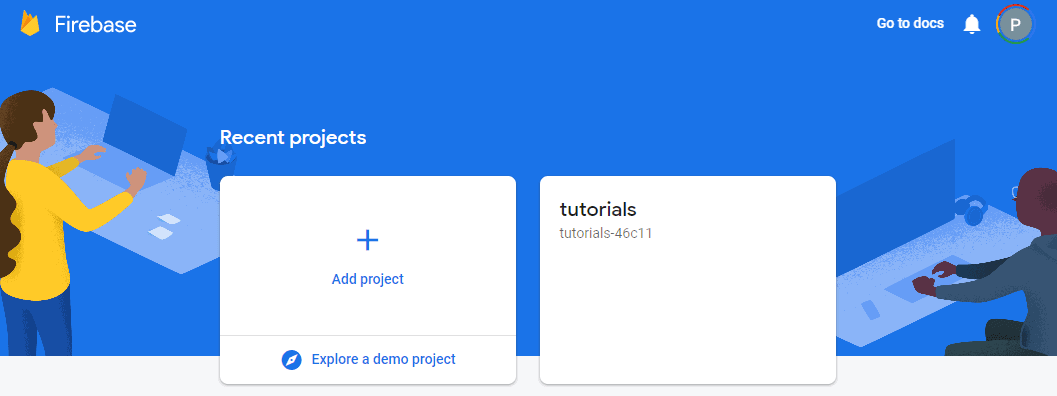
Here, we can choose to add a new project or select an existing one. Let’s pick the former. This will start a wizard that will gather the required information to create a new project.
Firstly, we must name our project:
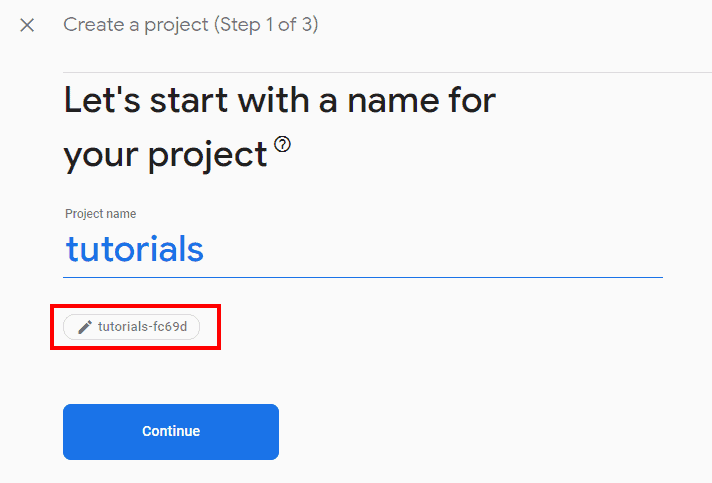
Notice that under the informed name, there’s a button with the generated internal ID for this project. Usually, there’s no need to change it, but if we don’t like it for some reason, we can click on it and use a different one. Also, notice that while project IDs are unique, project names are not unique, which can be a little confusing.
In the next step, we can choose to add analytics to our project. We’ll disable this option as we don’t need it for this tutorial. If the need arises, we can later enable it.
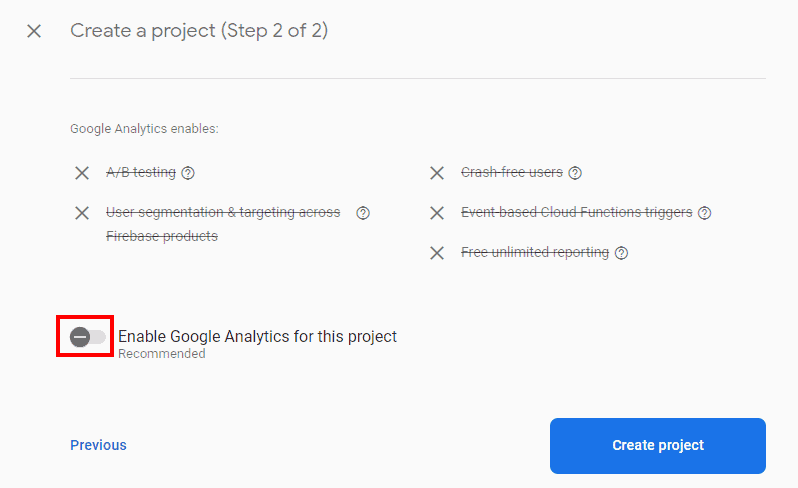
Once we click on “Create Project”, Firebase will redirect us to the newly created project management page.
5. Generating a Service Account
For a server-side application to make API calls to Firebase services, we need to generate a new service account and get its credentials. We can do that by accessing the project settings page and selecting the “Service Accounts” tab:
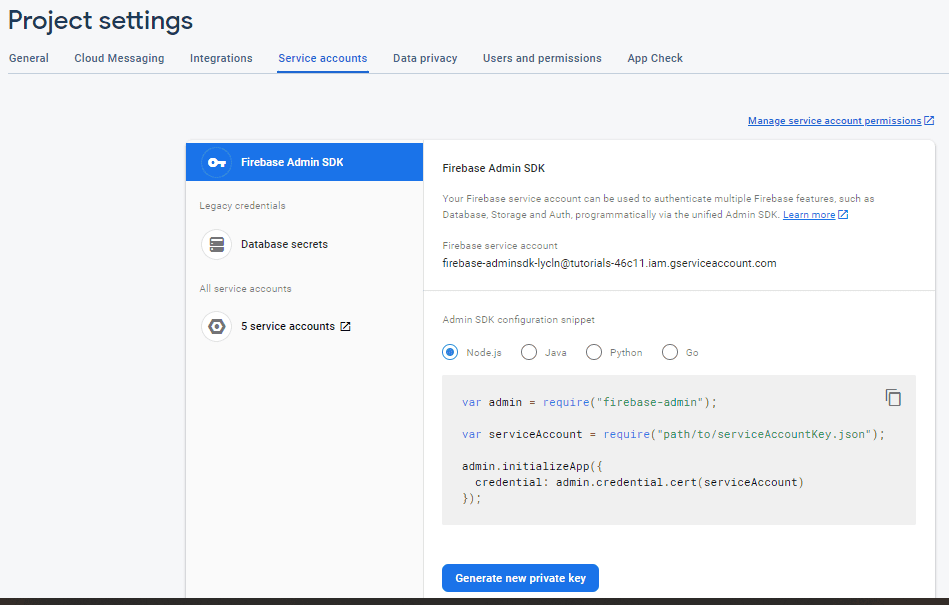
Any new project starts with an administrative service account that can basically do anything in this project. Here we’ll use it for our tests, but a real-world application should create a dedicated service account with limited privileges. Doing so requires some IAM (Google’s Identity & Access Management) knowledge and is beyond the scope of this tutorial.
We now have to click on the “generate new private key” button to download a JSON file containing the required data to call Firebase’s APIs. Needless to say, we must store this file in a secure location.
6. Maven Dependencies
Now that we have our Firebase project ready, it’s time to code the server component that will send notifications. Besides the regular Spring Boot starters for an MVC application, we must also add the firebase-admin dependency:
<dependency>
    <groupId>com.google.firebase</groupId>
    <artifactId>firebase-admin</artifactId>
    <version>9.1.1</version>
</dependency>
The latest version of this dependency is available on Maven Central.
7. Firebase Messaging Configuration
The FirebaseMessaging class is the main façade through which we’ll send messages using FCM. As this class is thread-safe, we’ll use a @Bean method in a @Configuration class to create a single instance of it and make it available to our controllers:
@Bean
FirebaseMessaging firebaseMessaging(FirebaseApp firebaseApp) {
    return FirebaseMessaging.getInstance(firebaseApp);
}
Quite trivial, but now we must provide a FirebaseApp. Alternatively, we could’ve used the no-args variant of getInstance(), which gets the job done but doesn’t allow us to change any of the default parameters.
To fix that, let’s create another @Bean method that creates a customized FirebaseApp instance:
@Bean
FirebaseApp firebaseApp(GoogleCredentials credentials) {
    FirebaseOptions options = FirebaseOptions.builder()
      .setCredentials(credentials)
      .build();

    return FirebaseApp.initializeApp(options);
}
Here, the only customization is the use of a specific GoogleCredentials object. FirebaseOptions‘s builder allows us to adjust other aspects of the Firebase client:
- Timeouts
- HTTP request factory
- Custom endpoints for specific services
- Thread Factory
The last piece of configuration is the credentials themselves. We’ll create another @Bean that creates a GoogleCredentials instance using either a service account provided through configuration properties or using the default credentials chain:
@Bean
GoogleCredentials googleCredentials() {
    if (firebaseProperties.getServiceAccount() != null) {
        try (InputStream is = firebaseProperties.getServiceAccount().getInputStream()) {
            return GoogleCredentials.fromStream(is);
        }
    }
    else {
        // Use standard credentials chain. Useful when running inside GKE
        return GoogleCredentials.getApplicationDefault();
    }
}
This approach simplifies testing on a local machine where we might have multiple service account files. We could use the standard GOOGLE_APPLICATION_CREDENTIALS environment variable to point to the correct file, but changing it is a bit cumbersome.
8. Sending Messages to a Topic
Sending a message to a topic requires two steps: build a Message object and send it using one of FirebaseMessaging‘s methods. Message instances are created using the familiar Builder Pattern:
Message msg = Message.builder()
  .setTopic(topic)
  .putData("body", "some data")
  .build();
Once we have a Message instance, we use send() to request its delivery:
String id = fcm.send(msg);Here, fcm is the FirebaseMessaging instance that we’ve injected into our controller class. send() returns a value which is the FCM-generated message identifier. We can use this identifier for tracking or logging purposes.
send() also has an asynchronous version, sendAsync(), which returns an ApiFuture object. This class extends Java’s Future, so we can easily use it with reactive frameworks like Project Reactor.
9. Sending Messages to Specific Clients
As we’ve mentioned before, each client has a unique subscription token associated with it. We use this token as its “address” when building a Message instead of a topic name:
Message msg = Message.builder()
  .setToken(registrationToken)
  .putData("body", "some data")
  .build();
For use cases where we want to send the same message to several clients, we can use a MulticastMessage and sendMulticast(). They work the same way as the unicast version but allow us to send the message to up to five hundred clients in a single call:
MulticastMessage msg = MulticastMessage.builder()
  .addAllTokens(message.getRegistrationTokens())
  .putData("body", "some data")
  .build();

BatchResponse response = fcm.sendMulticast(msg);
The returned BatchResponse contains the generated message identifiers and any errors associated with the delivery for a given client.
10. Sending Messages to Multiple Topics
FCM allows us to specify a condition to define the intended audience for a message. A condition is a logical expression that selects clients based on topics to which they’ve subscribed (or not). For instance, given three topics (T1, T2 and T3), this expression targets devices that are subscribers of T1 or T2 but not T3:
('T1' in topics || 'T2' in topics) && !('T3' in topics)Here, the topics variable represents all topics a given client has subscribed to. We can now build a message addressed to clients that satisfies this condition using the setCondition() method available in the builder:
Message msg = Message.builder()
  .setCondition("('T1' in topics || 'T2' in topics) && !('T3' in topics)")
  .putData("body", "some data")
  .build();

String id = fcm.send(msg);
11. Subscribing Clients to Topics
We use the subscribeToTopic() (or its async variant subscribeToTopicAsync() method to create a subscription that associates a client with a topic. The method accepts a list of client registration tokens and a topic name as arguments:
fcm.subscribeToTopic(registrationTokens, topic);Notice that, in contrast to other messaging systems, the returned value has no identifier for the created subscriptions. If we want to keep track of which topics a given client has subscribed to, we must do it ourselves.
To unsubscribe a client, we use unsubscribeFromTopic():
fcm.subscribeToTopic(Arrays.asList(registrationToken), topic);12. Conclusion
In this tutorial, we’ve shown how to send notification messages to web and mobile applications using Google’s Firebase Cloud Messaging service.


