Creating a Discord Bot with Discord4J + Spring Boot
Last updated: May 8, 2025


Mocking is an essential part of unit testing, and the Mockito library makes it easy to write clean and intuitive unit tests for your Java code.
Get started with mocking and improve your application tests using our Mockito guide:
Handling concurrency in an application can be a tricky process with many potential pitfalls. A solid grasp of the fundamentals will go a long way to help minimize these issues.
Get started with understanding multi-threaded applications with our Java Concurrency guide:
Spring 5 added support for reactive programming with the Spring WebFlux module, which has been improved upon ever since. Get started with the Reactor project basics and reactive programming in Spring Boot:
Since its introduction in Java 8, the Stream API has become a staple of Java development. The basic operations like iterating, filtering, mapping sequences of elements are deceptively simple to use.
But these can also be overused and fall into some common pitfalls.
To get a better understanding on how Streams work and how to combine them with other language features, check out our guide to Java Streams:
Explore Spring Boot 3 and Spring 6 in-depth through building a full REST API with the framework:
Yes, Spring Security can be complex, from the more advanced functionality within the Core to the deep OAuth support in the framework.
I built the security material as two full courses - Core and OAuth, to get practical with these more complex scenarios. We explore when and how to use each feature and code through it on the backing project.
You can explore the course here:
All Access is finally out, with all of my Spring courses. Learn JUnit is out as well, and Learn Maven is coming fast. And, of course, quite a bit more affordable. Finally.
>> GET THE COURSE
Spring Data JPA is a great way to handle the complexity of JPA with the powerful simplicity of Spring Boot.
Get started with Spring Data JPA through the guided reference course:
Refactor Java code safely — and automatically — with OpenRewrite.
Refactoring big codebases by hand is slow, risky, and easy to put off. That’s where OpenRewrite comes in. The open-source framework for large-scale, automated code transformations helps teams modernize safely and consistently.
Each month, the creators and maintainers of OpenRewrite at Moderne run live, hands-on training sessions — one for newcomers and one for experienced users. You’ll see how recipes work, how to apply them across projects, and how to modernize code with confidence.
Join the next session, bring your questions, and learn how to automate the kind of work that usually eats your sprint time.
1. Overview
Discord4J is an open-source Java library that can primarily be used to quickly access the Discord Bot API. It heavily integrates with Project Reactor to provide a completely non-blocking reactive API.
We’ll use Discord4J in this tutorial to create a simple Discord bot capable of responding to a predefined command. We’ll build the bot on top of Spring Boot to demonstrate how easy it would be to scale our bot across many other features enabled by Spring Boot.
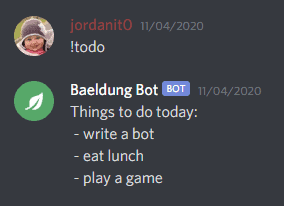
When we’re finished, this bot will be able to listen for a command called “!todo” and will print out a statically defined to-do list.
2. Create a Discord Application
For our bot to receive updates from Discord and post responses in channels, we’ll need to create a Discord Application in the Discord Developer Portal and set it up to be a bot. This is a simple process. Since Discord allows the creation of multiple applications or bots under a single developer account, feel free to try this multiple times with different settings.
Here are the steps to create a new application:
- Log in to the Discord Developer Portal
- In the Applications tab, click “New Application”
- Enter a name for our bot and click “Create”
- Upload an App Icon and a description and click “Save Changes”
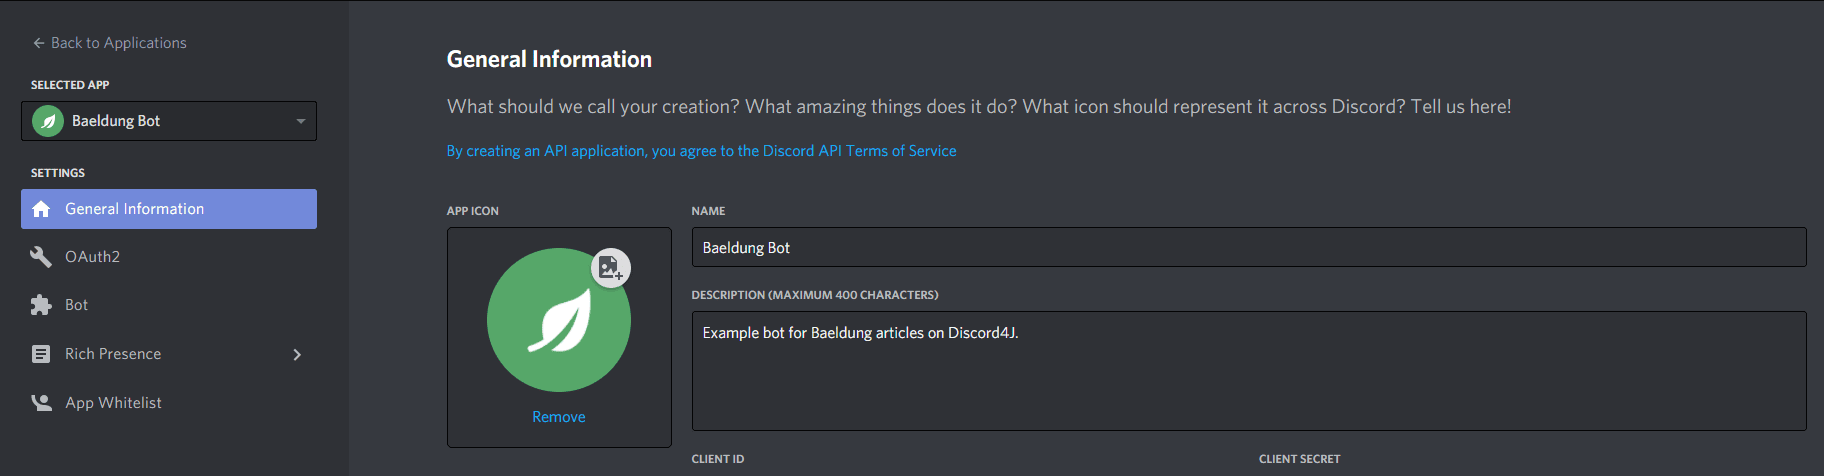
Now that an application exists, we simply need to add bot functionality to it. This will generate the bot token that Discord4J requires.
Here are the steps to transform an application into a bot:
- In the Applications tab, select our application (if it is not already selected).
- In the Bot tab, click “Add Bot” and confirm that we want to do it.
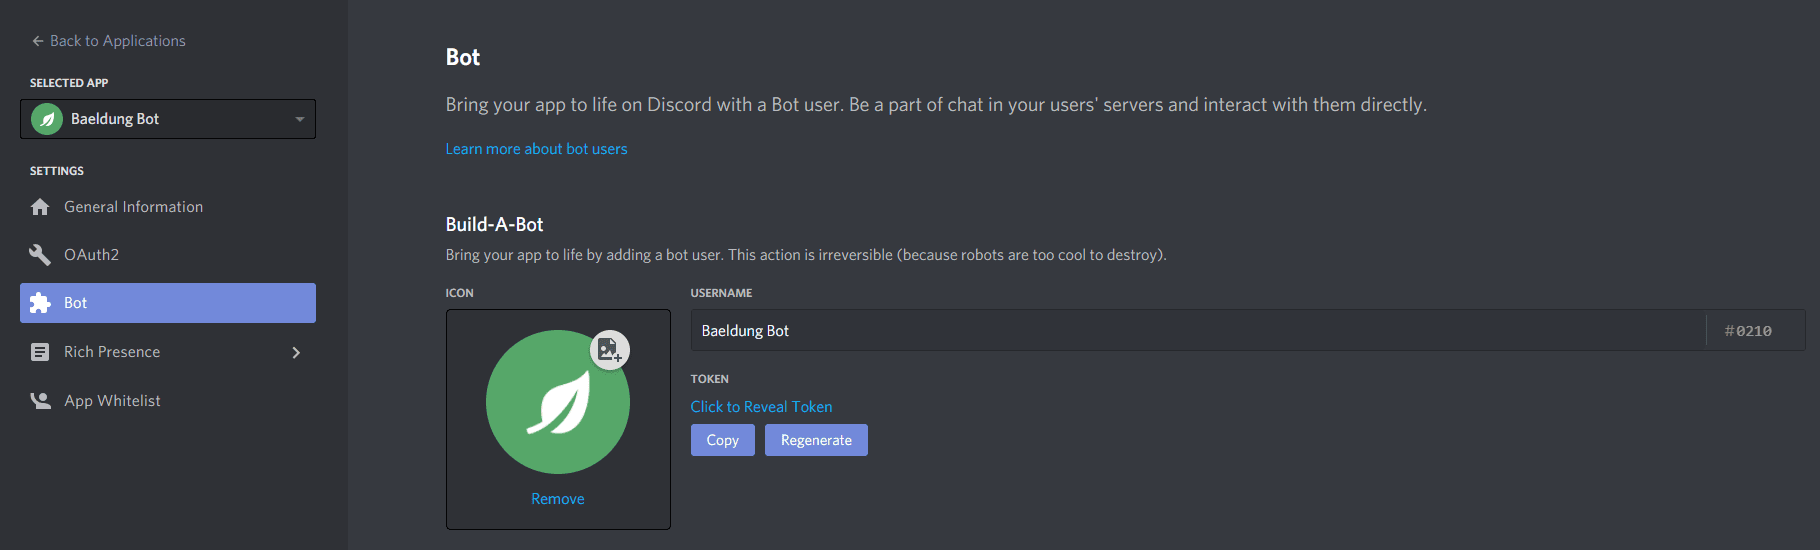
Now that our application has become a real bot, copy the token so that we can add it to our application properties. Be careful not to share this token publicly since someone else would be able to execute malicious code while impersonating our bot.
We’re now ready to write some code!
3. Create a Spring Boot App
After constructing a new Spring Boot app, we need to be sure to include the Discord4J core dependency:
<dependency>
    <groupId>com.discord4j</groupId>
    <artifactId>discord4j-core</artifactId>
    <version>3.3.0-RC1</version>
</dependency>
Discord4J works by initializing a GatewayDiscordClient with the bot token we created earlier. This client object allows us to register event listeners and configure many things, but at a bare minimum, we must at least call the login() method. This will display our bot as being online.
First, let’s add our bot token to our application.yml file:
token: 'our-token-here'Next, let’s inject it into a @Configuration class where we can instantiate our GatewayDiscordClient:
@Configuration
public class BotConfiguration {

    @Value("${token}")
    private String token;

    @Bean
    public GatewayDiscordClient gatewayDiscordClient() {
        return DiscordClientBuilder.create(token)
          .build()
          .login()
          .block();
    }
}
At this point, our bot would be seen as online, but it doesn’t do anything yet. Let’s add some functionality.
4. Add Event Listeners
The most common feature of a chatbot is the command. This is an abstraction seen in CLIs where a user types some text to trigger certain functions. We can achieve this in our Discord bot by listening to new messages that users send and replying with intelligent responses when appropriate.
There are many types of events to which we can listen. However, registering a listener is the same for all of them, so let’s first create an interface for all of our event listeners:
import discord4j.core.event.domain.Event;

public interface EventListener<T extends Event> {

    Logger LOG = LoggerFactory.getLogger(EventListener.class);

    Class<T> getEventType();
    Mono<Void> execute(T event);

    default Mono<Void> handleError(Throwable error) {
        LOG.error("Unable to process " + getEventType().getSimpleName(), error);
        return Mono.empty();
    }
}
Now we can implement this interface for as many discord4j.core.event.domain.Event extensions as we want.
Before we implement our first event listener, let’s modify our client @Bean configuration to expect a list of EventListener so that it can register everyone found in the Spring ApplicationContext:
@Bean
public <T extends Event> GatewayDiscordClient gatewayDiscordClient(List<EventListener<T>> eventListeners) {
    GatewayDiscordClient client = DiscordClientBuilder.create(token)
      .build()
      .login()
      .block();

    for(EventListener<T> listener : eventListeners) {
        client.on(listener.getEventType())
          .flatMap(listener::execute)
          .onErrorResume(listener::handleError)
          .subscribe();
    }

    return client;
}
Now, all we have to do to register event listeners is to implement our interface and annotate it with Spring’s @Component-based stereotype annotations. The registration will now happen automatically for us!
We could have chosen to register each event separately and explicitly. However, it is generally better to take a more modular approach for better code scalability.
Our event listener setup is now complete, but the bot still doesn’t do anything yet, so let’s add some events to listen to.
4.1. Command Processing
To receive a user’s command, we can listen to two different event types: MessageCreateEvent for new messages and MessageUpdateEvent for updated messages. We may only want to listen for new messages, but as a learning opportunity, let’s assume we want to support both kinds of events for our bot. This will provide an extra layer of robustness that our users may appreciate.
Both event objects contain all the relevant information about each event. In particular, we’re interested in the message contents, the author of the message, and the channel it was posted to. Luckily, all of these data points live in the Message object that both of these event types provide.
Once we have the Message, we can check the author to make sure it is not a bot, we can check the message contents to make sure it matches our command, and we can use the message’s channel to send a response.
Since we can fully operate from both events through their Message objects, let’s put all downstream logic into a common location so that both event listeners can use it:
import discord4j.core.object.entity.Message;

public abstract class MessageListener {

    public Mono<Void> processCommand(Message eventMessage) {
        return Mono.just(eventMessage)
          .filter(message -> message.getAuthor().map(user -> !user.isBot()).orElse(false))
          .filter(message -> message.getContent().equalsIgnoreCase("!todo"))
          .flatMap(Message::getChannel)
          .flatMap(channel -> channel.createMessage("Things to do today:\n - write a bot\n - eat lunch\n - play a game"))
          .then();
    }
}
A lot is going on here, but this is the most basic form of command and response. This approach uses a reactive functional design, but it is possible to write this in a more traditional imperative way using block().
Scaling across multiple bot commands, invoking different services or data repositories, or even using Discord roles as authorization for certain commands are common parts of a good bot command architecture. Since our listeners are Spring-managed @Services, we could easily inject other Spring-managed beans to take care of those tasks. However, we won’t tackle any of that in this article.
4.2. EventListener<MessageCreateEvent>
To receive new messages from a user, we must listen to the MessageCreateEvent. Since the command processing logic already lives in MessageListener, we can extend it to inherit that functionality. Also, we need to implement our EventListener interface to comply with our registration design:
@Service
public class MessageCreateListener extends MessageListener implements EventListener<MessageCreateEvent> {

    @Override
    public Class<MessageCreateEvent> getEventType() {
        return MessageCreateEvent.class;
    }

    @Override
    public Mono<Void> execute(MessageCreateEvent event) {
        return processCommand(event.getMessage());
    }
}
Through inheritance, the message is passed off to our processCommand() method where all verification and responses occur.
At this point, our bot will receive and respond to the “!todo” command. However, if a user corrects their mistyped command, the bot would not respond. Let’s support this use case with another event listener.
4.3. EventListener<MessageUpdateEvent>
The MessageUpdateEvent is emitted when a user edits a message. We can listen for this event to recognize commands, much like how we listen for the MessageCreateEvent.
For our purposes, we only care about this event if the message contents were changed. We can ignore other instances of this event. Fortunately, we can use the isContentChanged() method to filter out such instances:
@Service
public class MessageUpdateListener extends MessageListener implements EventListener<MessageUpdateEvent> {

    @Override
    public Class<MessageUpdateEvent> getEventType() {
        return MessageUpdateEvent.class;
    }

    @Override
    public Mono<Void> execute(MessageUpdateEvent event) {
        return Mono.just(event)
          .filter(MessageUpdateEvent::isContentChanged)
          .flatMap(MessageUpdateEvent::getMessage)
          .flatMap(super::processCommand);
    }
}
In this case, since getMessage() returns Mono<Message> instead of a raw Message, we need to use flatMap() to send it to our superclass.
5. Test Bot in Discord
Now that we have a functioning Discord bot, we can invite it to a Discord server and test it.
To create an invite link, we must specify which permissions the bot requires to function properly. A popular third-party Discord Permissions Calculator is often used to generate an invite link with the needed permissions. Although it’s not recommended for production, we can simply choose “Administrator” for testing purposes and not worry about the other permissions. Simply supply the Client ID for our bot (found in the Discord Developer Portal) and use the generated link to invite our bot to a server.
If we do not grant Administrator permissions to the bot, we might need to tweak channel permissions so that the bot can read and write in a channel.
The bot now responds to the message “!todo” and when a message is edited to say “!todo”:
6. Conclusion
This tutorial described all the necessary steps for creating a Discord bot using the Discord4J library and Spring Boot. Finally, it described how to set up a basic scalable command and response structure for the bot.
A valid bot token is required to run it.














