Using Spring Cloud Gateway with OAuth 2.0 Patterns
Last updated: January 8, 2024


Mocking is an essential part of unit testing, and the Mockito library makes it easy to write clean and intuitive unit tests for your Java code.
Get started with mocking and improve your application tests using our Mockito guide:
Handling concurrency in an application can be a tricky process with many potential pitfalls. A solid grasp of the fundamentals will go a long way to help minimize these issues.
Get started with understanding multi-threaded applications with our Java Concurrency guide:
Spring 5 added support for reactive programming with the Spring WebFlux module, which has been improved upon ever since. Get started with the Reactor project basics and reactive programming in Spring Boot:
Since its introduction in Java 8, the Stream API has become a staple of Java development. The basic operations like iterating, filtering, mapping sequences of elements are deceptively simple to use.
But these can also be overused and fall into some common pitfalls.
To get a better understanding on how Streams work and how to combine them with other language features, check out our guide to Java Streams:
Explore Spring Boot 3 and Spring 6 in-depth through building a full REST API with the framework:
Yes, Spring Security can be complex, from the more advanced functionality within the Core to the deep OAuth support in the framework.
I built the security material as two full courses - Core and OAuth, to get practical with these more complex scenarios. We explore when and how to use each feature and code through it on the backing project.
You can explore the course here:
Spring Data JPA is a great way to handle the complexity of JPA with the powerful simplicity of Spring Boot.
Get started with Spring Data JPA through the guided reference course:
Refactor Java code safely — and automatically — with OpenRewrite.
Refactoring big codebases by hand is slow, risky, and easy to put off. That’s where OpenRewrite comes in. The open-source framework for large-scale, automated code transformations helps teams modernize safely and consistently.
Each month, the creators and maintainers of OpenRewrite at Moderne run live, hands-on training sessions — one for newcomers and one for experienced users. You’ll see how recipes work, how to apply them across projects, and how to modernize code with confidence.
Join the next session, bring your questions, and learn how to automate the kind of work that usually eats your sprint time.
If you're working on a Spring Security (and especially an OAuth) implementation, definitely have a look at the Learn Spring Security course:
>> LEARN SPRING SECURITY1. Introduction
Spring Cloud Gateway is a library that allows us to quickly create lightweight API gateways based on Spring Boot, which we’ve already covered in earlier articles.
This time, we’ll show how to quickly implement OAuth 2.0 patterns on top of it.
2. OAuth 2.0 Quick Recap
The OAuth 2.0 standard is a well-established standard used all over the internet as a security mechanism by which users and applications can securely access resources.
Although it’s beyond the scope of this article to describe this standard in detail, let’s start with a quick recap of a few key terms:
- Resource: Any kind of information that can only be retrieved by authorized clients
- Client: an application that consumes a resource, usually through a REST API
- Resource Server: A service that is responsible for serving a resource to authorized clients
- Resource Owner: entity (human or application) that owns a resource and, ultimately, is responsible for granting access to it to a client
- Token: a piece of information got by a client and sent to a resource server as part of the request to authenticate it
- Identity Provider (IdP): Validates user credentials and issues access tokens to clients.
- Authentication Flow: Sequence of steps a client must go through to get a valid token.
For a comprehensive description of the standard, a good starting point is Auth0’s documentation on this topic.
3. OAuth 2.0 Patterns
Spring Cloud Gateway is mainly used in one of the following roles:
- OAuth Client
- OAuth Resource Server
Let’s discuss each of those cases in more detail.
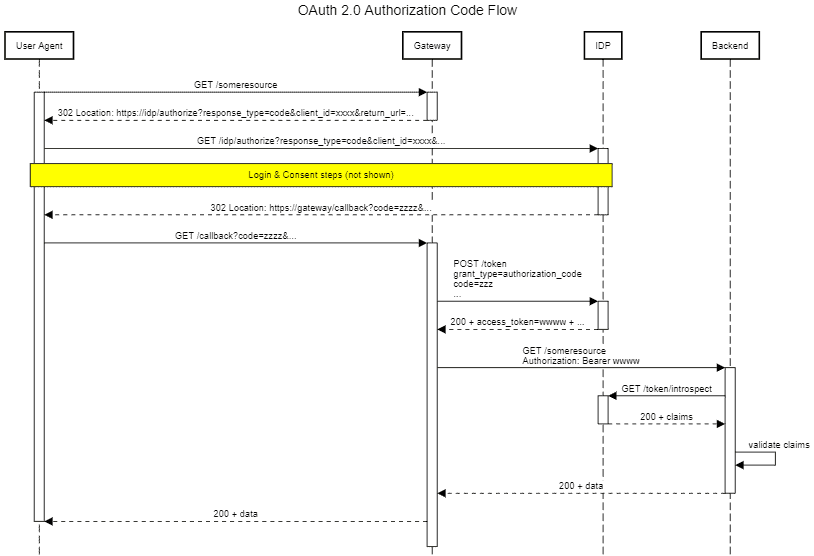
3.1. Spring Cloud Gateway as an OAuth 2.0 Client
In this scenario, any unauthenticated incoming request will initiate an authorization code flow. Once the token is acquired by the gateway, it is then used when sending requests to a backend service:
A good example of this pattern in action is a social network feed aggregator application: for each supported network, the gateway would act as an OAuth 2.0 client.
As a result, the frontend – usually a SPA application built with Angular, React, or similar UI frameworks – can seamlessly access data on those networks on behalf of the end-user. Even more important: it can do so without the user ever revealing their credentials to the aggregator.
3.2. Spring Cloud Gateway as an OAuth 2.0 Resource Server
Here, the Gateway acts as a gatekeeper, enforcing that every request has a valid access token before sending it to a backend service. Moreover, it can also check if the token has the proper permissions to access a given resource based on the associated scopes:
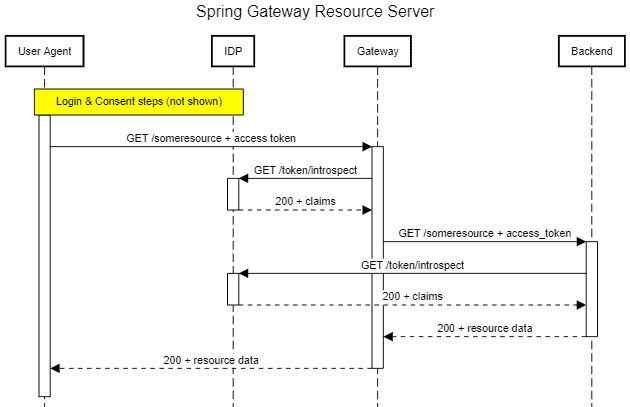
It is important to notice that this kind of permission check mainly operates at a coarse level. Fine-grained access control (e.g., object/field-level permissions) are usually implemented at the backend using domain logic.
One thing to consider in this pattern is how backend services authenticate and authorize any forwarded request. There are two main cases:
- Token propagation: API Gateway forwards the received token to the backend as-is
- Token replacement: API Gateway replaces the incoming token with another one before sending the request.
In this tutorial, we’ll cover just the token propagation case, as it is the most common scenario. The second one is also possible but requires additional setup and coding that would distract us from the main points we want to show here.
4. Sample Project Overview
To show how to use Spring Gateway with the OAuth patterns we’ve described so far, let’s build a sample project that exposes a single endpoint: /quotes/{symbol}. Access to this endpoint requires a valid access token issued by the configured identity provider.
In our case, we’ll use the embedded Keycloak identity provider. The only required changes are the addition of a new client application and a few users for testing.
To make things a little more interesting, our backend service will return a different quote price depending on the user associated with a request. Users that have the gold role get a lower price, while everybody else gets the regular price (life is unfair, after all ;^)).
We’ll front this service with Spring Cloud Gateway and, by changing just a few lines of configuration, we’ll be able to switch its role from an OAuth client to a resource server.
5. Project Setup
5.1. Keycloak IdP
The Embedded Keycloak we’ll use for this tutorial is just a regular SpringBoot application that we can clone from GitHub and build with Maven:
$ git clone https://github.com/Baeldung/spring-security-oauth
$ cd oauth-rest/oauth-authorization/server
$ mvn install
Note: This project currently targets Java 13+ but also builds and runs fine with Java 11. We only have to add -Djava.version=11 to Maven’s command.
Next, we’ll replace the src/main/resources/baeldung-domain.json for this one. The modified version has the same configurations available in the original one plus an additional client application (quotes-client), two user groups (golden_ and silver_customers), and two roles (gold and silver).
We can now start the server using the spring-boot:run maven plugin:
$ mvn spring-boot:run
... many, many log messages omitted
2022-01-16 10:23:20.318
INFO 8108 --- [ main] c.baeldung.auth.AuthorizationServerApp : Started AuthorizationServerApp in 23.815 seconds (JVM running for 24.488)
2022-01-16 10:23:20.334
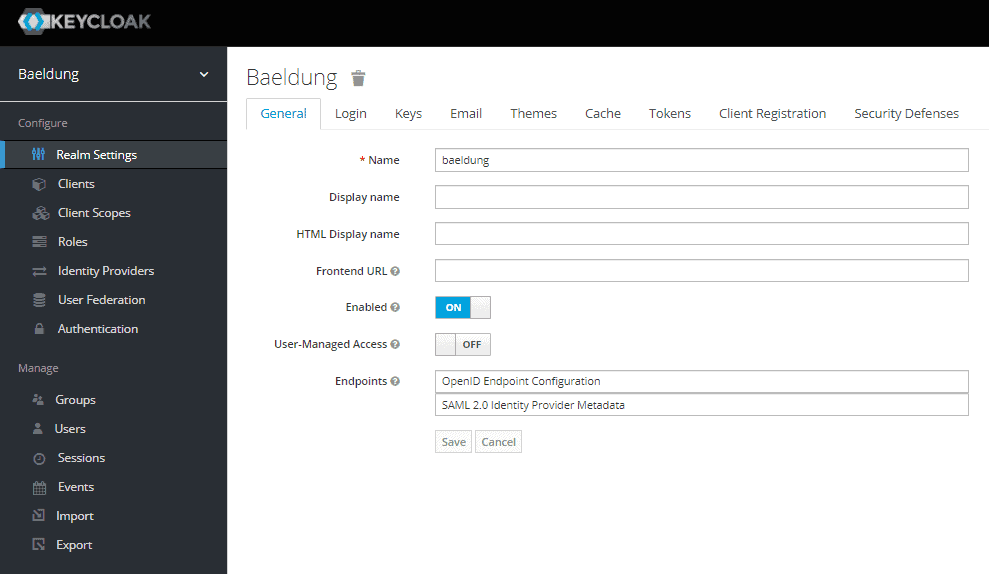
INFO 8108 --- [ main] c.baeldung.auth.AuthorizationServerApp : Embedded Keycloak started: http://localhost:8083/auth to use keycloakOnce the server is up, we can access it by pointing our browser to http://localhost:8083/auth/admin/master/console/#/realms/baeldung. Once we’ve logged in with the administrator’s credentials (bael-admin/pass), we’ll get the realm’s management screen:
To finish the IdP setup, let’s add a couple of users. The first one will be Maxwell Smart, a member of the golden_customer group. The second will be John Snow, which we won’t add to any group.
Using the provided configuration, members of the golden_customers group will automatically assume the gold role.
5.2. Backend Service
The quotes backend requires the regular Spring Boot Reactive MVC dependencies, plus the resource server starter dependency:
<dependency>
    <groupId>org.springframework.boot</groupId>
    <artifactId>spring-boot-starter-oauth2-resource-server</artifactId>
</dependency>
Notice that we’ve intentionally omitted the dependency’s version. This is the recommended practice when using SpringBoot’s parent POM or the corresponding BOM in the dependency management section.
In the main application class, we must enable web flux security with the @EnableWebFluxSecurity:
@SpringBootApplication
@EnableWebFluxSecurity
public class QuotesApplication {
    public static void main(String[] args) {
        SpringApplication.run(QuotesApplication.class);
    }
}
The endpoint implementation uses the provided BearerAuthenticationToken to check if the current user has or not the gold role:
@RestController
public class QuoteApi {
    private static final GrantedAuthority GOLD_CUSTOMER = new SimpleGrantedAuthority("gold");

    @GetMapping("/quotes/{symbol}")
    public Mono<Quote> getQuote(@PathVariable("symbol") String symbol,
      BearerTokenAuthentication auth ) {

        Quote q = new Quote();
        q.setSymbol(symbol);
        if ( auth.getAuthorities().contains(GOLD_CUSTOMER)) {
            q.setPrice(10.0);
        }
        else {
            q.setPrice(12.0);
        }
        return Mono.just(q);
    }
}
Now, how does Spring get the user roles? After all, this is not a standard claim like scopes or email. Indeed, there’s no magic here: we must supply a custom ReactiveOpaqueTokenIntrospection that extracts those roles from custom fields returned by Keycloak. This bean, available online, is basically the same shown in Spring’s documentation on this topic, with just a few minor changes specific to our custom fields.
We must also supply the configuration properties needed to access our identity provider:
spring.security.oauth2.resourceserver.opaquetoken.introspection-uri=http://localhost:8083/auth/realms/baeldung/protocol/openid-connect/token/introspect
spring.security.oauth2.resourceserver.opaquetoken.client-id=quotes-client
spring.security.oauth2.resourceserver.opaquetoken.client-secret=<CLIENT SECRET>
Finally, to run our application, we can either import it in an IDE or run it from Maven. The project’s POM contains a profile for this purpose:
$ mvn spring-boot:run -Pquotes-applicationThe application will now be ready to serve requests on http://localhost:8085/quotes. We can check that it is responding using curl:
$ curl -v http://localhost:8085/quotes/BAELAs expected, we get a 401 Unauthorized response since no Authorization header was sent.
6. Spring Gateway as OAuth 2.0 Resource Server
Securing a Spring Cloud Gateway application acting as a resource server is no different from a regular resource service. As such, it comes with no surprise that we must add the same starter dependency as we did for the backend service:
<dependency>
    <groupId>org.springframework.cloud</groupId>
    <artifactId>spring-cloud-starter-gateway</artifactId>
</dependency>
<dependency>
    <groupId>org.springframework.boot</groupId>
    <artifactId>spring-boot-starter-oauth2-resource-server</artifactId>
</dependency>
Accordingly, we also must add the @EnableWebFluxSecurity to our startup class:
@SpringBootApplication
@EnableWebFluxSecurity
public class ResourceServerGatewayApplication {
    public static void main(String[] args) {
        SpringApplication.run(ResourceServerGatewayApplication.class,args);
    }
}
The security-related configuration properties are the same used in the backend:
spring:
  security:
    oauth2:
      resourceserver:
        opaquetoken:
          introspection-uri: http://localhost:8083/auth/realms/baeldung/protocol/openid-connect/token/introspect
          client-id: quotes-client
          client-secret: <CLIENT SECRET>
Next, we just add route declarations the same way we did in our previous article on Spring Cloud Gateway setup:
... other properties omitted
  cloud:
    gateway:
      routes:
      - id: quotes
        uri: http://localhost:8085
        predicates:
        - Path=/quotes/**
Notice that, apart from the security dependencies and properties, we didn’t change anything on the gateway itself. To run the gateway application, we’ll use spring-boot:run, using a specific profile with the required settings:
$ mvn spring-boot:run -Pgateway-as-resource-server6.1. Testing the Resource Server
Now that we have all pieces of our puzzle, let’s put them together. Firstly, we have to make sure we have Keycloak, the quotes backend, and the gateway all running.
Next, we need to get an access token from Keycloak. In this case, the most straightforward way to get one is to use a password grant flow (a.k.a, “Resource Owner”). This means doing a POST request to Keycloak passing the username/password of one of the users, together with the client id and secret for the quotes client application:
$ curl -L -X POST \
  'http://localhost:8083/auth/realms/baeldung/protocol/openid-connect/token' \
  -H 'Content-Type: application/x-www-form-urlencoded' \
  --data-urlencode 'client_id=quotes-client' \
  --data-urlencode 'client_secret=0e082231-a70d-48e8-b8a5-fbfb743041b6' \
  --data-urlencode 'grant_type=password' \
  --data-urlencode 'scope=email roles profile' \
  --data-urlencode 'username=john.snow' \
  --data-urlencode 'password=1234'
The response will be a JSON object containing the access token, along with other values:
{
	"access_token": "...omitted",
	"expires_in": 300,
	"refresh_expires_in": 1800,
	"refresh_token": "...omitted",
	"token_type": "bearer",
	"not-before-policy": 0,
	"session_state": "7fd04839-fab1-46a7-a179-a2705dab8c6b",
	"scope": "profile email"
}
We can now use the returned access token to access the /quotes API:
$ curl --location --request GET 'http://localhost:8086/quotes/BAEL' \
--header 'Accept: application/json' \
--header 'Authorization: Bearer xxxx...'
Which produces a quote in JSON format:
{
  "symbol":"BAEL",
  "price":12.0
}
Let’s repeat this process, this time using an access token for Maxwell Smart:
{
  "symbol":"BAEL",
  "price":10.0
}
We see that we have a lower price, which means the backend was able to correctly identify the associated user. We can also check that unauthenticated requests do not get propagated to the backend, using a curl request with no Authorization header:
$ curl http://localhost:8086/quotes/BAELInspecting the gateway logs, we see that there are no messages related to the request forwarding process. This shows that the response was generated at the gateway.
7. Spring Gateway as OAuth 2.0 Client
For the startup class, we’ll use the same one we already have for the resource server version. We’ll use this to emphasize that all security behavior comes from the available libraries and properties.
In fact, the only noticeable difference when comparing both versions are in the configuration properties. Here, we need to configure the provider details using either the issuer-uri property or individual settings for the various endpoints (authorization, token, and introspection).
We also need to define our application client registration details, which include the requested scopes. Those scopes inform the IdP which set of information items will be available through the introspection mechanism:
... other propeties omitted
  security:
    oauth2:
      client:
        provider:
          keycloak:
            issuer-uri: http://localhost:8083/auth/realms/baeldung
        registration:
          quotes-client:
            provider: keycloak
            client-id: quotes-client
            client-secret: <CLIENT SECRET>
            scope:
            - email
            - profile
            - roles
Finally, there’s one important change in the route definitions section. We must add the TokenRelay filter to any route that requires the access token to be propagated:
spring:
  cloud:
    gateway:
      routes:
      - id: quotes
        uri: http://localhost:8085
        predicates:
        - Path=/quotes/**
        filters:
        - TokenRelay=
Alternatively, if we want all routes to start an authorization flow, we can add the TokenRelay filter to the default-filters section:
spring:
  cloud:
    gateway:
      default-filters:
      - TokenRelay=
      routes:
... other routes definition omitted
7.1. Testing Spring Gateway as OAuth 2.0 Client
For the test setup, we also need to make sure we have the three pieces of our project running. This time, however, we’ll run the gateway using a different Spring Profile containing the required properties to make it act as an OAuth 2.0 client. The sample project’s POM contains a profile that allows us to start it with this profile enabled:
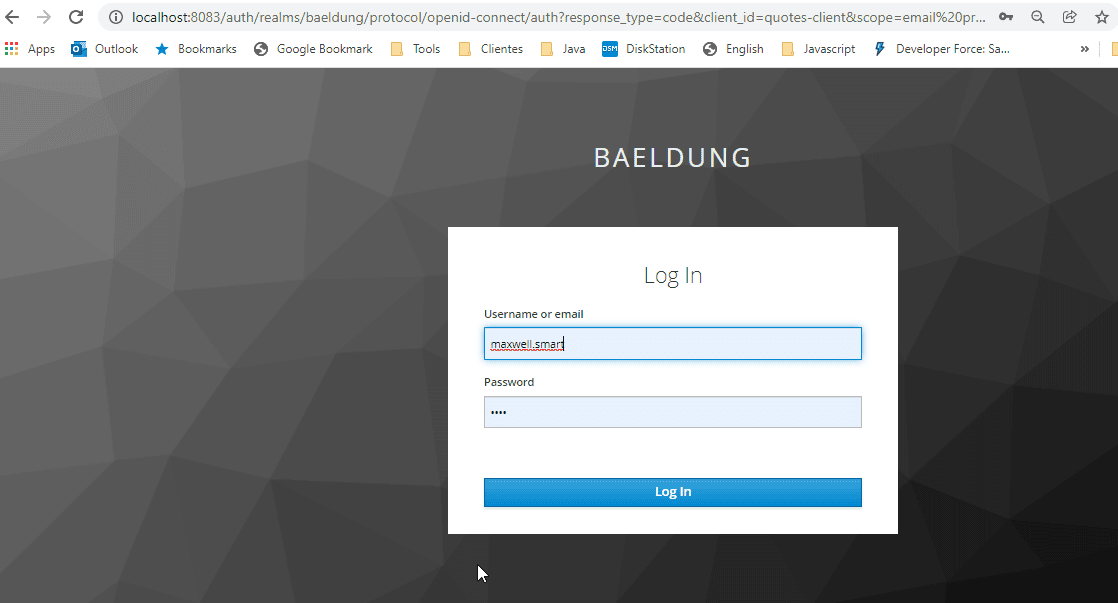
$ mvn spring-boot:run -Pgateway-as-oauth-clientOnce the gateway is running, we can test it by pointing our browser to http://localhost:8087/quotes/BAEL. If everything is working as expected, we’ll be redirected to the IdP’s login page:
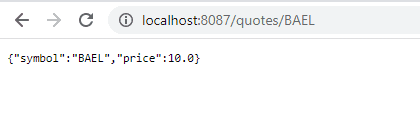
Since we’ve used Maxwell Smart’s credentials, we again get a quote with a lower price:
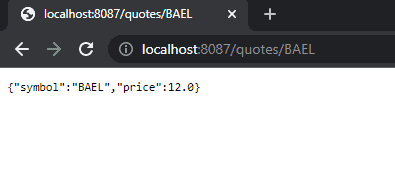
To conclude our test, we’ll use an anonymous/incognito browser window and test this endpoint with John Snow’s credentials. This time we get the regular quote price:
8. Conclusion
In this article, we’ve explored some of the OAuth 2.0 security patterns and how to implement them using Spring Cloud Gateway.


