

Mocking is an essential part of unit testing, and the Mockito library makes it easy to write clean and intuitive unit tests for your Java code.
Get started with mocking and improve your application tests using our Mockito guide:
Handling concurrency in an application can be a tricky process with many potential pitfalls. A solid grasp of the fundamentals will go a long way to help minimize these issues.
Get started with understanding multi-threaded applications with our Java Concurrency guide:
Spring 5 added support for reactive programming with the Spring WebFlux module, which has been improved upon ever since. Get started with the Reactor project basics and reactive programming in Spring Boot:
Since its introduction in Java 8, the Stream API has become a staple of Java development. The basic operations like iterating, filtering, mapping sequences of elements are deceptively simple to use.
But these can also be overused and fall into some common pitfalls.
To get a better understanding on how Streams work and how to combine them with other language features, check out our guide to Java Streams:
Explore Spring Boot 3 and Spring 6 in-depth through building a full REST API with the framework:
Yes, Spring Security can be complex, from the more advanced functionality within the Core to the deep OAuth support in the framework.
I built the security material as two full courses - Core and OAuth, to get practical with these more complex scenarios. We explore when and how to use each feature and code through it on the backing project.
You can explore the course here:
Spring Data JPA is a great way to handle the complexity of JPA with the powerful simplicity of Spring Boot.
Get started with Spring Data JPA through the guided reference course:
Refactor Java code safely — and automatically — with OpenRewrite.
Refactoring big codebases by hand is slow, risky, and easy to put off. That’s where OpenRewrite comes in. The open-source framework for large-scale, automated code transformations helps teams modernize safely and consistently.
Each month, the creators and maintainers of OpenRewrite at Moderne run live, hands-on training sessions — one for newcomers and one for experienced users. You’ll see how recipes work, how to apply them across projects, and how to modernize code with confidence.
Join the next session, bring your questions, and learn how to automate the kind of work that usually eats your sprint time.
Yes, we're now running our only Summer Sale. All Courses are 30% off until 20th July, 2026:
Yes, we're now running our only Summer Sale. All Courses are 30% off until 20th July, 2026:
1. Introduction
In this tutorial, we’ll explore how to use the Temporal Workflow Engine with the Spring Boot integration library available as part of its Java SDK.
2. Quick Recap
Temporal is a robust workflow engine that puts a strong focus on resiliency through deterministic execution.
We’ve already covered Temporal’s basic concepts in our “getting started” tutorial, so here we’ll just highlight its main features:
- Runtime architecture based on a centralized service orchestrating workflow executions that “live” on distributed worker instances
- Workflows: define the sequence of steps to complete a given business use case, along with methods to update and/or query its state
- Activities: perform actions corresponding to specific steps
Workflows and activities are just code that developers must write in one of the supported languages using the corresponding SDK.
3. Temporal’s Spring Boot Integration Overview
The Spring Boot Integration module complements the base Java SDK with a few quality-of-life features for projects that use the Spring Framework:
- Automatic workflow and activities registration using standard DI capabilities
- Declarative configuration of worker queues
- Auto-configured WorkflowClient instance available as a regular bean for use throughout the application
- Easy switch from a local development server to an in-memory test server or a production one by just changing a few properties.
In practical terms, using this module just requires adding a single extra dependency to the project’s pom:
<dependency>
    <groupId>io.temporal</groupId>
    <artifactId>temporal-spring-boot-starter</artifactId>
    <version>1.32.0</version>
</dependency>
The latest version of this dependency is available on Maven Central.
4. Order Processing Example
For this tutorial, we’ll create a simple order processing workflow using Temporal’s Spring Boot integration module. This is a graphical representation of the workflow we’ll implement, using BPMN notation:
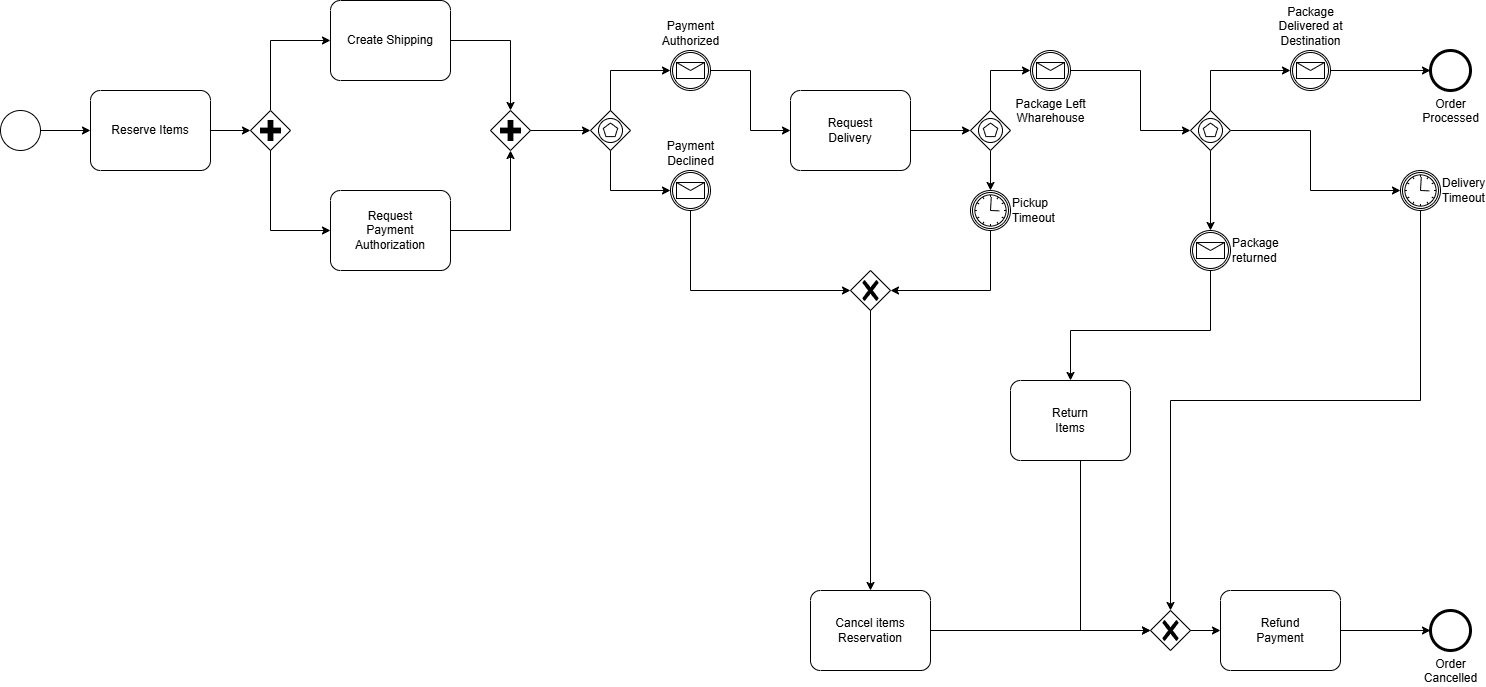
This diagram shows the sequence of activities and events that we need to orchestrate to fully complete an order processing workflow instance.
Of course, this is a very simplistic one, but it contains features that are likely to be present in a real-world scenario:
- Parallel execution: create Shipping and Request Payment
- External event handling: payment accepted/declined, shipping progress events
- Handling timeouts: pickup timeout, delivery timeout
- Process-level failure handling: handle returned event, refund payment
5. Application Structure
The Order application follows the familiar structure found in other Spring Boot applications.
At its top level, we have the OrderApplication class, which contains just the application’s entry point. Below that, we have sub-packages for different artifacts:
- workflow: Workflow interface and implementation
- activities: Activities interface and implementation
- services: Services used to perform tasks associated with activities
- domain: value objects used throughout the application
- adapter.rest: controller used to expose a simple REST API that allows clients to submit orders, send events to live instances, and query information about them
- config: Spring configuration classes
Last, but not least, we’ll also need to define some properties so the auto-configuration mechanism can bootstrap the engine’s environment. This is an example application.yaml file that defines the minimal set of properties required to run our example:
spring:
  temporal:
    connection:
      target: local
    workers-auto-discovery:
      packages:
        - "com.baeldung.temporal.workflows.sboot.order"
All Temporal-related properties go under the spring.temporal prefix. In our case, we define the connection target as local, which is an alias to a development server running locally and serving requests at the standard port 7233.
The workers-auto-discovery property expects a list of package names that will be scanned recursively for classes and/or interfaces with Temporal-related annotations.
6. Workflow Interface
We’ll start by creating the OrderWorkflow interface with the required @WorkflowInterface annotation to represent our Order business process. We define a processOrder() method and apply @WorkflowMethod on it so Temporal knows it is the workflow’s entry point. This method takes an OrderSpec record that holds information about the purchased items, along with billing, shipping, and customer information:
@WorkflowInterface
public interface OrderWorkflow {

    @WorkflowMethod
    void processOrder(OrderSpec spec);

   // ... other methods omitted
}
Next, we add @SignalMethod-annotated methods that map to the messages expected by the workflow:
@WorkflowInterface
public interface OrderWorkflow {

    // ... other methods omitted

    @SignalMethod
    void paymentAuthorized(String transactionId, String authorizationId);

    @SignalMethod
    void paymentDeclined(String transactionId, String cause);

    @SignalMethod
    void packagePickup(Instant pickupTime);

    @SignalMethod
    void packageDelivered(Instant pickupTime);

    @SignalMethod
    void packageReturned(Instant pickupTime);

}
Notice that we’re using @SignalMethod instead of @UpdateMethod because, in our case, clients don’t need to wait for those calls to be processed. This is also called a “fire-and-forget” pattern, which contrasts with @UpdateMethod calls that will block clients until the method completes.
To finish the workflow interface, we’ll add @QueryMethod methods, which will allow us to observe an instance’s internal state:
@WorkflowInterface
public interface OrderWorkflow {

    // ... other methods omitted
    @QueryMethod
    Order getOrder();

    @QueryMethod
    Shipping getShipping();

    @QueryMethod
    PaymentAuthorization getPayment();

    @QueryMethod
    RefundRequest getRefund();
}
7. Activities Interface
The activities interface acts as a façade with methods that correspond, as the name suggests, to the activities performed by a workflow instance during its life cycle. This means that, in general, we’ll have methods that map more-or-less directly to the activity boxes present in the BPMN diagram:
@ActivityInterface
public interface OrderActivities {

    void reserveOrderItems(Order order);
    void cancelReservedItems(Order order);
    void returnOrderItems(Order order);
    void dispatchOrderItems(Order order);

    PaymentAuthorization createPaymentRequest(Order order, BillingInfo billingInfo);
    RefundRequest createRefundRequest(PaymentAuthorization payment);

    Shipping createShipping(Order order);
    Shipping updateShipping(Shipping shipping, ShippingStatus status);
}
8. Workflow Implementation
Moving to the implementation, we can see that the business process has two features we need to be aware of:
- Parallel execution: after reserving the order items, the flow splits into two branches, one that creates a payment authorization request, and another to create the shipping
- Blocking on mutually exclusive events: timeout or (exclusive) a message
Let’s take a look at how we can implement those features, starting with the parallel execution:
@Service
@WorkflowImpl(taskQueues = "ORDERS")
public class OrderWorkflowImpl implements OrderWorkflow {
    // ... fields and constructor omitted

    @Override
    public void processOrder(OrderSpec spec) {

        // ... order initialization omitted

        activities.reserveOrderItems(spec.order());

        // Create a payment request
        Async.function(() -> payment = activities.createPaymentRequest(spec.order(), spec.billingInfo()));

        // Create a shipping request
        shipping = activities.createShipping(spec.order());

       // ... workflow logic omitted
    }

    // ... other methods omitted
}
The key point here is the use of Async.function() to run the activity in another thread. Since we only have two branches, we do the payment request in the background, while we continue to execute the activities on the main thread.
Once we’ve created the shipping order, we must wait for the payment. Here, we’ll use Workflow.await(), which takes a lambda returning a Boolean:
Workflow.await(() -> payment != null && payment.status() != PaymentStatus.PENDING);
In this case, we must first check whether we already have a payment and its status. The reason for this null check is that the payment class instance variable will be set asynchronously, so we can’t assume it already has a value.
Another critical aspect of those lambdas is that they must NOT have side effects. This is a Temporal’s requirement, deeply related to the deterministic workflow execution principle, which is the basis for proper error recovery.
9. Signal and Query Methods Implementation
Compared to the main workflow method, those methods are quite trivial. Here’s the signal handler’s implementation for the paymentAuthorized message:
@Override
public void paymentAuthorized(String transactionId, String authorizationId) {
    Workflow.await(() -> payment != null);
    payment = new PaymentAuthorization(
      payment.info(),
      PaymentStatus.APPROVED,
      payment.orderId(),
      transactionId,
      authorizationId,
      null
    );
}
Notice the use of Workflow.await() to ensure the workflow has already created the initial payment request. We need this check because clients may invoke signal, update, and query methods even before the main workflow method starts.
We must be aware that, contrary to signal and update methods, query methods can’t use Workflow.await() – this will result in a runtime exception! If a client requests information that’s not available, the return value must allow it to clearly identify this situation:
@Override
public PaymentAuthorization getPayment() {
    return payment;
}
Here, the method simply returns null if it’s called before the workflow populates it with a value.
10. Activities Implementation
The OrderActivitiesImpl class has the implementation for the OrderActivities interface. Here is where the real action happens, as its methods are the ones that interact with the workflow’s supporting services.
As a typical example, let’s look at the reserveInventoryItems method:
@Service
@ActivityImpl(taskQueues = "ORDERS")
public class OrderActivitiesImpl implements OrderActivities {
    // ... fields and constructors omitted

    @Override
    public void reserveOrderItems(Order order) {
        for (OrderItem item : order.items()) {
            inventoryService.reserveInventory(item.sku(), item.quantity());
        }
    }

    // ... other activities omitted
}
The activity goes through the order items and requests the inventoryService to reserve them from the available stock.
11. REST API
The main purpose of this API is to shield clients from any Temporal-specific knowledge. While not strictly required, it’s a common practice to have such a mechanism in place to avoid too much vendor lock-in.
If required, this API could be part of a completely independent module. For simplicity, here we’ll add it to the same project. This is the API’s @PostMapping method used to create new workflow instances:
@RestController
@RequestMapping("/order")
public class OrderApi {
    // ...fields and constructor omitted
    @PostMapping
    public ResponseEntity<OrderCreationResponse> createOrder(@RequestBody OrderSpec orderSpec) {
        var execution = orderService.createOrderWorkflow(orderSpec);
        var location = UriComponentsBuilder.fromUriString("/order/{orderExecutionId}").build(execution);

        return ResponseEntity.created(location).body(new OrderCreationResponse(execution));
    }

    // ... other endpoint methods omitted
}
OrderService is a thin layer over the Temporal-provided WorkflowClient bean, which factors out some boilerplate code:
@Service
public class OrderService {
    private final WorkflowClient workflowClient;

    public OrderService(WorkflowClient workflowClient) {
        this.workflowClient = workflowClient;
    }

    public OrderWorkflow getWorkflow(String orderExecutionId) {
        return workflowClient.newWorkflowStub(OrderWorkflow.class, orderExecutionId);
    }

    public String createOrderWorkflow(OrderSpec orderSpec) {
        var uuid = UUID.randomUUID();
        var wf = workflowClient.newWorkflowStub(
          OrderWorkflow.class,
          WorkflowOptions.newBuilder()
            .setTaskQueue("ORDERS")
            .setWorkflowId(uuid.toString()).build());
        var execution = WorkflowClient.start(wf::processOrder, orderSpec);
        return execution.getWorkflowId();
    }
}
12. Testing
Workflow applications require tests that emulate complex interactions with invoked services and associated failure modes. In this context, unit testing, although still useful to validate specific parts of the system, is usually complemented by integration tests.
One way of structuring those tests is to create scenarios for the “happy path” and associated alternate paths. The focus should be to cover all possible paths taken by a given workflow instance, which, in practice, means we should aim for 100% code coverage for the main workflow method.
This example shows the “happy path” test case implementation. Noteworthy points:
- The test uses the in-memory Temporal test server. To enable it, we’ve set the spring.temporal.test-server.enabled property to true
- All tests are driven by calls to the REST API, created by the @SpringBootTest annotation
- To simulate the response from a payment gateway, we need payment request data that is internal to the workflow. Notice that we query this information in a loop because this information may not be available until the workflow logic creates it.
A very useful feature available when using the embedded test server is the ability to skip time. This is crucial for testing workflows that have activities that take hours or even days to complete.
To use this feature, we use the sleep() method available in the TestWorkflowEnvironment service, available for injection in Spring tests. This is how we can use this method to simulate a pickup timeout in our Order workflow:
@Test
public void whenPickupTimeout_thenItemsReturnToStock() {

    // ... order creation steps (omitted)

    // Fast-forward 1 day to force a the delivery timeout
    testEnv.sleep(Duration.ofDays(1));

    // Wait until the workflow completes
    testEnv.getWorkflowClient().newUntypedWorkflowStub(orderExecutionId).getResult(Void.class);

    // ... Check for order cancelled and itens returned to stock (omitted)

}
When the test code calls sleep(), the engine fast-forwards its internal clock by the amount specified, so any pending await call will complete accordingly.
13. Conclusion
In this article, we’ve covered how to use the Temporal workflow engine with Spring Boot. Using an Order fulfillment as an example, we’ve shown how to set up the project and use the auto-configuration support for a simplified setup.
We’ve also covered in more detail the techniques required to implement a real-world workflow, with parallel executions, messages, and timeouts.


