API First Development with Spring Boot and OpenAPI 3.0
Last updated: May 8, 2025


Mocking is an essential part of unit testing, and the Mockito library makes it easy to write clean and intuitive unit tests for your Java code.
Get started with mocking and improve your application tests using our Mockito guide:
Handling concurrency in an application can be a tricky process with many potential pitfalls. A solid grasp of the fundamentals will go a long way to help minimize these issues.
Get started with understanding multi-threaded applications with our Java Concurrency guide:
Spring 5 added support for reactive programming with the Spring WebFlux module, which has been improved upon ever since. Get started with the Reactor project basics and reactive programming in Spring Boot:
Since its introduction in Java 8, the Stream API has become a staple of Java development. The basic operations like iterating, filtering, mapping sequences of elements are deceptively simple to use.
But these can also be overused and fall into some common pitfalls.
To get a better understanding on how Streams work and how to combine them with other language features, check out our guide to Java Streams:
Explore Spring Boot 3 and Spring 6 in-depth through building a full REST API with the framework:
Yes, Spring Security can be complex, from the more advanced functionality within the Core to the deep OAuth support in the framework.
I built the security material as two full courses - Core and OAuth, to get practical with these more complex scenarios. We explore when and how to use each feature and code through it on the backing project.
You can explore the course here:
Spring Data JPA is a great way to handle the complexity of JPA with the powerful simplicity of Spring Boot.
Get started with Spring Data JPA through the guided reference course:
Refactor Java code safely — and automatically — with OpenRewrite.
Refactoring big codebases by hand is slow, risky, and easy to put off. That’s where OpenRewrite comes in. The open-source framework for large-scale, automated code transformations helps teams modernize safely and consistently.
Each month, the creators and maintainers of OpenRewrite at Moderne run live, hands-on training sessions — one for newcomers and one for experienced users. You’ll see how recipes work, how to apply them across projects, and how to modernize code with confidence.
Join the next session, bring your questions, and learn how to automate the kind of work that usually eats your sprint time.
Yes, we're now running our only Summer Sale. All Courses are 30% off until 20th July, 2026:
Yes, we're now running our only Summer Sale. All Courses are 30% off until 20th July, 2026:
1. Introduction
The software engineering industry has become increasingly dependent on web APIs. The increasing usage of cloud computing and HTTP might explain that.
A software development team must ensure they design helpful and user-friendly APIs. The main challenge in traditional development approaches is to keep agility when, at the same time, we create the API contract and implement the business logic of new products.
In this article, we’ll introduce API-First Development using Spring Boot and Open API Specification 3.0. This approach improves the team’s communication and agility through timely API design feedback, fail-fast processes, and parallel work.
2. What Is the Open API Specification
The OpenAPI Specification (OAS) standardizes how to create an API design document. The typical workflow in an API-First approach using OAS is as follows:
- The team creates a design document and shares it with the involved people for feedback and iterative change.
- When the team and stakeholders agree on the API design, a developer uses the document to generate a server-side skeleton code using a document generator tool.
- Finally, the developer starts working on the API’s business logic using the previously generated code.
OAS 3.1 allows specifying HTTP resources, verbs, response codes, data models, media types, security schemes, and other API components.
3. Why Use API-First Development
Agile Development is one of the most used methodologies in the software industry. Being agile means building something small as quickly as possible to either fail fast and change the initial design or move on with it, incrementally adding small changes.
From an Agile team perspective, API-First Development has a few advantages:
- Provides a way for fast feedback on the API design.
- Creates a single channel of communication toward an API contract agreement.
- Allows parallel work of the people involved in the API design.
To fully understand the advantages of an APi-first approach, we’ll compare two agile teams’ workflow scenarios. The first team uses the traditional approach, while the second uses API-First Development:
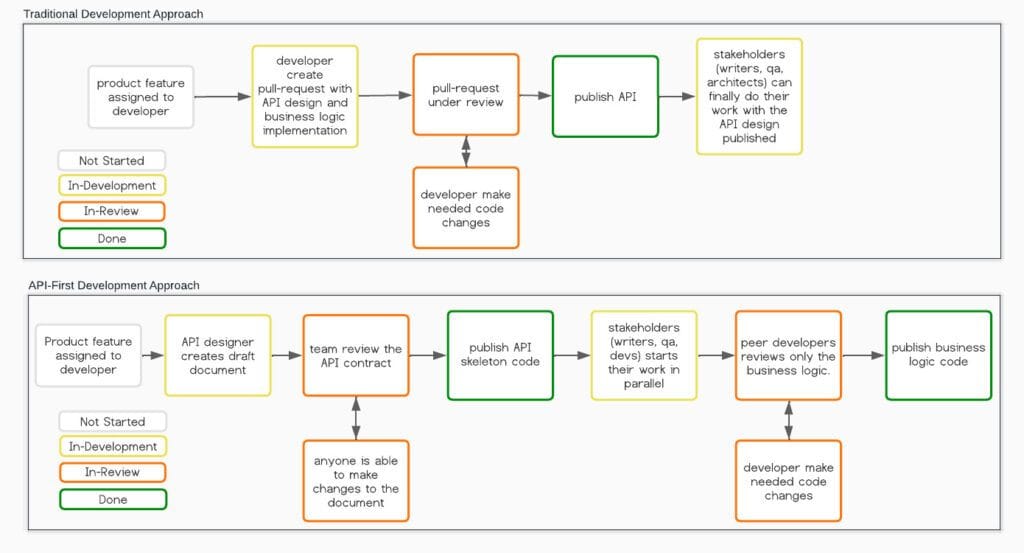
In a traditional scenario, a developer is assigned to build a new product feature. Typically, that developer creates the new feature by implementing the business logic first and then connecting that logic to an in-code API design. Thus, the API becomes available for the stakeholders to review only when the developer finishes all the code changes for that feature. Therefore, creating slowness and miscommunication about the API contract review and agreement.
In API-First Development, a designer creates the API contract document before the business logic development phase. That document provides a common language among the product stakeholders to evaluate the effort to build, provide timely feedback, create test use cases, document the API, etc. Thus, we can be more agile by either changing the initial design or moving on with it before wasting any time developing the application.
Another reason to use API-First Development is that multiple people can work in parallel on the same product feature after a document is created, for instance:
- Product managers evaluate risks, create new features, and manage time.
- QA analysts build their test scenarios.
- Technical writers document the API.
- Developers implement the business logic code.
4. Defining the API Contract
We’ll use a banking demo REST API to illustrate an API-First approach workflow. That API allows two operations: get balance and deposit amount. To clarify, the table below shows the resource paths, HTTP verbs, and response codes (RC) of these operations:
| HTTP verb | Resource | Error RCs | Successful RC’s | |
|---|---|---|---|---|
| get balance | GET | /account | 404 – Account not found | 200 – Get balance information |
| deposit amount | POST | /account/deposit | 404 – Account not found | 204 – Deposit operation complete |
Now, we can create the OAS API Specification file. We’ll use the Swagger Online Editor, an online solution for interpreting YAML to Swagger documentation.
4.1. Top-Level Context of the API
Let’s start by defining the top-level context of the API. To do that, go to the Swagger Editor and replace the content on the left side of the editor with the following YAML code:
openapi: 3.0.3
info:
  title: Banking API Specification for account operations
  description: |-
    A simple banking API that allows two operations:
    - get account balance given account number
    - deposit amount to a account
  version: 1.0-SNAPSHOT
servers:
  - url: https://testenvironment.org/api/v1
  - url: https://prodenvironment.org/api/v1
tags:
  - name: accounts
    description: Operations between bank accounts
Note: Don’t mind the errors right now. They don’t block our workflow and will fade away as we move into the next sections.
Let’s check each keyword individually:
- openapi – The version of OAS used.
- title – Short title for the API.
- description – Description of the API responsibilities.
- version – The current version of the API, for instance, 1.0-SNAPSHOT.
- servers – The available machines where the client can access the API.
- tags – A set of unique tags to group API operations in sub-sets.
4.2. Exposing API Paths
Now, let’s create the GET /account and POST /account/deposit API endpoints described earlier. To do that, add the following content at the root level of the YAML editor:
paths:
  /account:
    get:
      tags:
        - accounts
      summary: Get account information
      description: Get account information using account number
      operationId: getAccount
      responses:
        200:
          description: Success
          content:
            application/json:
              schema:
                $ref: '#/components/schemas/Account'
        404:
          description: Account not found
          content:
            application/json:
              schema:
                $ref: '#/components/schemas/AccountNotFoundError'
  /account/deposit:
    post:
      tags:
        - accounts
      summary: Deposit amount to account
      description: Initiates a deposit operation of a desired amount to the account specified
      operationId: depositToAccount
      requestBody:
        description: Account number and desired amount to deposit
        content:
          application/json:
            schema:
              $ref: '#/components/schemas/DepositRequest'
        required: true
      responses:
        204:
          description: Success
        404:
          description: Account not found
          content:
            application/json:
              schema:
                $ref: '#/components/schemas/AccountNotFoundError'
Note: Again, the YAML interpreter will show a few errors which we’ll address in section 4.3. For now, we can ignore them.
A lot is going on in the document above. Let’s break it down into parts by looking at each keyword individually:
- paths – Defines the API resources /account and /account/deposit. Under the resources, we must define the get and post verbs available for them.
- tags – The group to which it belongs. It should be the same tag name as described in section 4.1.
- summary – Brief information about what the endpoint does.
- description – More detailed information about how the endpoint works.
- operationId – A unique identifier of the operation described.
- requestBody – The request payload containing a description, content, and required keywords. We’ll define the content schema in section 4.3.
- responses – A list of all available response codes. Each response code object contains a description and content keywords. We’ll define that content schema in section 4.3.
- content: The HTTP Content-Type of the message.
4.3. Defining the Data Model Components
Finally, let’s create the data model objects of our API: the request and response bodies and the error messages. To accomplish that, add the following structure at the root level of the YAML editor:
components:
  schemas:
    Account:
      type: object
      properties:
        balance:
          type: number
    AccountNotFoundError:
      type: object
      properties:
        message:
          type: string
    DepositRequest:
      type: object
      properties:
        accountNumber:
          type: string
        depositAmount:
          type: number
After adding the content above, all the interpretation errors in the editor should have vanished.
In the above YAML code, we define the same components used in the schema keywords in section 4.2. We can reuse a component as much as we want. For instance, the AccountNotFoundError object is used in both endpoints’ 404 response codes. Let’s check the keywords in the code individually:
- components – The root level keyword of components.
- schemas – A list of all object definitions.
- type – The type of the field. If we use the object type, we must also define the properties keyword.
- properties – A list of all object field names and their types.
4.4. Review the API Documentation
At this point, the API is available online to be reviewed by the product’s stakeholders. We know that the main advantage of API-First Development is the power to fail or succeed quickly without wasting time in the development phase. Thus, ensure that everyone reviews and collaborates with the proposed API resources, response codes, data models, and the descriptions and responsibilities of the API before moving to the development phase.
Once the team agrees on a design, they can work on the API in parallel.
5. Import to Spring Boot Application
This section shows how the developer can import the YAML document into the application and auto-generate the API skeleton code.
First, we must create an empty YAML file named account_api_description.yaml inside the /src/main/resources folder. Then, let’s replace the content of account_api_description.yaml with the complete YAML code in the Swagger online editor. Finally, we must add the openapi-generator-maven-plugin plugin to the <plugins> tag in the Spring Boot Application pom.xml file:
<plugin>
    <groupId>org.openapitools</groupId>
    <artifactId>openapi-generator-maven-plugin</artifactId>
    <version>6.2.1</version>
    <executions>
        <execution>
            <goals>
                <goal>generate</goal>
            </goals>
            <configuration>
                <skipValidateSpec>true</skipValidateSpec>
                <inputSpec>./src/main/resources/account_api_description.yaml</inputSpec>
                <generatorName>spring</generatorName>
                <configOptions>
                    <openApiNullable>false</openApiNullable>
                    <interfaceOnly>true</interfaceOnly>
                </configOptions>
            </configuration>
        </execution>
    </executions>
</plugin>
You can find the code used here in the OpenAPI plugin tutorial.
Now, let’s generate the server-side code from the YAML file by running:
mvn clean installAfter that, we can check the following generated code in the target folder:
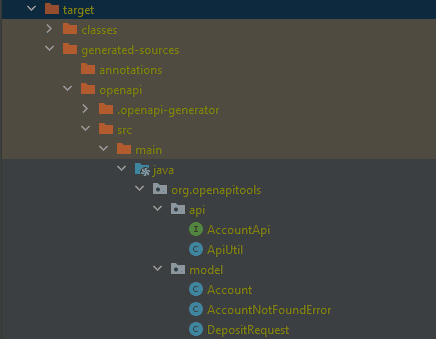
From there, a developer can use the generated classes as a starting point for the development phase. For example, we can implement the AccountApi interface using the AccountController class below:
@Controller
public class AccountController implements AccountApi {
    @Override
    public ResponseEntity<Void> depositToAccount(DepositRequest depositRequest) {
        //Execute the business logic through Service/Utils/Repository classes
        return AccountApi.super.depositToAccount(depositRequest);
    }

    @Override
    public ResponseEntity<Account> getAccount() {
        //Execute the business logic through Service/Utils/Repository classes
        return AccountApi.super.getAccount();
    }
}
The overridden methods depositToAccount and getAccount correspond to the POST /account/deposit and GET /account endpoints/, respectively.
6. Conclusion
In this article, we’ve seen how to use API-First Development using Spring-Boot and OAS. We’ve also looked at the benefits of being API-first and how it helps modern agile software development teams. The most important reason to use API-First is the agility increase and the reduction of wasted development time when creating APIs. Using that approach, we can draft, iteratively change, and provide feedback faster on the design.
Another good reason for using an API-First approach is that stakeholders don’t need to rely on the developer to finish the code to start their work. QAs, writers, managers, and developers can work in parallel after the initial API design document is created.


