

Mocking is an essential part of unit testing, and the Mockito library makes it easy to write clean and intuitive unit tests for your Java code.
Get started with mocking and improve your application tests using our Mockito guide:
Handling concurrency in an application can be a tricky process with many potential pitfalls. A solid grasp of the fundamentals will go a long way to help minimize these issues.
Get started with understanding multi-threaded applications with our Java Concurrency guide:
Spring 5 added support for reactive programming with the Spring WebFlux module, which has been improved upon ever since. Get started with the Reactor project basics and reactive programming in Spring Boot:
Since its introduction in Java 8, the Stream API has become a staple of Java development. The basic operations like iterating, filtering, mapping sequences of elements are deceptively simple to use.
But these can also be overused and fall into some common pitfalls.
To get a better understanding on how Streams work and how to combine them with other language features, check out our guide to Java Streams:
Explore Spring Boot 3 and Spring 6 in-depth through building a full REST API with the framework:
Yes, Spring Security can be complex, from the more advanced functionality within the Core to the deep OAuth support in the framework.
I built the security material as two full courses - Core and OAuth, to get practical with these more complex scenarios. We explore when and how to use each feature and code through it on the backing project.
You can explore the course here:
Spring Data JPA is a great way to handle the complexity of JPA with the powerful simplicity of Spring Boot.
Get started with Spring Data JPA through the guided reference course:
Refactor Java code safely — and automatically — with OpenRewrite.
Refactoring big codebases by hand is slow, risky, and easy to put off. That’s where OpenRewrite comes in. The open-source framework for large-scale, automated code transformations helps teams modernize safely and consistently.
Each month, the creators and maintainers of OpenRewrite at Moderne run live, hands-on training sessions — one for newcomers and one for experienced users. You’ll see how recipes work, how to apply them across projects, and how to modernize code with confidence.
Join the next session, bring your questions, and learn how to automate the kind of work that usually eats your sprint time.
Yes, we're now running our only Summer Sale. All Courses are 30% off until 20th July, 2026:
Yes, we're now running our only Summer Sale. All Courses are 30% off until 20th July, 2026:
1. Overview
In this short tutorial, we’re going to explore the main logging options available in Spring Boot.
Deeper information about Logback is available in A Guide to Logback, while Log4j2 is introduced in Intro to Log4j2 – Appenders, Layouts and Filters.
Further reading:
Setting the Log Level in Spring Boot When Testing
Display Auto-Configuration Report in Spring Boot
2. Initial Setup
Let’s first create a Spring Boot module. The recommended way to do so is using Spring Initializr, which we cover in our Spring Boot Tutorial.
Now let’s create our only class file, LoggingController:
@RestController
public class LoggingController {

    Logger logger = LoggerFactory.getLogger(LoggingController.class);

    @RequestMapping("/")
    public String index() {
        logger.trace("A TRACE Message");
        logger.debug("A DEBUG Message");
        logger.info("An INFO Message");
        logger.warn("A WARN Message");
        logger.error("An ERROR Message");

        return "Howdy! Check out the Logs to see the output...";
    }
}
Once we’ve loaded the web application, we’ll be able to trigger those logging lines by simply visiting http://localhost:8080/.
3. Zero Configuration Logging
Spring Boot is a very helpful framework. It allows us to forget about the majority of the configuration settings, many of which it opinionatedly auto-tunes.
In the case of logging, the only mandatory dependency is Apache Commons Logging.
We need to import it only when using Spring 4.x (Spring Boot 1.x) since it’s provided by Spring Framework’s spring-jcl module in Spring 5 (Spring Boot 2.x).
We shouldn’t worry about importing spring-jcl at all if we’re using a Spring Boot Starter (which we almost always are). That’s because every starter, like our spring-boot-starter-web, depends on spring-boot-starter-logging, which already pulls in spring-jcl for us.
3.1. Default Logback Logging
When using starters, Logback is used for logging by default.
Spring Boot preconfigures it with patterns and ANSI colors to make the standard output more readable.
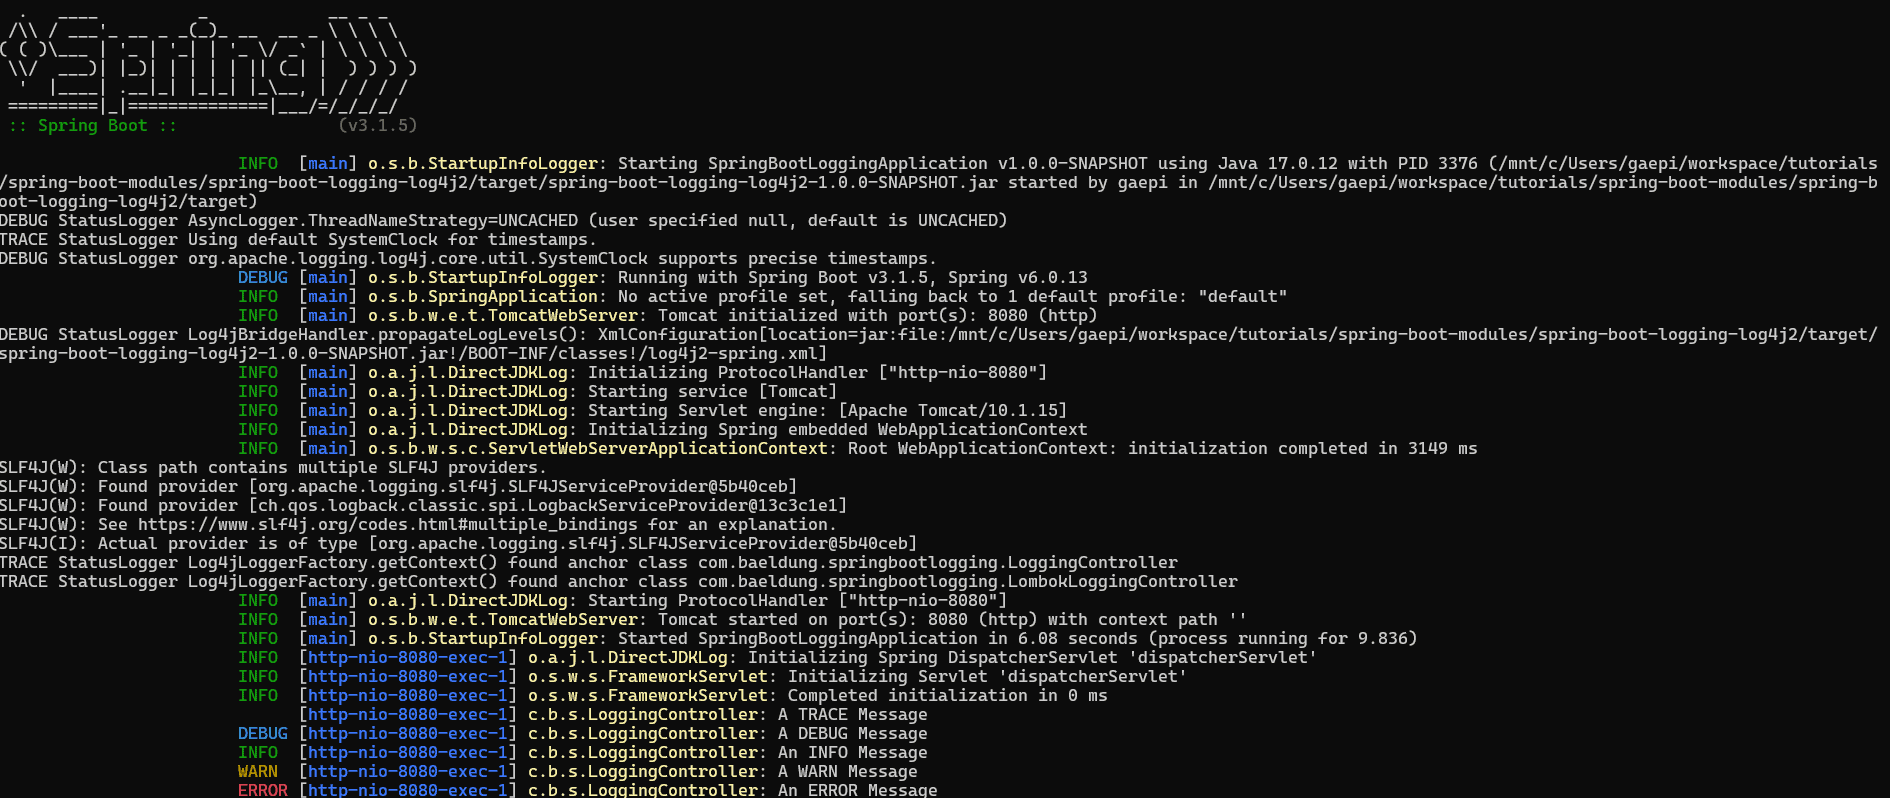
Let’s now run the application and visit the http://localhost:8080/ page, and see what happens in the console:

As we can see, the default logging level of the Logger is preset to INFO, meaning that TRACE and DEBUG messages are not visible.
In order to activate them without changing the configuration, we can pass the –debug or –trace arguments on the command line:
java -jar target/spring-boot-logging-0.0.1-SNAPSHOT.jar --trace
3.2. Log Levels
Spring Boot also gives us access to a more fine-grained log level setting via environment variables. There are several ways we can accomplish this.
First, we can set our logging level within our VM Options:
-Dlogging.level.org.springframework=TRACE
-Dlogging.level.com.baeldung=TRACE
Alternatively, if we’re using Maven, we can define our log settings via the command line:
mvn spring-boot:run
  -Dspring-boot.run.arguments=--logging.level.org.springframework=TRACE,--logging.level.com.baeldung=TRACE
When working with Gradle, we can pass log settings through the command line. This will require setting the bootRun task.
Once that’s done, we run the application:
./gradlew bootRun -Pargs=--logging.level.org.springframework=TRACE,--logging.level.com.baeldung=TRACEIf we want to change the verbosity permanently, we can do so in the application.properties file as described here:
logging.level.root=WARN
logging.level.com.baeldung=TRACE
Finally, we can change the logging level permanently by using our logging framework configuration file.
We mentioned that Spring Boot Starter uses Logback by default. Let’s see how to define a fragment of a Logback configuration file in which we set the level for two separate packages:
<logger name="org.springframework" level="INFO" />
<logger name="com.baeldung" level="INFO" />
Remember that if the log level for a package is defined multiple times using the different options mentioned above, but with different log levels, the lowest level will be used.
So, if we set the logging levels using Logback, Spring Boot, and environment variables at the same time, the log level will be TRACE, as it is the lowest among the requested levels.
3.3. Default Logging File
By default, Spring Boot logs messages to the console. However, it also allows writing a log to a file while retaining the console output. We can achieve this using the logging.file.name or logging.file.path properties. When both properties are set in the same configuration, logging.file.name takes precedence, and logging.file.path is ignored.
Let’s see an example configuration in the application.properties file:
logging.file.name=logs/app.log
logging.file.path=logs
The logging.file.name property specifies the full path, including the directory and the file name. If the specified file doesn’t exist, Spring Boot creates it automatically. Also, the file path can be absolute or relative.
Furthermore, the logging.file.path property specifies the directory to store the log file. If only this property is set, Spring Boot automatically generates a default file name for the log file. Like logging.file.name property, the file path can be absolute or relative.
Importantly, before Spring Boot version 2.3, the equivalent properties were named logging.path and logging.name.
4. Logback Configuration Logging
Even though the default configuration is useful (for example, to get started in zero time during POCs or quick experiments), it’s most likely not enough for our daily needs.
Let’s see how to include a Logback configuration with a different color and logging pattern, with separate specifications for console and file output, and with a decent rolling policy to avoid generating huge log files.
First, we should find a solution that allows for handling our logging settings alone instead of polluting application.properties, which is commonly used for many other application settings.
When a file in the classpath has one of the following names, Spring Boot will automatically load it over the default configuration:
- logback-spring.xml
- logback.xml
- logback-spring.groovy
- logback.groovy
Spring recommends using the -spring variant over the plain ones whenever possible, as described here.
Let’s write a simple logback-spring.xml:
<?xml version="1.0" encoding="UTF-8"?>
<configuration>

    <property name="LOGS" value="./logs" />

    <appender name="Console"
        class="ch.qos.logback.core.ConsoleAppender">
        <layout class="ch.qos.logback.classic.PatternLayout">
            <Pattern>
                %black(%d{ISO8601}) %highlight(%-5level) [%blue(%t)] %yellow(%C{1}): %msg%n%throwable
            </Pattern>
        </layout>
    </appender>

    <appender name="RollingFile"
        class="ch.qos.logback.core.rolling.RollingFileAppender">
        <file>${LOGS}/spring-boot-logger.log</file>
        <encoder
            class="ch.qos.logback.classic.encoder.PatternLayoutEncoder">
            <Pattern>%d %p %C{1} [%t] %m%n</Pattern>
        </encoder>

        <rollingPolicy
            class="ch.qos.logback.core.rolling.TimeBasedRollingPolicy">
            <!-- rollover daily and when the file reaches 10 MegaBytes -->
            <fileNamePattern>${LOGS}/archived/spring-boot-logger-%d{yyyy-MM-dd}.%i.log
            </fileNamePattern>
            <timeBasedFileNamingAndTriggeringPolicy
                class="ch.qos.logback.core.rolling.SizeAndTimeBasedFNATP">
                <maxFileSize>10MB</maxFileSize>
            </timeBasedFileNamingAndTriggeringPolicy>
        </rollingPolicy>
    </appender>

    <!-- LOG everything at INFO level -->
    <root level="info">
        <appender-ref ref="RollingFile" />
        <appender-ref ref="Console" />
    </root>

    <!-- LOG "com.baeldung*" at TRACE level -->
    <logger name="com.baeldung" level="trace" additivity="false">
        <appender-ref ref="RollingFile" />
        <appender-ref ref="Console" />
    </logger>

</configuration>
And when we run the application, here’s the output:

As we can see, it now logs TRACE and DEBUG messages, and the overall console pattern is both textually and chromatically different than before.
It also now logs on a file in a /logs folder created under the current path and archives it through a rolling policy.
5. Log4j2 Configuration Logging
While Apache Commons Logging is at the core, and Logback is the reference implementation provided, all the routings to the other logging libraries are already included to make it easy to switch to them.
In order to use any logging library other than Logback, though, we need to exclude it from our dependencies.
For every starter like this one (it’s the only one in our example, but we could have many of them):
<dependency>
    <groupId>org.springframework.boot</groupId>
    <artifactId>spring-boot-starter-web</artifactId>
    <version>3.5.7</version>
</dependency>
We need to turn it into a skinny version, and (only once) add our alternative library, here through a starter itself:
<dependency>
    <groupId>org.springframework.boot</groupId>
    <artifactId>spring-boot-starter-web</artifactId>
    <version>3.5.7</version>
    <exclusions>
        <exclusion>
            <groupId>org.springframework.boot</groupId>
            <artifactId>spring-boot-starter-logging</artifactId>
        </exclusion>
    </exclusions>
</dependency>
<dependency>
    <groupId>org.springframework.boot</groupId>
    <artifactId>spring-boot-starter-log4j2</artifactId>
    <version>3.5.7</version>
</dependency>
At this point, we need to place in the classpath a file named one of the following:
- log4j2-spring.xml
- log4j2.xml
We’ll print through Log4j2 (over SLF4J) without further modifications.
Let’s write a simple log4j2-spring.xml:
<?xml version="1.0" encoding="UTF-8"?>
<Configuration>
    <Appenders>
        <Console name="Console" target="SYSTEM_OUT">
            <PatternLayout
                pattern="%style{%d{ISO8601}}{black} %highlight{%-5level }[%style{%t}{bright,blue}] %style{%C{1}}{bright,yellow}: %msg%n%throwable" />
        </Console>

        <RollingFile name="RollingFile"
            fileName="./logs/spring-boot-logger-log4j2.log"
            filePattern="./logs/$${date:yyyy-MM}/spring-boot-logger-log4j2-%d{-dd-MMMM-yyyy}-%i.log.gz">
            <PatternLayout>
                <pattern>%d %p %C{1} [%t] %m%n</pattern>
            </PatternLayout>
            <Policies>
                <!-- rollover on startup, daily and when the file reaches
                    10 MegaBytes -->
                <OnStartupTriggeringPolicy />
                <SizeBasedTriggeringPolicy
                    size="10 MB" />
                <TimeBasedTriggeringPolicy />
            </Policies>
        </RollingFile>
    </Appenders>

    <Loggers>
        <!-- LOG everything at INFO level -->
        <Root level="info">
            <AppenderRef ref="Console" />
            <AppenderRef ref="RollingFile" />
        </Root>

        <!-- LOG "com.baeldung*" at TRACE level -->
        <Logger name="com.baeldung" level="trace"></Logger>
    </Loggers>

</Configuration>
And when we run the application, here’s the output:
As we can see, the output is quite different from the Logback one — a proof that we’re fully using Log4j2 now.
In addition to the XML configuration, Log4j2 allows us to use also a YAML or JSON configuration, described here.
6. Log4j2 Without SLF4J
We can also use Log4j2 natively, without passing through SLF4J.
In order to do that, we simply use the native classes:
import org.apache.logging.log4j.Logger;
import org.apache.logging.log4j.LogManager;
// [...]
Logger logger = LogManager.getLogger(LoggingController.class);
We don’t need to perform any other modification to the standard Log4j2 Spring Boot configuration.
We can now exploit the brand-new features of Log4j2 without getting stuck with the old SLF4J interface. But we’re also tied to this implementation, and we’ll need to rewrite our code when switching to another logging framework.
7. Logging With Lombok
In the examples we’ve seen so far, we’ve had to declare an instance of a logger from our logging framework.
This boilerplate code can be annoying. We can avoid it using various annotations introduced by Lombok.
We’ll first need to add the Lombok dependency in our build script to work with it:
<dependency>
    <groupId>org.projectlombok</groupId>
    <artifactId>lombok</artifactId>
    <version>1.18.42</version>
    <scope>provided</scope>
</dependency>
7.1. @Slf4j and @CommonsLog
SLF4J and Apache Commons Logging APIs allow us the flexibility to change our logging framework with no impact on our code.
And we can use Lombok’s @Slf4j and @CommonsLog annotations to add the right logger instance into our class: org.slf4j.Logger for SLF4J and org.apache.commons.logging.Log for Apache Commons Logging.
To see these annotations in action, let’s create a class similar to LoggingController but without a logger instance. We name it as LombokLoggingController and annotate it with @Slf4j:
@RestController
@Slf4j
public class LombokLoggingController {

    @RequestMapping("/lombok")
    public String index() {
        log.trace("A TRACE Message");
        log.debug("A DEBUG Message");
        log.info("An INFO Message");
        log.warn("A WARN Message");
        log.error("An ERROR Message");

        return "Howdy! Check out the Logs to see the output...";
    }
}
Note that we’ve adjusted the snippet just a bit, using log as our logger instance. This is because adding the annotation @Slf4j automatically adds a field named log.
With Zero-Configuration Logging, the application will use underlying logging implementation Logback for logging. Similarly, Log4j2 implementation is used for logging with Log4j2-Configuration Logging.
We get the same behavior when we replace the annotation @Slf4j with @CommonsLog.
7.2. @Log4j2
We can use the annotation @Log4j2 to use Log4j2 directly. So, we make a simple change to LombokLoggingController to use @Log4j2 instead of @Slf4j or @CommonsLog:
@RestController
@Log4j2
public class LombokLoggingController {

    @RequestMapping("/lombok")
    public String index() {
        log.trace("A TRACE Message");
        log.debug("A DEBUG Message");
        log.info("An INFO Message");
        log.warn("A WARN Message");
        log.error("An ERROR Message");

        return "Howdy! Check out the Logs to see the output...";
    }
}
Other than logging, there are other annotations from Lombok that help in keeping our code clean and tidy. More information about them is available in Introduction to Project Lombok, and we also have a tutorial on Setting Up Lombok With Eclipse and IntelliJ.
8. Beware of Java Util Logging
Spring Boot also supports JDK logging, through the logging.properties configuration file.
There are cases when it’s not a good idea to use it, though. From the documentation:
There are known classloading issues with Java Util Logging that cause problems when running from an ‘executable jar’. We recommend that you avoid it when running from an ‘executable jar’ if at all possible.
It’s also a good practice when using Spring 4 to manually exclude commons-logging in pom.xml, to avoid potential clashes between the logging libraries. Spring 5 instead handles it automatically, so we don’t need to do anything when using Spring Boot 2.
9. JANSI on Windows
While Unix-based operating systems such as Linux and Mac OS X support ANSI color codes by default, on a Windows console, everything will be sadly monochromatic.
Windows can obtain ANSI colors through a library called JANSI.
We should pay attention to the possible class loading drawbacks, though.
We must import and explicitly activate it in the configuration as follows:
<configuration debug="true">
    <appender name="STDOUT" class="ch.qos.logback.core.ConsoleAppender">
        <withJansi>true</withJansi>
        <encoder>
            <pattern>[%thread] %highlight(%-5level) %cyan(%logger{15}) - %msg %n</pattern>
        </encoder>
    </appender>
    <!-- more stuff -->
</configuration>
ANSI escape sequences are supported natively on many platforms but are not by default on Windows. To enable ANSI support, add the Jansi jar to our application and set property log4j.skipJansi to false. This allows Log4j to use Jansi to add ANSI escape codes when writing to the console.
Note: Prior to Log4j 2.10, Jansi was enabled by default. The fact that Jansi requires native code means that Jansi can only be loaded by a single class loader. For web applications, this means the Jansi jar has to be in the web container’s classpath. To avoid causing problems for web applications, Log4j no longer automatically tries to load Jansi without explicit configuration from Log4j 2.10 onward.
It’s also worth noting:
- The layout documentation page contains useful Log4j2 JANSI informations in the highlight{pattern}{style} section.
- While JANSI can color the output, Spring Boot’s Banner (native or customized through the banner.txt file) will stay monochromatic.
10. Conclusion
We’ve seen the main ways to interface with the major logging frameworks from within a Spring Boot project.
We also explored the main advantages and pitfalls of each solution.


