SEDA With Spring Integration and Apache Camel
Last updated: September 19, 2025


Mocking is an essential part of unit testing, and the Mockito library makes it easy to write clean and intuitive unit tests for your Java code.
Get started with mocking and improve your application tests using our Mockito guide:
Handling concurrency in an application can be a tricky process with many potential pitfalls. A solid grasp of the fundamentals will go a long way to help minimize these issues.
Get started with understanding multi-threaded applications with our Java Concurrency guide:
Spring 5 added support for reactive programming with the Spring WebFlux module, which has been improved upon ever since. Get started with the Reactor project basics and reactive programming in Spring Boot:
Since its introduction in Java 8, the Stream API has become a staple of Java development. The basic operations like iterating, filtering, mapping sequences of elements are deceptively simple to use.
But these can also be overused and fall into some common pitfalls.
To get a better understanding on how Streams work and how to combine them with other language features, check out our guide to Java Streams:
Explore Spring Boot 3 and Spring 6 in-depth through building a full REST API with the framework:
Yes, Spring Security can be complex, from the more advanced functionality within the Core to the deep OAuth support in the framework.
I built the security material as two full courses - Core and OAuth, to get practical with these more complex scenarios. We explore when and how to use each feature and code through it on the backing project.
You can explore the course here:
Spring Data JPA is a great way to handle the complexity of JPA with the powerful simplicity of Spring Boot.
Get started with Spring Data JPA through the guided reference course:
Refactor Java code safely — and automatically — with OpenRewrite.
Refactoring big codebases by hand is slow, risky, and easy to put off. That’s where OpenRewrite comes in. The open-source framework for large-scale, automated code transformations helps teams modernize safely and consistently.
Each month, the creators and maintainers of OpenRewrite at Moderne run live, hands-on training sessions — one for newcomers and one for experienced users. You’ll see how recipes work, how to apply them across projects, and how to modernize code with confidence.
Join the next session, bring your questions, and learn how to automate the kind of work that usually eats your sprint time.
Yes, we're now running our only Summer Sale. All Courses are 30% off until 20th July, 2026:
Yes, we're now running our only Summer Sale. All Courses are 30% off until 20th July, 2026:
1. Introduction
SEDA, or Staged Event-Driven Architecture, is an architectural style proposed by Matt Welsh in his Ph.D. thesis. Its primary benefits are scalability, support for highly-concurrent traffic, and maintainability.
In this tutorial, we’ll use SEDA to count the unique words in a sentence using two separate implementations: Spring Integration and Apache Camel.
2. SEDA
SEDA addresses several non-functional requirements specific to online services:
- High concurrency: The architecture must support as many concurrent requests as possible.
- Dynamic content: Software systems must often support complex business use cases, requiring many steps to process user requests and generate responses.
- Robustness to load: User traffic for online services can be unpredictable, and the architecture needs to deal with changes in traffic volume gracefully.
To address these requirements, SEDA decomposes complex services into event-driven stages. These stages are indirectly connected with queues and can thus be completely decoupled from each other. Furthermore, each stage has a scaling mechanism to cope with its incoming load:
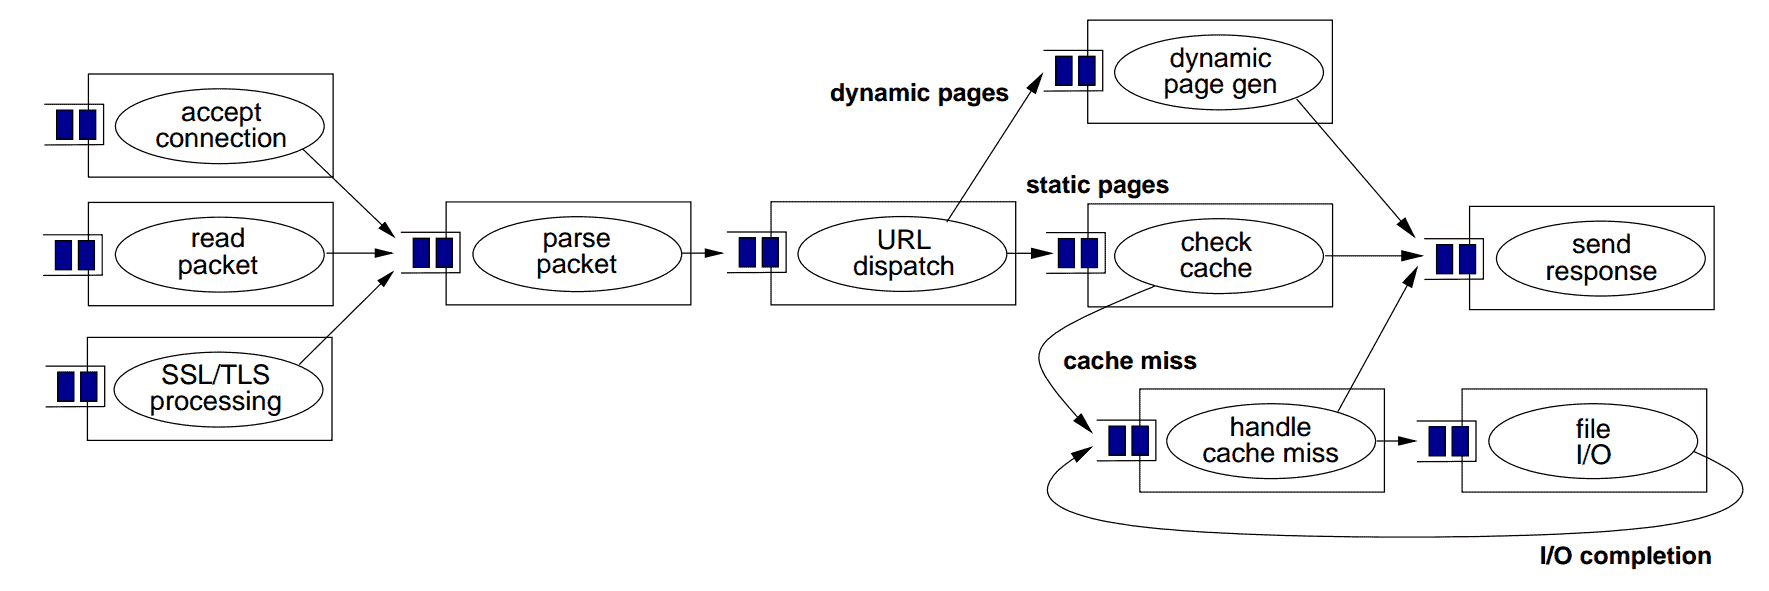
The above diagram from Matt Welsh’s paper depicts the overall structure of a web server implemented with SEDA. Each rectangle represents a single processing stage for an incoming HTTP request. The stages can independently consume tasks from their incoming queues, do some processing or I/O work, and then pass a message to the next queue.
2.1. Components
To better understand the components of SEDA, let’s look at how this diagram from Matt Welsh’s thesis shows the inner workings of a single stage:

As we can see, each SEDA stage has the following components:
- Event: Events are data structures containing whatever data the stage needs to perform its processing. For example, for an HTTP web server, events might contain user data – such as the body, header, and request parameters – and infrastructure data like the user’s IP, the request timestamp, etc.
- Event Queue: This holds the stage’s incoming events.
- Event Handler: The event handler is the procedural logic of the stage. This could be a simple routing stage, forwarding data from its event queue to other relevant event queues, or a more complex stage that processes the data somehow. The event handler can read events individually or in batches – the latter’s helpful when there’s a performance benefit to batch processing, such as updating multiple database records with one query.
- Outgoing Events: Based on the business use case and the overall structure of the flow, each stage can send new events to zero or more event queues. Creating and sending outgoing messages is done in the event handler method.
- Thread Pool: Threading is a well-known concurrency mechanism. In SEDA, threading is localized and customized for each stage. In other words, each stage maintains a thread pool. Thus, unlike the one-thread-per-request model, each user request is processed by several threads under SEDA. This model allows us to tune each stage independently according to its complexity.
- Controllers: A SEDA controller is any mechanism that manages the consumption of resources such as thread pool size, event queue size, scheduling, etc. Controllers are responsible for the elastic behavior of SEDA. A simple controller might manage the number of active threads in each thread pool. A more sophisticated controller could implement complex performance-tuning algorithms that monitor the whole application at runtime and tune various parameters. Moreover, controllers decouple the performance-tuning logic from the business logic. That separation of concerns makes it easier to maintain our code.
By putting all these components together, SEDA provides a robust solution for dealing with high and fluctuating traffic loads.
3. Sample Problem
In the following sections, we’ll create two implementations that solve the same problem using SEDA.
Our example problem will be straightforward: count how many times each word appears case-insensitive within a given string.
Let’s define a word as a sequence of characters without spaces, and we’ll ignore other complications such as punctuation. Our output will be a map that contains the words as keys and the counts as values. For example, given the input “My name is Hesam“, the output will be:
{
  "my": 1,
  "name": 1,
  "is": 1,
  "hesam": 1
}
3.1. Adapting the Problem to SEDA
Let’s look at our problem in terms of SEDA stages. Since scalability is a core goal of SEDA, it’s usually better to design small stages focused on specific operations, especially if we have I/O-intensive tasks. Moreover, having small stages helps us better tune the scale of each stage.
To solve our word count problem, we can implement a solution with the following stages:

Now that we have our stage design, let’s implement it in the next sections using two different enterprise integration technologies. In this table, we can preview how SEDA will show up in our implementations:
| SEDA Component | Spring Integration | Apache Camel |
|---|---|---|
| Event | org.springframework.messaging.Message | org.apache.camel.Exchange |
| Event Queue | org.springframework.integration.channel | Endpoints defined by URI strings |
| Event Handler | Instances of functional interfaces | Camel processors, Camel utility classes, and Functions |
| Thread Pool | Spring abstraction of TaskExecutor | Out-of-the-box support in SEDA endpoints |
4. Solution Using Spring Integration
For our first implementation, we’ll use Spring Integration. Spring Integration builds on the Spring model to support popular enterprise integration patterns.
Spring Integration has three main components:
- A message is a data structure containing a header and a body.
- A channel carries messages from one endpoint to another endpoint. There are two kinds of channels in Spring Integration:
- point-to-point: Only one endpoint can consume the messages in this channel.
- publish-subscribe: Multiple endpoints can consume the messages in this channel.
- An endpoint routes a message to an application component that performs some business logic. There are a variety of endpoints in Spring Integration, such as transformers, routers, service activators, and filters.
Let’s look at an overview of our Spring Integration solution:

4.1. Dependencies
Let’s get started by adding dependencies for Spring Integration, Spring Boot Test, and Spring Integration Test:
<dependencies>
    <dependency>
	<groupId>org.springframework.boot</groupId>
	<artifactId>spring-boot-starter-integration</artifactId>
    </dependency>
    <dependency>
	<groupId>org.springframework.boot</groupId>
	<artifactId>spring-boot-starter-test</artifactId>
	<scope>test</scope>
    </dependency>
    <dependency>
	<groupId>org.springframework.integration</groupId>
	<artifactId>spring-integration-test</artifactId>
	<scope>test</scope>
    </dependency>
</dependencies>
4.2. The Message Gateway
A messaging gateway is a proxy that hides the complexity of sending a message to integration flows. Let’s set one up for our Spring Integration flow:
@MessagingGateway
public interface IncomingGateway {
    @Gateway(requestChannel = "receiveTextChannel", replyChannel = "returnResponseChannel")
    public Map<String, Long> countWords(String input);
}
Later, we’ll be able to use this gateway method to test our entire flow:
incomingGateway.countWords("My name is Hesam");Spring wraps the “My name is Hesam” input within an instance of org.springframework.messaging.Message and passes it to receiveTextChannel, and later gives us the final result from returnResponseChannel.
4.3. Message Channels
In this section, we’ll look at how to set up our gateway’s initial message channel, receiveTextChannel.
Under SEDA, channels need to be scalable via an associated thread pool, so let’s begin by creating a thread pool:
@Bean("receiveTextChannelThreadPool")
TaskExecutor receiveTextChannelThreadPool() {
    ThreadPoolTaskExecutor executor = new ThreadPoolTaskExecutor();
    executor.setCorePoolSize(1);
    executor.setMaxPoolSize(5);
    executor.setThreadNamePrefix("receive-text-channel-thread-pool");
    executor.initialize();
    return executor;
}
Next, we’ll use our thread pool to create our channel:
@Bean(name = "receiveTextChannel")
MessageChannel getReceiveTextChannel() {
    return MessageChannels.executor("receive-text", receiveTextChannelThreadPool)
      .get();
}
MessageChannels is a Spring Integration class that helps us create channels of various types. Here, we use the executor() method to create an ExecutorChannel, which is a channel managed by a thread pool.
Our other channels and thread pools are set up the same way as above.
4.4. Receive Text Stage
With our channels set up, we can start implementing our stages. Let’s create our initial stage:
@Bean
IntegrationFlow receiveText() {
    return IntegrationFlows.from(receiveTextChannel)
      .channel(splitWordsChannel)
      .get();
}
IntegrationFlows is a fluent Spring Integration API for creating IntegrationFlow objects, representing the stages of our flow. The from() method configures our stage’s incoming channel, and channel() configures the outgoing channel.
In this example, our stage passes our gateway’s input message to splitWordsChannel. This stage might be more complex and I/O intensive in a production application, reading messages from a persistent queue or over a network.
4.5. Split Words Stage
Our next stage has a single responsibility: splitting our input String into a String array of the individual words in the sentence:
@Bean
IntegrationFlow splitWords() {
    return IntegrationFlows.from(splitWordsChannel)
      .transform(splitWordsFunction)
      .channel(toLowerCaseChannel)
      .get();
}
In addition to the from() and channel() invocations we’ve used before, here we also use transform(), which applies the supplied Function to our input message. Our splitWordsFunction implementation is very simple:
final Function<String, String[]> splitWordsFunction = sentence -> sentence.split(" ");4.6. Convert to Lowercase Stage
This stage converts every word in our String array into lowercase:
@Bean
IntegrationFlow toLowerCase() {
    return IntegrationFlows.from(toLowerCaseChannel)
      .split()
      .transform(toLowerCase)
      .aggregate(aggregatorSpec -> aggregatorSpec.releaseStrategy(listSizeReached)
        .outputProcessor(buildMessageWithListPayload))
      .channel(countWordsChannel)
      .get();
}
The first new IntegrationFlows method we use here is split(). The split() method uses the splitter pattern to send each element of our input message to toLowerCase as individual messages.
The next new method we see is aggregate(), which implements the aggregator pattern. The aggregator pattern has two essential arguments:
- the release strategy, which determines when to combine messages into a single one
- the processor, which determines how to combine messages into a single one
Our release strategy function uses listSizeReached, which tells the aggregator to start aggregation when all elements of the input array have been collected:
final ReleaseStrategy listSizeReached = r -> r.size() == r.getSequenceSize();The buildMessageWithListPayload processor then packages our lowercased results into a List:
final MessageGroupProcessor buildMessageWithListPayload = messageGroup ->
  MessageBuilder.withPayload(messageGroup.streamMessages()
      .map(Message::getPayload)
      .toList())
    .build();
4.7. Count Words Stage
Our final stage packages our word counts into a Map, wherein the keys are the words from the original input, and the values are the number of occurrences of each word:
@Bean
IntegrationFlow countWords() {
    return IntegrationFlows.from(countWordsChannel)
      .transform(convertArrayListToCountMap)
      .channel(returnResponseChannel)
      .get();
}
Here, we use our convertArrayListToCountMap function for packaging our counts as a Map:
final Function<List<String>, Map<String, Long>> convertArrayListToCountMap = list -> list.stream()
  .collect(Collectors.groupingBy(Function.identity(), Collectors.counting()));
4.8. Testing Our Flow
We can pass an initial message to our gateway method to test our flow:
public class SpringIntegrationSedaIntegrationTest {
    @Autowired
    TestGateway testGateway;

    @Test
    void givenTextWithCapitalAndSmallCaseAndWithoutDuplicateWords_whenCallingCountWordOnGateway_thenWordCountReturnedAsMap() {
        Map<String, Long> actual = testGateway.countWords("My name is Hesam");
        Map<String, Long> expected = new HashMap<>();
        expected.put("my", 1L);
        expected.put("name", 1L);
        expected.put("is", 1L);
        expected.put("hesam", 1L);

        assertEquals(expected, actual);
    }
}
5. Solution With Apache Camel
Apache Camel is a popular and powerful open-source integration framework. It’s based on four primary concepts:
- Camel context: The Camel runtime sticks different parts together.
- Routes: A route determines how a message should be processed and where it should go next.
- Processors: These are ready-to-use implementations of various enterprise integration patterns.
- Components: Components are extension points for integrating external systems via JMS, HTTP, file IO, etc.
Apache Camel has a component dedicated to SEDA functionality, making it straightforward to build SEDA applications.
5.1. Dependencies
Let’s add the required Maven dependencies for Apache Camel and Apache Camel Test:
<dependencies>
    <dependency>
        <groupId>org.apache.camel</groupId>
        <artifactId>camel-core</artifactId>
        <version>3.18.0</version>
    </dependency>
    <dependency>
        <groupId>org.apache.camel</groupId>
        <artifactId>camel-test-junit5</artifactId>
        <version>3.18.0</version>
        <scope>test</scope>
    </dependency>
</dependencies>
5.2. Defining SEDA Endpoints
First, we need to define the endpoints. An endpoint is a component defined with a URI string. SEDA endpoints must start with “seda:[endpointName]“:
static final String receiveTextUri = "seda:receiveText?concurrentConsumers=5";
static final String splitWordsUri = "seda:splitWords?concurrentConsumers=5";
static final String toLowerCaseUri = "seda:toLowerCase?concurrentConsumers=5";
static final String countWordsUri = "seda:countWords?concurrentConsumers=5";
static final String returnResponse = "mock:result";
As we can see, each endpoint is configured to have five concurrent consumers. This is equivalent to having a maximum of 5 threads for each endpoint.
For the sake of testing, the returnResponse is a mock endpoint.
5.3. Extending RouteBuilder
Next, let’s define a class that extends Apache Camel’s RouteBuilder and overrides its configure() method. This class wires all SEDA endpoints:
public class WordCountRoute extends RouteBuilder {
    @Override
    public void configure() throws Exception {
    }
}
In the following sections, we’ll define our stages by adding lines to this configure() method using convenience methods we’ve inherited from RouteBuilder.
5.4. Receive Text Stage
This stage receives messages from a SEDA endpoint and routes them to the next stage without any processing:
from(receiveTextUri).to(splitWordsUri);Here, we used our inherited from() method to specify the incoming endpoint and to() to set the outgoing endpoint.
5.5. Split Words Stage
Let’s implement the stage for splitting the input text into individual words:
from(splitWordsUri)
  .transform(ExpressionBuilder.bodyExpression(s -> s.toString().split(" ")))
  .to(toLowerCaseUri);
The transform() method applies our Function to our input message, splitting it into an array.
5.6. Convert to Lowercase Stage
Our next task is to convert each word in our input to lowercase. Because we need to apply our transformation function to each String in our message vs. the array itself, we’ll use the split() method both to split the input message for processing and to later aggregate the results back into an ArrayList:
from(toLowerCaseUri)
  .split(body(), new ArrayListAggregationStrategy())
  .transform(ExpressionBuilder.bodyExpression(body -> body.toString().toLowerCase()))
  .end()
  .to(countWordsUri);
The end() method marks the end of the split process. Once each item in the list has been transformed, Apache Camel applies the aggregation strategy ArrayListAggregationStrategy we’ve specified.
ArrayListAggregationStrategy extends Apache Camel’s AbstractListAggregationStrategy to define which part of the message should be aggregated. In this case, the message body is the newly-lowercased word:
class ArrayListAggregationStrategy extends AbstractListAggregationStrategy<String> {
    @Override
    public String getValue(Exchange exchange) {
        return exchange.getIn()
          .getBody(String.class);
    }
}
5.7. Count Words Stage
The last stage uses a transformer to convert the array into a map of words to word counts:
from(countWordsUri)
  .transform(ExpressionBuilder.bodyExpression(List.class, body -> body.stream()
    .collect(Collectors.groupingBy(Function.identity(), Collectors.counting()))))
  .to(returnResponse);
5.8. Testing Our Route
Let’s test our route:
public class ApacheCamelSedaIntegrationTest extends CamelTestSupport {
    @Test
    public void givenTextWithCapitalAndSmallCaseAndWithoutDuplicateWords_whenSendingTextToInputUri_thenWordCountReturnedAsMap()
      throws InterruptedException {
        Map<String, Long> expected = new HashMap<>();
        expected.put("my", 1L);
        expected.put("name", 1L);
        expected.put("is", 1L);
        expected.put("hesam", 1L);
        getMockEndpoint(WordCountRoute.returnResponse).expectedBodiesReceived(expected);
        template.sendBody(WordCountRoute.receiveTextUri, "My name is Hesam");

        assertMockEndpointsSatisfied();
    }

    @Override
    protected RoutesBuilder createRouteBuilder() throws Exception {
        RoutesBuilder wordCountRoute = new WordCountRoute();
        return wordCountRoute;
    }
}
The CamelTestSupport superclass provides many fields and methods to help us test our flow. We’re using getMockEndpoint() and expectedBodiesReceived() to set our expected result, and template.sendBody() to submit test data to our mock endpoint. Finally, we use assertMockEndpointsSatisfied() to test whether our expectation matches the actual results.
6. Conclusion
In this article, we learned about SEDA and its components and use cases. Afterward, we explored how to use SEDA to solve the same problem using first Spring Integration and then Apache Camel.


