Embedding HTML UIs in MCP Servers With Spring AI
Last updated: July 11, 2026


Mocking is an essential part of unit testing, and the Mockito library makes it easy to write clean and intuitive unit tests for your Java code.
Get started with mocking and improve your application tests using our Mockito guide:
Handling concurrency in an application can be a tricky process with many potential pitfalls. A solid grasp of the fundamentals will go a long way to help minimize these issues.
Get started with understanding multi-threaded applications with our Java Concurrency guide:
Spring 5 added support for reactive programming with the Spring WebFlux module, which has been improved upon ever since. Get started with the Reactor project basics and reactive programming in Spring Boot:
Since its introduction in Java 8, the Stream API has become a staple of Java development. The basic operations like iterating, filtering, mapping sequences of elements are deceptively simple to use.
But these can also be overused and fall into some common pitfalls.
To get a better understanding on how Streams work and how to combine them with other language features, check out our guide to Java Streams:
Explore Spring Boot 3 and Spring 6 in-depth through building a full REST API with the framework:
Yes, Spring Security can be complex, from the more advanced functionality within the Core to the deep OAuth support in the framework.
I built the security material as two full courses - Core and OAuth, to get practical with these more complex scenarios. We explore when and how to use each feature and code through it on the backing project.
You can explore the course here:
Spring Data JPA is a great way to handle the complexity of JPA with the powerful simplicity of Spring Boot.
Get started with Spring Data JPA through the guided reference course:
Refactor Java code safely — and automatically — with OpenRewrite.
Refactoring big codebases by hand is slow, risky, and easy to put off. That’s where OpenRewrite comes in. The open-source framework for large-scale, automated code transformations helps teams modernize safely and consistently.
Each month, the creators and maintainers of OpenRewrite at Moderne run live, hands-on training sessions — one for newcomers and one for experienced users. You’ll see how recipes work, how to apply them across projects, and how to modernize code with confidence.
Join the next session, bring your questions, and learn how to automate the kind of work that usually eats your sprint time.
Yes, we're now running our only Summer Sale. All Courses are 30% off until 20th July, 2026:
Yes, we're now running our only Summer Sale. All Courses are 30% off until 20th July, 2026:
1. Overview
MCP (Model Context Protocol) servers are the basis of modern AI handling and development. To that end, knowing how to configure one and integrate it into projects can be essential.
In this tutorial, we’ll learn how to build an MCP server with Spring AI and connect it to an AI harness such as Claude Desktop. To start, we create a simple hello-world tool, test it using the MCP Inspector, and then register it with Claude Desktop as a custom connector.
Once the basics are in place, we’ll take it one step further and expose a rich, interactive HTML UI — a fortune wheel that randomly picks today’s sport. In that implementation, we’ll see how Spring AI’s @McpTool and @McpResource annotations let the harness render the page inline in the chat and feed the result back into the conversation.
2. Creating an MCP Server
The Model Context Protocol (MCP) provides a standardized way for AI assistants such as Claude Code or Claude Desktop to invoke some custom functionality whenever the model sees fit. An MCP server is the lightweight backend that exposes this functionality via tools, resources, and prompts.
Let’s start by creating a simple hello-world MCP server. First, we add the spring-ai-starter-mcp-server dependency to the pom.xml:
<dependency>
  <groupId>org.springframework.ai</groupId>
  <artifactId>spring-ai-starter-mcp-server</artifactId>
</dependency>
Additionally, we use spring-ai-bom for version management:
<dependencyManagement>
  <dependencies>
    <dependency>
      <groupId>org.springframework.ai</groupId>
      <artifactId>spring-ai-bom</artifactId>
      <version>2.0.0</version>
      <type>pom</type>
      <scope>import</scope>
    </dependency>
  </dependencies>
</dependencyManagement>
Then, let’s configure the MCP transport protocol. Spring AI supports three transport options:
- stdio for local process-based communication
- streamable for the newer Streamable HTTP transport that handles both requests and streamed responses over a single endpoint
- stateless for a variant of Streamable HTTP that drops session state on the server. It scales horizontally trivially at the cost of losing the protocol’s bi-directional capabilities
Here, we use the stdio protocol. So, let’s configure it in application.properties:
spring.ai.mcp.server.stdio=true
spring.main.banner-mode=off
logging.file.name=./mcp-server.log
The last two properties are critical for stdio: Spring must not print anything to stdout, as that channel is reserved for JSON-RPC.
Finally, we add a tool that says hello from the server back to the user:
@SpringBootApplication
class McpUiApplication {

    public static void main(String[] args) {
        SpringApplication.run(McpUiApplication.class, args);
    }

    @McpTool(
        title = "Say Hello",
        name = "say-hello",
        description = "A simple tool that returns a greeting message."
    )
    String sayHello() {
        return "Hello from the MCP UI Application!";
    }
}
As expected, this tool is exposed to the AI agent, and the greeting message is returned to the user whenever the model decides to invoke it.
3. Testing the MCP Server
There are several ways to connect to and test an MCP server. Let’s try to use some of them to do that and trigger the Say Hello tool.
3.1. Test Using MCP Inspector
One convenient option is the MCP Inspector, an interactive developer tool designed for testing and debugging MCP servers:
npx @modelcontextprotocol/inspector java -jar target/spring-ai-mcp-0.0.1.jarThis command starts a local proxy server along with a web-based UI that we can open in the browser to test the MCP. Using this interface, we can perform different actions:
- connect to an MCP server
- see the resources, prompts, and tools it exposes
- trigger tools
The interface is fairly straightforward:
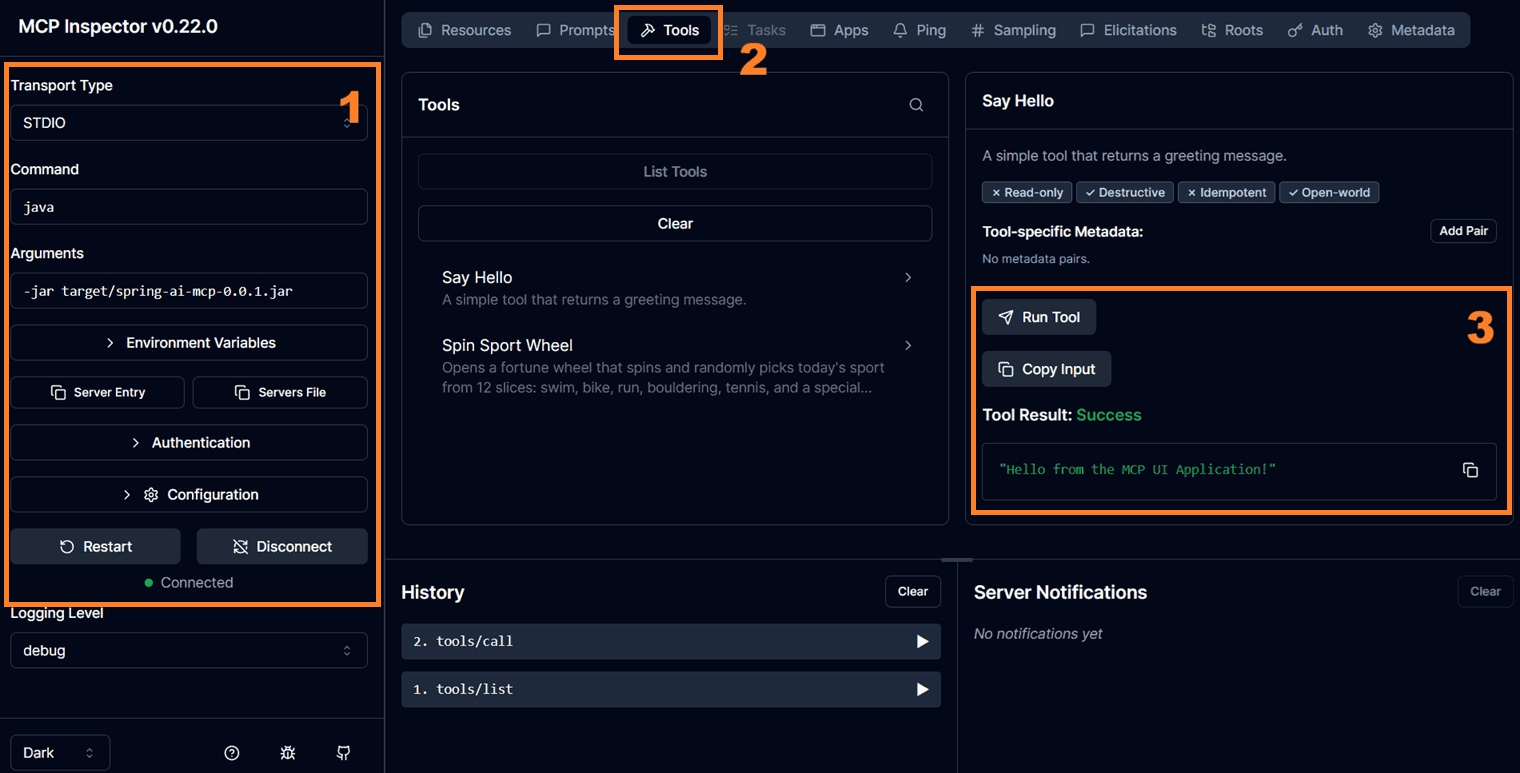
As we can see, we are connected to the MCP server we created using Spring AI, and we successfully ran its Say Hello tool.
3.2. Test Using Claude Desktop
Alternatively, we can use an AI harness to test the MCP server. After all, the end goal here is to use the MCP server from a desktop application such as Claude Desktop.
Firstly, we need to register it in the claude_desktop_config.json file, the location of which varies:
- on Windows, it’s %APPDATA%\Claude\claude_desktop_config.json
- on macOS, it’s ~/Library/Application Support/Claude/claude_desktop_config.json
Claude Desktop natively supports the stdio transport; we can point it directly at the jar file:
"mcpServers": {
  "sport-spinner": {
    "command": "java",
    "args": ["-jar", "D:/repos/tutorials/spring-ai-modules/spring-ai-mcp/target/spring-ai-mcp-0.0.1.jar"]
  }
}
As we can see, we also need to assign a label to the MCP application. Let’s call it sport-spinner, since we extend it to recommend a sport for the user to practice on any given day.
Finally, if we restart Claude Desktop, we should be able to see the MCP server as a custom connector:
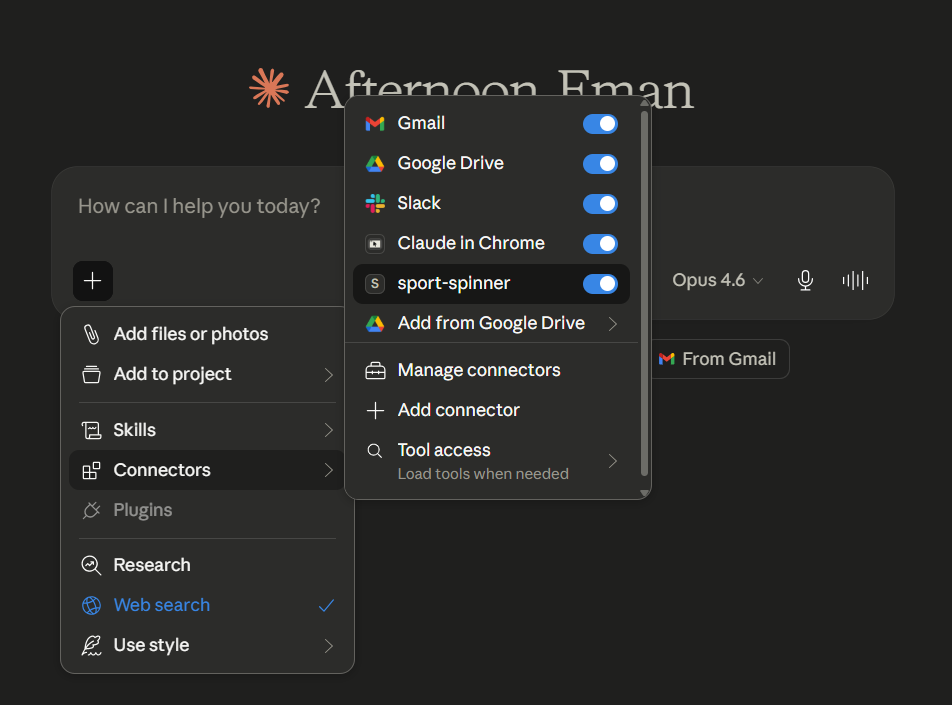
Therefore, the model can now decide to invoke the tools exposed by the MCP server:
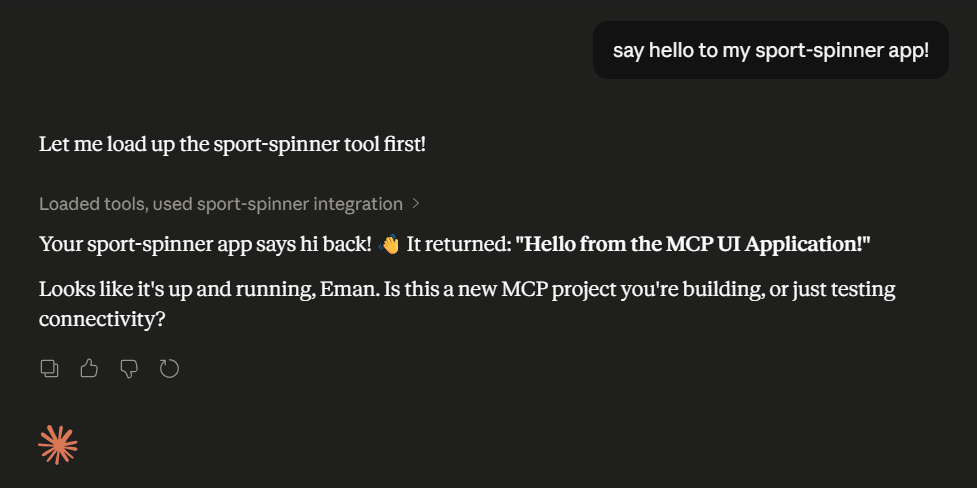
Looks like we managed to connect to the MCP application and return a String that AI Harness can use or display to the user. Now, let’s upgrade the application to return HTML that can be rendered in Claude Desktop.
4. Embedding HTML
So far, the MCP server only returns plain text. However, modern AI harnesses such as Claude Desktop can also render rich, interactive UIs that the server exposes as HTML resources. In this case, we can utilize these features by combining an @McpTool that triggers the UI with an @McpResource that serves the actual HTML.
Let’s enhance the sport-spinner to display a real fortune wheel that picks today’s sport. First, we add an HTML file under src/main/resources/static/sport-spinner.html, containing the HTML, CSS, and JavaScript that animates the wheel.
4.1. Exposing the HTML as an MCP Resource
Let’s create a new Spring bean that loads the HTML file and exposes it via the @McpResource annotation:
@Component
class SportSpinnerUI {

    @Value("classpath:/static/sport-spinner.html")
    private Resource sportSpinnerResource;

    @McpResource(
        name = "Sport Spinner App Resource",
        uri = "ui://sport/sport-spinner.html",
        mimeType = "text/html;profile=mcp-app",
        metaProvider = CspMetaProvider.class)
    public String getSportSpinnerResource() throws IOException {
        return sportSpinnerResource.getContentAsString(StandardCharsets.UTF_8);
    }
}
A few things worth highlighting here:
- the uri uniquely identifies the resource within the MCP server
- the mimeType uses the text/html;profile=mcp-app profile – signaling to the client that this HTML should be rendered as an interactive MCP app rather than displayed as raw text
- the metaProvider attaches additional metadata to the resource — in this case, a Content Security Policy that allow-lists unpkg.com so the page can load external scripts from that CDN
Let’s have a look at the CspMetaProvider:
class CspMetaProvider implements MetaProvider {
    @Override
    public Map<String, Object> getMeta() {
        return Map.of("ui",
            Map.of("csp",
                Map.of("resourceDomains", List.of("https://unpkg.com"))));
    }
}
At this point, we should be ready to connect the UI to the tool.
4.2. Linking the Tool to the UI Resource
Finally, let’s add an MCP tool that instructs the harness to open the wheel:
@McpTool(
    title = "Spin Sport Wheel",
    name = "spin-sport-wheel",
    description = "Opens a fortune wheel that spins and randomly picks today's sport.",
    metaProvider = SportSpinnerToolMetaProvider.class)
public String spinSportWheel() {
    return "Opening the sport spinner wheel.";
}
The key element here is metaProvider, which links this tool to the HTML resource we defined earlier:
class SportSpinnerToolMetaProvider implements MetaProvider {
    @Override
    public Map<String, Object> getMeta() {
        return Map.of("ui",
            Map.of("resourceUri", "ui://sport/sport-spinner.html"));
    }
}
When the model invokes spin-sport-wheel, the harness reads this metadata, fetches the resource at ui://sport/sport-spinner.html, and renders it inline in the chat, giving the user a fully interactive wheel instead of a plain text reply.
Let’s restart Claude Desktop and ask it what sport we should practice today:
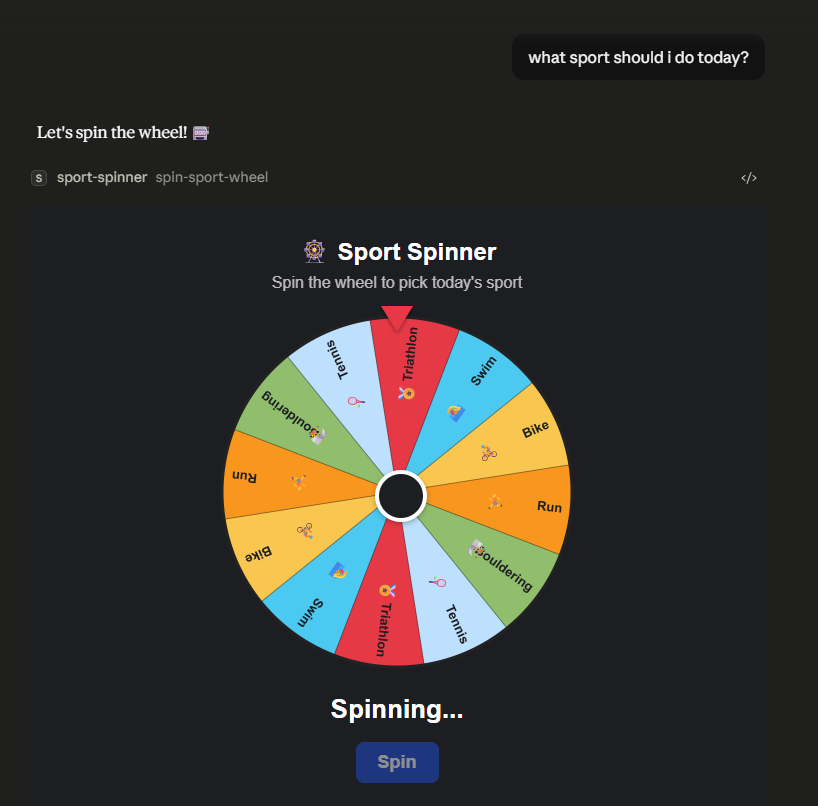
As expected, the HTML from the Spring Boot application is now rendered directly inside the Claude Desktop chat. At this point, we can spin the wheel to let it pick today’s sport, with the result fed back into the conversation so the model can react to it.
5. Conclusion
In this tutorial, we learned how to build an MCP server with Spring AI and connect it to an AI harness such as Claude Desktop.
Specifically, we started with a simple hello-world tool and tested it using the MCP Inspector and Claude Desktop. Then, we took it one step further by exposing a rich, interactive HTML UI through Spring AI’s @McpTool and @McpResource annotations. As a result, we made the harness render a fortune wheel inline in the chat and feed the result back into the conversation.
As always, the full source code is available over on GitHub.


