

Mocking is an essential part of unit testing, and the Mockito library makes it easy to write clean and intuitive unit tests for your Java code.
Get started with mocking and improve your application tests using our Mockito guide:
Handling concurrency in an application can be a tricky process with many potential pitfalls. A solid grasp of the fundamentals will go a long way to help minimize these issues.
Get started with understanding multi-threaded applications with our Java Concurrency guide:
Spring 5 added support for reactive programming with the Spring WebFlux module, which has been improved upon ever since. Get started with the Reactor project basics and reactive programming in Spring Boot:
Since its introduction in Java 8, the Stream API has become a staple of Java development. The basic operations like iterating, filtering, mapping sequences of elements are deceptively simple to use.
But these can also be overused and fall into some common pitfalls.
To get a better understanding on how Streams work and how to combine them with other language features, check out our guide to Java Streams:
Explore Spring Boot 3 and Spring 6 in-depth through building a full REST API with the framework:
Yes, Spring Security can be complex, from the more advanced functionality within the Core to the deep OAuth support in the framework.
I built the security material as two full courses - Core and OAuth, to get practical with these more complex scenarios. We explore when and how to use each feature and code through it on the backing project.
You can explore the course here:
Spring Data JPA is a great way to handle the complexity of JPA with the powerful simplicity of Spring Boot.
Get started with Spring Data JPA through the guided reference course:
Refactor Java code safely — and automatically — with OpenRewrite.
Refactoring big codebases by hand is slow, risky, and easy to put off. That’s where OpenRewrite comes in. The open-source framework for large-scale, automated code transformations helps teams modernize safely and consistently.
Each month, the creators and maintainers of OpenRewrite at Moderne run live, hands-on training sessions — one for newcomers and one for experienced users. You’ll see how recipes work, how to apply them across projects, and how to modernize code with confidence.
Join the next session, bring your questions, and learn how to automate the kind of work that usually eats your sprint time.
Yes, we're now running our only Summer Sale. All Courses are 30% off until 20th July, 2026:
Yes, we're now running our only Summer Sale. All Courses are 30% off until 20th July, 2026:
1. Overview
Keycloak is an open-source identity and access management server that secures our modern applications (like SPAs, mobile apps, APIs, etc.). Keycloak supports industry-standard protocols like Security Assertion Markup Language (SAML) 2.0, Single Sign-On (SSO), and OpenID Connect (OIDC).
Further, in this tutorial, we’ll learn how to leverage Keycloak to authenticate and authorize SOAP web services using OIDC (OpenID Connect).
2. Develop a SOAP Web Service
Let’s learn how to build a SOAP web service using Spring Boot.
2.1. The Web Service Operations
Straightaway, let’s define the operations:
- getProductDetails: Returns product details for a given product ID. Also, let’s assume that a user with a user role can request this operation.
- deleteProduct: Deletes a product for a given product ID. Also, only a user with admin can request this operation.
We have defined two operations and an RBAC (Role-based access control).
2.2. Define XSD
Above all, let’s define a product.xsd:
<xs:element name="getProductDetailsRequest">
    ...
</xs:element>
<xs:element name="deleteProductRequest">
    ...
</xs:element>
    ...
</xs:schema>
Also, let’s add wsdl4j and Spring Boot Webservices dependencies:
<dependency>
    <groupId>wsdl4j</groupId>
    <artifactId>wsdl4j</artifactId>
    <version>1.6.3</version>
</dependency>
<dependency>
    <groupId>org.springframework.boot</groupId>
    <artifactId>spring-boot-starter-web-services</artifactId>
    <version>2.7.5</version>
</dependency>
2.3. Web Service
Further, let’s develop a SOAP web service.
@PayloadRoot(namespace = "http://www.baeldung.com/springbootsoap/keycloak", localPart = "getProductDetailsRequest")
@ResponsePayload
public GetProductDetailsResponse getProductDetails(@RequestPayload GetProductDetailsRequest request) {
    ...
}
@PayloadRoot(namespace = "http://www.baeldung.com/springbootsoap/keycloak", localPart = "deleteProductRequest")
@ResponsePayload
public DeleteProductResponse deleteProduct(@RequestPayload DeleteProductRequest request) {
    ...
}
We can test this web service using tools like cURL, Postman, SOAPUI, etc. Henceforth, let’s see how to secure our SOAP web service.
3. Configuring Keycloak
To begin with, let’s configure Keycloak to secure our web service using OpenId Connect.
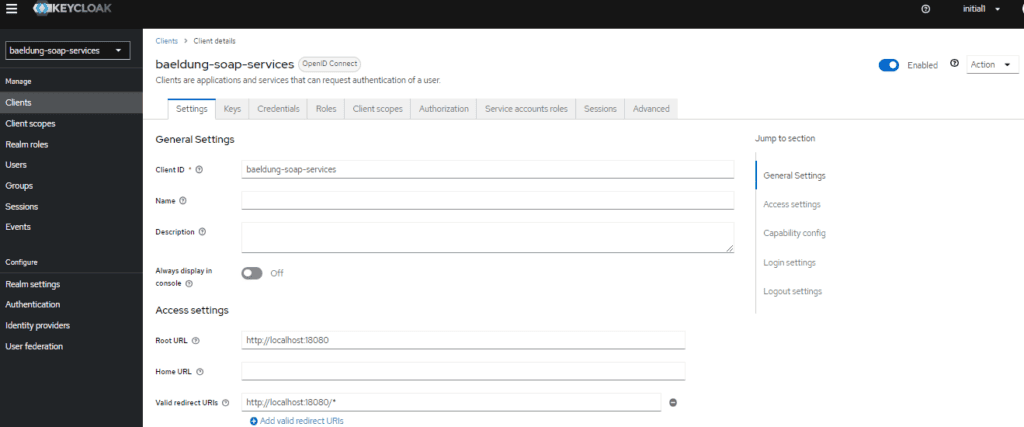
3.1. Create a Realm and Client
First, create a baeldung-soap-services realm, then create baeldung-soap-services client in this realm.
Typically, a Client is an application that requires Keycloaks’s authentication service. Also, while creating the client, choose:
- Application URL as the Root URL
- openid-connect as the Client Protocol
- Confidential as Access Type
- Turn on Authorization Enabled
Furthermore, enabling Service Accounts allows our application (the client) to authenticate with Keycloak. Subsequently, it provides the Client Credentials Grant type flow to our authentication flow:
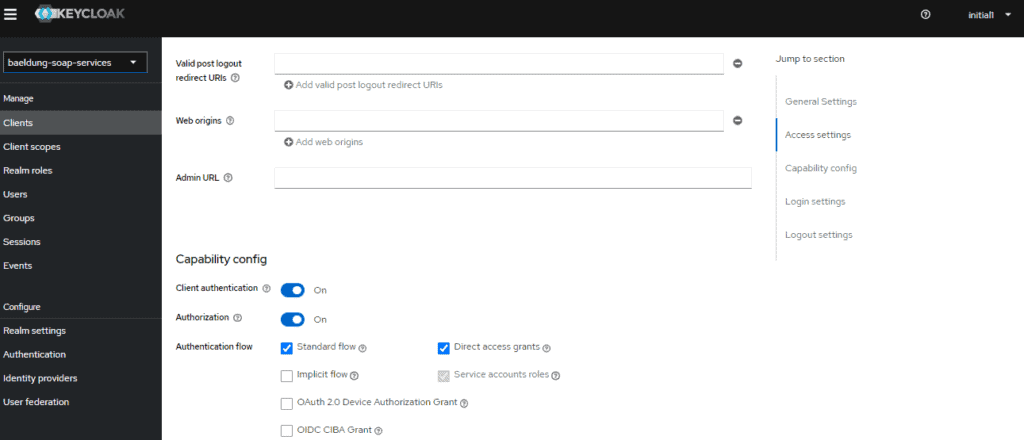
Finally, click Save and then click on the Credentials tab and make a note of the secret. Consequently, we’ll need it as part of the Spring Boot configuration.
3.2. Users and Roles
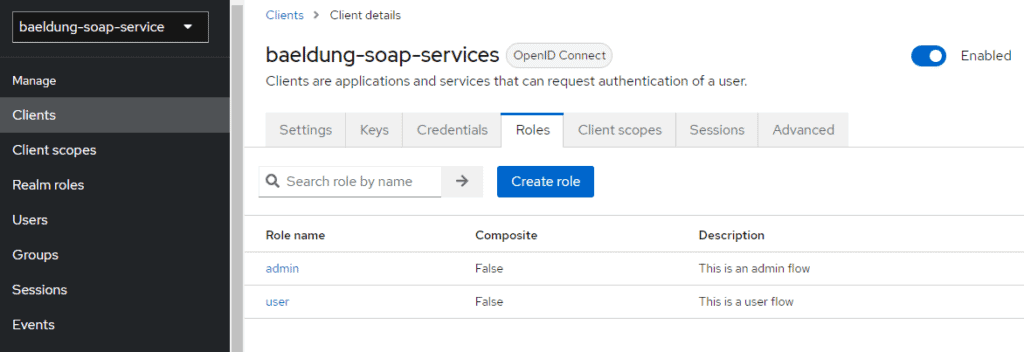
Firstly, let’s create the roles – admin and user. Keycloak allows us to create two kinds of roles – Realm Roles and Client Roles. First, however, let’s create Client Roles.
Click on Clients, choose the client and click on the Roles tab. Then, create two roles, admin and user:
Though Keycloak can fetch the users from LDAP or AD (Active Directory), to keep things simple, let’s manually configure the users and assign them the roles.
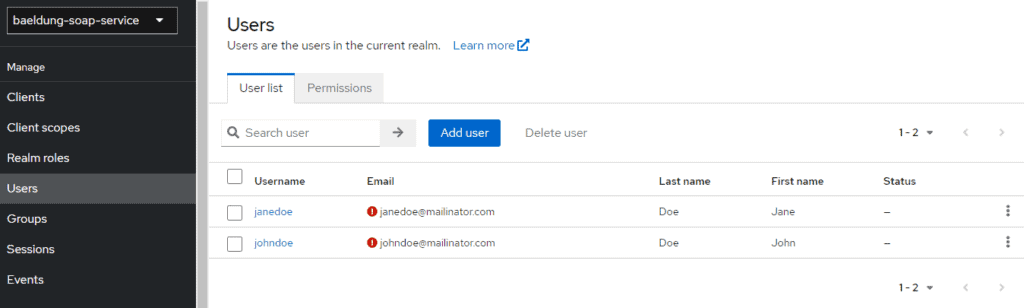
Next, Let’s create two users and assign them the roles and passwords:

Let’s create two users. First, we click on Users, then Add User :
Now, let’s allocate roles to the users.
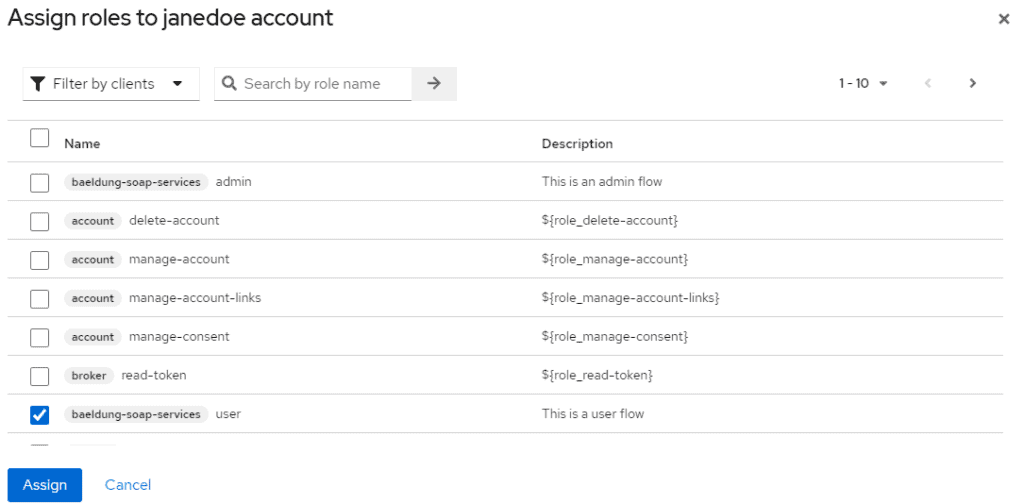
Again, click on Users, choose the user and click on Edit, then click the Role Mappings tab, then click on Assign role, select Filter by clients from the dropdown, and select a role. Let’s assign the admin role to one user and the user role to another user:
4. Spring Boot Configuration
Similarly, let’s secure our SOAP web services.
4.1. Keycloak – Spring Boot Integration
First, we’ll delegate the identification control to a Keycloak server. For this, we’ll use the spring-boot-starter-oauth2-resource-server library. It will allow us to validate a JWT token with the Keycloak server. Hence, let’s add it to our pom:
<dependency>
    <groupId>org.springframework.boot</groupId>
    <artifactId>spring-boot-starter-oauth2-resource-server</artifactId>
</dependency>
4.2. Enable Global Method Security
Besides the previous configurations, we must specify security constraints to secure our web services. These constraints allow us to restrict unauthorized access. For instance, we should limit a user from admin actions.
There are two ways to set up the constraints:
- Declare security-constraints and security-collections in the application configuration file.
- Method-level security using @EnableGlobalMethodSecurity.
For SOAP web services, security-constraints fall short of providing fine-grained control. Moreover, declaring these constraints is verbose.
Henceforth, let’s leverage the power of @EnableGlobalMethodSecurity to secure our SOAP web service operations.
4.3. Defining KeycloakSecurityConfig
To secure our application with Keycloak, we need to define the KeycloakSecurityConfig class that configures Spring Security to use Keycloak for authentication and authorization. We’re setting up a new filter chain for all incoming requests. It will validate the bound JWT token against our Keycloak server:
@Configuration
@EnableWebSecurity
@ConditionalOnProperty(name = "keycloak.enabled", havingValue = "true")
@EnableMethodSecurity(jsr250Enabled = true)
public class KeycloakSecurityConfig {

    @Value("${client.id}")
    private String clientId;

    @Bean
    public SecurityFilterChain filterChain(HttpSecurity http) throws Exception {
        http.csrf(AbstractHttpConfigurer::disable)
          .authorizeHttpRequests(auth -> auth.anyRequest()
            .authenticated())
          .oauth2ResourceServer(oauth2 -> oauth2
            .jwt(jwt -> jwt.jwtAuthenticationConverter(jwtAuthenticationConverter()))
          );
        return http.build();
    }

    @Bean
    public JwtAuthenticationConverter jwtAuthenticationConverter() {
        JwtAuthenticationConverter converter = new JwtAuthenticationConverter();
        converter.setJwtGrantedAuthoritiesConverter(new KeycloakRoleConverter(clientId));
        return converter;
    }
}
We’re using @Value(“${client.id}”) to inject our Keycloak client ID from the application properties. The KeycloakRoleConverter class is responsible for converting roles from Keycloak’s JWT token into Spring Security’s GrantedAuthority objects. It retrieves the roles from the JWT’s resource_access claim, which contains the client’s assigned roles, and maps them to GrantedAuthority objects with the ROLE_ prefix:
public class KeycloakRoleConverter implements Converter<Jwt, Collection> {

    private final String clientId;

    public KeycloakRoleConverter(String clientId) {
        this.clientId = clientId;
    }

    @Override
    public Collection convert(Jwt jwt) {
        Map<String, Object> resourceAccess = jwt.getClaim("resource_access");

        Map<String, Object> client = (Map<String, Object>) resourceAccess.get(clientId);
        List roles = (List) client.get("roles");

        return roles.stream()
          .map(role -> new SimpleGrantedAuthority("ROLE_" + role))
          .collect(Collectors.toList());
    }
}
Its constructor accepts a clientId, which is used to locate the relevant client configuration in the JWT. The convert() method extracts roles from the resource_access field in the JWT, particularly for the specified client, and converts them into GrantedAuthority objects.
This conversion is necessary for enabling role-based access control (RBAC) within our application, where Keycloak roles are mapped to Spring Security authorities for authorization decisions.
4.4. Adding Authorization
Finally, use @RolesAllowed annotation (part of JSR-250) to authorize our SOAP web service operations.
Given that, let’s configure our methods with access roles. To do this, let’s use the @RolesAllowed annotation. Recall we defined two different roles, user and admin, in Keycloak. Let’s define each of our web services with a role:
@RolesAllowed("user")
@PayloadRoot(namespace = "http://www.baeldung.com/springbootsoap/keycloak", localPart = "getProductDetailsRequest")
@ResponsePayload
public GetProductDetailsResponse getProductDetails(@RequestPayload GetProductDetailsRequest request) {
    ...
}
@RolesAllowed("admin")
@PayloadRoot(namespace = "http://www.baeldung.com/springbootsoap/keycloak", localPart = "deleteProductRequest")
@ResponsePayload
public DeleteProductResponse deleteProduct(@RequestPayload DeleteProductRequest request) {
    ...
}
With this, we completed the configuration.
5. Test the Application
5.1. Check the Setup
Now that the application is ready let’s start testing our SOAP web services using curl:
curl -d @request.xml -i -o -X POST --header 'Content-Type: text/xml' http://localhost:18080/ws/api/v1Eventually, if all the configurations are correct, we get an access denied response:
<SOAP-ENV:Fault>
    <faultcode>SOAP-ENV:Server</faultcode>
    <faultstring xml:lang="en">Access is denied</faultstring>
</SOAP-ENV:Fault>
As expected, Keycloak denies the request as the request does not contain an access token.
5.2. Acquiring Access Token
Now, let’s get an access token from Keycloak to access our SOAP web services. Typically, the flow involves:
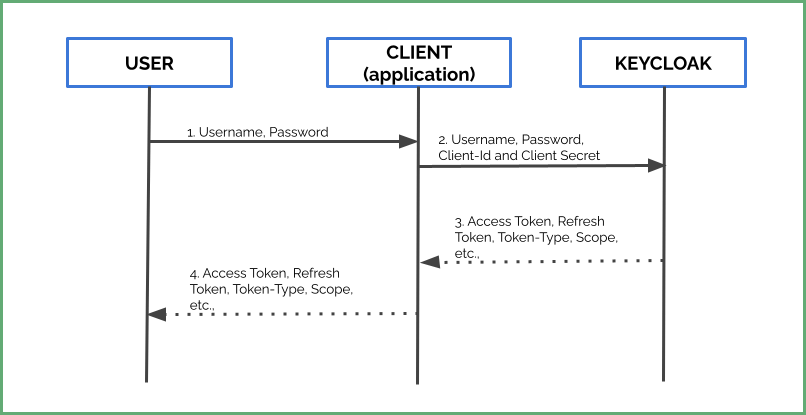
- Firstly, a user sends his credentials to the application
- The application passes client-id and client-secret along with these credentials to the Keycloak server.
- Finally, Keycloak returns an access token, refresh token, and other meta-data based on user credentials and roles.
Keycloak exposes a token endpoint for the clients to request access tokens. Typically, this endpoint is of the form:
<PROTOCOL>://<HOST>:<PORT>/realms/<REALM_NAME>/protocol/openid-connect/token
For example:
http://localhost:8080/realms/baeldung/protocol/openid-connect/token
Now, let’s obtain the access token:
curl -L -X POST 'http://localhost:8080/realms/baeldung-soap-services/protocol/openid-connect/token' \
-H 'Content-Type: application/x-www-form-urlencoded' \
--data-urlencode 'grant_type=password' \
--data-urlencode 'client_id=baeldung-soap-services' \
--data-urlencode 'client_secret=14da6f9e-261f-489a-9bf0-1441e4a9ddc4' \
--data-urlencode 'username=janedoe' \
--data-urlencode 'password=password'
In effect, we get an access token and refresh token along with meta-data:
{
    "access_token": "eyJh ...",
    "expires_in": 300,
    "refresh_expires_in": 1800,
    "refresh_token": "eyJh ...",
    "token_type": "Bearer",
    "not-before-policy": 0,
    "session_state": "364b8f3e-34ff-4ca0-8895-bfbdb8b466d4",
    "scope": "profile email"
}
Additionally, the configurable expires_in key defines the lifetime of this token. For instance, the above access token expires in 5 minutes (300 seconds).
5.3. Webservice Invocation with Access Token
Let’s use the access token we retrieved in the previous section in this example. Let’s invoke the SOAP web service with the access token as a Bearer Token.
curl -d @request.xml -i -o -X POST -H 'Authorization: Bearer BwcYg94bGV9TLKH8i2Q' \
  -H 'Content-Type: text/xml' http://localhost:18080/ws/api/v1
With the correct access token, the response is:
<ns2:getProductDetailsResponse xmlns:ns2="http://www.baeldung.com/springbootsoap/keycloak">
    <ns2:product>
        <ns2:id>1</ns2:id>
            ...
        </ns2:product>
</ns2:getProductDetailsResponse>
5.4. Authorization
Recall that we generated the access token for the user janedoe with a user role. With the user access token, let’s try to perform admin operations. That is, let’s try to invoke deleteProduct:
curl -d @request.xml -i -o -X POST -H 'Authorization: Bearer sSgGNZ3KbMMTQ' -H 'Content-Type: text/xml' \
  http://localhost:18080/ws/api/v1
where contents of request.xml are:
<soapenv:Envelope xmlns:soapenv="http://schemas.xmlsoap.org/soap/envelope/" xmlns:key="http://www.baeldung.com/springbootsoap/keycloak">
    <soapenv:Header/>
    <soapenv:Body>
        <key:deleteProductRequest>
            <key:id>1</key:id>
        </key:deleteProductRequest>
   </soapenv:Body>
</soapenv:Envelope>
Since a user is not unauthorized to access the admin operations, we get an access denied:
<SOAP-ENV:Fault>
    <faultcode>SOAP-ENV:Server</faultcode>
        <faultstring xml:lang="en">Access is denied</faultstring>
</SOAP-ENV:Fault>
6. Conclusion
This tutorial showed how to develop a SOAP web service, keycloak configurations, and secure our web services using Keycloak. The way we secure REST web services, we have to secure our SOAP web services from suspicious users and unauthorized access.


