How to Automate Hidden and Read-Only Inputs with Selenium and JavaScript
Last updated: February 19, 2026


Mocking is an essential part of unit testing, and the Mockito library makes it easy to write clean and intuitive unit tests for your Java code.
Get started with mocking and improve your application tests using our Mockito guide:
Handling concurrency in an application can be a tricky process with many potential pitfalls. A solid grasp of the fundamentals will go a long way to help minimize these issues.
Get started with understanding multi-threaded applications with our Java Concurrency guide:
Spring 5 added support for reactive programming with the Spring WebFlux module, which has been improved upon ever since. Get started with the Reactor project basics and reactive programming in Spring Boot:
Since its introduction in Java 8, the Stream API has become a staple of Java development. The basic operations like iterating, filtering, mapping sequences of elements are deceptively simple to use.
But these can also be overused and fall into some common pitfalls.
To get a better understanding on how Streams work and how to combine them with other language features, check out our guide to Java Streams:
Explore Spring Boot 3 and Spring 6 in-depth through building a full REST API with the framework:
Yes, Spring Security can be complex, from the more advanced functionality within the Core to the deep OAuth support in the framework.
I built the security material as two full courses - Core and OAuth, to get practical with these more complex scenarios. We explore when and how to use each feature and code through it on the backing project.
You can explore the course here:
Spring Data JPA is a great way to handle the complexity of JPA with the powerful simplicity of Spring Boot.
Get started with Spring Data JPA through the guided reference course:
Refactor Java code safely — and automatically — with OpenRewrite.
Refactoring big codebases by hand is slow, risky, and easy to put off. That’s where OpenRewrite comes in. The open-source framework for large-scale, automated code transformations helps teams modernize safely and consistently.
Each month, the creators and maintainers of OpenRewrite at Moderne run live, hands-on training sessions — one for newcomers and one for experienced users. You’ll see how recipes work, how to apply them across projects, and how to modernize code with confidence.
Join the next session, bring your questions, and learn how to automate the kind of work that usually eats your sprint time.
1. Overview
Interacting with web forms using Selenium feels simple at first. We type text using sendKeys(), click radio buttons, submit forms, and everything works flawlessly. But the moment we introduce hidden inputs, read‑only fields, or values populated dynamically by JavaScript, Selenium’s usual approach starts falling short.
In this tutorial, we’ll walk through a complete, real-world setup using Spring Boot and Selenium. We’ll see how and why we sometimes need to set an input element’s value attribute directly using JavaScript. We’ll wire a backend application, expose a form, and automate it using Selenium. Finally, we’ll verify that the server correctly receives all values, including the hidden ones.
2. What Selenium Really Does When We Type?
Selenium is designed to simulate real user interactions. When we call sendKeys(), Selenium doesn’t magically assign a value; it triggers keyboard events, just like a real person typing. This is why it refuses to interact with things a human can’t physically touch, like hidden inputs, disabled boxes, or fields strictly controlled by background scripts.
These elements aren’t meant for direct user interaction. However, browsers still submit them with the form, which means we can set their values programmatically. To do that, we step outside Selenium’s user-level API and work directly with the DOM using JavaScript.
3. Maven Dependencies
Before writing any code, we need the right dependencies. We’ll use Selenium 4:
<dependency>
    <groupId>org.seleniumhq.selenium</groupId>
    <artifactId>selenium-java</artifactId>
    <version>${selenium.version}</version>
</dependency>
This package integrates the Selenium WebDriver APIs for seamless web automation. It provides extensive support for various browser drivers. We also get essential utilities like the JavascriptExecutor for advanced tasks. It further includes sophisticated wait mechanisms to handle synchronization. Finally, comprehensive tools help us manage browser actions and window navigation effectively.
<dependency>
    <groupId>org.springframework.boot</groupId>
    <artifactId>spring-boot-starter-web</artifactId>
</dependency>
We add the spring-boot-starter-web dependency to our project to handle HTTP requests. This tells Spring Boot to pull in all necessary tools. It includes the Spring MVC framework and an embedded Tomcat server automatically.
4. Spring Boot Application Setup
Now let’s set up the backend that serves our HTML page:
@SpringBootApplication
public class DemoApplication {
    public static void main(String[] args) {
        SpringApplication.run(DemoApplication.class, args);
    }
}
It boots an embedded web server and helps in initializing Spring’s application context. Also, makes HTTP endpoints available on localhost:8080. This application must be running before Selenium starts. Selenium doesn’t create the page. It inspects an already running one.
4.1. Controller Layer: Serving and Receiving Data
Let’s set up the backend that serves our HTML page. We define a controller that serves the form and receives submitted values:
@Controller
public class DemoController {

    @GetMapping("/demo")
    public String showForm() {
        return "index";
    }

    @PostMapping(value = "/submit")
    public String handleSubmit(
      @RequestParam String username,
      @RequestParam String password,
      @RequestParam String gender,
      @RequestParam String dateOfBirth,
      @RequestParam String hiddenInput
    ) {
        System.out.println("Username: "+username);
        System.out.println("Password: "+password);
        System.out.println("Gender: "+gender);
        System.out.println("DateOfBirth: "+dateOfBirth);
        System.out.println("HiddenInput: "+hiddenInput);
        return "redirect:/result.html";
    }
}
In this snippet, we’ve built a web controller by marking the class with @Controller. It’s structured to handle two distinct steps: first, we’ve a @GetMapping at the /demo endpoint, which returns the “index” view to let us display the initial form to a user. The second part is the @PostMapping at /submit, which is where the actual data capture (which will be later set by Selenium) happens.
We’re using @RequestParam to automatically pull specific values like the username, password, and even hidden inputs, directly from the incoming request and map them into our method variables. We print these details to the console to verify we’ve received the data, then finish the workflow by redirecting the browser to a results page.
This clean approach prevents the user from accidentally submitting the form twice. The console output becomes our verification mechanism. If values appear here, Selenium did its job correctly. All these endpoints will be called by Selenium directly.
4.2. HTML Form: Where Selenium Interacts
Let’s see the page that Selenium will automate:
<!DOCTYPE html>
<html>
<head>
    <title>Selenium Input Demo</title>
</head>
<body>
<h2>Demo Form</h2>
<form action="/submit" method="post">

    <input type="hidden" id="hiddenInput" name="hiddenInput" value=""/>

    <label>Username</label><br>
    <input type="text" id="username" name="username"><br><br>

    <label>Password</label><br>
    <input type="password" id="password" name="password"><br><br>

    <label>Gender</label><br>
    <input type="radio" name="gender" value="male"> Male
    <input type="radio" name="gender" value="female"> Female<br><br>

    <label>Date of Birth</label><br>
    <input type="date" id="dob" name="dateOfBirth"><br><br>

    <button type="submit" id="submitBtn">Submit</button>
</form>
</body>
</html>
This HTML snippet is configured with a POST method pointing to the /submit endpoint, which ensures data is transmitted securely within the request body rather than the URL. We’ve included a variety of input types like a hidden field for background metadata, standard text and password boxes for credentials, and radio buttons for a clean gender selection.
It also features a native date picker to keep the input format consistent, all triggered by a simple submit button that kicks off the backend logic we just discussed. This hidden input is the centerpiece of our Selenium challenge.
4.3. Selenium Automation: Filling the Form
Here is the entire Selenium automation logic in one block, executed independently after the Spring Boot application is running:
public class SeleniumValue {

    public static void main(String[] args) throws InterruptedException {
        WebDriver driver = new ChromeDriver();
        driver.manage()
          .timeouts()
          .implicitlyWait(Duration.ofSeconds(5));
        driver.manage()
          .window()
          .maximize();

        driver.get("http://localhost:8080/index.html");

        driver.findElement(By.id("username"))
          .sendKeys("selenium_user");

        driver.findElement(By.id("password"))
          .sendKeys("secret123");

        driver.findElement(By.cssSelector("input[name='gender'][value='male']"))
          .click();

        driver.findElement(By.id("dob"))
          .sendKeys("15-08-2025");

        JavascriptExecutor js = (JavascriptExecutor) driver;
        js.executeScript("document.getElementById('hiddenInput').value='input-from-selenium';");

        Thread.sleep(4000);

        driver.findElement(By.id("submitBtn"))
          .click();
        WebDriverWait wait = new WebDriverWait(driver, Duration.ofSeconds(8));
        wait.until(ExpectedConditions.urlContains("/result"));

        Thread.sleep(4000);

        driver.quit();
    }
}
First, we launch a Chrome browser and configure timeouts, so Selenium waits for elements to appear instead of failing immediately. Next, we load the page served by the already running Spring Boot application. Selenium doesn’t start the app; it only inspects what’s already available. We use standard Selenium commands like sendKeys() and click() to manage visible fields such as the username, password, gender, and date of birth.
Then comes the critical part of setting the hidden input. Since sendKeys() can’t work on hidden elements, we cast the driver to JavascriptExecutor and directly update the DOM. Setting values through JavaScript isn’t a workaround; it’s a deliberate technique. In today’s applications, we frequently encounter hidden fields that store information like CSRF tokens, session metadata, or feature flags.
We’ve also added a few strategic pauses with Thread.sleep() so we can actually see the automation happen in real-time before we trigger the submit button. Once all values are set, we submit the form and wait until navigation confirms the POST request was processed. Finally, we close the browser cleanly.
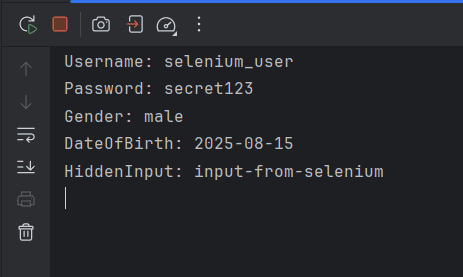
4.4. Output
First, we’ll be running our DemoApplication.java, and then we’ll trigger the main() function in SeleniumValue.java. The following will be the observed output in our app console:
5. Conclusion
We know Selenium’s standard tools won’t touch hidden elements because they aren’t meant for human interaction. Yet, the browser still includes them in form submissions. We can use JavaScript to bridge that gap. By talking directly to the DOM, we ensure our automation covers every piece of data the server expects, making our tests much more robust and realistic.
In this tutorial, we’ve combined Spring Boot and Selenium to create a realistic, production-grade environment. This setup shows us exactly how to handle hidden input values when traditional automation methods fall short. Because we understand that Selenium mimics human behavior, we appreciate why it limits us to visible elements. This knowledge helps us recognize the JavascriptExecutor as a vital tool in our kit for handling everything else.


