


Mocking is an essential part of unit testing, and the Mockito library makes it easy to write clean and intuitive unit tests for your Java code.
Get started with mocking and improve your application tests using our Mockito guide:
Handling concurrency in an application can be a tricky process with many potential pitfalls. A solid grasp of the fundamentals will go a long way to help minimize these issues.
Get started with understanding multi-threaded applications with our Java Concurrency guide:
Spring 5 added support for reactive programming with the Spring WebFlux module, which has been improved upon ever since. Get started with the Reactor project basics and reactive programming in Spring Boot:
Since its introduction in Java 8, the Stream API has become a staple of Java development. The basic operations like iterating, filtering, mapping sequences of elements are deceptively simple to use.
But these can also be overused and fall into some common pitfalls.
To get a better understanding on how Streams work and how to combine them with other language features, check out our guide to Java Streams:
Explore Spring Boot 3 and Spring 6 in-depth through building a full REST API with the framework:
Yes, Spring Security can be complex, from the more advanced functionality within the Core to the deep OAuth support in the framework.
I built the security material as two full courses - Core and OAuth, to get practical with these more complex scenarios. We explore when and how to use each feature and code through it on the backing project.
You can explore the course here:
All Access is finally out, with all of my Spring courses. Learn JUnit is out as well, and Learn Maven is coming fast. And, of course, quite a bit more affordable. Finally.
>> GET THE COURSE
Spring Data JPA is a great way to handle the complexity of JPA with the powerful simplicity of Spring Boot.
Get started with Spring Data JPA through the guided reference course:
Refactor Java code safely — and automatically — with OpenRewrite.
Refactoring big codebases by hand is slow, risky, and easy to put off. That’s where OpenRewrite comes in. The open-source framework for large-scale, automated code transformations helps teams modernize safely and consistently.
Each month, the creators and maintainers of OpenRewrite at Moderne run live, hands-on training sessions — one for newcomers and one for experienced users. You’ll see how recipes work, how to apply them across projects, and how to modernize code with confidence.
Join the next session, bring your questions, and learn how to automate the kind of work that usually eats your sprint time.
1. Introduction
In this article, we’re going to have a look at the Selenide project for UI automation testing. We’ll see what it is and how to use it for testing our UI projects.
2. What Is Selenide?
Selenide is a free, open-source framework built on top of Selenium WebDriver. It gives us access to all of the power of Selenium for performing automation testing of our webapps. Still, it is significantly streamlined so that we can focus only on what’s important.
In particular, Selenide will streamline all of the management of web browsers. It will also automatically take screenshots of our browser window if a test fails. It then gives us a much more streamlined API for interacting with the web browser, including several functions that aren’t directly available from Selenium and simplifying others that are available.
3. Getting Started
Let’s have a quick look at a simple example of using Selenide.
3.1. Maven Dependencies
Before we can do anything, we need to add Selenide to our project. This is a single dependency that we can add to our build:
<dependency>
    <groupId>com.codeborne</groupId>
    <artifactId>selenide</artifactId>
    <version>6.15.0</version>
    <scope>test</scope>
</dependency>
The latest version can be found in the Maven Central Repository.
This will automatically pull in everything necessary, including the appropriate version of Selenium WebDriver.
We’ll also need to have a testing framework already available – for example, JUnit. This will be used to write our tests as usual, with Selenide being just another library that we can use within our test code.
3.2. Our First Test
Now that we have the dependencies set up, let’s write a test. We’ll do one to check that Baeldung is indeed the first hit on a search engine when searching for it.
The first thing we want is some imports. We don’t need these, but they it much easier to read the code:
import static com.codeborne.selenide.Selenide.*;
import static com.codeborne.selenide.Condition.*;
import org.openqa.selenium.By;
Now we can write our test:
@Test
public void searchBaeldung() throws Exception {
    open("https://duckduckgo.com/");

    SelenideElement searchbox = $(By.id("searchbox_input"));
    searchbox.click();
    searchbox.sendKeys("Baeldung");
    searchbox.pressEnter()

    SelenideElement firstResult = $(By.id("r1-0"));
    firstResult.shouldHave(text("Baeldung"));
}
The first thing to notice is how little there is here. We’ve got nothing regarding browser management, waiting for things to load, or any of the other things that normally make these tests so complicated. Instead, everything we see here is directly to do with the test in question.
We start off by opening our web page. Then we click in the search box, type in our search term, and press enter. Finally, we locate the first result (We know from the HTML of the page that r1-0 is the ID given to the first result) and ensure that it has the expected text.
The $() notation that we see here is the means we have of querying the browser page. This takes a selector and returns a SelenideElement representing the first matching element in the entire page. We also have $$() which will return a collection of all matching elements.
Once we have a SelenideElement, we can continue getting more specific using the same pattern – only this time it would be SelenideElement.$ and SelenideElement.$$ that we use instead.
Once we have a SelenideElement then we can start to interact with it – e.g. using methods such as click(), sendKeys() and pressEnter().
We can also assert that the element is as we expect it to be by using should(), shouldBe() and shouldHave(). These three methods are identical and are worded differently just to make the test read better – for example, firstResult.should(text(“Baeldung”)); would be functionally identical but wouldn’t read well.
4. Page Objects
Page objects are a useful pattern we can use in our UI testing. This involves writing classes to encapsulate entire web pages or parts thereof. We can then use these objects within our tests. The benefit here is that if we change how the page works, we change the single page object, and every test using it is automatically correct.
Unsurprisingly, Selenide allows us to use the page object pattern as easily as Selenium WebDriver does. We can write classes that directly use the Selenide classes as appropriate. Either by using the $ static method, which allows us to interact with the entire page or by wrapping a SelenideElement value representing a smaller part of the page.
Let’s re-write our original test using this pattern to see what it looks like. First, we need a page model to represent the search form:
public class SearchFormPage {
    public void open() {
        Selenide.open("http://duckduckgo.com/");
    }

    public void search(String term) {
        SelenideElement searchbox = $(By.id("searchbox_input"));
        searchbox.click();
        searchbox.sendKeys(term);
        searchbox.pressEnter();
    }
}
This has two methods we can use – one to open the search page and one to actually perform a search for a supplied term.
Next, we need a page model to represent the search results page:
public class SearchResultsPage {
    public SearchResult getResult(int index) {
        SelenideElement result = $(By.id("r1-" + index));
        result.shouldBe(visible);

        return new SearchResult(result);
    }
}
This gives us a single method to get access to a single result. This returns another page object, this time wrapping a single SelenideElement in the page:
public class SearchResult {
    private SelenideElement result;

    public SearchResult(SelenideElement result) {
        this.result = result;
    }

    public String getText() {
        return result.getText();
    }
}
This page object then wraps that SelenideElement and allows us to interact exactly with it. In this case, by getting the text from the search result.
Now we can actually write a test:
@Test
public void searchBaeldung() {
    SearchFormPage searchFormPage = new SearchFormPage();
    searchFormPage.open();
    searchFormPage.search("Baeldung");

    SearchResultsPage results = new SearchResultsPage();

    SearchResult firstResult = results.getResult(0);
    assertTrue(firstResult.getText().contains("Baeldung"));
}
This test is the same as before, but we’re now writing it in terms of classes that better explain what’s going on. This has the benefit that the tests are much more readable to people who don’t know exactly how the HTML is rendered.
It also gives us the ability to easily make changes to how the pages are interacted with. For example, if the means to find an individual search result were to change, then we have to change the getResult() method here, as opposed to individually changing many different tests.
5. Failing Tests
One important detail, when we’re writing tests is to be able to easily identify the reason why they fail. Without this, we can spend significant effort identifying what’s gone wrong.
Let’s try changing our original test so that it’s failing instead. We’ll do this by adjusting it to search for the wrong term instead:
SelenideElement searchbox = $(By.id("searchbox_input"));
searchbox.click();
searchbox.sendKeys("Something Else");
searchbox.pressEnter();
Running this test is obviously going to fail – a search for “Something Else” isn’t going to find Baeldung as the first result. But what does it look like when it fails?
Unsurprisingly, the failure is on our first assertion:

But what does the actual error look like?
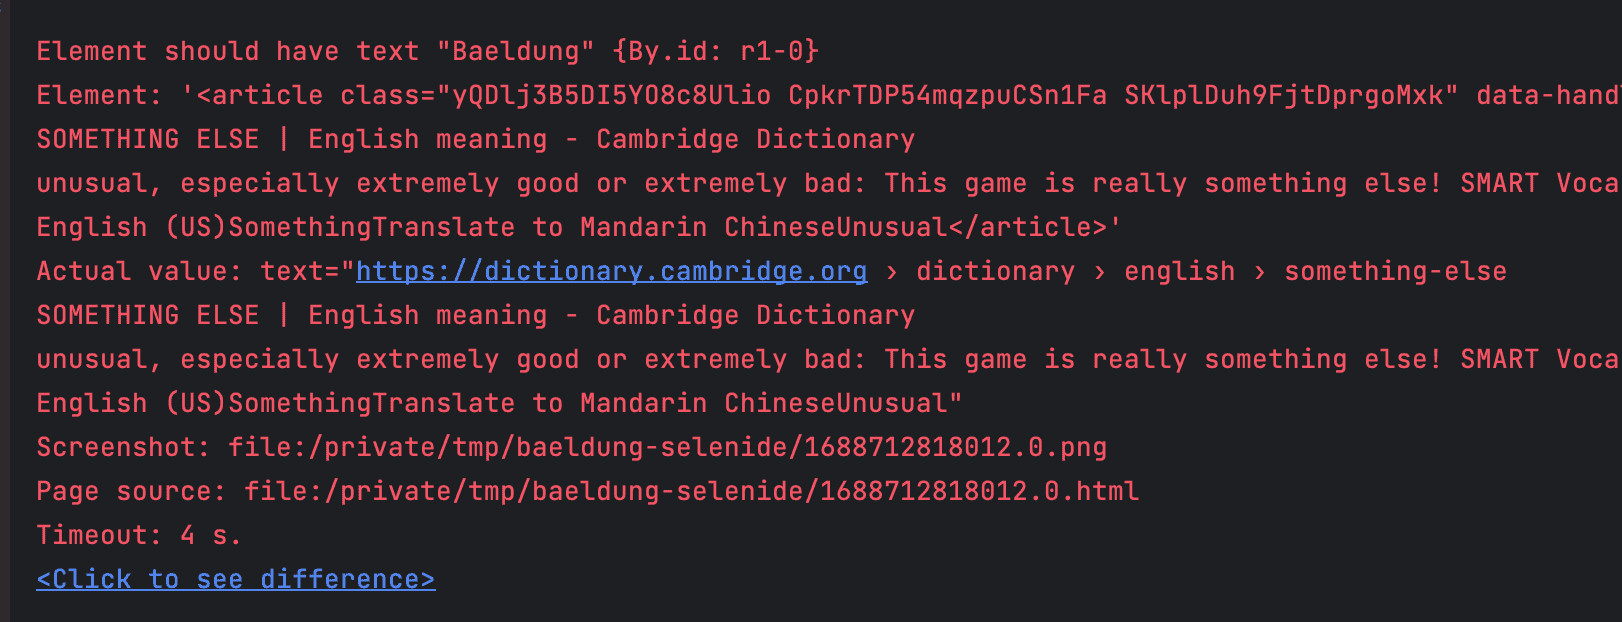
From this, we can immediately see the exact HTML element that we were asserting on, but also the exact value from it. In this case, we’re asserting on the text content, so this is what we see.
But there’s more as well. We have captured a screenshot and page source file. We can open these to see the exact state of the web page at the time of the error:
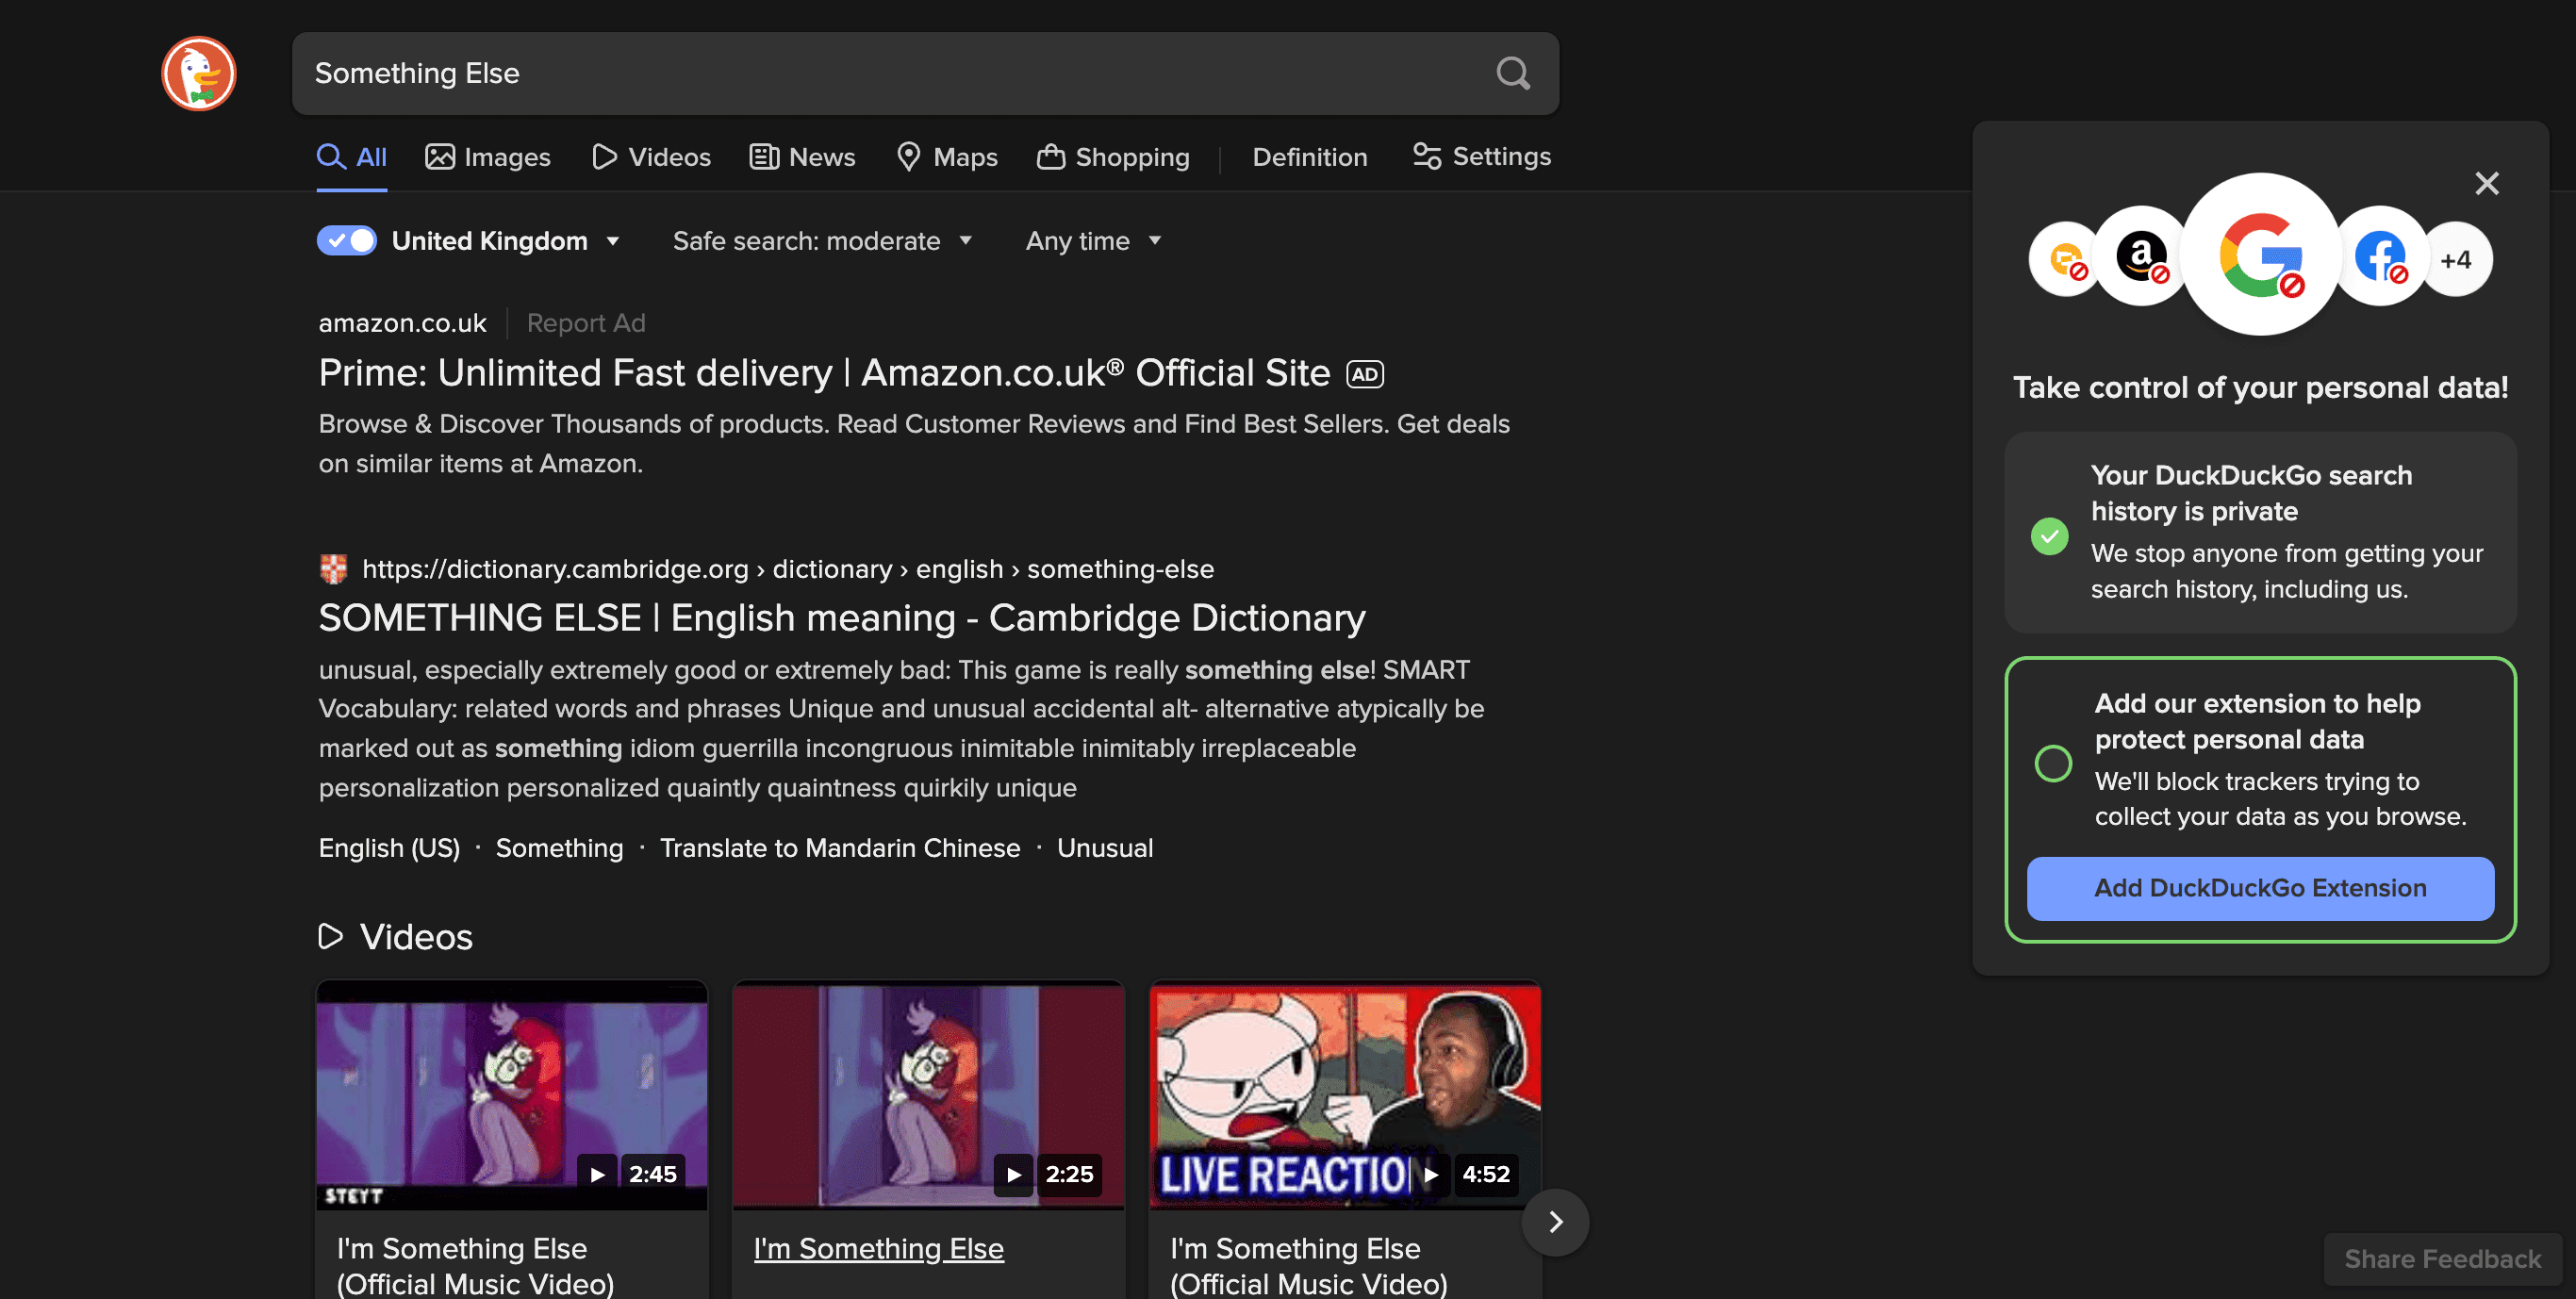
Immediately looking at this screenshot, we can see that we’ve searched for the wrong thing, and so we’ve got the wrong search results. This can help us identify the problem and fix the test easily.
Alternatively, it might actually highlight that the application isn’t acting as expected. In this case, the test is fine but has identified a regression in our code.
6. Configuring Selenide
We’ve just seen Selenide saving screenshots for failed tests. But it needs to know where to put the screenshots.
Selenide comes with sensible default behavior out of the box. For example, our screenshots are stored in build/reports/tests by default.
However, these defaults don’t always work for every situation, so we have to be able to tweak them. We can do this in one of three ways:
- With a properties file
- With system properties
- Programatically in code
The highest priority way that we can control these settings is in our code. We do this by changing properties on the com.codeborne.selenide.Configuration object during our testing. This can be directly in the test itself, in a @BeforeEach method, or anywhere that gets executed at the appropriate time. All of these properties have JavaDoc explaining exactly what they mean so that we can change them correctly.
The next highest priority is to use system properties. We can provide these in the standard way that we would provide system properties to our running tests. The property names are the exact same name as the field names in the Configuration class, only prefixed with “selenide.”. So, for example, selenide.reportsFolder corresponds to Configuration.reportsFolder.
Finally, we can define all of these properties in a selenide.properties file at the root of the classpath. For example, in a maven project, this would go in src/test/resources. This file has properties named exactly the same as system properties, but they exist within the project, whereas system properties can be specified from outside – e.g., by our CI system.
The most important properties to understand here are those around how the web browser is used and where files are stored. For example, we can use Firefox instead of Chrome by:
- Programmatically setting Configuration.browser = “firefox”; in our code.
- Adding -Dselenide.browser=firefox to the command line.
- Adding selenide.browser=firefox to the selenide.properties file.
All three of these will have the same effect. This means, for example, we can use the system property approach to run the exact same tests on a variety of different web browsers as part of our CI builds.
7. Conclusion
Here we’ve seen an introduction to the Selenide library and how to use it to write UI automation tests. Next time you’re doing UI testing, why not try it?














