


Mocking is an essential part of unit testing, and the Mockito library makes it easy to write clean and intuitive unit tests for your Java code.
Get started with mocking and improve your application tests using our Mockito guide:
Handling concurrency in an application can be a tricky process with many potential pitfalls. A solid grasp of the fundamentals will go a long way to help minimize these issues.
Get started with understanding multi-threaded applications with our Java Concurrency guide:
Spring 5 added support for reactive programming with the Spring WebFlux module, which has been improved upon ever since. Get started with the Reactor project basics and reactive programming in Spring Boot:
Since its introduction in Java 8, the Stream API has become a staple of Java development. The basic operations like iterating, filtering, mapping sequences of elements are deceptively simple to use.
But these can also be overused and fall into some common pitfalls.
To get a better understanding on how Streams work and how to combine them with other language features, check out our guide to Java Streams:
Explore Spring Boot 3 and Spring 6 in-depth through building a full REST API with the framework:
Yes, Spring Security can be complex, from the more advanced functionality within the Core to the deep OAuth support in the framework.
I built the security material as two full courses - Core and OAuth, to get practical with these more complex scenarios. We explore when and how to use each feature and code through it on the backing project.
You can explore the course here:
All Access is finally out, with all of my Spring courses. Learn JUnit is out as well, and Learn Maven is coming fast. And, of course, quite a bit more affordable. Finally.
>> GET THE COURSE
Spring Data JPA is a great way to handle the complexity of JPA with the powerful simplicity of Spring Boot.
Get started with Spring Data JPA through the guided reference course:
Refactor Java code safely — and automatically — with OpenRewrite.
Refactoring big codebases by hand is slow, risky, and easy to put off. That’s where OpenRewrite comes in. The open-source framework for large-scale, automated code transformations helps teams modernize safely and consistently.
Each month, the creators and maintainers of OpenRewrite at Moderne run live, hands-on training sessions — one for newcomers and one for experienced users. You’ll see how recipes work, how to apply them across projects, and how to modernize code with confidence.
Join the next session, bring your questions, and learn how to automate the kind of work that usually eats your sprint time.
1. Overview
Reladomo (formerly known as Mithra) is an object-relational mapping (ORM) framework for Java, developed at Goldman Sachs and currently released as an open-source project. The framework provides the features commonly needed from an ORM as well as some additional ones.
Let’s see some of the key features of Reladomo:
- it can generate Java classes as well as DDL scripts
- it is driven by metadata written in XML files
- the generated code is extensible
- the query language is object-oriented and strongly typed
- the framework provides support for sharding (same schema, different datasets)
- the support for testing is also included
- it provides useful features like performant caching and transactions
In the following sections, we’ll see the setup and some basic examples of use.
2. Maven Setup
To start using the ORM, we need to add the reladomo dependency to our pom.xml file:
<dependency>
    <groupId>com.goldmansachs.reladomo</groupId>
    <artifactId>reladomo</artifactId>
    <version>18.1.0</version>
</dependency>
We will use an H2 database for our examples, so let’s also add the h2 dependency:
<dependency>
    <groupId>com.h2database</groupId>
    <artifactId>h2</artifactId>
    <version>2.1.214</version>
</dependency>
In addition to this, we need to set up plugins that will generate classes and SQL files and load them during execution.
For file generation, we can use tasks that are executed using the maven-antrun-plugin. First, let’s see how we can define the task for generating Java classes:
<plugin>
    <artifactId>maven-antrun-plugin</artifactId>
    <executions>
        <execution>
            <id>generateMithra</id>
            <phase>generate-sources</phase>
            <goals>
                <goal>run</goal>
            </goals>
            <configuration>
                <tasks>
                    <property name="plugin_classpath"
                      refid="maven.plugin.classpath"/>
                    <taskdef name="gen-reladomo"
                      classpath="plugin_classpath"
                      classname="com.gs.fw.common.mithra.generator.MithraGenerator"/>
                    <gen-reladomo
                      xml="${project.basedir}/src/main/resources/reladomo/ReladomoClassList.xml"
                      generateGscListMethod="true"
                      generatedDir="${project.build.directory}/generated-sources/reladomo"
                      nonGeneratedDir="${project.basedir}/src/main/java"/>
                </tasks>
            </configuration>
        </execution>
    </executions>
</plugin>
The gen-reladomo task uses the provided MithraGenerator to create Java files based on the configuration in the ReladomoClassList.xml file. We will take a closer look at what this file contains in a later section.
The tasks also have two properties that define the location of the generated files:
- generatedDir – contains the classes that shouldn’t be modified or versioned
- nonGeneratedDir – the generated concrete object classes that can be further customized and versioned
The database tables corresponding to the Java objects can either be created manually or automatically by using the DDL scripts generated by a second Ant task:
<taskdef
  name="gen-ddl"
  classname = "com.gs.fw.common.mithra.generator.dbgenerator.MithraDbDefinitionGenerator"
  loaderRef="reladomoGenerator">
    <classpath refid="maven.plugin.classpath"/>
</taskdef>
<gen-ddl
  xml="${project.basedir}/src/main/resources/reladomo/ReladomoClassList.xml"
  generatedDir="${project.build.directory}/generated-db/sql"
  databaseType="postgres"/>
This task uses the MithraDbDefinitionGenerator based on the same ReladomoClassList.xml file mentioned before. The SQL scripts will be placed in the generated-db/sql directory.
To complete the definition for this plugin, we also have to add two dependencies used for the creation:
<plugin>
    <artifactId>maven-antrun-plugin</artifactId>
    <executions>
    //...
    </executions>
    <dependencies>
        <dependency>
            <groupId>com.goldmansachs.reladomo</groupId>
            <artifactId>reladomogen</artifactId>
            <version>16.5.1</version>
        </dependency>
        <dependency>
            <groupId>com.goldmansachs.reladomo</groupId>
            <artifactId>reladomo-gen-util</artifactId>
            <version>16.5.1</version>
        </dependency>
    </dependencies>
</plugin>
Finally, using the build-helper-maven-plugin, we can add the generated files to the classpath:
<plugin>
    <groupId>org.codehaus.mojo</groupId>
    <artifactId>build-helper-maven-plugin</artifactId>
    <executions>
        <execution>
            <id>add-source</id>
            <phase>generate-sources</phase>
            <goals>
                <goal>add-source</goal>
            </goals>
            <configuration>
                <sources>
                    <source>${project.build.directory}/generated-sources/reladomo</source>
                </sources>
            </configuration>
        </execution>
        <execution>
            <id>add-resource</id>
            <phase>generate-resources</phase>
            <goals>
                <goal>add-resource</goal>
            </goals>
            <configuration>
                <resources>
                    <resource>
                        <directory>${project.build.directory}/generated-db/</directory>
                    </resource>
                </resources>
            </configuration>
        </execution>
    </executions>
</plugin>
Adding the DDL scripts is optional. In our example, we will use an in-memory database, so we want to execute the scripts in order to create the tables.
3. XML Configuration
The metadata for the Reladomo framework can be defined in several XML files.
3.1. Object XML Files
Each entity we want to create needs to be defined in its XML file.
Let’s create a simple example with two entities: departments and employees. Here is a visual representation of our domain model:
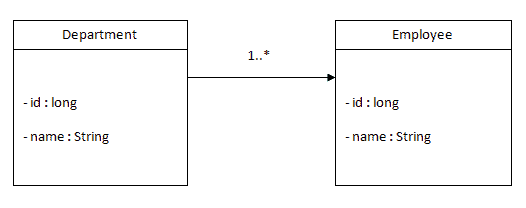
Let’s define the first Department.xml file:
<MithraObject objectType="transactional">
    <PackageName>com.baeldung.reladomo</PackageName>
    <ClassName>Department</ClassName>
    <DefaultTable>departments</DefaultTable>

    <Attribute name="id" javaType="long"
      columnName="department_id" primaryKey="true"/>
    <Attribute name="name" javaType="String"
      columnName="name" maxLength="50" truncate="true"/>
    <Relationship name="employees" relatedObject="Employee"
      cardinality="one-to-many"
      reverseRelationshipName="department"
      relatedIsDependent="true">
         Employee.departmentId = this.id
    </Relationship>
</MithraObject>
We can see above the entity is defined inside a root element called MithraObject. Then, we have specified the package, class, and name of the corresponding database table.
Each property of the type is defined using an Attribute element, for which we can state the name, Java type, and column name.
We can describe the relationships between objects using the Relationship tag. In our example, we have defined a one-to-many relationship between Department and Employee objects based on the expression:
Employee.departmentId = this.idThe reverseRelationshipName attribute can be used to make the relationship bi-directional without defining it twice.
The relatedIsDependent attribute allows us to cascade operations.
Next, let’s create the Employee.xml file similarly:
<MithraObject objectType="transactional">
    <PackageName>com.baeldung.reladomo</PackageName>
    <ClassName>Employee</ClassName>
    <DefaultTable>employees</DefaultTable>

    <Attribute name="id" javaType="long"
      columnName="employee_id" primaryKey="true"/>
    <Attribute name="name" javaType="String"
      columnName="name" maxLength="50" truncate="true"/>
    <Attribute name="departmentId" javaType="long"
      columnName="department_id"/>
</MithraObject>
3.2. ReladomoClassList.xml File
Reladomo needs to be told about the objects it should generate.
In the Maven section, we defined the ReladomoClassList.xml file as a source for the generation tasks, so it’s time to create the file:
<Mithra>
    <MithraObjectResource name="Department"/>
    <MithraObjectResource name="Employee"/>
</Mithra>
This is a simple file containing a list of entities for which classes will be generated based on the XML configuration.
4. Generated Classes
Now we have all the elements we need to start the code generation by building the Maven application using the command mvn clean install.
The concrete classes will be generated in the src/main/java folder in the specified package:
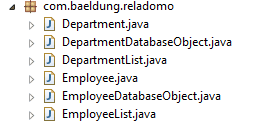
These are simple classes where we can add our custom code. For example, the Department class only contains a constructor which should not be removed:
public class Department extends DepartmentAbstract {
    public Department() {
        super();
        // You must not modify this constructor. Mithra calls this internally.
        // You can call this constructor. You can also add new constructors.
    }
}
If we want to add a custom constructor to this class, it needs to call the parent constructor as well:
public Department(long id, String name){
    super();
    this.setId(id);
    this.setName(name);
}
These classes are based on the abstract and utility classes in the generated-sources/reladomo folder:
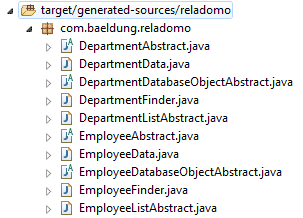
The main types of classes in this folder are:
- DepartmentAbstract and EmployeeAbstract classes – which contains methods for working with the entities defined
- DepartmentListAbstract and EmployeeListAbstract – that contains methods for working with lists of departments and employees
- DepartmentFinder and EmployeeFinder – these provide methods for querying entities
- other utility classes
By generating these classes, a large part of the code necessary to perform CRUD operations on our entities is already created for us.
5. Reladomo Application
To perform operations on the database, we need a connection manager class that allows us to obtain database connections.
5.1. Connection Manager
When working with a single database, we can implement the SourcelessConnectionManager interface:
public class ReladomoConnectionManager implements SourcelessConnectionManager {

    private static ReladomoConnectionManager instance;
    private XAConnectionManager xaConnectionManager;

    public static synchronized ReladomoConnectionManager getInstance() {
        if (instance == null) {
            instance = new ReladomoConnectionManager();
        }
        return instance;
    }

    private ReladomoConnectionManager() {
        this.createConnectionManager();
    }
    //...
}
Our ReladomoConnectionManager class implements the singleton pattern and is based on an XAConnectionManager, which is a utility class for a transactional connection manager.
Let’s take a closer look at the createConnectionManager() method:
private XAConnectionManager createConnectionManager() {
    xaConnectionManager = new XAConnectionManager();
    xaConnectionManager.setDriverClassName("org.h2.Driver");
    xaConnectionManager.setJdbcConnectionString("jdbc:h2:mem:myDb");
    xaConnectionManager.setJdbcUser("sa");
    xaConnectionManager.setJdbcPassword("");
    xaConnectionManager.setPoolName("My Connection Pool");
    xaConnectionManager.setInitialSize(1);
    xaConnectionManager.setPoolSize(10);
    xaConnectionManager.initialisePool();
    return xaConnectionManager;
}
In this method, we’ve set the properties necessary to create a connection to an H2 in-memory database.
Also, we need to implement several methods from the SourcelessConnectionManager interface:
@Override
public Connection getConnection() {
    return xaConnectionManager.getConnection();
}

@Override
public DatabaseType getDatabaseType() {
    return H2DatabaseType.getInstance();
}

@Override
public TimeZone getDatabaseTimeZone() {
    return TimeZone.getDefault();
}

@Override
public String getDatabaseIdentifier() {
    return "myDb";
}

@Override
public BulkLoader createBulkLoader() throws BulkLoaderException {
    return null;
}
Finally, let’s add a custom method to execute the generated DDL scripts that create our database tables:
public void createTables() throws Exception {
    Path ddlPath = Paths.get(ClassLoader.getSystemResource("sql").toURI());
    try (
      Connection conn = xaConnectionManager.getConnection();
      Stream<Path> list = Files.list(ddlPath)) {

        list.forEach(path -> {
            try {
                RunScript.execute(conn, Files.newBufferedReader(path));
            }
            catch (SQLException | IOException exc){
                exc.printStackTrace();
            }
        });
    }
}
This is, of course, not necessary for a production application, where your tables would not be recreated for every execution.
5.2. Initializing Reladomo
The Reladomo initialization process uses a configuration file that specifies the connection manager class and the object types used. Let’s define a ReladomoRuntimeConfig.xml file:
<MithraRuntime>
    <ConnectionManager
      className="com.baeldung.reladomo.ReladomoConnectionManager ">
    <MithraObjectConfiguration
      className="com.baeldung.reladomo.Department" cacheType="partial"/>
    <MithraObjectConfiguration
      className="com.baeldung.reladomo.Employee " cacheType="partial"/>
    </ConnectionManager>
</MithraRuntime>
Next, we can create a main class where we first call the createTables() method, then use the MithraManager class to load the configuration and initialize Reladomo:
public class ReladomoApplication {
    public static void main(String[] args) {
        try {
            ReladomoConnectionManager.getInstance().createTables();
        } catch (Exception e1) {
            e1.printStackTrace();
        }
        MithraManager mithraManager = MithraManagerProvider.getMithraManager();
        mithraManager.setTransactionTimeout(120);

        try (InputStream is = ReladomoApplication.class.getClassLoader()
          .getResourceAsStream("ReladomoRuntimeConfig.xml")) {
            MithraManagerProvider.getMithraManager()
              .readConfiguration(is);

            //execute operations
        }
        catch (IOException exc){
            exc.printStackTrace();
        }
    }
}
5.3. Performing CRUD Operations
Let’s now use the Reladomo-generated classes to perform a few operations on our entities.
First, let’s create two Department and Employee objects, then save both using the cascadeInsert() method:
Department department = new Department(1, "IT");
Employee employee = new Employee(1, "John");
department.getEmployees().add(employee);
department.cascadeInsert();
Each object can also be saved separately by calling the insert() method. In our example, it’s possible to use cascadeInsert() because we’ve added the relatedIsDependent=true attribute to our relationship definition.
To query objects, we can use the generated Finder classes:
Department depFound = DepartmentFinder
  .findByPrimaryKey(1);
Employee empFound = EmployeeFinder
  .findOne(EmployeeFinder.name().eq("John"));
The objects obtained in this manner are “live” objects, meaning any change to them using setters is immediately reflected in the database:
empFound.setName("Steven");To avoid this behavior, we can obtain detached objects:
Department depDetached = DepartmentFinder
  .findByPrimaryKey(1).getDetachedCopy();
To remove objects, we can use the delete() method:
empFound.delete();5.4. Transaction Management
If we want a set of operations to be executed or not as one unit, we can wrap them in a transaction:
mithraManager.executeTransactionalCommand(tx -> {
    Department dep = new Department(2, "HR");
    Employee emp = new Employee(2, "Jim");
    dep.getEmployees().add(emp);
    dep.cascadeInsert();
    return null;
});
6. Reladomo Test Support
In the sections above, we wrote our examples in a Java main class.
If we want to write tests for our application, one way to do this is to write the same code in a test class.
However, for better test support, Reladomo also provides the MithraTestResource class. This allows us to use a different configuration and in-memory database just for the tests.
First, we need to add the additional reladomo-test-util dependency, along with the junit dependency:
<dependency>
    <groupId>com.goldmansachs.reladomo</groupId>
    <artifactId>reladomo-test-util</artifactId>
    <version>16.5.1</version>
</dependency>
<dependency>
    <groupId>junit</groupId>
    <artifactId>junit</artifactId>
    <version>4.12</version>
</dependency>
Next, we have to create a ReladomoTestConfig.xml file that uses the ConnectionManagerForTests class:
<MithraRuntime>
    <ConnectionManager
      className="com.gs.fw.common.mithra.test.ConnectionManagerForTests">
        <Property name="resourceName" value="testDb"/>
        <MithraObjectConfiguration
          className="com.baeldung.reladomo.Department" cacheType="partial"/>
        <MithraObjectConfiguration
          className="com.baeldung.reladomo.Employee " cacheType="partial"/>
    </ConnectionManager>
 </MithraRuntime>
This connection manager configures an in-memory H2 database used only for tests.
A convenient feature of the MithraTestResource class is that we can provide text files with test data in the following format:
class com.baeldung.reladomo.Department
id, name
1, "Marketing"

class com.baeldung.reladomo.Employee
id, name
1, "Paul"
Let’s create a JUnit test class and setup our MithraTestResource instance in a @Before method:
public class ReladomoTest {
    private MithraTestResource mithraTestResource;

    @Before
    public void setUp() throws Exception {
        this.mithraTestResource
          = new MithraTestResource("reladomo/ReladomoTestConfig.xml");

        ConnectionManagerForTests connectionManager
          = ConnectionManagerForTests.getInstanceForDbName("testDb");
        this.mithraTestResource.createSingleDatabase(connectionManager);
        mithraTestResource.addTestDataToDatabase("reladomo/test-data.txt",
          connectionManager);

        this.mithraTestResource.setUp();
    }
}
Then we can write a simple @Test method that verifies our test data was loaded:
@Test
public void whenGetTestData_thenOk() {
    Employee employee = EmployeeFinder.findByPrimaryKey(1);
    assertEquals(employee.getName(), "Paul");
}
After the tests have run, the test database needs to be cleared:
@After
public void tearDown() throws Exception {
    this.mithraTestResource.tearDown();
}
7. Conclusion
In this article, we went through the main features of the Reladomo ORM framework, as well as setup and examples of common use.














