Isomorphic Application with React and Nashorn
Last updated: February 13, 2024


Mocking is an essential part of unit testing, and the Mockito library makes it easy to write clean and intuitive unit tests for your Java code.
Get started with mocking and improve your application tests using our Mockito guide:
Handling concurrency in an application can be a tricky process with many potential pitfalls. A solid grasp of the fundamentals will go a long way to help minimize these issues.
Get started with understanding multi-threaded applications with our Java Concurrency guide:
Spring 5 added support for reactive programming with the Spring WebFlux module, which has been improved upon ever since. Get started with the Reactor project basics and reactive programming in Spring Boot:
Since its introduction in Java 8, the Stream API has become a staple of Java development. The basic operations like iterating, filtering, mapping sequences of elements are deceptively simple to use.
But these can also be overused and fall into some common pitfalls.
To get a better understanding on how Streams work and how to combine them with other language features, check out our guide to Java Streams:
Explore Spring Boot 3 and Spring 6 in-depth through building a full REST API with the framework:
Yes, Spring Security can be complex, from the more advanced functionality within the Core to the deep OAuth support in the framework.
I built the security material as two full courses - Core and OAuth, to get practical with these more complex scenarios. We explore when and how to use each feature and code through it on the backing project.
You can explore the course here:
Spring Data JPA is a great way to handle the complexity of JPA with the powerful simplicity of Spring Boot.
Get started with Spring Data JPA through the guided reference course:
Refactor Java code safely — and automatically — with OpenRewrite.
Refactoring big codebases by hand is slow, risky, and easy to put off. That’s where OpenRewrite comes in. The open-source framework for large-scale, automated code transformations helps teams modernize safely and consistently.
Each month, the creators and maintainers of OpenRewrite at Moderne run live, hands-on training sessions — one for newcomers and one for experienced users. You’ll see how recipes work, how to apply them across projects, and how to modernize code with confidence.
Join the next session, bring your questions, and learn how to automate the kind of work that usually eats your sprint time.
Yes, we're now running our only Summer Sale. All Courses are 30% off until 20th July, 2026:
Yes, we're now running our only Summer Sale. All Courses are 30% off until 20th July, 2026:
1. Overview
In this tutorial, we’ll understand what exactly is an isomorphic app. We’ll also discuss Nashorn, the JavaScript engine bundled with Java.
Furthermore, we’ll explore how we can use Nashorn along with a front-end library like React to create an isomorphic app.
2. A Little Bit of History
Traditionally, client and server applications were written in a manner that was quite heavy on the server-side. Think of PHP as a scripting engine generating mostly static HTML and web browsers rendering them.
Netscape came with the support of JavaScript in its browser way back in mid-nineties. That started to shift some of the processing from server-side to the client-side browser. For a long time, developers struggled with different issues concerning JavaScript support in web browsers.
With the growing demand for faster and interactive user experience, the boundary was already being pushed harder. One of the earliest frameworks that changed the game was jQuery. It brought several user-friendly functions and much-enhanced support for AJAX.
Soon, many frameworks for front-end development started to appear, which improved the developer’s experience greatly. Starting with AngularJS from Google, React from Facebook, and later, Vue, they started to capture developer attention.
With modern browser support, remarkable frameworks and required tools, the tides are largely shifting towards client-side.
An immersive experience on increasingly faster hand-held devices requires more client-side processing.
3. What’s an Isomorphic App?
So, we saw how front-end frameworks are helping us develop a web application where the user interface is completely rendered at the client-side.
However, it’s also possible to use the same framework at the server-side and generate the same user interface.
Now, we do not have to stick to client-side only or server-side only solutions necessarily. A better way is to have a solution where the client and server can both process the same front-end code and generate the same user interface.
There are benefits to this approach, which we’ll discuss later.
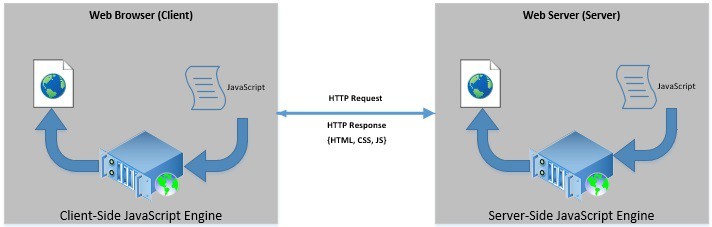
Such web applications are called Isomorphic or Universal. Now the client-side language is most exclusively JavaScript. Hence, for an isomorphic app to work, we have to use JavaScript at the server-side as well.
Node.js is by far the most common choice to build a server-side rendered application.
4. What Is Nashorn?
So, where does Nashorn fit in, and why should we use it? Nashorn is a JavaScript engine packaged by default with Java. Hence, if we already have a web application back-end in Java and want to build an isomorphic app, Nashorn is pretty handy!
Nashorn has been released as part of Java 8. This is primarily focused on allowing embedded JavaScript applications in Java.
Nashorn compiles JavaScript in-memory to Java Bytecode and passes it to the JVM for execution. This offers better performance compared to the earlier engine, Rhino.
5. Creating an Isomorphic App
We have gone through enough context now. Our application here will display a Fibonacci sequence and provide a button to generate and display the next number in the sequence. Let’s create a simple isomorphic app now with a back-end and front-end:
- Front-end: A simple React.js based front-end
- Back-end: A simple Spring Boot back-end with Nashorn to process JavaScript
6. Application Front-End
We’ll be using React.js for creating our front end. React is a popular JavaScript library for building single-page apps. It helps us decompose a complex user interface into hierarchical components with optional state and one-way data binding.
React parses this hierarchy and creates an in-memory data structure called virtual DOM. This helps React to find changes between different states and make minimal changes to the browser DOM.
6.1. React Component
Let’s create our first React component:
var App = React.createClass({displayName: "App",
    handleSubmit: function() {
    	var last = this.state.data[this.state.data.length-1];
    	var secondLast = this.state.data[this.state.data.length-2];
        $.ajax({
            url: '/next/'+last+'/'+secondLast,
            dataType: 'text',
            success: function(msg) {
                var series = this.state.data;
                series.push(msg);
                this.setState({data: series});
            }.bind(this),
            error: function(xhr, status, err) {
                console.error('/next', status, err.toString());
            }.bind(this)
        });
    },
    componentDidMount: function() {
    	this.setState({data: this.props.data});
    },
    getInitialState: function() {
        return {data: []};
    },
    render: function() {
        return (
            React.createElement("div", {className: "app"},
            	React.createElement("h2", null, "Fibonacci Generator"),
            	React.createElement("h2", null, this.state.data.toString()),
                React.createElement("input", {type: "submit", value: "Next", onClick: this.handleSubmit})
            )
        );
    }
});
Now, let’s understand what is the above code doing:
- To begin with, we have defined a class component in React called “App”
- The most important function inside this component is “render”, which is responsible for generating the user interface
- We have provided a style className that the component can use
- We’re making use of the component state here to store and display the series
- While the state initializes as an empty list, it fetches data passed to the component as a prop when the component mounts
- Finally, on click of the button “Add”, a jQuery call to the REST service is made
- The call fetches the next number in the sequence and appends it to the component’s state
- Change in the component’s state automatically re-renders the component
6.2. Using the React Component
React looks for a named “div” element in the HTML page to anchor its contents. All we have to do is provide an HTML page with this “div” element and load the JS files:
<%@ page contentType="text/html;charset=UTF-8" language="java" %>
<html>
<head>
    <title>Hello React</title>
    <script type="text/javascript" src="js/react.js"></script>
    <script type="text/javascript" src="js/react-dom.js"></script>
    <script type="text/javascript" src="http://code.jquery.com/jquery-1.10.0.min.js"></script>
</head>
<body>
<div id="root"></div>
<script type="text/javascript" src="app.js"></script>
<script type="text/javascript">
    ReactDOM.render(
        React.createElement(App, {data: [0,1,1]}),
        document.getElementById("root")
    );
</script>
</body>
</html>
So, let’s see what we’ve done here:
- We imported the required JS libraries, react, react-dom and jQuery
- After that, we defined a “div” element called “root”
- We also imported the JS file with our React component
- Next, we called the React component “App” with some seed data, the first three Fibonacci numbers
7. Application Back-End
Now, let’s see how we can create a fitting back-end for our application. We’ve already decided to use Spring Boot along with Spring Web for building this application. More importantly, we’ve decided to use Nashorn to process the JavaScript-based front-end we developed in the last section.
7.1. Maven Dependencies
For our simple application, we’ll be using JSP together with Spring MVC, so we’ll add a couple of dependencies to our POM:
<dependency>
    <groupId>org.springframework.boot</groupId>
    <artifactId>spring-boot-starter-web</artifactId>
</dependency>
<dependency>
    <groupId>org.apache.tomcat.embed</groupId>
    <artifactId>tomcat-embed-jasper</artifactId>
    <scope>provided</scope>
</dependency>
The first one is the standard spring boot dependency for a web application. The second one is needed to compile JSPs.
7.2. Web Controller
Let’s now create our web controller, which will process our JavaScript file and return an HTML using JSP:
@Controller
public class MyWebController {
    @RequestMapping("/")
    public String index(Map<String, Object> model) throws Exception {
        ScriptEngine nashorn = new ScriptEngineManager().getEngineByName("nashorn");
        nashorn.eval(new FileReader("static/js/react.js"));
        nashorn.eval(new FileReader("static/js/react-dom-server.js"));
        nashorn.eval(new FileReader("static/app.js"));
        Object html = nashorn.eval(
          "ReactDOMServer.renderToString(" +
            "React.createElement(App, {data: [0,1,1]})" +
          ");");
        model.put("content", String.valueOf(html));
        return "index";
    }
}
So, what exactly is happening here:
- We fetch an instance of ScriptEngine of type Nashorn from ScriptEngineManager
- Then, we load relevant libraries to React, react.js, and react-dom-server.js
- We also load our JS file that has our react component “App”
- Finally, we evaluate a JS fragment creating react element with the component “App” and some seed data
- This provides us with an output of React, an HTML fragment as Object
- We pass this HTML fragment as data to the relevant view – the JSP
7.3. JSP
Now, how do we process this HTML fragment in our JSP?
Recall that React automatically adds its output to a named “div” element – “root” in our case. However, we’ll add our server-side generated HTML fragment to the same element manually in our JSP.
Let’s see how the JSP looks now:
<%@ page contentType="text/html;charset=UTF-8" language="java" %>
<html>
<head>
    <title>Hello React!</title>
    <script type="text/javascript" src="js/react.js"></script>
    <script type="text/javascript" src="js/react-dom.js"></script>
    <script type="text/javascript" src="http://code.jquery.com/jquery-1.10.0.min.js"></script>
</head>
<body>
<div id="root">${content}</div>
<script type="text/javascript" src="app.js"></script>
<script type="text/javascript">
	ReactDOM.render(
        React.createElement(App, {data: [0,1,1]}),
        document.getElementById("root")
    );
</script>
</body>
</html>
This is the same page we created earlier, except for the fact that we’ve added our HTML fragment into the “root” div, which was empty earlier.
7.4. REST Controller
Finally, we also need a server-side REST endpoint that gives us the next Fibonacci number in the sequence:
@RestController
public class MyRestController {
    @RequestMapping("/next/{last}/{secondLast}")
    public int index(
      @PathVariable("last") int last,
      @PathVariable("secondLast") int secondLast) throws Exception {
        return last + secondLast;
    }
}
Nothing fancy here, just a simple Spring REST controller.
8. Running the Application
Now, that we have completed our front-end as well as our back-end, it’s time to run the application.
We should start the Spring Boot application normally, making use of the bootstrapping class:
@SpringBootApplication
public class Application extends SpringBootServletInitializer {
    @Override
    protected SpringApplicationBuilder configure(SpringApplicationBuilder application) {
        return application.sources(Application.class);
    }
    public static void main(String[] args) throws Exception {
        SpringApplication.run(Application.class, args);
    }
}
When we run this class, Spring Boot compiles our JSPs and makes them available on embedded Tomcat along with the rest of the web application.
Now, if we visit our site, we’ll see:
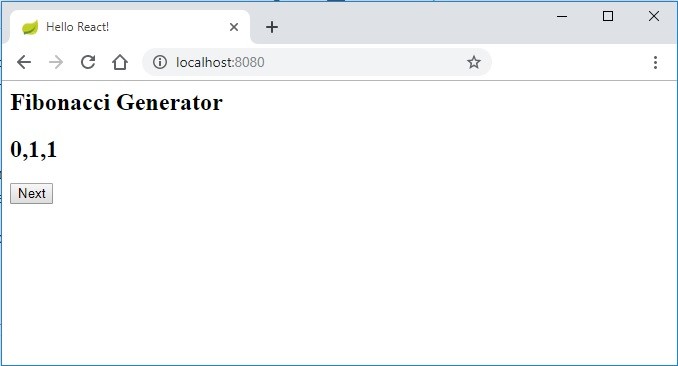
Let’s understand the sequence of events:
- The browser requests this page
- When the request for this page arrives, Spring web controller process the JS files
- Nashorn engine generates an HTML fragment and passes this to the JSP
- JSP adds this HTML fragment to the “root” div element, finally returning the above HTML page
- The browser renders the HTML, meanwhile starts downloading JS files
- Finally, the page is ready for client-side actions — we can add more numbers in the series
The important thing to understand here is what happens if React finds an HTML fragment in the target “div” element. In such cases, React compares this fragment with what it has and does not replace it if it finds a legible fragment. This is exactly what powers server-side rendering and isomorphic apps.
9. What More Is Possible?
In our simple example, we have just scratched the surface of what’s possible. Front-end applications with modern JS-based frameworks are getting increasingly more powerful and complex. With this added complexity, there are many things that we need to take care of:
- We’ve created just one React component in our application when in reality, this can be several components forming a hierarchy which pass data through props
- We would like to create separate JS files for every component to keep them manageable and manage their dependencies through “exports/require” or “export/import”
- Moreover, it may not be possible to manage state within components only; we may want to use a state management library like Redux
- Furthermore, we may have to interact with external services as side-effects of actions; this may require us to use a pattern like redux-thunk or Redux-Saga
- Most importantly, we would want to leverage JSX, a syntax extension to JS for describing the user interface
While Nashorn is fully compatible with pure JS, it may not support all the features mentioned above. Many of these require trans-compiling and polyfills due to JS compatibility.
The usual practice in such cases is to leverage a module bundler like Webpack or Rollup. What they mainly do is to process all of React source files and bundle them into a single JS file along with all dependencies. This invariably requires a modern JavaScript compiler like Babel to compile JavaScript to be backward compatible.
The final bundle only has good old JS, which browsers can understand and Nashorn adheres to as well.
10. Benefits of an Isomorphic App
So, we’ve talked a great deal about isomorphic apps and have even created a simple application now. But why exactly should we even care about this? Let’s understand some of the key benefits of using an isomorphic app.
10.1. First Page Rendering
One of the most significant benefits of an isomorphic app is the faster rendering of the first page. In the typical client-side rendered application, the browser begins by downloading all the JS and CSS artifacts.
After that, they load and start rendering the first page. If we send the first page rendered from the server-side, this can be much faster, providing an enhanced user experience.
10.2. SEO Friendly
Another benefit often cited with server-side rendering is related to SEO. It’s believed that search bots are not able to process JavaScript and hence do not see an index page rendered at client-side through libraries like React. A server-side rendered page, therefore, is SEO friendlier. It’s worth noting, though, that Modern search engine bots claim to process JavaScript.
11. Conclusion
In this tutorial, we went through the basic concepts of isomorphic applications and the Nashorn JavaScript engine. We further explored how to build an isomorphic app with Spring Boot, React, and Nashorn.
Then, we discussed the other possibilities to extend the front-end application and the benefits of using an isomorphic app.


