

Mocking is an essential part of unit testing, and the Mockito library makes it easy to write clean and intuitive unit tests for your Java code.
Get started with mocking and improve your application tests using our Mockito guide:
Handling concurrency in an application can be a tricky process with many potential pitfalls. A solid grasp of the fundamentals will go a long way to help minimize these issues.
Get started with understanding multi-threaded applications with our Java Concurrency guide:
Spring 5 added support for reactive programming with the Spring WebFlux module, which has been improved upon ever since. Get started with the Reactor project basics and reactive programming in Spring Boot:
Since its introduction in Java 8, the Stream API has become a staple of Java development. The basic operations like iterating, filtering, mapping sequences of elements are deceptively simple to use.
But these can also be overused and fall into some common pitfalls.
To get a better understanding on how Streams work and how to combine them with other language features, check out our guide to Java Streams:
Explore Spring Boot 3 and Spring 6 in-depth through building a full REST API with the framework:
Yes, Spring Security can be complex, from the more advanced functionality within the Core to the deep OAuth support in the framework.
I built the security material as two full courses - Core and OAuth, to get practical with these more complex scenarios. We explore when and how to use each feature and code through it on the backing project.
You can explore the course here:
Spring Data JPA is a great way to handle the complexity of JPA with the powerful simplicity of Spring Boot.
Get started with Spring Data JPA through the guided reference course:
Refactor Java code safely — and automatically — with OpenRewrite.
Refactoring big codebases by hand is slow, risky, and easy to put off. That’s where OpenRewrite comes in. The open-source framework for large-scale, automated code transformations helps teams modernize safely and consistently.
Each month, the creators and maintainers of OpenRewrite at Moderne run live, hands-on training sessions — one for newcomers and one for experienced users. You’ll see how recipes work, how to apply them across projects, and how to modernize code with confidence.
Join the next session, bring your questions, and learn how to automate the kind of work that usually eats your sprint time.
1. Overview
Java plays a pivotal role in modern software development, empowering many applications and systems. To harness the power of Java on our machine, we need to install the Java Development Kit (JDK). While Oracle JDK is a popular choice, OpenJDK offers an open-source alternative with similar functionality.
In this article, we’ll explore various approaches to installing OpenJDK on a Windows environment, catering to different preferences and requirements.
2. Manual Installation
This method involves downloading the OpenJDK distribution directly from the official website or trusted repositories such as AdoptOpenJDK.
Once downloaded, extract the archive’s contents to a preferred location on our machine. It’s essential to configure environment variables such as PATH and JAVA_HOME to point to the directory where OpenJDK is installed. Let’s proceed by accessing the control panel and navigating to System settings:

Selecting the Advanced system settings will prompt a dialog box to appear:
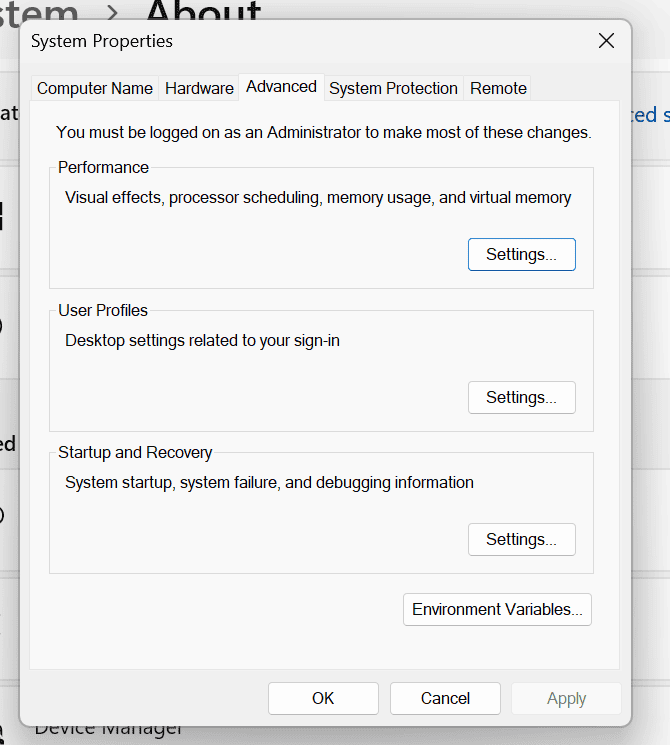
Let’s see the system and user variables now by clicking on Environment Variables. Here, we’ll modify the PATH variable and include the JAVA_HOME variable. The JAVA_HOME variable should indicate the installation directory of OpenJDK, while the PATH variable should direct to the bin directory of the JDK.
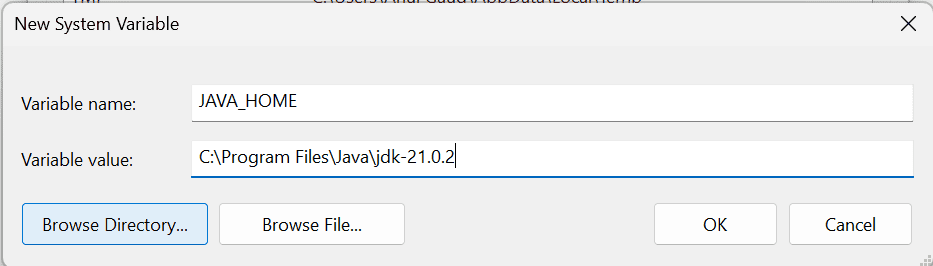
In our case, JAVA_HOME will be C:\Program Files\Java\jdk-21.0.2 and PATH will be C:\Program Files\Java\jdk-21.0.2\bin
Finally, we can confirm the installation’s success by running the following command in the command prompt:
> java -versionAfter running the command above, a similar output will be displayed in the command prompt:
3. Chocolatey Package Manager
Chocolatey is a popular package manager for Windows that simplifies the installation and management of software packages. It provides a command-line interface (CLI) that allows users to search for, install, and uninstall software packages with ease, similar to package managers like apt on Ubuntu or Homebrew on macOS.
We need to first install Chocolatey on our machine before proceeding. Let’s open an elevated command and run the following command:
> Set-ExecutionPolicy Bypass -Scope Process -Force; [System.Net.ServicePointManager]::SecurityProtocol = [System.Net.ServicePointManager]::SecurityProtocol -bor 3072; iex ((New-Object System.Net.WebClient).DownloadString('https://community.chocolatey.org/install.ps1'))Once Chocolatey is installed, we can move forward with installing OpenJDK using it. Running the below command will install Java:
> choco install openjdk4. Scoop Package Manager
Similar to Chocolatey, Scoop is another package manager designed specifically for Windows. Scoop is geared towards individual users rather than system-wide installations. It installs packages in the user’s home directory, which doesn’t require administrative privileges.
To get started with Scoop, we must first install it:
> Set-ExecutionPolicy -ExecutionPolicy RemoteSigned -Scope CurrentUser
> Invoke-RestMethod -Uri https://get.scoop.sh | Invoke-Expression
Now, to install OpenJDK using Scoop, we need to open PowerShell as an administrator and execute the following commands:
> scoop bucket add java
> scoop install openjdk
5. Using Third-Party Installers
Some third-party tools and utilities offer simplified installation procedures for OpenJDK on Windows. For instance, tools like SDKMAN! and WinGet provide an easy-to-use interface for managing software installations, including OpenJDK.
We can explore these options if we prefer a more streamlined installation process with additional features and customization options.
6. Conclusion
In this article, we explored different ways to install OpenJDK on our Windows machine. We can either opt for manual installation, package managers like Chocolatey or Scoop, or third-party installers, each method offers its advantages in simplicity, customization, and automation.
We can choose the approach that best fits our preferences and workflow.


