Custom Event Handlers and Listeners in Netty
Last updated: March 5, 2024


Mocking is an essential part of unit testing, and the Mockito library makes it easy to write clean and intuitive unit tests for your Java code.
Get started with mocking and improve your application tests using our Mockito guide:
Handling concurrency in an application can be a tricky process with many potential pitfalls. A solid grasp of the fundamentals will go a long way to help minimize these issues.
Get started with understanding multi-threaded applications with our Java Concurrency guide:
Spring 5 added support for reactive programming with the Spring WebFlux module, which has been improved upon ever since. Get started with the Reactor project basics and reactive programming in Spring Boot:
Since its introduction in Java 8, the Stream API has become a staple of Java development. The basic operations like iterating, filtering, mapping sequences of elements are deceptively simple to use.
But these can also be overused and fall into some common pitfalls.
To get a better understanding on how Streams work and how to combine them with other language features, check out our guide to Java Streams:
Explore Spring Boot 3 and Spring 6 in-depth through building a full REST API with the framework:
Yes, Spring Security can be complex, from the more advanced functionality within the Core to the deep OAuth support in the framework.
I built the security material as two full courses - Core and OAuth, to get practical with these more complex scenarios. We explore when and how to use each feature and code through it on the backing project.
You can explore the course here:
Spring Data JPA is a great way to handle the complexity of JPA with the powerful simplicity of Spring Boot.
Get started with Spring Data JPA through the guided reference course:
Refactor Java code safely — and automatically — with OpenRewrite.
Refactoring big codebases by hand is slow, risky, and easy to put off. That’s where OpenRewrite comes in. The open-source framework for large-scale, automated code transformations helps teams modernize safely and consistently.
Each month, the creators and maintainers of OpenRewrite at Moderne run live, hands-on training sessions — one for newcomers and one for experienced users. You’ll see how recipes work, how to apply them across projects, and how to modernize code with confidence.
Join the next session, bring your questions, and learn how to automate the kind of work that usually eats your sprint time.
Yes, we're now running our only Summer Sale. All Courses are 30% off until 20th July, 2026:
Yes, we're now running our only Summer Sale. All Courses are 30% off until 20th July, 2026:
1. Introduction
In this tutorial, we’ll use Netty to create a chat room app. In network programming, Netty stands out as a robust framework that simplifies the complexities of asynchronous I/O operations. We’ll explore how to build a basic chat server where multiple clients can connect and engage in real-time conversations.
2. Scenario
Messages sent to the server will be relayed to all connected clients. It’ll also keep a list of the last few messages sent so new clients can have context from the current conversation when they connect. To do this, we’ll only need a couple of event handlers to maintain communication between channels:
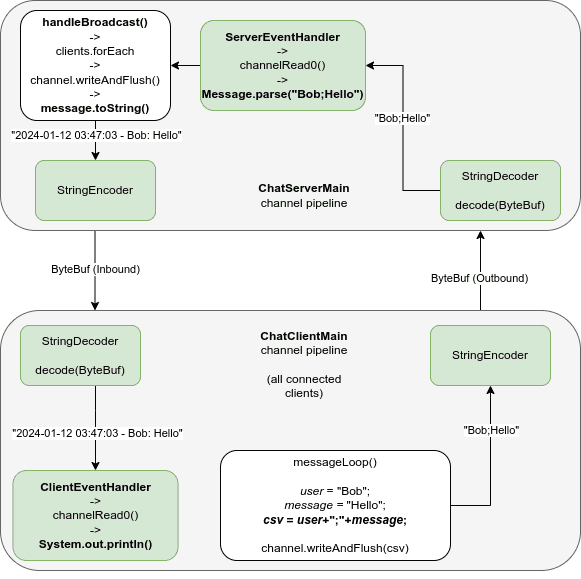
In Netty, communication is done through channels, which abstract asynchronous I/O operations over any protocol. That allows us to focus on application logic instead of networking code. Our application will work via the command line. We’ll write a server and a client app.
3. Creating a Custom Event Handler
For communication between channels, we’ll implement a SimpleChannelInboundHandler<String>, a generic implementation of ChannelInboundHandlerAdapter. This adapter allows us to focus on implementing only the events we care about. In this case, it’s channelRead0(), which is called when a message is received from the server. We’ll use this to simplify our use case since we’ll only exchange String messages.
3.1. Client Event Handler
Let’s start with the handler for client messages, which will print anything received by the server to the console, without modifications:
public class ClientEventHandler extends SimpleChannelInboundHandler<String> {

    @Override
    protected void channelRead0(ChannelHandlerContext ctx, String msg) {
        System.out.println(msg);
    }
}
Later, we’ll handle message sending by writing directly to the channel.
3.2. Message Object
Before we move on to server events, let’s write a POJO to represent every message sent to the server. We’ll register the date sent along with a user name and message:
public class Message {

    private final Instant time;
    private final String user;
    private final String message;

    public Message(String user, String message) {
        this.time = Instant.now();
        this.user = user;
        this.message = message;
    }

    // standard getters...
}
Then, we’ll include a few helpers, starting with how the messages will appear on the console when sent by the server:
@Override
public String toString() {
    return time + " - " + user + ": " + message;
}
Then, for parsing messages received by clients, we’ll use a CSV format. We’ll see how the client sends messages in this format when we create our client app:
public static Message parse(String string) {
    String[] arr = string.split(";", 2);
    return new Message(arr[0], arr[1]);
}
Limiting the split to 2 is important because the message part might contain a semicolon.
3.3. Server Event Handler
In our server event handler, we’ll first create a helper method for the other events we’ll override. Also, we’ll need a map of clients connected and a Queue to keep at most MAX_HISTORY elements:
public class ServerEventHandler extends SimpleChannelInboundHandler<String> {

    static final Map<String, Channel> clients = new HashMap<>();
    static final Queue<String> history = new LinkedList<>();
    static final int MAX_HISTORY = 5;

    private void handleBroadcast(Message message, ChannelHandlerContext context) {
        String channelId = context.channel()
          .id()
          .asShortText();

        clients.forEach((id, channel) -> {
            if (!id.equals(channelId))
                channel.writeAndFlush(message.toString());
        });

        // history-control code...
    }

    // ...
}
First, we get the channel ID as a key for our map. Then, for the broadcast, for every client connected, excluding the sender, we relay their message.
It’s important to note that writeAndFlush() receives an Object. And, since our handlers can only handle strings, it’s essential to call toString() so the client can correctly receive it.
In the end, we do history control. Every time we add a new message, we remove the oldest one if our list exceeds MAX_HISTORY items:
history.add(message.toString());
if (history.size() > MAX_HISTORY)
    history.poll();
Now, we can override channelRead0() and parse messages received from clients:
@Override
public void channelRead0(ChannelHandlerContext context, String msg) {
    handleBroadcast(Message.parse(msg), context);
}
Then, for every client that comes online, we add it to our clients list, relay old messages for context, and send a system message announcing the new client:
@Override
public void channelActive(final ChannelHandlerContext context) {
    Channel channel = context.channel();
    clients.put(channel.id().asShortText(), channel);

    history.forEach(channel::writeAndFlush);

    handleBroadcast(new Message("system", "client online"), context);
}
Finally, we override channelInactive(), called in the event of a client that went offline. This time, we only need to remove the client from the list and send a system message:
@Override
public void channelInactive(ChannelHandlerContext context) {
    Channel channel = context.channel();
    clients.remove(channel.id().asShortText());

    handleBroadcast(new Message("system", "client offline"), context);
}
4. Server Bootstrap App
Our handler does nothing independently, so we need an application to bootstrap and run it, which is a common template.
4.1. Registering Custom Components in the ChannelPipeline
To prepare the bootstrap, we select a channel implementation and implement a child handler, which serves the requests for the channel:
bootstrap.group(serverGroup, clientGroup)
  .channel(NioServerSocketChannel.class)
  .childHandler(new ChannelInitializer<SocketChannel>() {
      @Override
      public void initChannel(SocketChannel channel) {
          channel.pipeline()
            .addFirst(
              new StringDecoder(),
              new ServerEventHandler()
              new StringEncoder());
      }
  });
In the child handler, we define our processing pipeline. Since we’re only concerned about String messages, we’ll use the built-in String encoder and decoder, saving us some time by not having to encode/decode the exchanged byte buffers ourselves.
Lastly, since the order matters, we add the decoder, our ServerEventHandler, and the encoder. That’s because events flow through the pipeline from inbound to outbound.
We’ll bind our server to a host/port to finish our app, which returns a ChannelFuture. We’ll use this to wait until our async socket is closed with sync():
ChannelFuture future = bootstrap.bind(HOST, PORT).sync();
System.out.println("server started. accepting clients.");
future.channel().closeFuture().sync();
5. Client Bootstrap App
Finally, our client app follows a common client template for bootstrapping. Most importantly, when calling handler(), we’ll use our ClientEventHandler instead:
channel.pipeline().addFirst(
  new StringDecoder(),
  new ClientEventHandler(),
  new StringEncoder());
5.1. Handling Message Input
Finally, to handle user input, after connecting to the server, we’ll loop with a Scanner until we receive a user name, and then, until the message equals “exit.” Most importantly, we must use writeAndFlush() to send our message. We send the message in the format expected by Message.parse():
private static void messageLoop(Scanner scanner, Channel channel) {
    while (user.isEmpty()) {
        System.out.print("your name: ");
        user = scanner.nextLine();
    }

    while (scanner.hasNext()) {
        System.out.print("> ");
        String message = scanner.nextLine();
        if (message.equals("exit"))
            break;

        channel.writeAndFlush(user + ";" + message);
    }
}
6. Creating a Custom Event Listener
In Netty, event listeners play a crucial role in handling asynchronous events throughout the lifecycle of channels. An event listener is essentially a callback mechanism that we can use to react to the completion of any operation that returns a ChannelFuture.
We implement the ChannelFutureListener interface for custom behavior upon its completion. A ChannelFuture represents the result of an asynchronous operation, such as a connection attempt or an I/O operation.
ChannelFutureListener is useful because it defines default implementations like CLOSE_ON_FAILURE or FIRE_EXCEPTION_ON_FAILURE. But, since we won’t use these, let’s implement a GenericFutureListener that we’ll use for operation confirmations.
We’ll hold a custom event name for context, and we’ll check if our future is completed successfully. Otherwise, we’ll mark the status as “FAILED” before logging:
public class ChannelInfoListener implements GenericFutureListener<ChannelFuture> {

    private final String event;

    public ChannelInfoListener(String event) {
        this.event = event;
    }

    @Override
    public void operationComplete(ChannelFuture future) throws Exception {
        Channel channel = future.channel();
        String status = "OK";

        if (!future.isSuccess()) {
            status = "FAILED";
            future.cause().printStackTrace();
        }

        System.out.printf(
          "%s - channel#%s %s: %s%n", Instant.now(), channel.id().asShortText(), status, event);
    }
}
6.1. Event Receipts
Let’s return to some parts of our code to include listeners. First, for the client, let’s include a “connected to server” confirmation:
future.addListener(new ChannelInfoListener("connected to server"));Then, let’s include a “message sent” confirmation in the message loop:
ChannelFuture sent = channel.writeAndFlush(user + ";" + message);
sent.addListener(new ChannelInfoListener("message sent"));
This allows us to ensure we’re still connected to the server when sending messages. Finally, for the server handler, let’s send a “message relayed” confirmation during the broadcast:
clients.forEach((id, channel) -> {
    if (!id.equals(channelId)) {
        ChannelFuture relay = channel.writeAndFlush(message.toString());
        relay.addListener(new ChannelInfoListener("message relayed to " + id));
    }
});
7. Seeing It in Action
Netty allows us to test pipelines with EmbeddedChannel, but for client/server interactions, let’s see what it looks like when running from the terminal. Let’s start the server (we’ll omit package names for readability):
$ mvn exec:java -Dexec.mainClass=ChatServerMain
chat server started. ready to accept clients.
Then, let’s start the first client, input a name, and send two messages:
$ mvn exec:java -Dexec.mainClass=ChatClientMain
2024-01-12 3:47:02 - channel#03c40ad4 OK: connected to server
your name: Bob
> Hello
2024-01-12 3:47:02 - channel#03c40ad4 OK: message sent
> Anyone there?!
2024-01-12 3:47:03 - channel#03c40ad4 OK: message sent
When we connect with a second client, we’ll get the message history before inputting a name:
$ mvn exec:java -Dexec.mainClass=ChatClientMain
2024-01-12 3:49:33 - channel#daa64476 OK: connected to server
2024-01-12 3:46:55 - system: client online: 03c40ad4
2024-01-12 3:47:03 - Bob: Hello
2024-01-12 3:48:40 - Bob: Anyone there?!
Naturally, after choosing a name and sending a message:
your name: Alice
> Hi, Bob!
2024-01-12 3:51:05 - channel#daa64476 OK: message sent
The first client will receive it:
2024-01-12 3:49:33 - system: client online: daa64476
2024-01-12 3:51:05 - Alice: Hi, Bob!
8. Conclusion
In this article, we successfully built a functional chat server using Netty, demonstrating the power and simplicity of this framework in handling asynchronous communication. Through implementing event handlers, we managed to relay messages among connected clients and maintain context history.


