

Mocking is an essential part of unit testing, and the Mockito library makes it easy to write clean and intuitive unit tests for your Java code.
Get started with mocking and improve your application tests using our Mockito guide:
Handling concurrency in an application can be a tricky process with many potential pitfalls. A solid grasp of the fundamentals will go a long way to help minimize these issues.
Get started with understanding multi-threaded applications with our Java Concurrency guide:
Spring 5 added support for reactive programming with the Spring WebFlux module, which has been improved upon ever since. Get started with the Reactor project basics and reactive programming in Spring Boot:
Since its introduction in Java 8, the Stream API has become a staple of Java development. The basic operations like iterating, filtering, mapping sequences of elements are deceptively simple to use.
But these can also be overused and fall into some common pitfalls.
To get a better understanding on how Streams work and how to combine them with other language features, check out our guide to Java Streams:
Explore Spring Boot 3 and Spring 6 in-depth through building a full REST API with the framework:
Yes, Spring Security can be complex, from the more advanced functionality within the Core to the deep OAuth support in the framework.
I built the security material as two full courses - Core and OAuth, to get practical with these more complex scenarios. We explore when and how to use each feature and code through it on the backing project.
You can explore the course here:
Spring Data JPA is a great way to handle the complexity of JPA with the powerful simplicity of Spring Boot.
Get started with Spring Data JPA through the guided reference course:
Refactor Java code safely — and automatically — with OpenRewrite.
Refactoring big codebases by hand is slow, risky, and easy to put off. That’s where OpenRewrite comes in. The open-source framework for large-scale, automated code transformations helps teams modernize safely and consistently.
Each month, the creators and maintainers of OpenRewrite at Moderne run live, hands-on training sessions — one for newcomers and one for experienced users. You’ll see how recipes work, how to apply them across projects, and how to modernize code with confidence.
Join the next session, bring your questions, and learn how to automate the kind of work that usually eats your sprint time.
Yes, we're now running our only Summer Sale. All Courses are 30% off until 20th July, 2026:
Yes, we're now running our only Summer Sale. All Courses are 30% off until 20th July, 2026:
1. Overview
Mule ESB is a lightweight Java-based Enterprise Service Bus. It allows developers to connect multiple applications together by exchanging data in different formats. It carries data in the form of a message.
ESBs offer powerful capabilities by providing a number of services, such as:
- Service creation and hosting
- Service mediation
- Message routing
- Data transformation
We’ll find ESBs useful if we need to integrate multiple applications together, or if we have the notion of adding more applications in the future.
ESB is also used for dealing with more than one type of communication protocol and when message routing capabilities are required.
Let’s create a sample project in Section 5 using AnyPoint Studio which is available for download here.
2. Mule Message Structure
Simply put, the primary purpose of an ESB is to mediate between services and route messages to various endpoints. So it needs to deal with different types of content or payload.
The message structure is divided into two parts:
- The header, which contains message metadata
- The payload, which contains business-specific data
The message is embedded within a message object. We can retrieve the message object from the context. We can change its properties and payload using custom Java components and transformers inside a Mule flow.
Each application consists of one or more flows.
In a flow, we can use components to access, filter or alter a message and its different properties.
For example, we can obtain an instance of a message using Java component. This component class implements a Callable interface from org.mule.api.lifecycle package:
public Object onCall(MuleEventContext eventContext) throws Exception {
    MuleMessage message = eventContext.getMessage();
    message.setPayload("Message payload is changed here.");
    return message;
}
3. Properties and Variables
Message metadata consists of properties. Variables represent data about a message. How properties and variables are applied across the message’s life-cycle is defined by their scopes. Properties can be of two types, based on their scope: inbound and outbound.
Inbound properties contain metadata that prevents messages to become scrambled while traversing across flows. Inbound properties are immutable and cannot be altered by the user. They’re present only for the duration of the flow – once the message exits the flow, inbound properties are no longer there.
Outbound properties can be set automatically by Mule, or a user can set them through flow configuration. These properties are mutable. They become inbound properties when a message enters another flow after crossing transport-barriers.
We can set and get outbound and inbound properties respectively by calling associated setter and getter methods in their respective scopes:
message.setProperty(
  "outboundKey", "outboundpropertyvalue", PropertyScope.OUTBOUND);
String inboundProp = (String) message.getInboundProperty("outboundKey");
There are two types of variables available to declare in applications.
One is flow variable which is local to a Mule flow and available across the flow, sub-flows and private flows.
Session variables once declared become available across the entire application.
4. Transport Barriers and flow-ref
Transport barriers are HTTP-connectors, VMs, JMS or similar connectors that require paths or endpoints for messages to be routed. Flow variables aren’t available across transport barriers, but session variables are available across the project in all flows.
When we need to create sub-flow or private flow, we can refer to the flow from a parent or another flow using flow-ref component. Both flow variables and session variables are available in sub-flows and private flows referred to using flow-ref.
5. Example Project
Let’s create an application in Anypoint Studio that contains multiple flows, which communicate between themselves through inbound and outbound connectors.
Let’s look at the first flow:
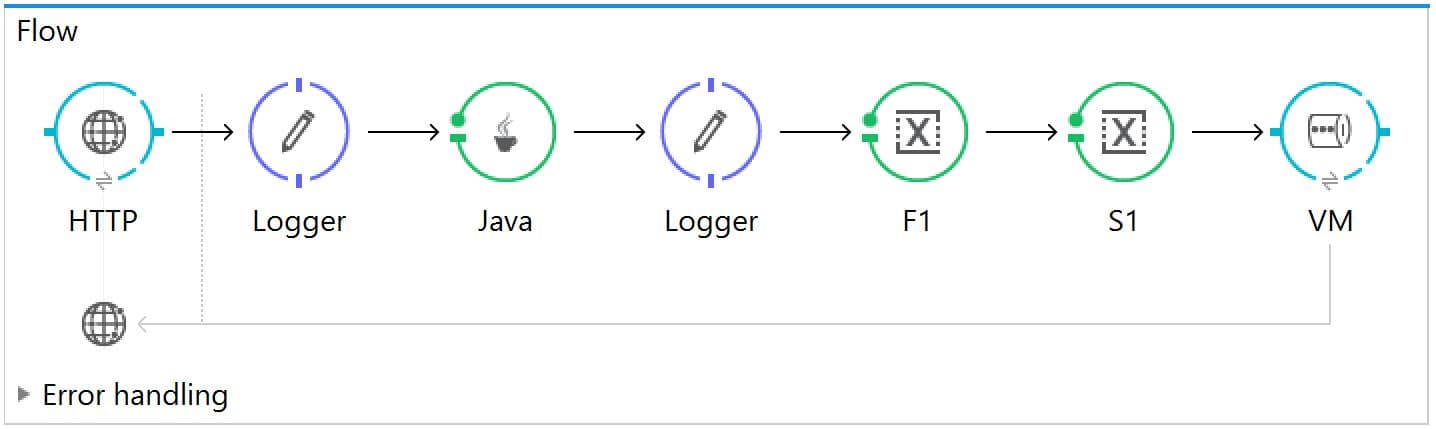
We can configure an HTTP listener as:
<http:listener-config name="HTTP_Listener_Configuration"
  host="localhost" port="8081" doc:name="HTTP Listener Configuration"/>
Flow components must be inside a <flow> tag. So, an example flow with multiple components is:
<flow name="Flow">
    <http:listener
      config-ref="HTTP_Listener_Configuration"
      path="/" doc:name="HTTP"
      allowedMethods="POST"/>
    <logger message="Original
      paylaod: #[payload]"
      level="INFO" doc:name="Logger"/>
    <custom-transformer
      class="com.baeldung.transformer.InitializationTransformer"
      doc:name="Java"/>
    <logger message="Payload After Initialization: #[payload]"
      level="INFO" doc:name="Logger"/>
    <set-variable variableName="f1"
      value="#['Flow Variable 1']" doc:name="F1"/>
    <set-session-variable variableName="s1"
      value="#['Session variable 1']" doc:name="S1"/>
    <vm:outbound-endpoint exchange-pattern="request-response"
      path="test" doc:name="VM"/>
</flow>
Inside the flow, we’re providing a reference to a configured HTTP listener. Then we’re keeping a logger to log the payload that HTTP listener is receiving through POST method.
After that, a custom Java transformer class is placed, that transforms the payload after receiving the message:
public Object transformMessage(
  MuleMessage message,
  String outputEncoding) throws TransformerException {

    message.setPayload("Payload is transferred here.");
    message.setProperty(
      "outboundKey", "outboundpropertyvalue", PropertyScope.OUTBOUND);
    return message;
}
The transformer class must extend AbstractMessageTransformer. We’re also setting an outbound property inside the class.
Now, we have already converted payload inside the message object, and have logged that in the console using logger. We’re setting a flow variable and a session variable.
Finally, we are sending our payload through outbound VM connector. The path in VM connector determines the receiving endpoint:
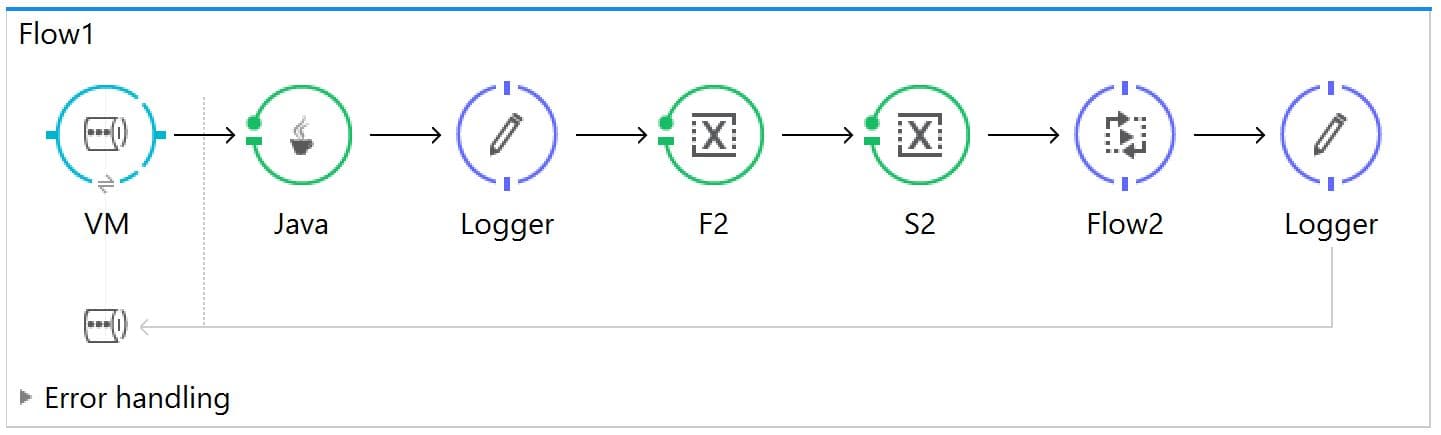
The message carried and transformed by the initial flow reaches Flow1 through an inbound VM endpoint.
The Java component retrieves outbound properties set by the first flow and returns the object which becomes the message payload.
The transformMessage() method for this task:
public Object transformMessage(
  MuleMessage message,
  String outputEncoding) throws TransformerException {

    return (String) message.getInboundProperty("outboundKey");
}
Then, flow and session variables are set to the second flow. After that, we’ve got a reference to Flow2 using flow-ref component.
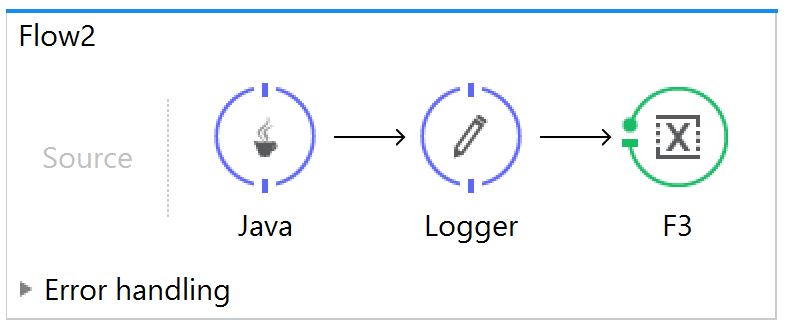
In Flow2, we’ve transformed the message using Java component class and logged it in the console. We’ve also set a flow variable F3.
After calling Flow2 using flow-ref, Flow1 will wait for the message to be processed in Flow2.
Any flow variable set in Flow1 and Flow2 will be available in both flows since these flows aren’t separated by any transport barriers.
Finally, the message is sent back to the HTTP requester through VMs. We configured all VMs as request-response.
We can invoke this application from any REST client by posting any JSON data in the body. The URL will be localhost:8081 as configured in HTTP listener.
6. Maven Archetype
We can build a Mule ESB project using Mulesoft’s Maven archetype.
In Maven’s settings.xml file, we first need to add the org.mule.tools plugin group:
<pluginGroups>
    <pluginGroup>org.mule.tools</pluginGroup>
</pluginGroups>
Then, we need to add a profile tag that says where Maven should look for Mulesoft artifacts:
<profile>
    <id>Mule Org</id>
    <activation>
        <activeByDefault>true</activeByDefault>
    </activation>
    <repositories>
        <repository>
            <id>mulesoft-releases</id>
            <name>MuleSoft Repository</name>
            <url>https://repository.mulesoft.org/releases/</url>
            <layout>default</layout>
        </repository>
    </repositories>
</profile>
Finally, we can create the project using mule-project-archetype:create:
mvn mule-project-archetype:create -DartifactId=muleesb -DmuleVersion=3.9.0After configuring our project, we can create a deployable archive using mvn package.
After that, we’d deploy the archive into the apps folder of any standalone Mule server.
7. A Standalone Mule Server via MuleSoft’s Maven Repository
As just noted, the project we just created requires a standalone Mule server.
If we don’t already have one, we can edit our pom.xml to pull one from MuleSoft’s Maven repository:
<plugin>
    <groupId>org.mule.tools.maven</groupId>
    <artifactId>mule-maven-plugin</artifactId>
    <version>2.2.1</version>
    <configuration>
        <deploymentType>standalone</deploymentType>
        <muleVersion>3.9.0</muleVersion>
    </configuration>
    <executions>
        <execution>
            <id>deploy</id>
            <phase>deploy</phase>
            <goals>
                <goal>deploy</goal>
            </goals>
        </execution>
    </executions>
</plugin>
8. Conclusion
In this article, we’ve gone through different necessary concepts of building as ESB application in Mule. We’ve created a sample project illustrating all the described concepts.
We can now start creating ESB application using Anypoint Studio to meet our various needs.


