

Mocking is an essential part of unit testing, and the Mockito library makes it easy to write clean and intuitive unit tests for your Java code.
Get started with mocking and improve your application tests using our Mockito guide:
Handling concurrency in an application can be a tricky process with many potential pitfalls. A solid grasp of the fundamentals will go a long way to help minimize these issues.
Get started with understanding multi-threaded applications with our Java Concurrency guide:
Spring 5 added support for reactive programming with the Spring WebFlux module, which has been improved upon ever since. Get started with the Reactor project basics and reactive programming in Spring Boot:
Since its introduction in Java 8, the Stream API has become a staple of Java development. The basic operations like iterating, filtering, mapping sequences of elements are deceptively simple to use.
But these can also be overused and fall into some common pitfalls.
To get a better understanding on how Streams work and how to combine them with other language features, check out our guide to Java Streams:
Explore Spring Boot 3 and Spring 6 in-depth through building a full REST API with the framework:
Yes, Spring Security can be complex, from the more advanced functionality within the Core to the deep OAuth support in the framework.
I built the security material as two full courses - Core and OAuth, to get practical with these more complex scenarios. We explore when and how to use each feature and code through it on the backing project.
You can explore the course here:
Spring Data JPA is a great way to handle the complexity of JPA with the powerful simplicity of Spring Boot.
Get started with Spring Data JPA through the guided reference course:
Refactor Java code safely — and automatically — with OpenRewrite.
Refactoring big codebases by hand is slow, risky, and easy to put off. That’s where OpenRewrite comes in. The open-source framework for large-scale, automated code transformations helps teams modernize safely and consistently.
Each month, the creators and maintainers of OpenRewrite at Moderne run live, hands-on training sessions — one for newcomers and one for experienced users. You’ll see how recipes work, how to apply them across projects, and how to modernize code with confidence.
Join the next session, bring your questions, and learn how to automate the kind of work that usually eats your sprint time.
Get up to speed with the core of Maven quickly, and then go beyond the foundations into the more powerful functionality of the build tool, such as profiles, scopes, multi-module projects and quite a bit more:
1. Introduction
Maven offers a great variety of plugins to help us with the build of our project. However, we may find cases where these plugins are not enough and we have to develop our own.
Luckily, Maven provides some useful tools to help us in this process.
In this tutorial, we’ll be quite practical and will show step-by-step how to create a Maven plugin from scratch.
We’ll also show how to use it in our projects and how to create documentation for it.
2. Creating a Plugin
During this tutorial, we’ll develop a plugin called counter-maven-plugin that will count the number of dependencies that a project contains. It’s very important to follow the plugin naming convention that Maven recommends when we choose the name for our plugin.
Now that we know what we’re going to develop, the next thing we need to do is to create a Maven project. In the pom.xml we’ll define the groupId, artifactId and version of our plugin:
<project xmlns="http://maven.apache.org/POM/4.0.0"
    xmlns:xsi="http://www.w3.org/2001/XMLSchema-instance"
    xsi:schemaLocation="http://maven.apache.org/POM/4.0.0 http://maven.apache.org/maven-v4_0_0.xsd">

    <modelVersion>4.0.0</modelVersion>
    <groupId>com.baeldung</groupId>
    <artifactId>counter-maven-plugin</artifactId>
    <packaging>maven-plugin</packaging>
    <version>0.0.1-SNAPSHOT</version>

    <name>counter-maven-plugin Maven Mojo</name>
    <url>http://maven.apache.org</url>

    <properties>
        <maven.compiler.target>17</maven.compiler.target>
        <maven.compiler.source>17</maven.compiler.source>
    </properties>
</project>
Notice that we set the packaging to maven-plugin.
In this case, we’ve created the project manually but we could also do it by using the maven-archetype-mojo:
mvn archetype:generate
  -DgroupId=com.baeldung
  -DartifactId=counter-maven-plugin
  -Dversion=0.0.1-SNAPSHOT
  -DarchetypeGroupId=org.apache.maven.archetypes
  -DarchetypeArtifactId=maven-archetype-mojo
When doing this, we should update the default versions of the dependencies to use the latest ones.
3. Creating a Mojo
Now it’s time to create our first mojo. Mojo is a Java class that represents a goal that our plugin will execute. A plugin contains one or more mojos.
Our mojo will be responsible for counting the number of dependencies of a project.
3.1. Adding Dependencies
Before creating the mojo, we need to add some dependencies to our pom.xml:
<dependencies>
    <dependency>
        <groupId>org.apache.maven</groupId>
        <artifactId>maven-plugin-api</artifactId>
        <version>3.6.3</version>
    </dependency>
    <dependency>
        <groupId>org.apache.maven.plugin-tools</groupId>
        <artifactId>maven-plugin-annotations</artifactId>
        <version>3.6.0</version>
        <scope>provided</scope>
    </dependency>
    <dependency>
        <groupId>org.apache.maven</groupId>
        <artifactId>maven-project</artifactId>
        <version>2.2.1</version>
    </dependency>
</dependencies>
The maven-plugin-api dependency is required and contains the necessary classes and interfaces to create our mojo. The maven-plugin-annotations dependency comes in handy to use annotations in our classes. The maven-project dependency lets us access the information about the project where we’re including the plugin.
3.2. Creating the Mojo Class
Now we’re ready to create our mojo!
A mojo has to implement the Mojo interface. In our case, we’ll extend from AbstractMojo so we’ll only have to implement the execute method:
@Mojo(name = "dependency-counter", defaultPhase = LifecyclePhase.COMPILE)
public class DependencyCounterMojo extends AbstractMojo {
    // ...
}
As we can see, dependency-counter is the name of the goal. On the other hand, we’ve attached it to the compile phase by default so we won’t necessarily have to specify a phase when using this goal.
To have access to the project information, we have to add a MavenProject as a parameter:
@Parameter(defaultValue = "${project}", required = true, readonly = true)
MavenProject project;
This object will be injected by Maven when the context is created.
At this point, we’re able to implement the execute method and count the number of dependencies of the project:
public void execute() throws MojoExecutionException, MojoFailureException {
    List<Dependency> dependencies = project.getDependencies();
    long numDependencies = dependencies.stream().count();
    getLog().info("Number of dependencies: " + numDependencies);
}
The getLog() method provides access to the Maven log. The AbstractMojo already handles its lifecycle.
3.3. Adding Parameters
The parameter we’ve added before is read-only and can’t be configured by the user. Also, it’s injected by Maven so we could say it’s kind of special.
In this section, we’re going to add a parameter where users can specify the scope of the dependencies that we want to count.
Hence, let’s create a scope parameter in our mojo:
@Parameter(property = "scope")
String scope;
We’ve only set the property attribute. It allows us to set this property via the command line or a pom property. For the rest of the attributes, we’re fine with the default values.
Now we’ll modify our execute method to use this parameter and filter the dependencies when counting:
public void execute() throws MojoExecutionException, MojoFailureException {
    List<Dependency> dependencies = project.getDependencies();
    long numDependencies = dependencies.stream()
      .filter(d -> (scope == null || scope.isEmpty()) || scope.equals(d.getScope()))
      .count();
    getLog().info("Number of dependencies: " + numDependencies);
}
More advanced types of parameters are explained in the official documentation.
4. Testing the Plugin
We’re done with the development of the plugin. Let’s test it to see if it works!
First of all, we have to install the plugin in our local repository:
mvn clean installIn the next sections, we’ll first see how to run our plugin from the command line. Then, we’ll also cover how to use it in a Maven project.
4.1. Executing Our Plugin
We can run the goal of a plugin in the command line by specifying its fully qualified name:
mvn groupId:artifactId:version:goalIn our case, it looks like this:
mvn com.baeldung:counter-maven-plugin:0.0.1-SNAPSHOT:dependency-counterHowever, if we’ve followed the plugin naming convention that we mentioned at the beginning of this tutorial, Maven will resolve the prefix of our plugin and we can shorten the command:
mvn counter:dependency-counterNotice that this command is using the latest version of the plugin. Also, keep in mind that we have to add our groupId to the pluginGroups of our settings.xml so Maven also searches in this group:
<pluginGroups>
    <pluginGroup>com.baeldung</pluginGroup>
</pluginGroups>
If we check the output of the command, we can see that the plugin counted the number of dependencies in the pom.xml of our plugin:
[INFO] Scanning for projects...
[INFO]
[INFO] -----------------< com.baeldung:counter-maven-plugin >------------------
[INFO] Building counter-maven-plugin Maven Mojo 0.0.1-SNAPSHOT
[INFO] ----------------------------[ maven-plugin ]----------------------------
[INFO]
[INFO] --- counter-maven-plugin:0.0.1-SNAPSHOT:dependency-counter (default-cli) @ counter-maven-plugin ---
[INFO] Number of dependencies: 3
[INFO] ------------------------------------------------------------------------
[INFO] BUILD SUCCESS
[INFO] ------------------------------------------------------------------------
[INFO] Total time: 0.529 s
[INFO] Finished at: 2019-11-30T20:43:41+01:00
[INFO] ------------------------------------------------------------------------
We can also set the scope parameter via command line properties:
mvn counter:dependency-counter -Dscope=testNotice that the scope name is the one that we defined in the property attribute of our parameter in the mojo.
4.2. Using Our Plugin in a Project
Let’s test now our plugin by using it in a project!
We’re going to create a very simple Maven project with some dependencies that our plugin will count:
<project xmlns="http://maven.apache.org/POM/4.0.0"
    xmlns:xsi="http://www.w3.org/2001/XMLSchema-instance"
    xsi:schemaLocation="http://maven.apache.org/POM/4.0.0 http://maven.apache.org/xsd/maven-4.0.0.xsd">

    <modelVersion>4.0.0</modelVersion>
    <groupId>com.baeldung</groupId>
    <artifactId>example</artifactId>
    <packaging>pom</packaging>
    <version>0.0.1-SNAPSHOT</version>

    <dependencies>
        <dependency>
            <groupId>org.apache.commons</groupId>
            <artifactId>commons-lang3</artifactId>
            <version>3.9</version>
        </dependency>
        <dependency>
            <groupId>org.junit.vintage</groupId>
            <artifactId>junit-vintage-engine</artifactId>
            <version>5.10.2</version>
            <scope>test</scope>
        </dependency>
    </dependencies>
</project>
The last thing is to add our plugin to the build. We have to explicitly set that we want to run the dependency-counter goal:
<build>
    <plugins>
        <plugin>
            <groupId>com.baeldung</groupId>
            <artifactId>counter-maven-plugin</artifactId>
            <version>0.0.1-SNAPSHOT</version>
            <executions>
                <execution>
                    <goals>
                        <goal>dependency-counter</goal>
                    </goals>
                </execution>
            </executions>
            <configuration>
                <scope>test</scope>
            </configuration>
        </plugin>
    </plugins>
</build>
Notice that we’ve specified the scope parameter in the configuration node. Also, we haven’t specified any phase because our mojo is attached to the compile phase by default.
Now, we just need to run the compile phase to execute our plugin:
mvn clean compileAnd our plugin will print the number of test dependencies:
[INFO] Scanning for projects...
[INFO]
[INFO] ------------------------< com.baeldung:example >------------------------
[INFO] Building example 0.0.1-SNAPSHOT
[INFO] --------------------------------[ pom ]---------------------------------
[INFO]
[INFO] --- maven-clean-plugin:2.5:clean (default-clean) @ example ---
[INFO]
[INFO] --- counter-maven-plugin:0.0.1-SNAPSHOT:dependency-counter (default) @ example ---
[INFO] Number of dependencies: 1
[INFO] ------------------------------------------------------------------------
[INFO] BUILD SUCCESS
[INFO] ------------------------------------------------------------------------
[INFO] Total time: 0.627 s
[INFO] Finished at: 2019-11-25T18:57:22+01:00
[INFO] ------------------------------------------------------------------------
In this tutorial, we’re not covering how to write unit or integration tests for our plugin but Maven provides some mechanisms to do it.
5. Adding Documentation
When we create a Maven plugin, it’s important to generate documentation to make it easy for other people to use it.
We’ll briefly cover how to generate this documentation with maven-plugin-plugin.
maven-plugin-plugin is already included in the project, but we’re gonna update it to use the latest version.
Also, we’ll do the same for maven-site-plugin:
<build>
    <pluginManagement>
        <plugins>
            <plugin>
                <groupId>org.apache.maven.plugins</groupId>
                <artifactId>maven-plugin-plugin</artifactId>
                <version>3.11.0</version>
            </plugin>
            <plugin>
                <groupId>org.apache.maven.plugins</groupId>
                <artifactId>maven-site-plugin</artifactId>
                <version>3.8.2</version>
            </plugin>
        </plugins>
    </pluginManagement>
</build>
Then, we have to make sure that we’ve added javadoc to our Mojo and also add some metadata in the pom.xml of the plugin:
<organization>
    <name>Baeldung</name>
    <url>https://www.baeldung.com/</url>
</organization>
After that, we need to add a reporting section in our pom.xml that includes the maven-plugin-report-plugin:
<reporting>
    <plugins>
        <plugin>
            <groupId>org.apache.maven.plugins</groupId>
            <artifactId>maven-plugin-report-plugin</artifactId>
            <version>3.15.1</version>
        </plugin>
    </plugins>
</reporting>
Finally, we’ll generate the documentation with the maven site command:
mvn siteInside the target folder, we can find a site directory with all the HTML files generated. The plugin-info.html is the one containing the plugin documentation:
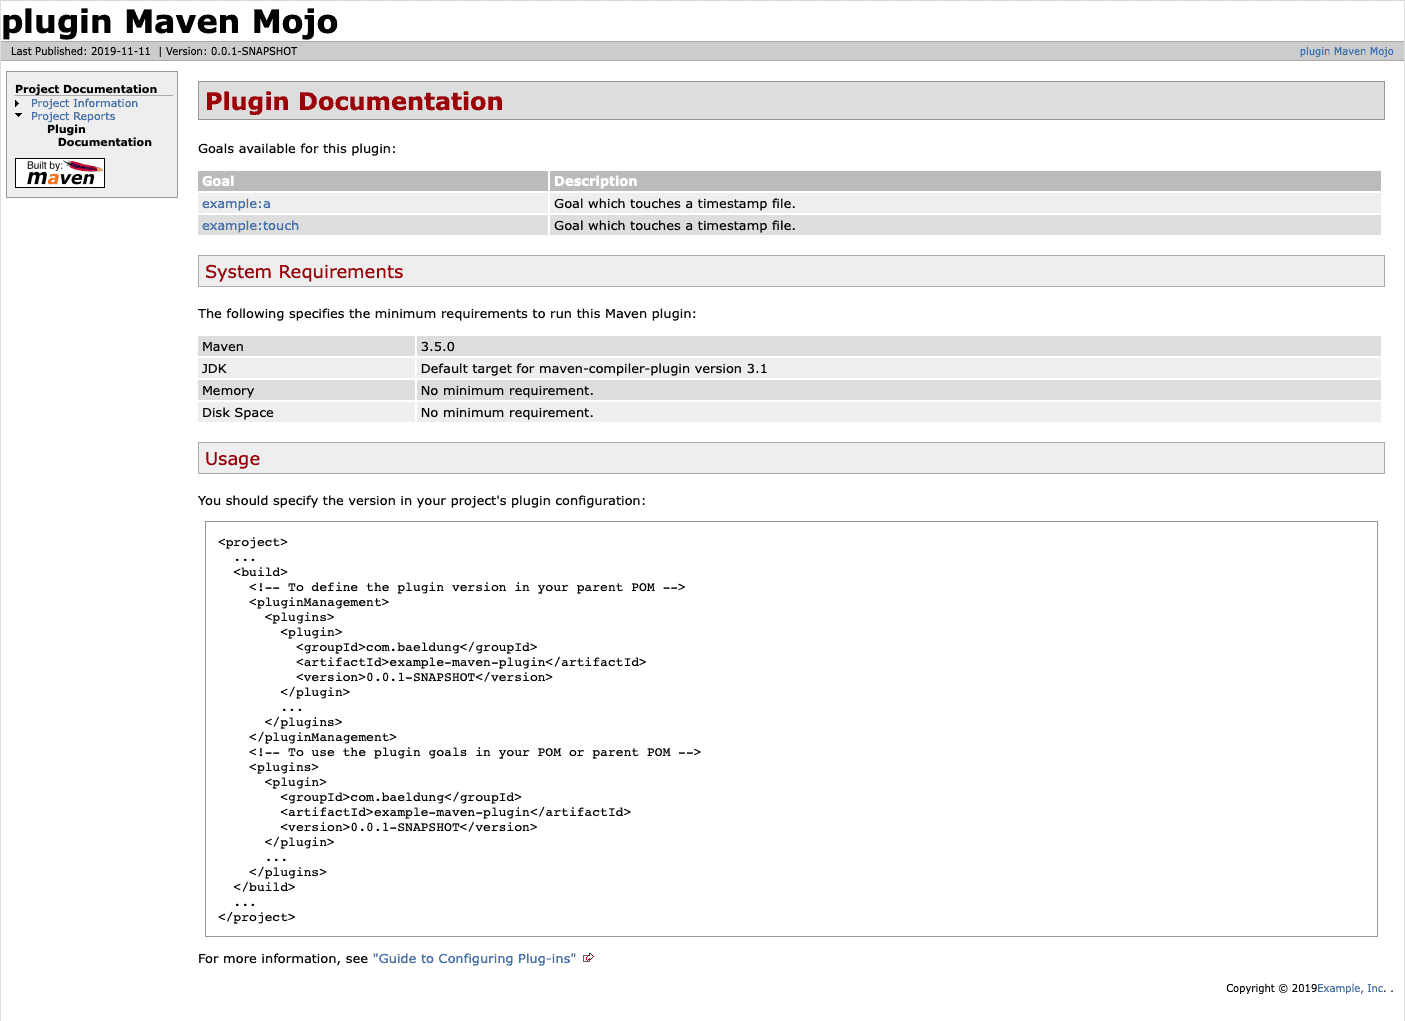
More options to add to our documentation can be found on the Maven plugin documentation guide.
6. Conclusion
In this tutorial, we’ve shown how to create a Maven plugin. We first implemented a simple plugin, which helped us see a typical Maven plugin project structure. Then, we covered some of the tools that Maven provides to help us develop plugins.
We’ve kept it simple to make things clearer, but at the same time, we’ve provided some useful links with the necessary information on how to create a more powerful plugin.


