

Mocking is an essential part of unit testing, and the Mockito library makes it easy to write clean and intuitive unit tests for your Java code.
Get started with mocking and improve your application tests using our Mockito guide:
Handling concurrency in an application can be a tricky process with many potential pitfalls. A solid grasp of the fundamentals will go a long way to help minimize these issues.
Get started with understanding multi-threaded applications with our Java Concurrency guide:
Spring 5 added support for reactive programming with the Spring WebFlux module, which has been improved upon ever since. Get started with the Reactor project basics and reactive programming in Spring Boot:
Since its introduction in Java 8, the Stream API has become a staple of Java development. The basic operations like iterating, filtering, mapping sequences of elements are deceptively simple to use.
But these can also be overused and fall into some common pitfalls.
To get a better understanding on how Streams work and how to combine them with other language features, check out our guide to Java Streams:
Explore Spring Boot 3 and Spring 6 in-depth through building a full REST API with the framework:
Yes, Spring Security can be complex, from the more advanced functionality within the Core to the deep OAuth support in the framework.
I built the security material as two full courses - Core and OAuth, to get practical with these more complex scenarios. We explore when and how to use each feature and code through it on the backing project.
You can explore the course here:
Spring Data JPA is a great way to handle the complexity of JPA with the powerful simplicity of Spring Boot.
Get started with Spring Data JPA through the guided reference course:
Refactor Java code safely — and automatically — with OpenRewrite.
Refactoring big codebases by hand is slow, risky, and easy to put off. That’s where OpenRewrite comes in. The open-source framework for large-scale, automated code transformations helps teams modernize safely and consistently.
Each month, the creators and maintainers of OpenRewrite at Moderne run live, hands-on training sessions — one for newcomers and one for experienced users. You’ll see how recipes work, how to apply them across projects, and how to modernize code with confidence.
Join the next session, bring your questions, and learn how to automate the kind of work that usually eats your sprint time.
1. Overview
In this tutorial, we’ll walk through the steps to configure SolarWinds Loggly, a cloud-based log management tool, for Java applications using various logging libraries. We’ll also learn how logs are consolidated in Loggly for streamlined monitoring and analysis.
2. Brief Introduction to Loggly
Let’s consider a business service running multiple distributed, highly available critical applications. It’s common to have applications consisting of clusters of microservices spread across private and public clouds.
With such a challenging setup centralizing the logs generated from all these systems is essential. Moreover, fetching logs from multiple sources and running analytics after consolidating them, can provide valuable actionable insights to developers and support. Furthermore, it comes with rich, easy-to-use, and customizable visualization dashboards. As a result, it would help them efficiently troubleshoot and fix issues and meet the SLAs.
Loggly is a cloud-based SaaS log management tool from Solarwinds that offers many features:

3. Prerequisite
Let’s begin by first creating a free 30-day trial Loggly account. After creating the account, we get access to a Loggly SaaS instance with the URL https://www.<<account name>>.loggly.com.
For example, for this tutorial, we created a free https://www.baeldung.loggly.com account:

The portal is user-friendly and seamlessly guides through the setup process for different log sources:

Additionally, there’s a wizard available to guide setting up log sources for different environments:

Let’s move on to the setup process following the steps in the wizard.
The Log4j 2 and Logback libraries support sending the log events over HTTPS. However, for Log4j, in a few cases, we might need a utility running on our system to forward the logs to Loggly. In Linux, the rsyslog utility can play this role. Hence, let’s first configure the syslog daemon:

First, we run the curl command to download the configure-linux.sh script file, and then we run it by copying the command from the Loggly console:

Later, we uncomment a few configurations in the /etc/rsyslog.conf file to enable log transport over UDP on port 514:

Then, we restart rsyslog to apply the configuration changes:

Lastly, the easiest and most generic way to send application logs to Loggly is by setting up file watch monitoring jobs on the hosting servers. On Linux servers, the Syslog daemon can help achieve this. Whereas on Windows servers, we can do this by setting up Nxlog.
Furthermore, we can verify the setup by pushing a test event to Loggly by running the logger utility:

Finally, we search for the event by logging into the Loggly console:
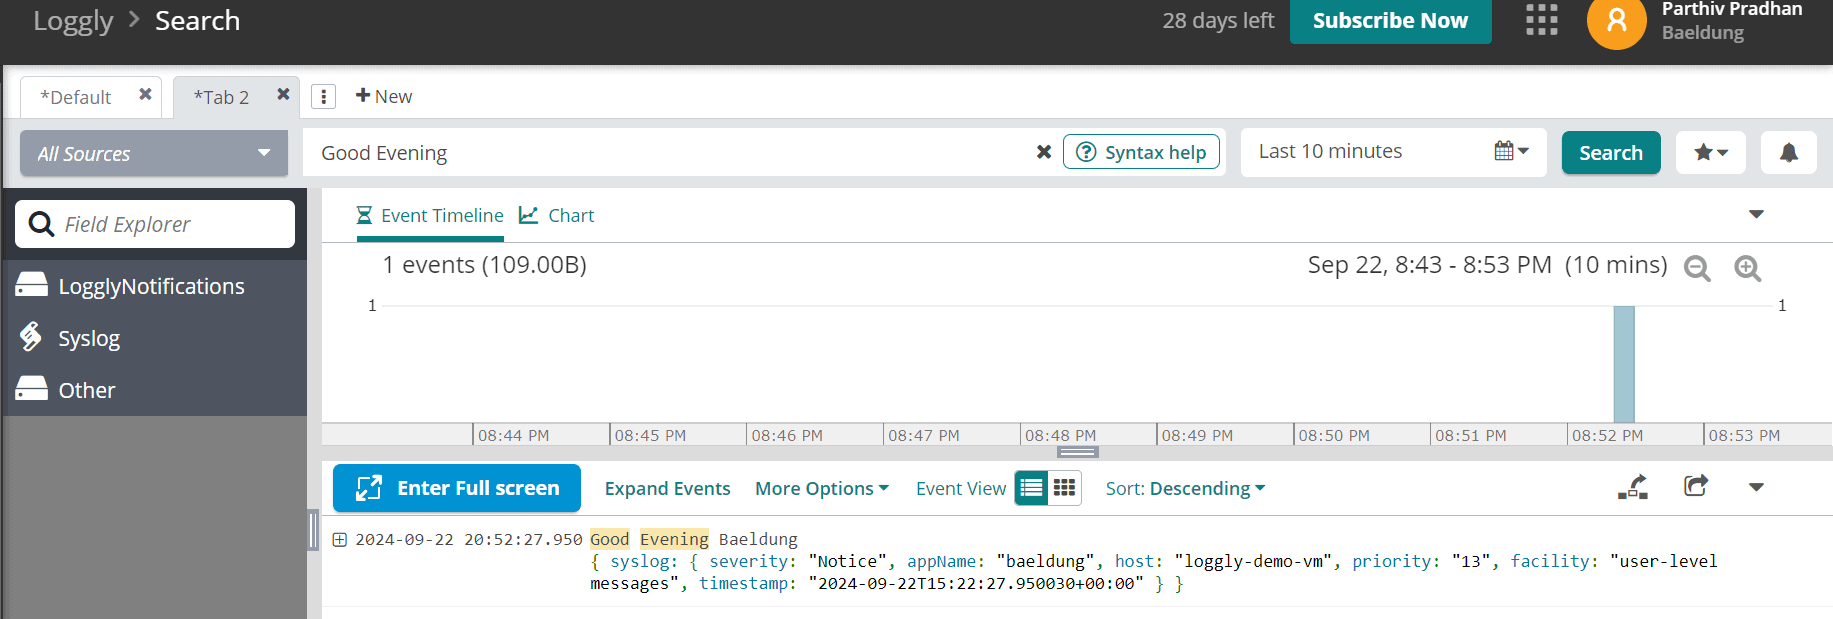
Normally, the log events appear instantly on Loggly. However, there can be delays depending on the network bandwidth and load on the Loggly server.
4. Loggly for Application Using Log4j Library
Before starting on this topic, we must note that Log4j 1 has been reported to have critical vulnerabilities, hence it’s best to avoid it.
First, we’ll begin by entering the Maven dependency for adding the Loggly syslog appender to the Log4j Java application:
<dependency>
    <groupId>com.github.loggly.log4jSyslogWriter64k</groupId>
    <artifactId>log4jSyslogWriter64k</artifactId>
    <version>2.0.0</version>
</dependency>
Next, we’ll use the SyslogAppender64k in the log4j.properties file:
log4j.rootLogger=INFO, SYSLOG

log4j.appender.SYSLOG=com.github.loggly.log4j.SyslogAppender64k
log4j.appender.SYSLOG.SyslogHost=localhost
log4j.appender.SYSLOG.Facility=Local3
log4j.appender.SYSLOG.Header=true
log4j.appender.SYSLOG.layout=org.apache.log4j.EnhancedPatternLayout
log4j.appender.SYSLOG.layout.ConversionPattern=baeldung-java-app %d{ISO8601}{GMT} %p %t %c %M - %m%n
In the log4j.properties file, we may replace baeldung-java-app with any other custom app name corresponding to the conversion pattern property key. It helps identify the logs on the Loggly log explorer. This syslog appender writes these messages to the syslog daemon which runs on the local host.
After completing the prerequisite setups, we can write a few logger statements with different log levels in the application:
public class LogglyLog4jLiveTest {

    private static final Logger logger = Logger.getLogger(LogglyLog4jUnitTest.class);

    @Test
    void givenLoggly_whenLogEvent_thenPushEventToLoggly() {
        logger.info("This is a test info message");
        logger.debug("This is a test debug message");
        logger.error("This is a test error message");
    }
}
Eventually, when the application runs, the logs are pushed into Loggly and visible on its log explorer screen:

5. Loggly for Application Using Log4j 2 Library
As usual, let’s start with the Maven dependencies for the Log4j 2 Java application:
<dependency>
    <groupId>org.apache.logging.log4j</groupId>
    <artifactId>log4j-core</artifactId>
    <version>2.23.1</version>
</dependency>
<dependency>
    <groupId>org.apache.logging.log4j</groupId>
    <artifactId>log4j-api</artifactId>
    <version>2.23.1</version>
</dependency>
Next, we’ll define the log4j2.xml file:
<?xml version="1.0" encoding="UTF-8"?>
<Configuration>
    <Appenders>
        <Socket name="Loggly" host="localhost" port="514" protocol="UDP">
            <PatternLayout>
                <pattern>${hostName} baeldung-java-app %d{yyyy-MM-dd HH:mm:ss,SSS}{GMT} %p %t %c.%M - %m%n</pattern>
            </PatternLayout>
        </Socket>
    </Appenders>
    <Loggers>
        <Root level="DEBUG">
            <AppenderRef ref="Loggly"/>
        </Root>
    </Loggers>
</Configuration>
The Loggly Socket appender in the log4j2.xml file writes the logs to the rsyslog utility over UDP.
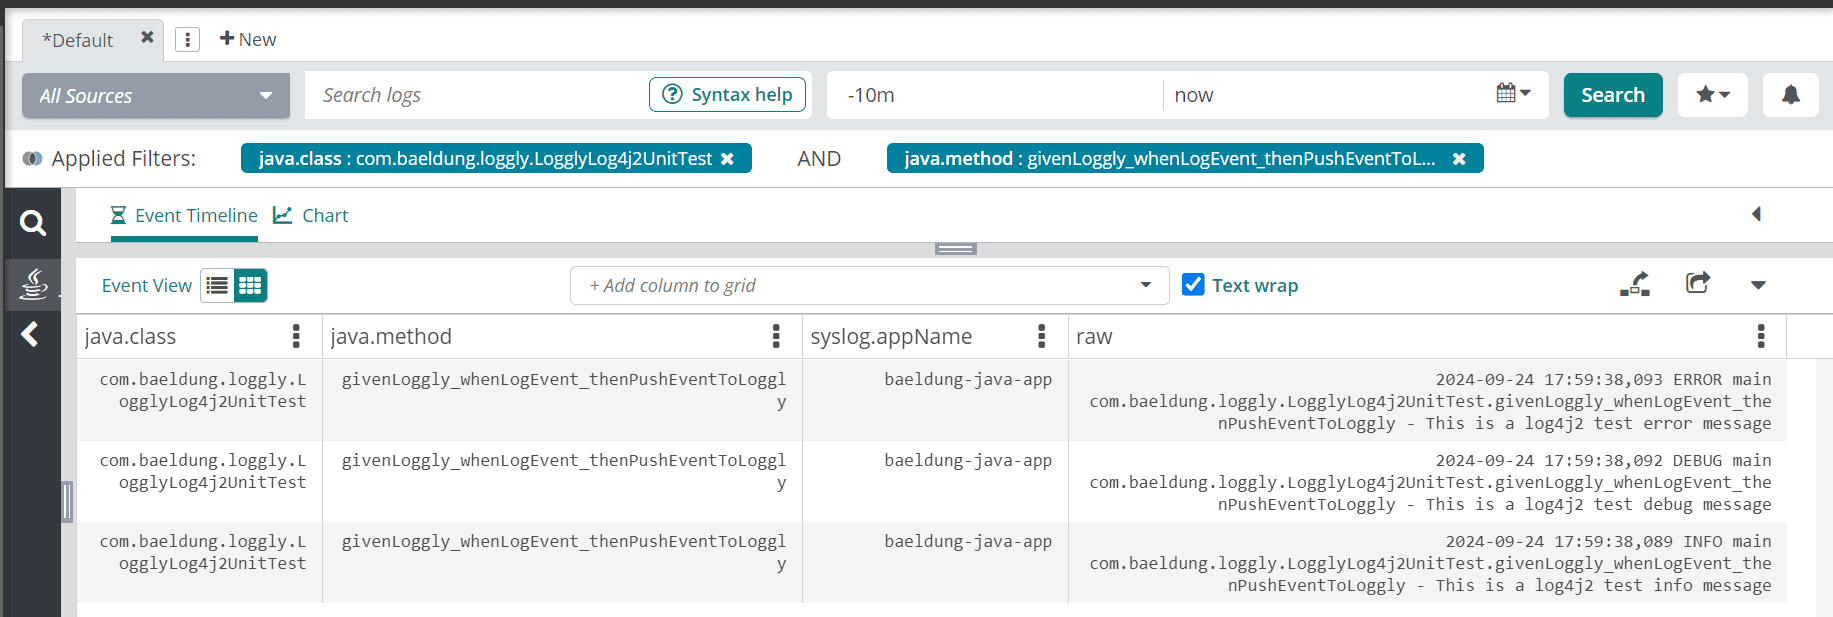
Moving on, let’s go through the Java program with the logger statements:
public class LogglyLog4j2LiveTest {

    private static final Logger logger = LogManager.getLogger(LogglyLog4j2UnitTest.class);

    @Test
    void givenLoggly_thenLogEvent_thenPushErrorEventToLoggly() {
        logger.info("This is a log4j2 test info message");
        logger.debug("This is a log4j2 test debug message");
        logger.error("This is a log4j2 test error message");
    }
}
Eventually, when the app runs, the log events appear on the Loggly log explorer screen:
Apart from the socket appender, we can also use the HTTP appender in the log4j2.xml file to push the logs to Loggly:
<?xml version="1.0" encoding="UTF-8"?>
<Configuration>
<Appenders>
<Http name="Loggly" url="https://logs-01.loggly.com/inputs/TOKEN/tag/java">
<PatternLayout>
<pattern>${hostName} %d{yyyy-MM-dd HH:mm:ss,SSS}{GMT} %p %t %c.%M - %m%n</pattern>
</PatternLayout>
</Http>
</Appenders>
<Loggers>
<Root level="DEBUG">
<AppenderRef ref="Loggly"/>
</Root>
</Loggers>
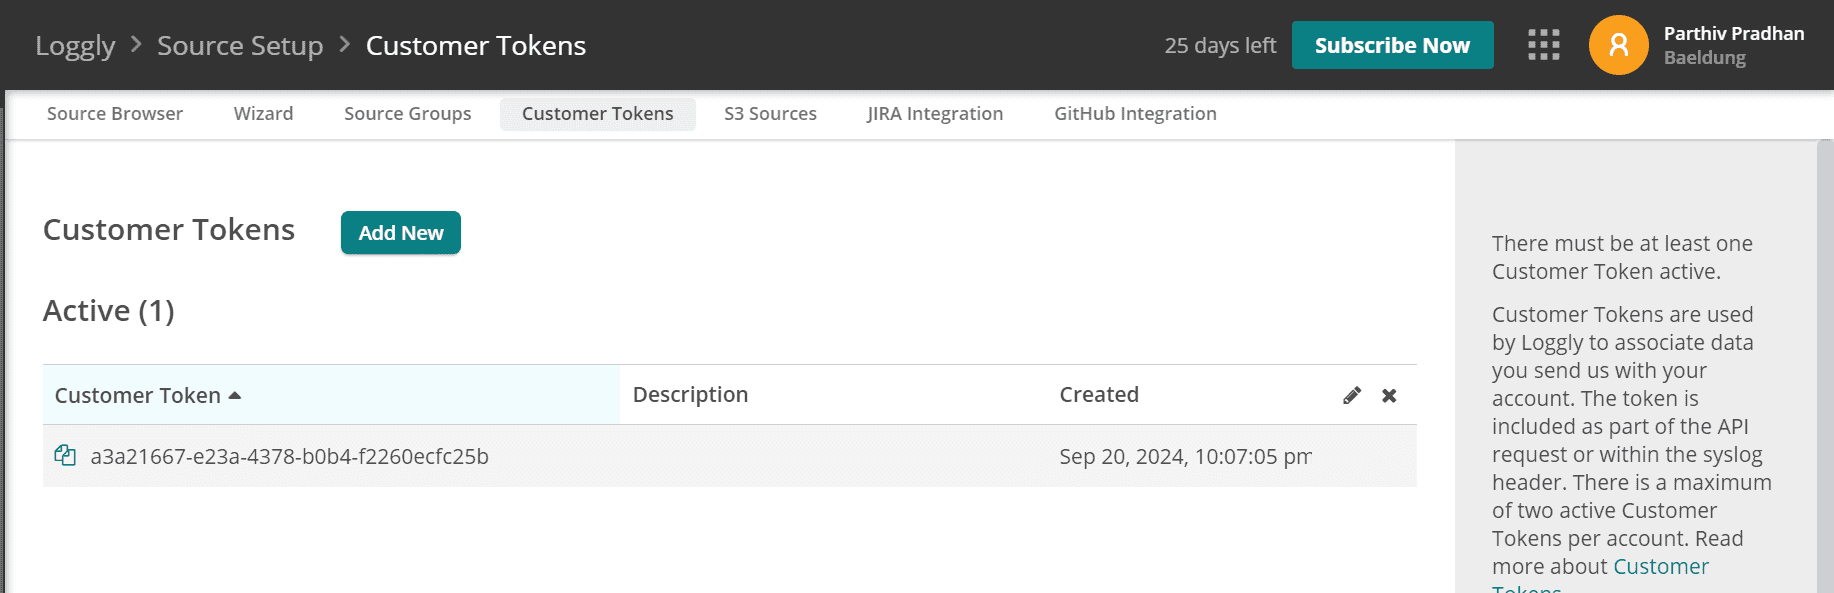
</Configuration>Moreover, the authentication token used in the URL can be copied from the Loggly portal:
As usual, when the program runs, it publishes the logs to Loggly over HTTP:
6. Loggly for Application Using Logback Library
In the applications that use the Logback library for logging, we must add the Maven dependency for the Loggly extension:
<dependency>
    <groupId>org.logback-extensions</groupId>
    <artifactId>logback-ext-loggly</artifactId>
    <version>0.1.5</version>
</dependency>
Next, we’ll define the logback.xml file:
<configuration debug="true">
    <appender name="loggly" class="ch.qos.logback.ext.loggly.LogglyAppender">
        <endpointUrl>https://logs-01.loggly.com/inputs/a3a21667-e23a-4378-b0b4-f2260ecfc25b/tag/logback</endpointUrl>
        <pattern>%d{"ISO8601", UTC} %p %t %c{0}.%M - %m%n</pattern>
    </appender>
    <root level="debug">
        <appender-ref ref="loggly"/>
    </root>
</configuration>
The logback.xml file uses the custom LogglyAppender from the logback loggly extension library. There could be scenarios where the frequency of log event creation might be high. Therefore in such cases, we can send multi-line log events in batches with the help of ch.qos.logback.ext.loggly.LogglyBatchAppender to the Loggly bulk endpoint https://logs-01.loggly.com/bulk/TOKEN/tag/bulk/.
Similar to the basic LogglyAppender, we have to specify the batch appender and bulk endpoint URL in the logback.xml file:
<configuration debug="true">
    <appender name="loggly" class="ch.qos.logback.ext.loggly.LogglyBatchAppender">
        <endpointUrl>https://logs-01.loggly.com/bulk/a3a21667-e23a-4378-b0b4-f2260ecfc25b/tag/bulk</endpointUrl>
        <pattern>%d{"ISO8601", UTC} %p %t %c %M - %m%n</pattern>
    </appender>
    <root level="info">
        <appender-ref ref="loggly" />
    </root>
</configuration>
However, this appender can send a maximum of 5 MB per batch and up to 1 MB per event. As mentioned in the previous section, we can download the TOKEN from the Customer Tokens page.
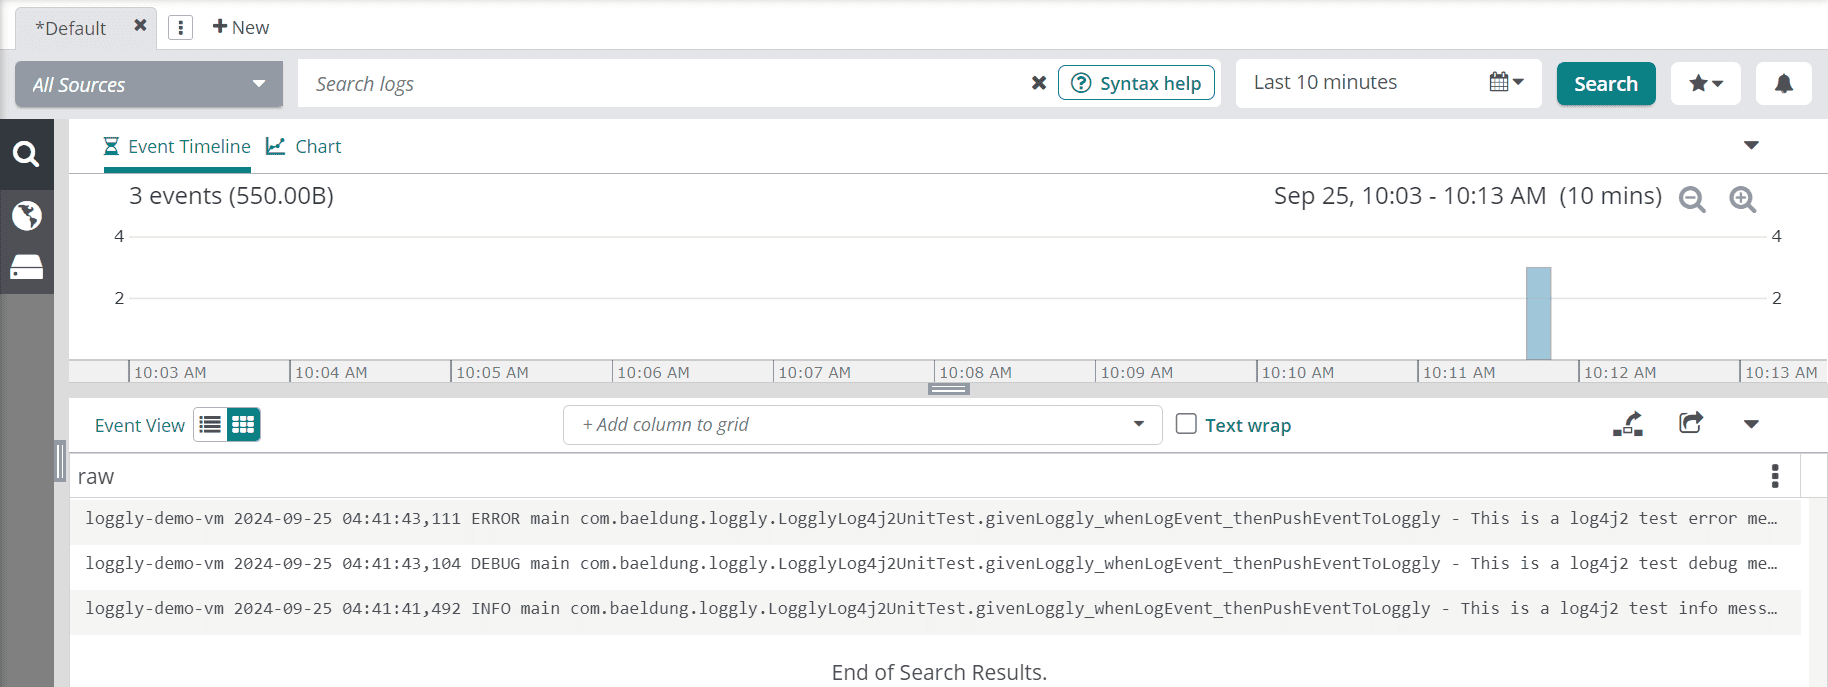
After completing the prerequisites, let’s go through the Java program with the logger statements:
public class LogglyLogbackLiveTest {

    Logger logger = LoggerFactory.getLogger(LogglyLogbackUnitTest.class);

    @Test
    void givenLoggly_whenLogEvent_thenPushEventToLoggly() {
        logger.info("This is a logback test info message");
        logger.debug("This is a logback test debug message");
        logger.error("This is a logback test error message");
    }
}
The program uses the Logback implementation of the SLF4J framework. Now, let’s run the test program and check the Loggly log explorer:
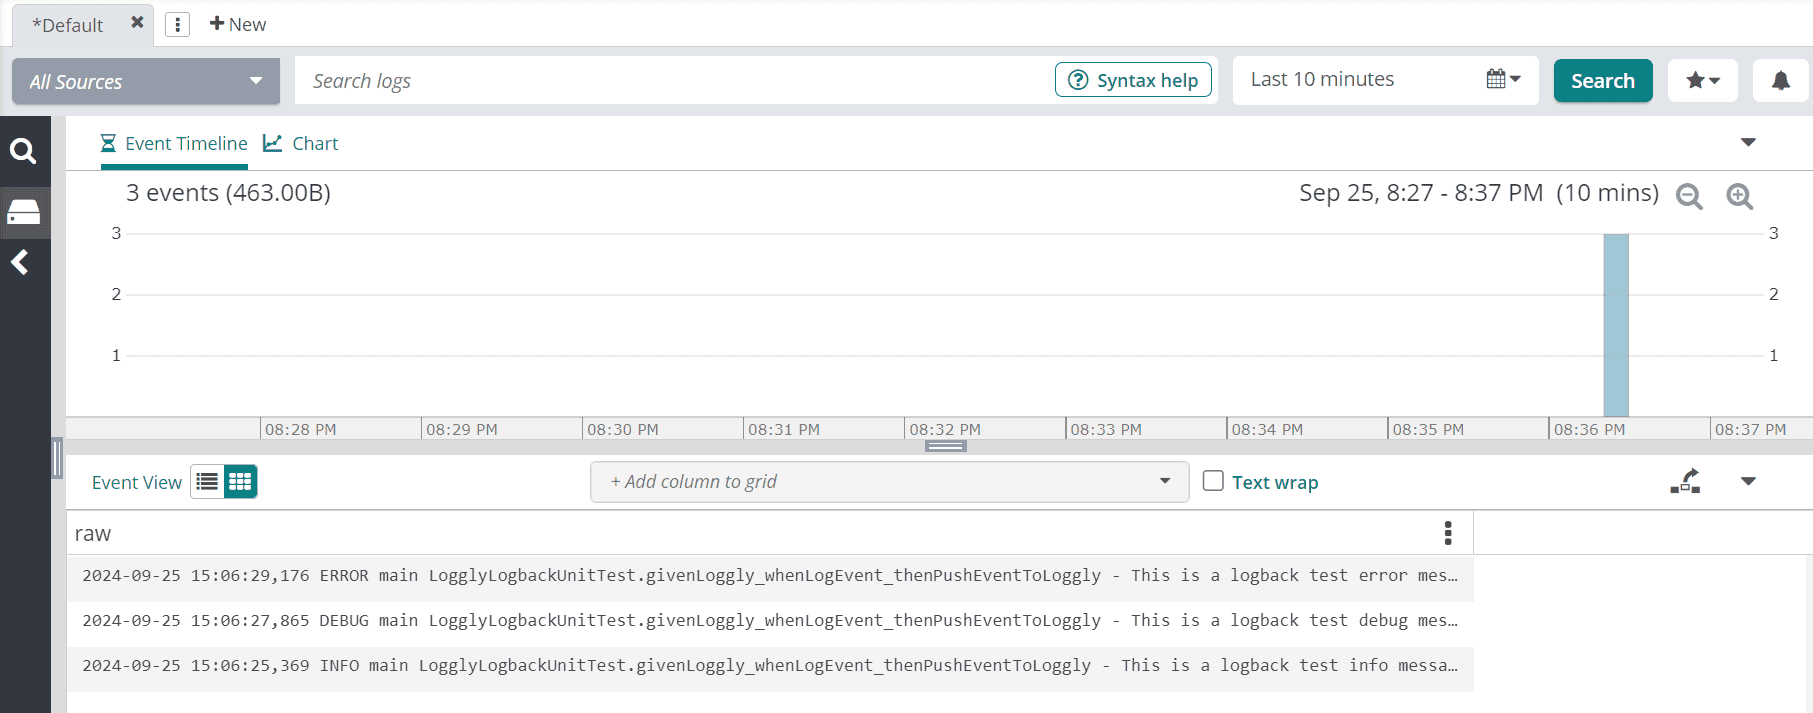
As expected, the log events register on the log explorer.
7. Conclusion
In this article, we discussed setting up Java applications to send their logs to the SolarWinds Loggly.
Impressively, the Loggly portal has documented the setup process quite elaborately and has a wizard that expedites it further. Additionally, the troubleshooting processes are covered in the online guide.


