

Learn through the super-clean Baeldung Pro experience:
>> Membership and Baeldung Pro.
No ads, dark-mode and 6 months free of IntelliJ Idea Ultimate to start with.
Last updated: January 26, 2024
Learn through the super-clean Baeldung Pro experience:
>> Membership and Baeldung Pro.
No ads, dark-mode and 6 months free of IntelliJ Idea Ultimate to start with.
Sometimes, we might want to control our Linux system from Windows. This could be for several reasons, such as reading data or executing commands without having physical access. We can achieve this by using various tools to establish a remote connection to Linux and access it from Windows.
In this tutorial, we’ll use different tools to access Linux from Windows remotely.
Specifically, we’re using Ubuntu 22.04 and Windows 10 for demonstration purposes.
In this section, we’ll cover all steps required to establish a seamless remote connection. To begin, we need sudo privileges.
We can use the hostname command with the -I flag to obtain our system’s IP address:
$ hostname -IWe can also use the ifconfig command to check the system’s IP address along with more network information. To use the ifconfig command, we’ll install the net-tools package:
$ sudo apt install net-toolsAfter the package installation, we’ll run the ifconfig command:
$ ifconfig
ens33: flags=4163<UP,BROADCAST,RUNNING,MULTICAST>  mtu 1500
        inet 192.168.15.100  netmask 255.255.255.0  broadcast 192.168.15.255
...
We’ll copy the IP address for later use.
We’ll discuss three different tools, two of which (RDP and VNC) support graphical remote connections. To use the graphical user interface (GUI), we install a desktop environment.
We can install any desktop environment, but for now, let’s install XFCE as it’s lightweight and fast:
$ sudo apt install xfce4 -yOnce the XFCE is installed, we can use RDP or VNC to establish a graphical remote connection.
Additionally, we can modify some settings for a smoother user experience. However, this modification isn’t mandatory but rather optional, as it comes with security concerns.
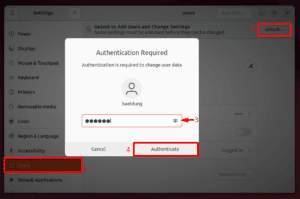
To enable Automatic Login, we open Settings, navigate to Users, and click on the Unlock button located in the top-right position. This action opens a pop-up. Here, we type the user password and press the Authenticate button:
Next, we enable the Automatic Login option:
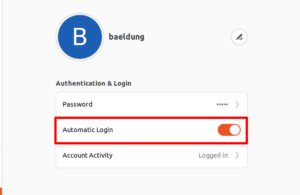
Now, we won’t require a password to log in.
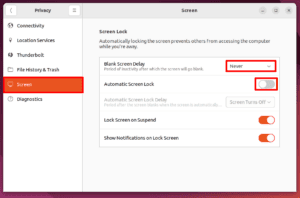
In Settings, we navigate to the Privacy tab and choose the Screen option. Next, we disable the Automatic Screen Lock option and set the Blank Screen Delay to Never:
Finally, close the Settings window.
Microsoft developed Remote Desktop Protocol (RDP) for Windows, but we can also utilize it for other operating systems, including Linux. RDP aids in accessing and managing remote systems graphically. In Ubuntu, we use xrdp, an open-source and free implementation of RDP, to connect with Windows remotely.
We can install xrdp from Ubuntu’s official repository:
$ sudo apt install xrdpNext, we execute the systemctl status command to check the current status of the xrdp server:
$ sudo systemctl status xrdp
● xrdp.service - xrdp daemon
     Loaded: loaded (/lib/systemd/system/xrdp.service; enabled; vendor preset: >
     Active: active (running)
...
Here, our status shows the xrdp.service is active. However, if the status is not active, we can enable it using the systemctl enable command:
$ sudo systemctl enable xrdp
Synchronizing state of xrdp.service with SysV service script with /lib/systemd/systemd-sysv-install.
Executing: /lib/systemd/systemd-sysv-install enable xrdp
Once xrdp is active (running), we add it to the ssl-cert group to ensure that it has the necessary privileges for SSL-related configurations:
$ sudo adduser xrdp ssl-cert
Adding user `xrdp' to group `ssl-cert' ...
Adding user xrdp to group ssl-cert
Done.
Next, we update the .xsession file to start the XFCE desktop environment for the current user:
$ echo "sudo -u ${USER} xfce4-session" | tee .xsession
sudo -u baeldung xfce4-session
After modifying the configuration file, we restart the xrdp server:
$ sudo systemctl restart xrdpMoving forward, let’s ensure that we allow incoming connections on the default port 3389 for xrdp in our firewall:
$ sudo ufw allow from any to any port 3389
Rule added
Rule added (v6)
We’ve successfully configured the xrdp server on Linux. Now, let’s access our Ubuntu system from Windows.
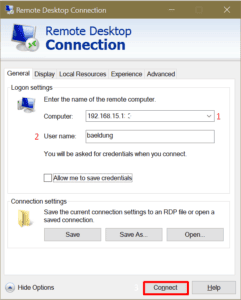
In Windows, we search for RDP and open the Remote Desktop Connection application. In the General tab, we click on the Show Option drop-down icon and paste the Ubuntu IP address copied earlier. We can also append the IP address with a colon and the port number (3389). Additionally, we type in the User name and press the Connect button:
A new window will open. Here, we enter the user’s password and press the OK button:

This way, we’ll be able to control and access our Ubuntu system:
Notably, all the changes we make in this session will reflect on our Ubuntu system.
Virtual Network Computing (VNC) is a cross-platform graphical sharing system that enables users to share and access other systems. We can use any VNC implementation tool to access our system remotely.
In this tutorial, we’ll install and use TightVNC as a server and client on both of our machines. It’s lightweight, fast, and free software.
We can install the TightVNC server from the official Ubuntu repository:
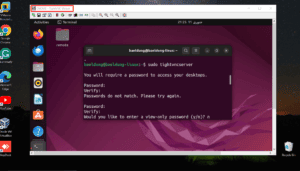
$ sudo apt install tightvncserverAfter installing the TightVNC server, we set its password. We can also set a view-only password to allow users to access the system without controlling it:
$ sudo tightvncserver
You will require a password to access your desktops.

Password:
Verify:
...
It’s important to note that with the view-only password, we can only monitor the remotely connected machine without having control over it.
Next, we allow incoming connections on the default VNC port 5900:
$ sudo ufw allow 5900
Rule added
Rule added (v6)
The rules are added successfully in our firewall.
Moving forward, let’s download and install the TightVNC client on Windows from its official website.
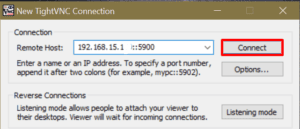
Next, we open the TightVNC Viewer application and enter Ubuntu’s IP address, followed by a double colon (::) and the port number, 5900. Then, we click the Connect button:
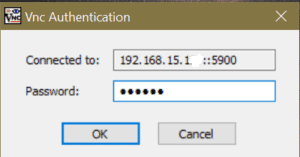
Afterward, we provide the VNC password and press the OK button:
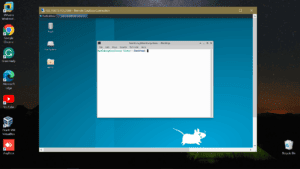
Finally, we can access and control our Ubuntu server from Windows:
VNC is generally less secure than the RDP connection. However, it’s easier to establish and use.
Sometimes, we only want to securely access the command-line interface (CLI) of our Ubuntu machine. If that’s the scenario, we can opt for the Secure Shell (SSH) protocol to establish a secure connection with our remote machine. SSH encrypts the data before sending it to the remote server.
There are many SSH clients we can use to connect to a remote server, such as PuTTY. It’s a lightweight, free tool that supports many protocols, including Telnet and SSH.
PuTTY is easy to use and offers various features, like appearance customization, session logging, key management, and port forwarding. Furthermore, it stores information about frequently used connections.
To begin, let’s install SSH from Ubuntu’s official repository:
$ sudo apt install ssh
Reading package lists... Done
Building dependency tree... Done
Reading state information... Done
The following additional packages will be installed:
  ncurses-term openssh-server openssh-sftp-server ssh-import-id
...
Next, we execute systemctl enable command to automatically start the SSH server after reboot:
$ sudo systemctl enable ssh
Synchronizing state of ssh.service with SysV service script with /lib/systemd/systemd-sysv-install.
Executing: /lib/systemd/systemd-sysv-install enable ssh
Afterward, we’ll add the default port 22 of SSH in the firewall rules:
$ sudo ufw allow 22/tcp
Rule added
Rule added (v6)On Windows, we can access our Ubuntu machine using an SSH session directly via command prompt or through PuTTY.
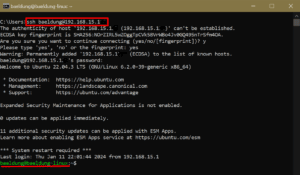
To access Ubuntu via the command prompt, execute the SSH command:
> ssh [email protected]The above command contains the username and IP address of our Ubuntu machine:
However, to gain more control over our SSH session, we’ll download and install PuTTY.
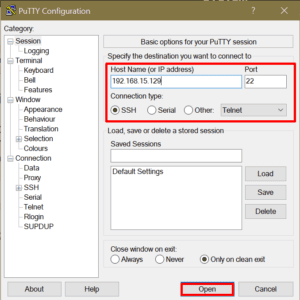
Once it’s installed, we open the PuTTY application and navigate to the Session category. Then, we enter the Ubuntu IP address, and we ensure that the port is 22 and the Connection type is SSH. Finally, we press the Open button:
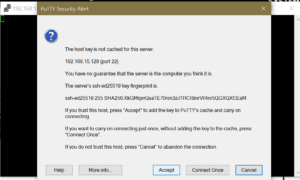
A security alert may appear. In this situation, we click on the Accept button to continue:
Finally, let’s provide the Ubuntu system’s login credentials to manage it:
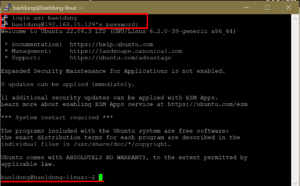
As a result, we can run commands on our Ubuntu machine from Windows.
In this article, we used the RDP protocol, TightVNC server, and SSH to establish remote connections to our Ubuntu 22.04 system. Then, we employed the Remote Desktop Connection application, TightVNC client, and PuTTY application to access Ubuntu from Windows 10.