

Learn through the super-clean Baeldung Pro experience:
>> Membership and Baeldung Pro.
No ads, dark-mode and 6 months free of IntelliJ Idea Ultimate to start with.
Learn through the super-clean Baeldung Pro experience:
>> Membership and Baeldung Pro.
No ads, dark-mode and 6 months free of IntelliJ Idea Ultimate to start with.
Many times, we find ourselves needing to remotely access a Linux server. If we particularly need access to the Linux GUI, then we can set up a VNC server on our Linux, to allow us to control the GUI.
In this tutorial, we’ll install the TightVNC server on Ubuntu 22.04 and access it via Windows, MacOS, and a Linux machine.
We’ll assume a secure network environment where our server isn’t accessible to the outside world, and a password is strong enough protection. However, we’ll also cover using SSH tunneling for cases where additional security is required.
VNC (Virtual Network Computing) is a popular graphical desktop-sharing system. It allows users to control their systems using RFB (Remote Frame Buffer) protocol without having physical access.
VNC enables users to seamlessly read and share files, change settings, and execute commands on the server using the keyboard and mouse event of the client machine.
For establishing a remote connection, we require both a server and a client. There are many VNC solutions to choose from, such as Vino, RealVNC, TightVNC, and TigerVNC.
We’ll install the TightVNC server because it’s open-source, actively maintained, and lightweight. Moreover, it offers numerous features such as password protection, encryption, and scaling.
Before installing the TightVNC server, we should ensure our package manager is up-to-date:
$ sudo apt update && sudo apt upgrade -y
Hit:1 http://pk.archive.ubuntu.com/ubuntu jammy InRelease
Hit:2 http://security.ubuntu.com/ubuntu jammy-security InRelease
…
Next, we’ll install a desktop environment on our Ubuntu server because it doesn’t come with it by default. For this purpose, let’s install the XFCE desktop environment, along with the xfce-goodies GUI enhancements:
$ sudo apt install xfce4 xfce4-goodies
Reading package lists... Done
Building dependency tree... Done
…
Thus, our desktop environment is successfully installed.
Next, let’s install the TightVNC server:
$ sudo apt install tightvncserver -yFinally, our TightVNC server is successfully installed.
Now, let’s configure our VNC server to access it from client machines.
Firstly, we’ll set a password for our VNC server. To do so, we run the vncpasswd command and set a six to eight-character-long secure password:
$ vncpasswd
Using password file /home/baeldung/.vnc/passwd
Password:
Verify:
Would you like to enter a view-only password (y/n)? N
Moving forward, we’ll encounter a prompt asking if we would like to set a view-only password for accessing the server. Setting this password depends on our needs.
In our case, we want to provide complete access to the server, so we’ll type N.
Next, let’s run the vncserver command to start the TightVNC server and create its initial configuration files:
$ vncserver
New 'X' desktop is baeldung-linux:1

Starting applications specified in /home/baeldung/.vnc/xstartup
Log file is /home/baeldung/.vnc/baeldung-linux:1.log
In the output, we can observe that after the hostname, there’s a number (:1), which is known as the display port. This display port indicates the port on which the server instance is running. By default, the VNC server listens on TCP port 5900, so this :1 display port means the server instance is running on port 5901 (5900 + 1).
VNC allows us to create multiple VNC server instances on different display ports by running the same command.
For now, let’s kill this server instance to perform some server configurations:
$ vncserver -kill :1 -force
Killing Xtightvnc process ID 6111
We can use this command to terminate any server instance running on a specific display port when not needed by modifying the display port number accordingly.
Next, we want our VNC server to use the XFCE desktop environment every time it runs. For this purpose, we’ll add the startxfce4 & line in the ~/.vnc/xstartup file. After modifying the file, we can verify its content using the cat command:
$ echo "startxfce4 &" >> ~/.vnc/xstartup
$ cat ~/.vnc/xstartup
#!/bin/sh

xrdb "$HOME/.Xresources"
xsetroot -solid grey
#x-terminal-emulator -geometry 80x24+10+10 -ls -title "$VNCDESKTOP Desktop" &
#x-window-manager &
# Fix to make GNOME work
export XKL_XMODMAP_DISABLE=1
/etc/X11/Xsession
startxfce4 &
The xstartup file automatically executes when a VNC session starts.
Additionally, we can configure other components or applications, such as a file manager, to initiate with our VNC server in this file.
After modifying the xstartup file, we’ll change its permission to executable using the chmod command:
$ chmod +x ~/.vnc/xstartupFinally, let’s start our TightVNC server instance:
$ vncserver
New 'X' desktop is baeldung-linux:1
...
We must note the display port of our server instance (:1) and our server’s IP address for later use.
We’ve successfully installed and configured the VNC server in our Ubuntu. To check the IP address of our server, we can use the hostname -I command.
Additionally, we can set up our VNC Server to run as a systemd service for our convenience.
Once our VNC server is up and running, we can access it from any client machine using our server’s details. However, it’s important to note that anyone with this information can access the server. Therefore, we assume we’ve set a strong VNC password and configured firewall rules to restrict access to specific IP addresses or ranges.
Let’s access our VNC server from Windows. For this purpose, let’s download and install the TightVNC client in our system.
Now, we’ll open TightVNC Viewer and type server_IP_address::display_port in the Remote Host field. Then, press the Connect button:
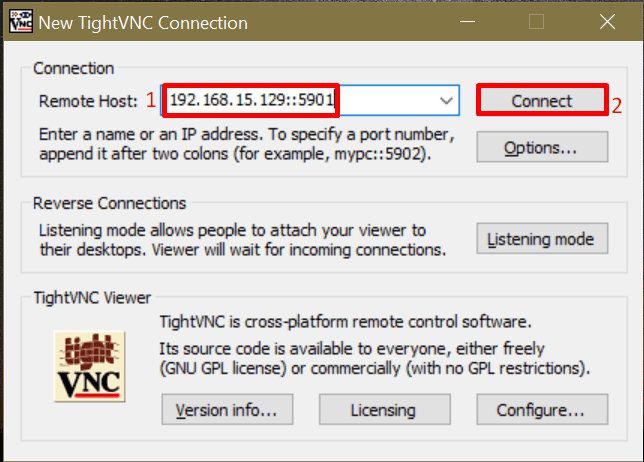
Next, we’ll enter the server’s password:
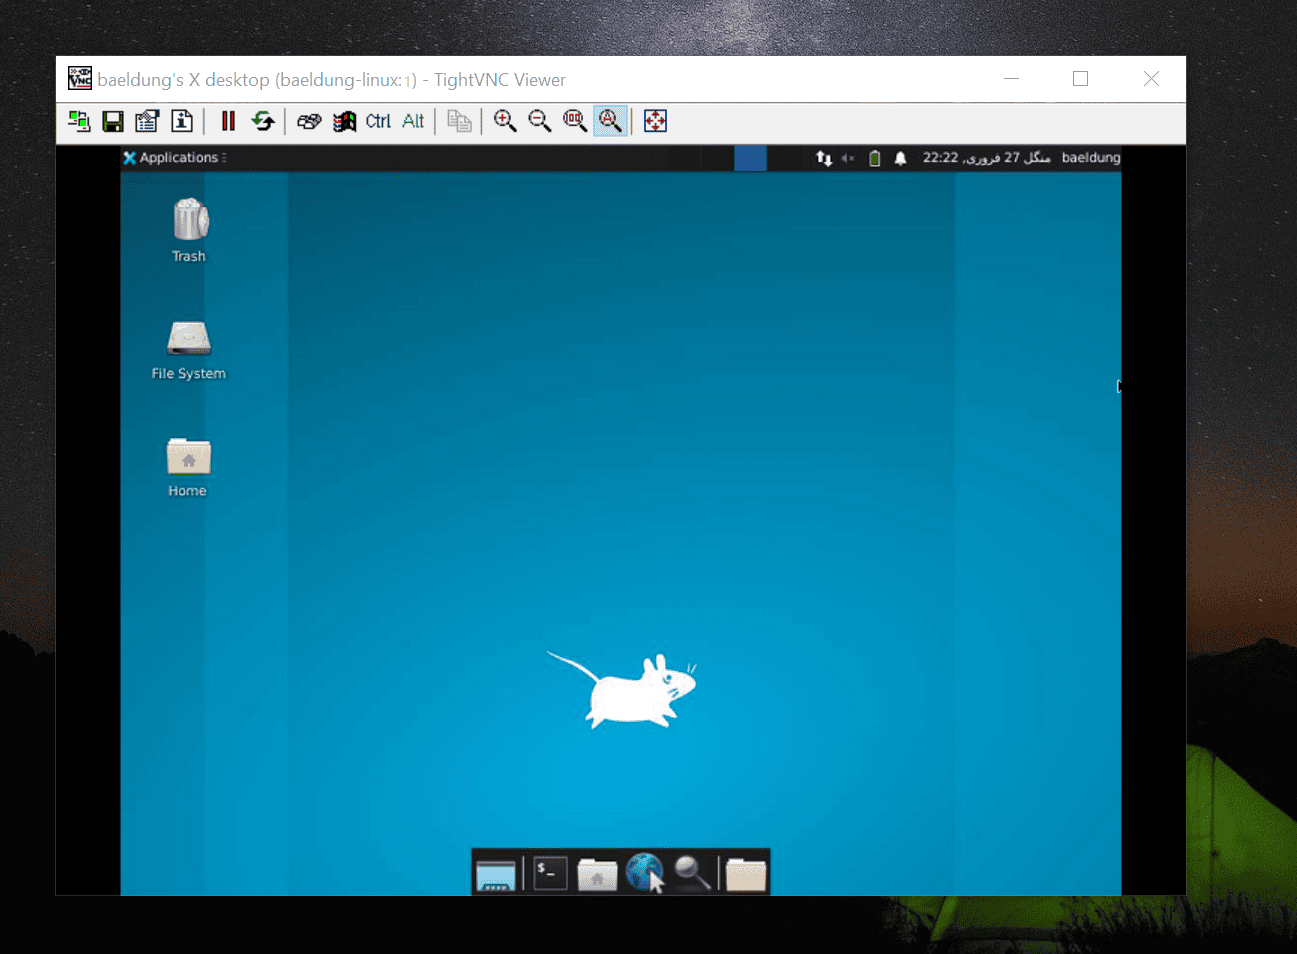
We can use any VNC client on our MacOS or Linux machine to control our VNC server. In the VNC client, type <server_IP_address>::<display_port> to access the server.
For instance, on our Linux machine, we can open the Remmina Remote Desktop Client and enter the IP and display port of our server:
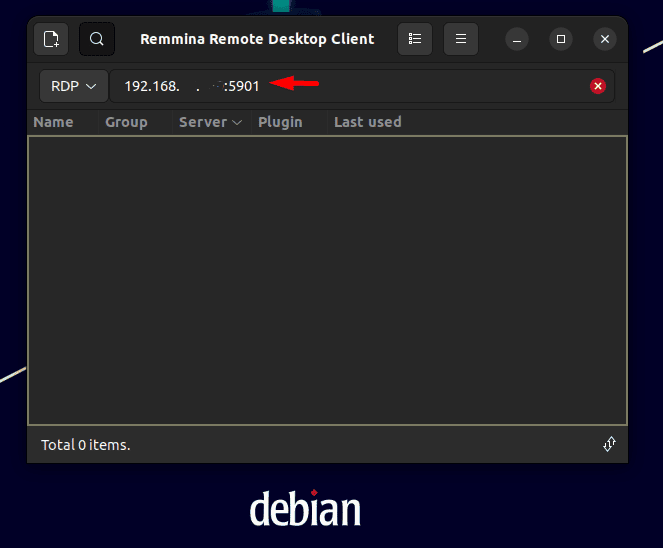
Next, we’ll type the VNC server’s password to access it:
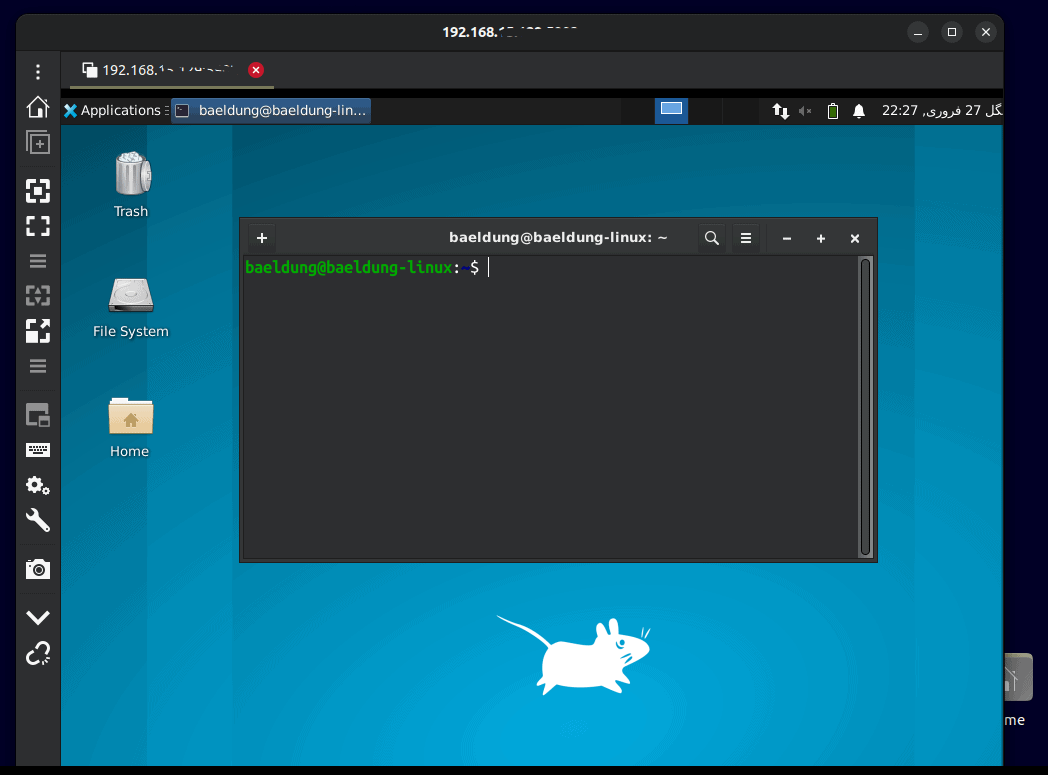
Thus, we can successfully control our server without having physical access.
If we require additional security and want to ensure that only clients with prior SSH access to our server can connect to the VNC server, we can restrict our VNC server to only accept connections originating from it. Then, we can forward all connections from our clients to the server through an encrypted SSH tunnel.
For this purpose, we’ll start our server using the vncserver command with the -localhost flag:
$ vncserver -localhostOnce our server is running, we’ll head to our client machine to access our server.
We can create an SSH tunnel by running the ssh command in the terminal:
$ ssh -L 5901:localhost:5901 -C -N -l baeldung-linux 192.168.10.119
The syntax for this command is given below:
$ ssh -L <source_port>:localhost:<display_port> -C -N -l <username> <server_ip>We must replace the command variables according to our server’s information and preferences (source port). Once the SSH session is successfully established, we’ll minimize the terminal. Then, we’ll open any VNC client and type localhost::<display_port> to access the VNC server.
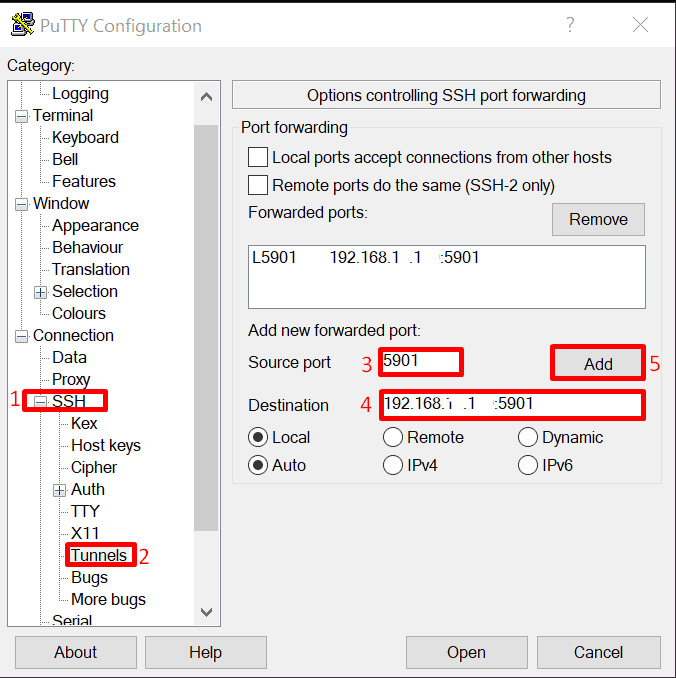
In Windows, we’ll use PuTTY to create an SSH tunnel.
In PuTTY, navigate to the Tunnels option located under the SSH option in the Category sidebar. Here, specify a Source port (5901) for SSH traffic forwarding. It can be any unused port (ranging from 0 to 65535). Additionally, we’ll enter the IP address and display port of the VNC server in the Destination field. Then, we’ll press the Add button:
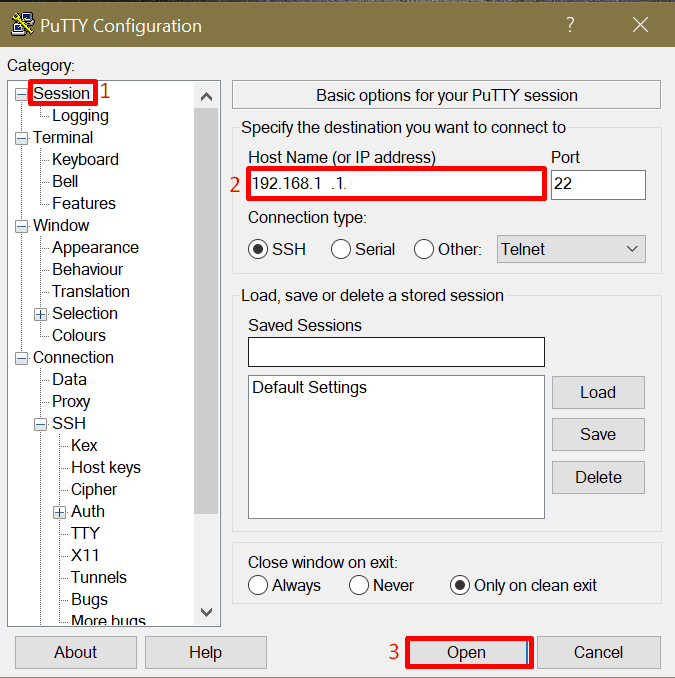
Next, let’s choose the Session category and type the server’s IP address in the Host Name field. Then, press the Open button:
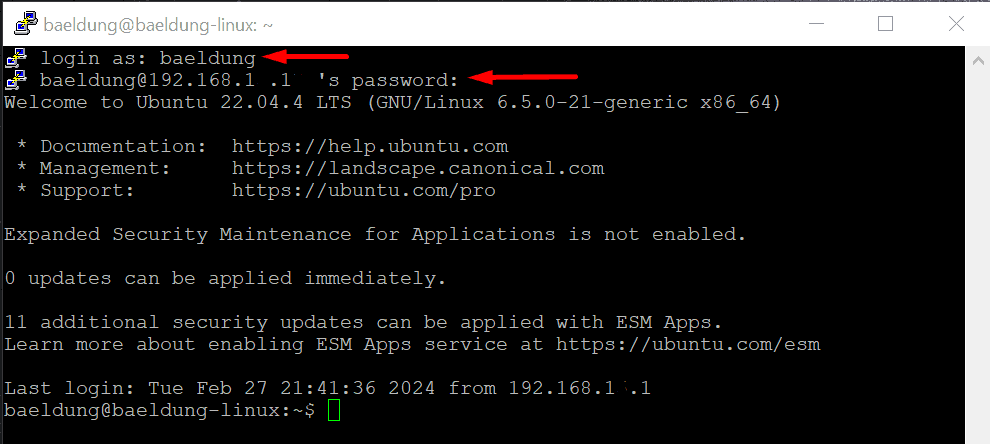
Now, we’ll enter the server’s password to establish an SSH session and minimize this window:
Next, we’ll open TightVNC Viewer and type localhost::<display_port> in the Remote Host field:
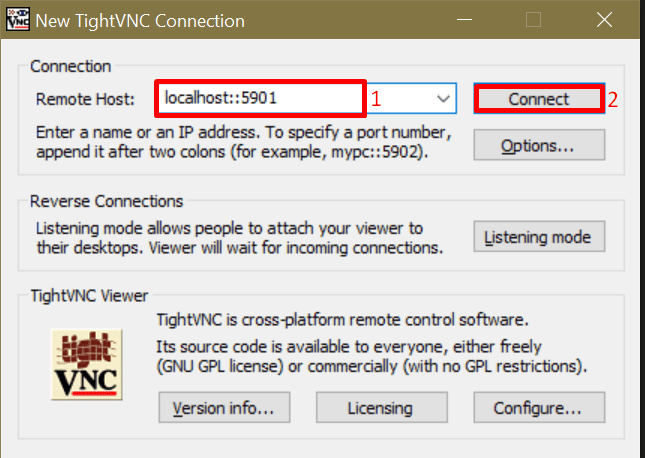
Finally, let’s press the Connect button to access the server.
In this article, we’ve installed the XFCE desktop environment and TightVNC server on our Ubuntu 22.04 machine.
Then, we configured the VNC server to initiate the desktop environment along with it. Finally, we accessed our VNC server using the VNC client from our client systems.
For additional security, we even established an SSH tunnel.