

Learn through the super-clean Baeldung Pro experience:
>> Membership and Baeldung Pro.
No ads, dark-mode and 6 months free of IntelliJ Idea Ultimate to start with.
Last updated: March 25, 2025
Learn through the super-clean Baeldung Pro experience:
>> Membership and Baeldung Pro.
No ads, dark-mode and 6 months free of IntelliJ Idea Ultimate to start with.
Disk management is a crucial aspect of maintaining a well-functioning Linux system. Keeping track of available space, allocated, and unallocated free space on the hard disk is essential to ensure smooth operations and prevent data loss.
Unallocated free space refers to a portion of the hard disk that hasn’t been allocated to any partition or file system. It can be used for creating new partitions or expanding existing ones. Checking for unallocated free space is also useful when we’re resizing one of the existing partitions.
In this tutorial, we’ll explore different methods for checking unallocated free space on a hard disk in a Linux environment.
parted is a Linux tool for manipulating disk partitions. We can use it to create, destroy, resize, move, and copy different partition formats.
It’s compatible with numerous partition table formats including FAT, FAT32, MS-DOS, and GPT. Moreover, it also supports Macintosh HFS partitions.
The parted command is useful in creating space for new operating systems, reorganizing disk usage, and copying data to new hard drives.
Let’s check for unallocated space using the parted command. We need to run this command as a root user or a user with sudo privileges:
$ sudo parted /dev/sda print free
Model: ATA GOLDEN MEMORY-25 (scsi)
Disk /dev/sda: 256GB
Sector size (logical/physical): 512B/512B
Partition Table: gpt
Disk Flags:

Number  Start   End     Size    File system  Name                  Flags
        17.4kB  1049kB  1031kB  Free Space
 1      1049kB  538MB   537MB   fat32        EFI System Partition  boot, esp
 2      538MB   256GB   256GB   ext4
        256GB   256GB   335kB   Free Space
In the command above, /dev/sda represents the device name of the hard disk. We then use the print free option to output information about the partitions and unallocated space.
Here, we have two partitions, the first one contains boot files, and the second is a partition in the ext4 file system format. In the disk above, we have unallocated free space of about 1.3 MB.
We can inspect how many disks we have available in the system using the fdisk command:
$ sudo fdisk -l
Disk /dev/sda: 238.49 GiB, 256060514304 bytes, 500118192 sectors
Disk model: GOLDEN MEMORY-25
Units: sectors of 1 * 512 = 512 bytes
Sector size (logical/physical): 512 bytes / 512 bytes
I/O size (minimum/optimal): 512 bytes / 512 bytes
Disklabel type: gpt
Disk identifier: 6A6487E4-B1EE-45E3-919E-1F21D2D8D97B

Device       Start       End   Sectors  Size Type
/dev/sda1     2048   1050623   1048576  512M EFI System
/dev/sda2  1050624 500117503 499066880  238G Linux filesystem
The fdisk -l command lists all available disks and partitions in each disk. We can see that only the /dev/sda/ disk is available with a memory of about 238 GB.
The lsblk command displays information about all block devices available on the system. It reads the sysfs filesystem and udev db to gather information. It then displays it in a tree-like format with each device at the top and partitions or logical volumes branching from it. By default, it prints all block devices except RAM disks.
The output includes names, sizes, major and minor numbers, mount points, and the device type. Let’s use the lsblk command to display to display available devices:
lsblk -b
NAME   MAJ:MIN RM         SIZE RO TYPE MOUNTPOINT
sda      8:0    0 256060514304  0 disk
├─sda1   8:1    0    536870912  0 part /boot/efi
└─sda2   8:2    0 255522242560  0 part /
We’re using the -b option to display the partition sizes in bytes. To find out the total unallocated space on the drive, we need to add the size of each partition and compare it with the total size of the drive.
In this case, the partitions, sda1 and sda2 add up to 256059113472 bytes. This gives us a difference of 1400832 bytes which is equivalent to 1.3 MB.
In case we prefer a graphical approach to checking unallocated space, Linux has several disk management utilities with user-friendly interfaces that simplify the process.
Linux supports several utilities, but we’ll focus on GParted. GParted is a free and open-source partition editor for graphically managing disk partitions. It lets us resize, move, and copy partitions without data loss.
It isn’t available by default on most Linux distros. However, we can install it on Ubuntu-based systems using apt:
$ sudo apt install gpartedOnce GParted is installed, we can open it by searching “GParted” in the applications menu:

Since GParted requires admin privileges to view and manage disk information, we might be prompted to enter the password.
Once it’s open, we can see an overview of all partitions including their names, sizes, mount points, used memory, and unused memory:
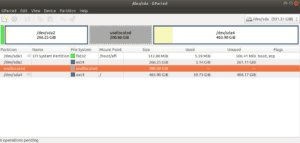
Unallocated space appears as a gray area on the graphical interface. The size of the unallocated space is displayed next to it.
From the information we gather from GParted, we can choose to create new partitions, resize existing ones, or any other action to manage the disk space efficiently.
In this article, we’ve explored how to check unallocated space on a hard disk. Checking unallocated free space on a hard disk in Linux is a key task in effectively managing the system’s storage. Depending on our preference, we can opt to use the command-line tools such as parted and lslbk, or GUI tools such as GParted.
Having a solid understanding of the disk partition layout and available space empowers us to make informed decisions about overall disk management. We need to exercise caution when making changes to disk partitions to avoid data loss and ensure the integrity of the system.