

Yes, we're now running our only Summer Sale. All Courses are 30% off until 20th July, 2026:
Learn through the super-clean Baeldung Pro experience:
>> Membership and Baeldung Pro.
No ads, dark-mode and 6 months free of IntelliJ Idea Ultimate to start with.
1. Overview
Apple Macs aren’t primarily intended for use by other operating systems; it’s not their cup of tea. Indeed, the newer Apple silicon-based Macs dropped support for Boot Camp and third-party EFI boot managers.
However, there are still many working Intel-based Macs hanging around that Apple no longer supports. Unfortunately, using outdated macOS on these devices is a security risk.
In this article, we’ll discuss how to address this by installing Ubuntu alongside macOS on Intel-based Macs. First, we’ll see how Apple boots an operating system on a Mac. Then, we cover the installation and dual-booting process for Ubuntu.
2. Introduction
In this section, we cover the Apple boot process and the need for additional bootloaders that enable using other operating systems on Intel-based Macs.
2.1. Prerequisites
Before installing Ubuntu on a Mac, we should know that dual-booting is only supported on Intel-based Macs. In addition, we also need to have a working macOS installed on the Mac.
We’ll also need a bootable Ubuntu flash drive for the installation. We can create one using balenaEtcher.
2.2. The Apple Boot Process
The sole purpose of the Apple Boot Manager is to present a list of bootable devices. By default, the boot manager will boot macOS on the primary EFI partition, without any prompts. Therefore, we’ll need to explicitly invoke the boot manager by holding down the Option (⌥) key as soon as we power on the machine.
The Apple Boot Manager searches for bootable devices connected to the Mac. However, it’s primitive and doesn’t know how to load a kernel into the system memory. Therefore, we need a bootloader for that purpose. Once we select a bootable device, the boot manager will run the appropriate bootloader.
For instance, if we choose Ubuntu, it will launch the GRUB bootloader, which loads the Linux kernel, as depicted:
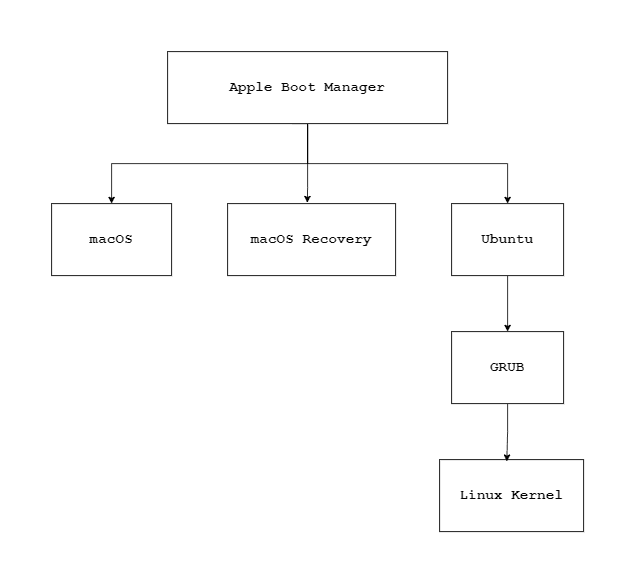
Essentially, the boot manager gives control to GRUB after we select Ubuntu from the boot menu.
Furthermore, the Apple Boot Manager is very limited in terms of features. However, there are open-source boot managers like rEFInd, which includes many features and can be customized.
With that background in mind, let’s jump into dual-booting Ubuntu alongside macOS.
3. Dual Booting Ubuntu 18+ and macOS
Installing the modern versions of Ubuntu on a Mac is as easy as installing it on a PC or a ThinkPad.
3.1. Step 1: Disable FileVault
Make sure that the FileVault is turned off. Otherwise, it will prevent us from creating new partitions. We can turn it off in Settings → Privacy & Security.
3.2. Step 2: Create the Partition
We’ll need to create a separate partition for Ubuntu using the Disk Utility, which comes with macOS. In Disk Utility, we create a FAT32 (MS-DOS) partition and resize it as needed.
3.3. Step 3: Boot Into the Ubuntu Installer
Now, we restart the machine and boot from the Ubuntu flash drive by holding down the “⌥” key and selecting the Ubuntu installer from the list. It will load the GRUB menu, where we choose the appropriate entry.
3.4. Step 4: Install Ubuntu
We’ll install Ubuntu on the newly created partition. Optionally, if needed, we can format it as EXT3 or EXT4. However, we don’t need to make any changes to the EFI or recovery partitions. The installer will take care of putting the appropriate EFI files on the EFI partition.
3.5. Step 5: Restart
Once installed, we can restart the machine and boot from the Ubuntu partition by holding down the “⌥” key.
4. Older Versions of Ubuntu
If we install Ubuntu 17 or an earlier version on a Mac, the installer will put the EFI file inside /EFI/EFI/ubuntu directory. So, we won’t be able to boot to Ubuntu. Fortunately, we can resolve this using a few extra steps.
4.1. Step 1: Installation
Install Ubuntu as we did in the previous section. Then, restart the machine and boot to macOS.
4.2. Step 2: Create EFI Directories
In macOS, open up Terminal and mount the EFI partition. Usually, it’s the first partition on the disk:
$ sudo diskutil mount disk0s1However, if you’re not sure, we can check it using list:
$ diskutil listWe create the EFI/Boot directory on the EFI partition:
$ mkdir -p /Volumes/EFI/EFI/Boot4.3. Step 3: Copy the EFI File
Finally, we’ll copy the grubx64.efi to the previously created directory:
$ cp /EFI/EFI/ubuntu/grubx64.efi /EFI/EFI/Boot/grubx64.efiThat’s it. GRUB 2 will now load when we select Ubuntu from the list.
4.4. Step 4: Unmount the ESP Partition
Though optional, we can unmount the partition to be on the safe side:
$ sudo diskutil umount /Volumes/EFI5. Optional: Adding Ubuntu Bootloader Icon
We can change the icon for Ubuntu in the boot manager by creating or downloading a ready-made *.icns and copying it to /EFI:
$ cp ubuntu.icns /Volumes/EFI/.VolumeIcon.icnsWe can use mac-icns, which is a free icon pack.
6. Conclusion
In this article, we learned how to install Ubuntu along with macOS on Intel-based Macs. First, we got familiar with how the Apple boot process works. Then, we took a step-by-step approach to dual-booting Ubuntu alongside macOS on the same disk.