

Learn through the super-clean Baeldung Pro experience:
>> Membership and Baeldung Pro.
No ads, dark-mode and 6 months free of IntelliJ Idea Ultimate to start with.
Learn through the super-clean Baeldung Pro experience:
>> Membership and Baeldung Pro.
No ads, dark-mode and 6 months free of IntelliJ Idea Ultimate to start with.
Operating system installation doesn’t always need manual intervention. Similar to other processes, we might be able to define system settings beforehand through a configuration file.
This way, we can set up an autoinstallation that saves time and effort in system administration. Further, we can install the OS on multiple systems at the same time. As a result, this keeps things consistent.
In this tutorial, we’ll see how to perform an automatic installation of a Ubuntu 22.04 server. In general, we’ll perform the autoinstall over a network.
Notably, in our sample environment, a preconfigured Ubuntu server (192.168.29.45) provides the installation files from a predownloaded ISO. On the other hand, a VM is the client that boots in UEFI mode over the network.
Ubuntu server installation has changed after version 20.04. It now uses autoinstall instead of preseeding.
The new autoinstall process is slightly different from the preseeding approach:
To summarize, we go through several steps for autoinstallation:
With a UEFI boot, we can also use the secure boot option.
Let’s now set up a sample environment for autoinstalling Ubuntu 22.04.
To begin with, let’s configure DNS, DHCP, and TFTP for file discovery and provision.
dnsmasq simplifies network-based installation. In particular, it provides DHCP and DNS services.
We can install dnsmasq using the apt package manager:
$ sudo apt install dnsmasq -yNext, we adjust the /etc/dnsmasq.conf file:
$ cat /etc/dnsmasq.conf
...
interface=wlo1
bind-interfaces
dhcp-range=192.168.29.150,192.168.29.240,255.255.255.0,8h
dhcp-option=option:router,192.168.29.1
dhcp-option=option:dns-server,192.168.29.1
dhcp-boot=bootx64.efi,192.168.29.45
Specifically, we insert the desired DHCP configuration for IP ranges and boot settings.
Now, let’s restart the dnsmasq service:
$ sudo systemctl restart dnsmasqAt this point, we should have a working configuration for DNS and DHCP.
Next, we install the TFTP server:
$ sudo apt install tftpd-hpaThen, we set the TFTP_DIRECTORY in the file /etc/default/tftpd-hpa:
$ cat /etc/default/tftpd-hpa
...
TFTP_USERNAME="tftp"
TFTP_DIRECTORY="/srv/tftp"
...
Finally, we restart the TFTP server:
$ sudo systemctl restart tftpd-hpaIn fact, we can change the value of TFTP_DIRECTORY to something else.
Now, we continue with a Web server setup. Notably, we use the Web server to supply configuration files to cloud-init.
So, let’s install the Apache Web server:
$ sudo apt install -y apache2Next, we create a new Apache config file to share the TFTP root directory:
$ cat /etc/apache2/conf-available/tftp.conf
<Directory /srv/tftp>
Options +FollowSymLinks +Indexes
Require all granted
</Directory>
Alias /tftp /srv/tftp
Let’s enable the new settings:
$ sudo a2enconf tftpFinally, we restart the Web server:
$ sudo systemctl restart apache2At this point, Apache is up and running, serving the /srv/tftp directory under the /tftp alias.
We proceed by mounting the ISO file.
To that end, let’s create a new subdirectory, jammy, in the TFTP root directory:
$ sudo mkdir /srv/tftp/jammyNext, we move the ISO file to the jammy directory:
$ sudo mv /path/to/iso/file jammy/Then, we create a mount subdirectory /mnt/iso:
$ sudo mkdir /mnt/isoNow, we can mount the ISO file as a loop device:
$ sudo mount jammy/ubuntu-22.04.4-live-server-amd64.iso /mnt/iso -o loop
mount: /mnt/iso: WARNING: device write-protected, mounted read-only.
A loop device creates a virtual block device. This enables us to mount a file as if it were a physical disk.
Moving on, we copy some boot files from /mnt/iso to the jammy directory:
$ sudo cp -a /mnt/iso/. jammy/
$ sudo cp -rf /mnt/iso/* jammy/
$ sudo cp /mnt/iso/casper/{vmlinuz,initrd} jammy/
From here, we can unmount the ISO file:
$ sudo umount /mnt/isoThe ISO files are now ready to serve over the network.
As mentioned earlier, Ubuntu uses a new autoinstall configuration. The new autoinstall mode needs two main files:
Further, we use an autoinstall config via the cloud-init configuration. Autoinstall calls this config file user-data. Since cloud-init uses YAML, we write user-data in YAML as well.
Also, we need to keep the above files at the same base URL.
Let’s create the user-data file:
$ cat jammy/user-data
# cloud-config
autoinstall:
  debconf-selections: tasksel tasksel/first multiselect standard, ssh-server
  identity:
    hostname: ubuntu-server
    password: "$6$exDY1mhS4KUYCE/2$zmn9ToZwTKLhCw.b4/b.ZRTIZM30JZ4QrOQ2aOXJ8yk96xpcCof0kxKwuX1kqLG/ygbJ1f8wxED22bTL4F46P0"
    realname: Mufti Muneer
    username: ubuntu
  keyboard:
    layout: us
  locale: en_US
  network:
    ethernets:
      any:
        addresses:
        - 192.168.29.61/24
        gateway4: 192.168.29.1
        match:
          name: en*
        nameservers:
          addresses:
          - 8.8.8.8
    version: 2
  storage:
    layout:
      name: lvm
  version: 1
In the above file, we’ve added some sections:
Also, we’ve set the credentials for the user under the identity section:
The password in the file is hashed. In general, we can adjust the file to add more options. For example, we can add a packages section to preinstall packages.
Alternatively, we can also use the autoinstall-generator tool to convert an existing Debian preseed file:
$ autoinstall-generator preseed.txt user-data --cloudIn this way, we convert a preseed file into a cloud-config format.
Similarly, we add an empty meta-data file:
$ sudo touch jammy/meta-dataIn particular, cloud-init uses the meta-data file to set up the cloud server instances. For example, it specifies details like packages to install and commands to execute during the initial setup process. Cloud services can populate the meta-data file with data relevant to the instance during provisioning.
Since we’re working locally, we can keep the file empty.
There are several ways to provide user data and metadata to cloud-init. Markedly, we’re using a custom web server.
The GRUB menu lets us choose which operating system to boot. It does this by using a file with instructions for each system.
Let’s create a subdirectory, grub, inside the TFTP root directory:
$ sudo mkdir grubThen, we add a GRUB config file to the above directory:
$ cat grub/grub.cfg
default=autoinstall
timeout=10
timeout_style=menu
menuentry "Jammy - OS" --id=autoinstall {
    linux /jammy/vmlinuz ip=dhcp url=http://192.168.29.45/tftp/jammy/ubuntu-22.04.4-live-server-amd64.iso autoinstall ds='nocloud-net;s=http://192.168.29.45/tftp/jammy/' cloud-config-url=/dev/null root=/dev/ram0
    echo "Loading Ram Disk Now..."
    initrd /jammy/initrd
}
Let’s see the meaning of the GRUB menu:
Also, the cloud-config-url=/dev/null setting stops cloud-init from performing multiple downloads of the ISO file.
UEFI mode needs downloading signed binaries and a font file for the GRUB menu:
Thus, we place the above files in the TFTP root directory.
Let’s set up a test machine in VMware.
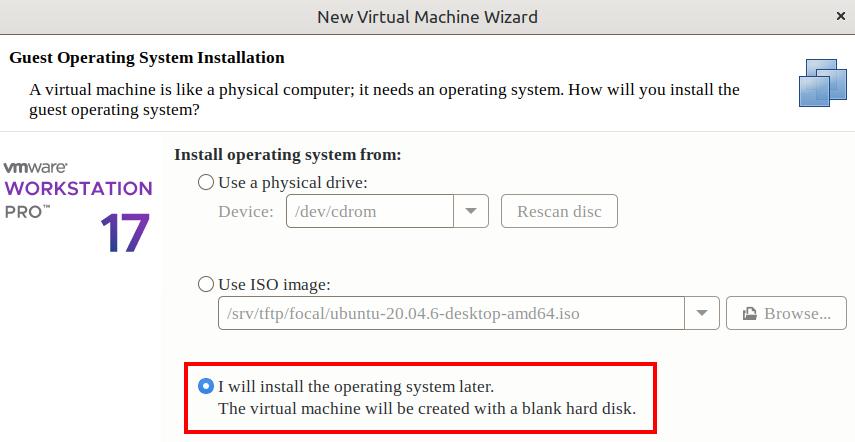
First, we set up the VM to boot from the network via the I will install the operating system later in the New Virtual Machine Wizard option:
After the VM is set up, we tweak the VM settings and set the firmware type to UEFI. Also, we’ve used the Bridge Network Adpater to replicate a physical network connection state. The rest of the VM settings are unchanged. Finally, we start the VM and wait for the boot menu.
The VM should automatically start installing the OS after 10 seconds in the boot menu. Thus, the server installation should proceed without any user interaction.
At last, we press the Return key to get to the login screen:
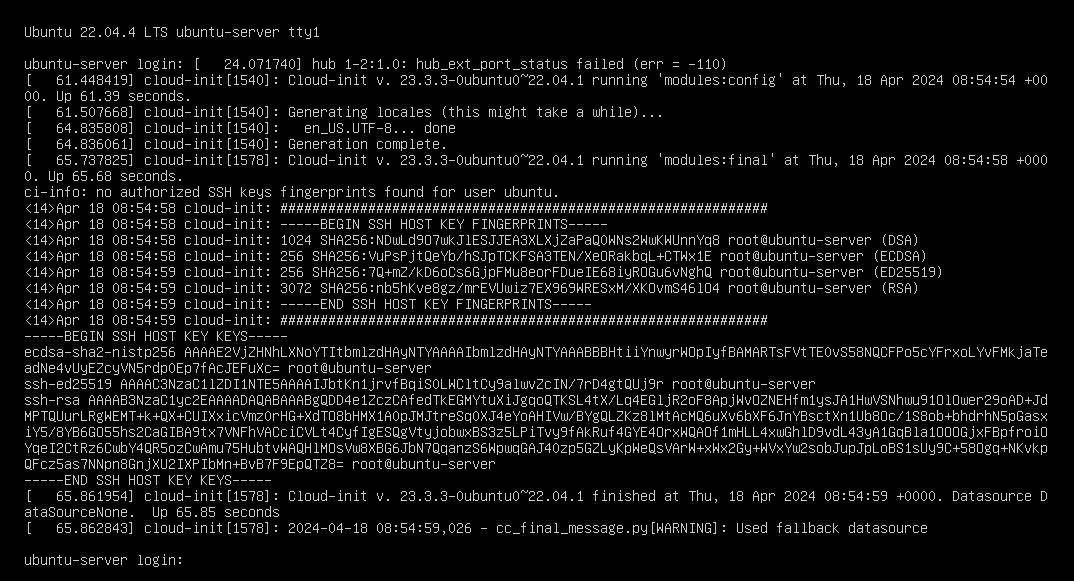
At this point, we can log in with our username and password.
Also, we can now remove the ISO file from the preconfigured Ubuntu server:
$ sudo rm jammy/ubuntu-22.04.4-live-server-amd64.isoRemoving the ISO file reclaims server space.
In this article, we’ve seen how to install Ubuntu 22.04 automatically. We also looked at how we can get an autoinstall file from a preseed file.
In short, we’ve used netbooting to install the OS. Also, we don’t need to restart the system. We can directly log into the new installation.