

Yes, we're now running our only Summer Sale. All Courses are 30% off until 20th July, 2026:
Learn through the super-clean Baeldung Pro experience:
>> Membership and Baeldung Pro.
No ads, dark-mode and 6 months free of IntelliJ Idea Ultimate to start with.
1. Overview
Secure Shell (SSH) is a popular network protocol that allows different hosts to communicate securely over a public network.
In this tutorial, we’ll learn how to set up an SSH server with a dynamic DNS on a Linux machine.
2. Problem Statement
One challenge with setting up an SSH server on a machine with a dynamic IP address is that there’s constantly a need to check the current IP address of the machine. This partially defeats the purpose of an SSH server as we’ll need to physically go to the SSH server to check its IP address whenever it has changed to be able to access it again.
Fortunately, with dynamic DNS (DDNS) services, we can access SSH servers that are on dynamic IP addresses using a static hostname. Behind the scenes, there’ll be a process that constantly checks for the IP address of the system and updates the DNS record with the new IP address.
To demonstrate the idea, we’ll set up an SSH server. Furthermore, we’ll set up a dynamic DNS that points to this SSH server.
3. Setting up the SSH Server
First, we’ll have to obtain the sshd binary to run the SSH server. To do that, we can use the package manager on our system to install the openssh-server package. For example, in Ubuntu Linux, we can use the apt-get command to update the repositories and install the openssh-server package:
$ sudo apt-get update -qq
$ sudo apt-get install -y openssh-server
3.1. Checking the Status of the SSH Server Process
The post-installation script of the openssh-server will install a systemd service unit file, ssh.service. Using the service unit file, we can manage the lifecycle of the SSH server process using the systemctl command.
Notably, the ssh.service service unit file defines an alias with the value of sshd.service. This means that when we’re managing the lifecycle of the SSH server process, we can refer to the service using either ssh or sshd. For consistency’s sake, we’ll refer to the service as ssh.service throughout our demonstration.
To check the status of the SSH server process, we can use the systemctl status command:
$ systemctl status ssh
● ssh.service - OpenBSD Secure Shell server
     Loaded: loaded (/lib/systemd/system/ssh.service; enabled; vendor preset: enabled)
     Active: active (running) since Fri 2023-12-22 02:56:34 CET; 13min ago
       Docs: man:sshd(8)
             man:sshd_config(5)
    Process: 5848 ExecStartPre=/usr/sbin/sshd -t (code=exited, status=0/SUCCESS)
   Main PID: 5849 (sshd)
      Tasks: 1 (limit: 4599)
     Memory: 1.0M
     CGroup: /system.slice/ssh.service
             └─5849 sshd: /usr/sbin/sshd -D [listener] 0 of 10-100 startups

Dec 22 03:21:24 ssh-server systemd[1]: Starting OpenBSD Secure Shell server...
Dec 22 03:21:24 ssh-server sshd[5849]: Server listening on 0.0.0.0 port 22.
Dec 22 03:21:24 ssh-server sshd[5849]: Server listening on :: port 22.
Dec 22 03:21:24 ssh-server systemd[1]: Started OpenBSD Secure Shell server.
From the output, we can see that the status subcommand prints various diagnostic information about our service. First, we can see that the first row shows that this service’s unit file resides in /lib/systemd/system/ssh.service. Critically, the second row shows us that the service is active along with the timestamp at which the service was started.
Furthermore, we can see more diagnostic information such as the man page for this service, the PID, and the cgroup for the service. Finally, at the bottom, we can see a few lines of logs for the service, which are handy in case the service fails to start up.
3.2. Starting and Stopping the SSH Server
We can use the systemctl start command to start our ssh.service:
$ sudo systemctl start ssh
$ sudo systemctl status ssh | head -n3
● ssh.service - OpenBSD Secure Shell server
     Loaded: loaded (/lib/systemd/system/ssh.service; enabled; vendor preset: enabled)
     Active: active (running) since Fri 2023-12-22 03:21:24 CET; 6s ago
After running the start subcommand, we run the status subcommand to get the status of the service. Additionally, we’ve also used the head command to only print the first three rows of the output. This is because the second row will sufficiently tell us the service’s health.
On the other hand, we can use the systemctl stop command to shut down the ssh.service:
$ sudo systemctl stop ssh
$ sudo systemctl status ssh | head -n3
● ssh.service - OpenBSD Secure Shell server
     Loaded: loaded (/lib/systemd/system/ssh.service; enabled; vendor preset: enabled)
     Active: inactive (dead) since Fri 2023-12-22 03:19:11 CET; 5s ago
From the status, we can see that the service is now inactive along with the timestamp at which it was turned off.
3.3. Enabling and Disabling the SSH Server
By default, the post-installation script of the openssh-server enables the ssh.service to start up on system boot. We can disable a systemd service using the systemctl disable command:
$ sudo systemctl disable ssh
Removed /etc/systemd/system/sshd.service.
Removed /etc/systemd/system/multi-user.target.wants/ssh.service.
The disable command removes the service file in the /etc/systemd/system directory. This means on system start-up, the service will not be included among the services to start as part of the boot process.
To re-enable the ssh.service, we can use the systemctl enable command:
$ sudo systemctl enable ssh
Created symlink /etc/systemd/system/sshd.service → /lib/systemd/system/ssh.service.
Created symlink /etc/systemd/system/multi-user.target.wants/ssh.service → /lib/systemd/system/ssh.service.
3.4. Testing the SSH Server
After we’ve set up the SSH server, we can do a quick sanity test to ensure it’s running as expected. On the same machine, we can validate the SSH server by running the ssh command to connect to host 127.0.0.1:
$ ssh [email protected]
The authenticity of host '127.0.0.1 (127.0.0.1)' can't be established.
ECDSA key fingerprint is SHA256:BfQp...
Are you sure you want to continue connecting (yes/no/[fingerprint])? yes
Warning: Permanently added '127.0.0.1' (ECDSA) to the list of known hosts.
[email protected]'s password:
Welcome to Ubuntu 20.04.6 LTS (GNU/Linux 5.15.0-91-generic x86_64)
...
Last login: Sat Dec 16 05:20:37 2023 from 127.0.0.1
$
When we first connect to an SSH host, we’ll be prompted to validate the host’s fingerprint. Subsequently, we’ll be asked to key in the password of the user we want to log in as. If the password is correctly entered, we’ll be dropped into the shell.
Now, we’ll set up a DDNS to make our SSH server accessible from the public network using a static domain name.
4. Setting up Dynamic DNS (DDNS)
A dynamic DNS (DDNS) is an extension of a DNS service in which the service provider allows a rather frequent and programmatic way to update DNS records.
Importantly, the DDNS helps to solve the issue of accessing an SSH server with a dynamic IP by allowing us to SSH to a server using a static hostname. Behind the scenes, the DDNS mechanism will ensure that the hostname always points to the IP address of the intended host.
To demonstrate the process of setting up DDNS, we’ll be using the No-IP DNS service provider.
4.1. Creating a Dynamic DNS on No-IP
Before we can create a DDNS hostname, we’ll need to create an account on the No-IP registration page:

We follow the instructions to enter the information and validate the email address to get an active account.
Once we log into an active account, we can select Dynamic DNS and then No-IP Hostnames on the left navigation bar. Then, press the Create Hostname button to open up the form for creating a hostname:
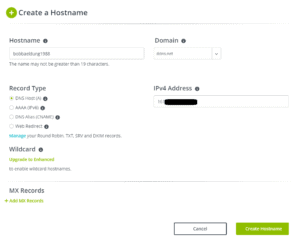
In the example above, we create a hostname bobbaeldung1988 with the domain ddns.net. This gives us a fully qualified domain name of bobbaeldung1988.ddns.net. The form will auto-populate the system’s public IP address as the No-IP service detects it when we visit their webpage.
After pressing the Create Hostname button, we’ll have the DNS record that points the bobbaeldung1988.ddns.net hostname to the IP address. At this point, we can already access the SSH server using the domain bobbaeldung1988.ddns.net.
Next, we’ll set up the ddclient to update the No-IP service provider whenever the IP address is changed. This ensures that our hostname bobbaeldung1988.ddns.net is always pointing to the actual IP address of our SSH server.
4.2. Installing ddclient
The ddclient command is a program that can update DDNS entries by interfacing with the DDNS provider. It is capable of figuring out the public IP address of the system and then sending a request to change the IP address of a DDNS entry. For our SSH server with a dynamic IP address, we must run ddclient on the server to ensure our DDNS entry is always pointing to the correct IP address.
We can install the ddclient command using our package manager:
$ sudo apt-get install -y ddclient
During the installation, we’ll be prompted for various configurations. We’ll skip the setup wizard by pressing enter until the end. This is because we’ll configure it manually by editing the /etc/dcclient.conf as the setup wizard doesn’t have an option for setting up a client for a No-IP provider.
4.3. Configuring ddclient
After installing the ddclient command, we need to update the /etc/ddclient.conf file to configure ddclient:
$ sudo cat /etc/ddclient.conf
# Configuration file for ddclient generated by debconf
#
# /etc/ddclient.conf
use=web
ssl=yes
daemon=300
protocol=noip
login={YOUR_EMAIL_HERE}
password={YOUR_PASSWORD_HERE}
bobbaeldung1988.ddns.net
There are two parts to the configuration file. The first part consists of general configurations and the second part consists of the configurations that are specific to the dynamic DNS provider.
For our ddclient, we configure it to use the web method to check the public IP address. The alternative is to use the interface method, but it could be inaccurate if our system is behind a router. Then, we’ve also set ddclient to run in daemon mode with 300 seconds delay between successive IP address checks. This ensures ddclient runs in the background and constantly checks for IP address changes and updates the provider.
Since we’re using No-IP as our dynamic DNS provider, we specify noip as the protocol to use. Then, we pass in the credentials using the login and password keys. For No-IP, the login is the email we use for registration. Finally, we specify the hostname at the bottom.
4.4. Running ddclient
To start the ddclient process, we can enter the command on a terminal session:
$ ddclientSince we’ve configured it to run in daemon mode in the /etc/ddclient.conf configuration file, the process will continue to run in the background. To check the status, we can use the ps command to get the list of running processes:
$ ps -ef | grep ddclient
root        4014    2533  0 07:01 pts/0    00:00:00 ddclient - sleeping for 10 seconds
The last column shows that ddclient is sleeping for X seconds as it has to wait for 300 seconds in between successive checks.
5. Conclusion
In this tutorial, we’ve first learned about setting up the SSH server. Specifically, we’ve looked at various systemctl subcommands that allow us to manage the lifecycle of the SSH server daemon process.
Then, we showed the process for setting up a dynamic DNS for free using the No-IP service. Finally, we demonstrated the setup of ddclient, which ensures that our hostname always points to the right host despite the dynamic nature of the IP address on our system.