

Learn through the super-clean Baeldung Pro experience:
>> Membership and Baeldung Pro.
No ads, dark-mode and 6 months free of IntelliJ Idea Ultimate to start with.
Last updated: May 9, 2025
Learn through the super-clean Baeldung Pro experience:
>> Membership and Baeldung Pro.
No ads, dark-mode and 6 months free of IntelliJ Idea Ultimate to start with.
An operating system should allow interaction with users. Components such as menus facilitate it and enhance user experience. Moreover, narrowing the user’s input to a well-defined set of possibilities improves data consistency and security.
In this tutorial, we’ll look through ways to create menus in Bash.
We should use the select command to create a simple menu in the terminal. Then, the command displays a list of options preceded by numbers.
Let’s learn the command syntax:
select NAME [in WORDS ... ;] do COMMANDS; doneselect repeatedly reads a number from standard input. Subsequently, if the number corresponds to a string’s position in WORDS, the command sets NAME to the respective text. Otherwise, nothing is set.
In addition, we should set the PS3 variable to the prompt text.
Finally, let’s notice that the command is available in the Bash and Korn (ksh) shells but not in the Bourne (sh) one. As for bash built-in, we should use help select to obtain more information.
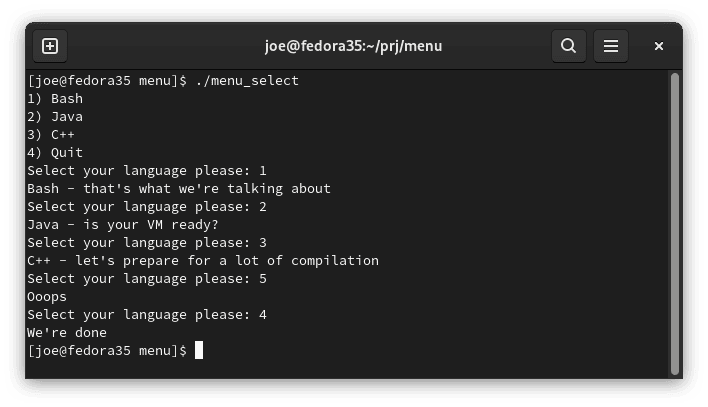
Now let’s test a simple example:
#!/bin/bash

PS3="Select your language please: "

select lng in Bash Java C++ Quit
do
    case $lng in
        "Bash")
            echo "$lng - that's what we're talking about";;
        "Java")
           echo "$lng - is your VM ready?";;
        "C++")
           echo "$lng - let's prepare for a lot of compilation";;
        "Quit")
           echo "We're done"
           break;;
        *)
           echo "Ooops";;
    esac
done
We use the case statement to process the user’s input. Moreover, the select loop is infinite, so we need to break it explicitly:
In addition to returning the selected name, the command sets the REPLY variable to the number entered by the user. Let’s use it in the case statement instead of NAME:
#!/bin/bash

PS3="Select item please: "

items=("Item 1" "Item 2" "Item 3")

select item in "${items[@]}" Quit
do
    case $REPLY in
        1) echo "Selected item #$REPLY which means $item";;
        2) echo "Selected item #$REPLY which means $item";;
        3) echo "Selected item #$REPLY which means $item";;
        $((${#items[@]}+1))) echo "We're done!"; break;;
        *) echo "Ooops - unknown choice $REPLY";;
    esac
done
Let’s notice that we store the menu’s positions in an array. Consequently, we need to type them only once, making the code less error-prone.
Moreover, we add the Quit option right after the items’ array. Therefore, its corresponding REPLY value is the length of item array plus one – $((${#items[@]}+1))).
Finally, we may easily inform a user about the incorrect choice.
Let’s observe that the list of items scrolls up out from the terminal. It happens when we print the information for the user in the same terminal where select runs.
Therefore, we need to put select into an infinite while true loop to refresh the menu:
#!/bin/bash

PS3="Select item please: "

items=("Item 1" "Item 2" "Item 3")

while true; do
    select item in "${items[@]}" Quit
    do
        case $REPLY in
            1) echo "Selected item #$REPLY which means $item"; break;;
            2) echo "Selected item #$REPLY which means $item"; break;;
            3) echo "Selected item #$REPLY which means $item"; break;;
            $((${#items[@]}+1))) echo "We're done!"; break 2;;
            *) echo "Ooops - unknown choice $REPLY"; break;
        esac
    done
done
Let’s notice further modifications – each case instruction breaks the select loop immediately after the choice is made. So effectively, we restart select each time to show the list of options again.
Moreover, break 2 after the Quit option terminates both loops, the select and the while one.
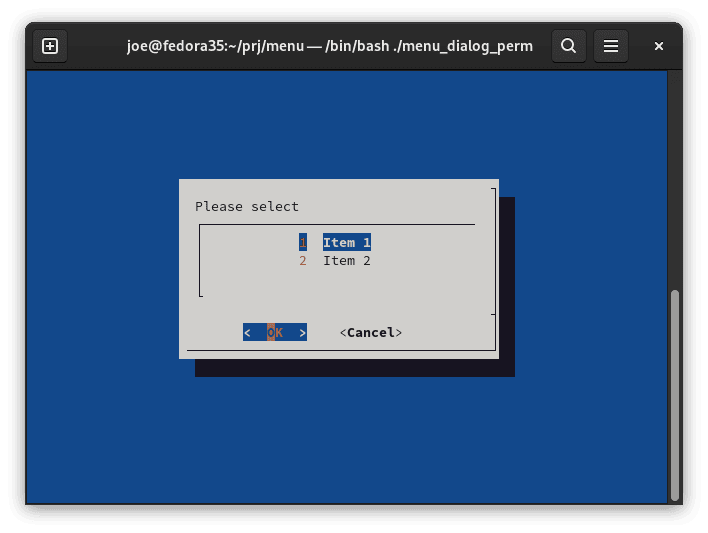
With dialog, we can create textual mc-style dialog components. The command is available from the package of the same name.
Let’s start a simple dialog directly from the terminal. We’re going to pass the options as tag-description pairs:
dialog \
    --backtitle "This is an options panel" \
    --menu "Please select" \
    10 40 3 \
    1 "First option" \
    2 "Second option"
Let’s notice that the tag is displayed at the front of the description. Furthermore, the tag’s first letter is a menu hot-key. In addition, we should define the dimensions of the menu, with 10, 40, and 3 standing for width, height, and the menu height, respectively. Finally, the return value is a tag of the selected option or empty string after pressing the Cancel button.
Let’s create a menu that disappears when the user presses Cancel. So, we need to check the dialog‘s return value in the while loop.
Furthermore, we’re going to collect options for the dialog in the bash array items:
#!/bin/bash

items=(1 "Item 1"
       2 "Item 2")

while choice=$(dialog --title "$TITLE" \
                 --menu "Please select" 10 40 3 "${items[@]}" \
                 2>&1 >/dev/tty)
    do
    case $choice in
        1) ;; # some action on 1
        2) ;; # some action on 2
        *) ;; # some action on other
    esac
done
clear # clear after user pressed Cancel
We should notice that by default, the command outputs to stderr. Hence, for the command substitution, we need to redirect it to the terminal with the 2>&1 >/dev/tty construct:
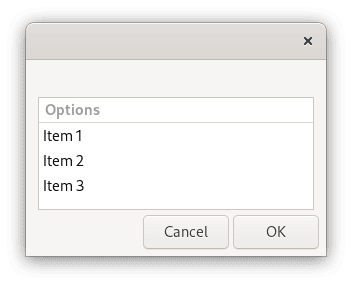
Now let’s try zenity. It’s a graphical components toolkit based on GTK. Consequently, we use it to interact between the Bash script and the graphical environment.
To use zenity, we need to install a package of the same name. We’re going to create a simple graphical widget to present options to the user. Furthermore, the user’s choice will be shown in the terminal:
#!/bin/bash

items=("Item 1" "Item 2" "Item 3")

while item=$(zenity --title="$title" --text="$prompt" --list \
               --column="Options" "${items[@]}")
do
    case "$item" in
        "${items[0]}") echo "Selected $item, item #1";;
        "${items[1]}") echo "Selected $item, item #2";;
        "${items[2]}") echo "Selected $item, item #3";;
        *) echo "Ooops! Invalid option.";;
    esac
done
We should provide a list of options as an argument to zenity. Furthermore, the while loop keeps displaying the dialog until it returns an empty string related to the cancel operation:
In this tutorial, we learned how to create a menu with a list of options in Bash.
First, we used the select command to create a simple menu in the terminal. In addition, we studied common cases of its use and learned how to account for the user’s input.
Next, we applied the dialog command to create a textual menu in the mc-style. Finally, we briefly described the zenity command to create pure graphical dialogs in the Bash script.